Thursday 31 March 2011

Thurs: Farewell (nearly) to the Pear Lady

Heavy rain overnight meant a delayed start: I put off my morning job until the afternoon, by which time the increasing wind - for that, read "howling, blustery, wind" - had done a good job of drying things off.

While doing the rounds of digging, lifting, splitting and replanting, I suddenly noticed that the dear old Pear Lady under the mulberry tree was very nearly gone...

"The Pear Lady?" I hear you ask, visions of an elderly fruit-collector breathing her last.. no, it's a statue, one of several in my client's garden.

She's called the Pear Lady as she was sculpted from pear tree wood, and she is - was - a tall, elegant female figure, very twenties in style, with a flowing gown.

When I first came to this garden, some five or six years ago, one of my regular jobs was applying Teak Oil to the sculpture, but about three years ago she started showing signs of woodworm, and since then it has been a bit of a battle.

Here she is back in 2009, this is the first photo I have of her, and alas, she's already lost most of her head.

You can see her general scale from my fork, stuck in the ground to her rear: she's taller than I am.

We'd tried special varnishes, we'd tried all sorts of woodworm treatment, but nothing seemed to work, and she's been gradually falling apart.

Of course, once the head went, it was easier for the rain and weather to get inside her..


So here she is as seen today.

Sad, isn't it?

And of course she's not replaceable, having been a one-off work. It's not as though you can ask a sculptor to "knock up another one, exactly the same, please!"  I can just about imagine what a craftsman and artist would have to say to that...

It looks as though another month or two will see her final disintegration, and I'm guessing that by the time the mulberry is in leaf again, there won't be much to be seen.

Ah well.

I suppose at some point later this year there might be thoughts about finding a new piece to replace her..

I'm quite keen to see one of these Sand Pendulums in action in a real garden, but I'm not entirely convinced as to how long the sand would stay in place.

Robert Longstaff sell them, with the suggestion that "a sheltered spot in the garden" would work, so it's theoretically possible. I'd just like to see one that's been outdoors for a few months, first...

Well, at the end of the afternoon I popped into Dews Meadow Farm Shop to see if any of my plants have sold: and yes! there was money in the box, so that was a good end to the afternoon.

Actually, not quite the end, I stopped off at the Yard on my way home, having noticed on my way out that the gate was swinging open: not latched back, but just swinging. I'd reported it to the manager by text, but I thought I'd just pop in and check if everything was ok, and to make sure that no-one had taken my hosepipe, which I have left there in anticipation of getting my Agreement, which should be any day now. I hope.

All was well, and great news, the water tank was holding water! About 3" of it, which is very exciting, as all the holes were below that level. This means my patches were successful, and I will be able to reduce my water costs a little by using any rainwater that I can catch in it.


Did you enjoy this article? Did you find it useful? Would you like me to answer your own, personal, gardening question? Become a Patron - just click here - and support me! Or use the Donate button for a one-off donation. If just 10% of my visitors gave me a pound a month, I'd be able to spend a lot more time answering all the questions!!

Wednesday 30 March 2011

Biodegradeable pots: yes or no?

Today's weather forecast was "heavy rain" but I ignored it and went out to work anyway. I managed a solid three hours before the black clouds came rolling overhead and I packed up for the day...

...but not before Indigo, my favourite of the, er, five or six house cats in this garden, came over for another instalment of his Train Gardener How To Stroke Me course.

"Urrr, urrr, left a bit, urrr urr, just there."

After supervising me for a while, he headed off back indoors towards the Rayburn, leaving me to get on with the weeding.


But while digging out a failed plant, I discovered the Thought for Today: Biodegradable Plant Pots - do they work?

Understandably, there's a growing movement wanting an alternative to the plastic plant pot, which is, after all, about as non-eco as it gets, considering that they are designed for and used by gardeners.  They are used once, then thrown away, or left in great tottering piles wreathed in cobwebs and dessicated snails.

For some time we've had the Jiffy Pot: horrible cardboard-like things in fetching shades of grey and brown.

Fully bio-degradable, yes, but I find them impossible to work with, as they have to be kept absolutely soaked, otherwise it's hard work to re-wet them.

As they are basically paper fibre, they dry out quite quickly by simple evaporation, which means they have to be kept standing in water on a drip tray of some kind: and when they are kept wet, they are permanently fragile and can't be moved around without them turning to mush in your hands.

Not a favourite of mine, you can probably tell.


Next there's a thing called the Vipot, which - it is claimed - is fully biodegradable, being made from coconut shells and rice husks. Mmm, sounds yummy. The clever part is that the pots are glazed, so they last as long as  you want them to. But once you are done with them, you just crush them to break the glaze, put them on your compost heap and within 18 months (they say) they have rotted away to nothing.

I haven't seen any of these yet: and I certainly won't be putting them, crushed or otherwise, on any of "my" composty heaps, as I expect my compost to be ready in considerably less than 18 months.

As a side issue, there is a big difference between "biodegradable" and "compostable". I am sure I will refer to this point again...

Now we come to the Coir Pot:  two years ago, and again last year, my client bought some plants - Lychnis coronaria to be exact - in coir pots. These are weird-looking fibrous pots, all hairy and compressed, proudly bearing labels telling us that the roots of the plant will grow through them, and that they will gently rot away into the soil.

Well, here is Exhibit A: one dead plant, one coir plant pot in extremely good, ie not rotted at all, condition.  I rather think that I did the rip in the side when I dug out the plant, and it was already frayed around the top, so it doesn't seem to have degraded very much at all, does it?

I keep finding the non-rotted shells of these coir pots in the bed, even long after the plant inside it has rotted away to nothing.

So I'm not convinced about the worth of coir pots, so far.

Personally I do my bit by reusing pots as many times as possible, and whenever I find a pile of used pots in sheds or round the back of a greenhouse, I ask if I can take them. This reduces the number of new pots that I have to buy.

Now you might think it strange, and possibly "wrong" that I am selling plants in old pots, but think about it: I would never, ever sell a plant that has just been potted on, I always hold them back until they are well rooted. So by the time it is ready for sale, the plant pot has been "used" for several months, and often they don't exactly look very new any more.

So I much prefer to re-use pots whenever possible. As long as they are washed out and sterilized, they seem to work just as well as brand new ones.

And I'm doing my small bit for the environment.

Tuesday 29 March 2011

Tues: brambles....

... blood, guts and gore everywhere. Well, blood everywhere, at any rate. Today I spent most of the morning scrambling around on what we call The Grand Bank, attacking brambles. Or rather, being attacked by brambles. And there's still a lot more to do...

..but, great news, I was greeted by happy smiling faces and "We did the bonfire!"  Sure enough, the massive bonfire pile was mostly gone, and this means I get a pile of ash with which to fill in the steps up to the bonfire plateau. Ash, and the soil underneath the ash, is great stuff for packing out earthern steps in gardens, as it's sterlised, so you don't get masses of weeds springing from it. So, a quick ten minutes with the spade doing that, then a couple of hours doing my best to re-fill the bonfire heap with brambles and pampas grass.

I'm thinking I might add Pampas to the list of Plants Hated By Gardeners: the proper name for pampas is Cortadera, and apparently that means "sword" in Spanish. Yes, I can see why, said she, dripping liberally from any number of saw-toothed slashes on the arms....

But enough of that, we have a question:

"Can I plant veg after using weed killer on the ground?"

This is a good question: put simply, it depends on what type of weed killer you used.

Without going into a long lecture about the different types of weedkiller, the simplest way is to look on the pack of the weedkiller you used, and read the small print until you find out what the active ingredient is.

If the weedkiller contains Glyphosate - brand names include "Round-Up" - then you are safe to plant veg, as Glyphosate is inactivated once it makes contact with soil.

If you used a defoliant such as Paraquat, or Diquat - brand names include "Weedol" -, then you will be ok to plant veg once you have removed all the dead foliage. Personally I would advise you to wait a couple of weeks, remove all dead foliage, then dig over the top layer of the soil.

Finally, if you used a "residual" weedkiller such as Pathclear then you cannot plant veg, or anything else for that matter, as it stays in the soil for 3-6 months, killing all seeds. 


Did you enjoy this article? Did you find it useful? Would you like me to answer your own, personal, gardening question? Become a Patron - just click here - and support me! Or use the Donate button for a one-off donation. If just 10% of my visitors gave me a pound a month, I'd be able to spend a lot more time answering all the questions!!

Monday 28 March 2011

Mon: restocking the bench at Dews Meadow

Yes, it was time to bring back the unsold Snowdrops - they'll go into safe storage under the bench until next year.

So now I have a new selection of plants on sale there:


Not exactly a huge selection, must admit that I took three trayfulls down there, and thought that would be ample! The bench is only a yard square, more or less, but it looks as though I could have got another few plants on there. I'll take some more down mid-week.

So this week I am offering:

A) The last couple of pots of miniature daffodils, Tete a tete, my favourites: I won't mind if they don't sell, as I will then keep them for myself!


B) Smilacena racemosa - False Solomon's Seal, lovely plant, great for shady woodland beds, although I've also seen it growing very happily in perfectly ordinary Oxfordshire borders, in full sun!

Sometimes this plant is described as being a lime-hater, ie a plant that needs acid soil, like rhododendrons and camellias, but in my experience it's quite happy here in Oxfordshire. The picture - right - is from summer: this week they are just barely sprouting.

Just look at those happy little tufty flowers! You can see from the leaves why it gets it's common name, can't you?

C) Lilium 'Black Beauty' just sprouting now: really tall, strong Lily, lovely colours. Like all lilies, subject to attack by Lily Beetle, which in case you haven't met it, looks like this:

Hard to believe that there is really a pest with such a ridiculously bright coat colour, isn't there?

The trouble is that when knocked off the lily, they invariably land upside down, and are therefore invisible.

If you have  lilies, either in the beds or in pots, you are almost certain to have this pest: they fly, so they get everywhere. Just look closely whenever you are out in the garden - lift up some of the leaves and check underneath them too. When you find lily beetles, just squish them between your fingers - it's ok to wear gloves to do this.

If you find that they do indeed fall off and disappear, then you can try taking a sheet of A4 paper out with you - hold it under the stem with one hand and shake the plant gently with the other. With luck, they'll all fall neatly onto the paper. If you are squeamish, you can fold the paper in half and tread on it to kill them.

Don't confuse lily beetle with ladybirds: ladybirds are very much rounder, and have spots: also, ladybirds are rarely such a strong, simple red colour as the lily beetles.

They also lack those long black antenna.

Ladybirds = good.
Lily beetles = bad.

Simple, really!

I'm also offering some Ophiopogon, black grass, one of my all year round favourites: plus some large hemerocallis, some Crocosmia 'Lucifer' just starting to sprout now,  and an odd Aucuba japonica or Spotted Laurel that is just taking up space in my front yard.

Talking of the Yard, all I am waiting for now is the Agreement, so hopefully in a short time I will start moving plants there, which should free up some space in my front yard for potting things on.

It's always a hard time of year to fill a plants for sale bench, as not much is flowering, and I know from experience that most people will only buy the plants when they are actually flowering. Unless they are devoted gardeners who have been searching for a particular plant, that is!


Did you enjoy this article? Did you find it useful? Would you like me to answer your own, personal, gardening question? Become a Patron - just click here - and support me! Or use the Donate button for a one-off donation. If just 10% of my visitors gave me a pound a month, I'd be able to spend a lot more time answering all the questions!!

Friday 25 March 2011

Frost, dead plants and winter scent

Yes, it was frosty this morning, so I didn't start work until 9am. But within half an hour, the jacket was off, the fleece was off, and it was warm, warm, warm.

Today, to make a change from weeding the prairie beds, the client asked me to remove two dead hebes from under the kitchen window. Had to admit that I'd looked at them last week and thought how horrible they looked... it turns out that the client inherited them with the house, and has never liked them.

Out they came! It always amazes me that garden owners will put up with something they really don't like, just because it was there before they were? I suppose it's good to give strange plants a chance, rather than ripping everything out every time you move, but if you simply don't like a particular shrub/tree/plant, then it's your garden, change it!

Talking of moving, it has been so long since I moved house that I have had to start re-painting the back garden fences. Good heavens! I've never lived anywhere longer than 3 years, prior to moving into this house, and now I've been here so long that my blue fences have paled to - well, sort of greeny brown. I didn't realise how tatty they were until my neighbour's hedge pushed over the fence on that side, and he had to rebuild it: he re-used all the old slats, which is very eco, but put them back up in a different order, so they all had strips that weren't painted (by me) blue.  It looked awful, so I had to repaint that side: and then it really made the next section look tatty! And so it goes.

So I spent a lovely couple of hours out there, slapping blue fence paint about.

Now a question: I do love getting questions. Feel free to email me if you have one.

A question from Bristol: Can you suggest a late winter flowering shrub that is scented?

Yes, in a word, Lonicera fragrantissima. Great name, just rolls off the tongue...

Lonicera is the honeysuckle family, and this is a shrubby honeysuckle: it doesn't climb, it sends up strong arching shoots that reach six feet in height after a few years.

Through late winter into spring, the branches are covered in these fabulous white flowers - they are still flowering now, by the way, and it's nearly the end of March, so it gives good value.

On a still day, the scent just wafts across the garden, lovely.

I even have a couple of them for sale! (See my website for details...)


Did you enjoy this article? Did you find it useful? Would you like me to answer your own, personal, gardening question? Become a Patron - just click here - and support me! Or use the Donate button for a one-off donation. If just 10% of my visitors gave me a pound a month, I'd be able to spend a lot more time answering all the questions!!

Thursday 24 March 2011

Thurs: Are we back to November already?

Woke up this morning to 4 degrees and thick fog! But by 9am the sun had broken through, and just to prove it, here is the promised picture of what used to be the Left Hand Shrubbery:


As you can see, the shrubs are all gone, the herbaceous perennials are all gone - although I am harbouring dire suspicions that certain Euphorbias are going to be haunting me all year - and it's now covered with bark which, as I found out last week, you can smell even from next door's garden.

The plan is to have a paved area and a bench for sitting on, and to move some of the hydrangeas along the back.

But this might change, so we'll see. At present, both my client and I are enjoying the clear, uncluttered look of it, but we might change our minds later!


This section of the garden is always a thrill for me, see those daffs?  I planted every single one of them, over the last 2-3 years.

My client would approach me with a paper bag behind her back, and an apologetic expression, and the opening "I know you hate planting bulbs, but:"

This always makes me laugh! Of course I hate planting bulbs, but as I am paid to do what the client wants, then of course I will plant them!

It's a running joke that every professional gardener I have known hates a) raking leaves in autumn and b) planting bulbs.  I suppose for the same reason: it's a lot of work, with nothing to show for it until months or years later....

Then, further round the garden, I found evidence that Sabrina The Hunter Cat has been doing her thing again, in a small sad pile of feathers.

Considering that this cat is a) tiny and b) wears a collar with a bell, she is an amazingly successful hunter. When she was barely out of kittenhood she caught a rabbit that was very nearly bigger than her, and dragged it all round the garden ("Lookit! Lookit! I gottit!") with clearly no idea how to finish it off.

Guess who got the job of giving what was left of it mercy? Yup, that would be me.

Anyway, whose feathers are these, do we think?

The orangey-russetty colour made me think it would be from a robin ("Bad cat! Bad cat!") but then, looking at this one, there's a bit too much pattern on it, isn't there? Also, the very tips are dark, and generally it is only the very tips that we see on the outside of the bird.

All suggestions welcome.

After lunch, it was a spot of mowing: one of my ad hoc clients is away for a month, and asked me to have the grass cut and tidied ready for when she returned, so I spent two hours putting nice stripes into the lawn, and clipping the edges. I don't get to cut grass very often these days (there are cheaper people out there to do that!) but I'm always happy to oblige.

And it does look so lovely when it's freshly done. This was the first cut of the year, so it was very long and rather damp, which makes it slow going, as I have to keep unclogging the blades, and emptying the collector. It's a complicated lawn, with one big open area and a lot of paths through beds etc. A couple of years ago I used to cut it regularly, when my client was too busy to do it, and I developed a routine for going over all of it once, and not repeating any bits. But it's been so long since I did it regularly that I'd forgotten the route!

After that it was a quick trip home to pick up some tools and off to "my" Yard (not quite mine yet, but soon) to fix the water tank. Remember the water tank? Jim and I moved it into place, then found an 'ole in it, which I patched. Then on Tuesday I discovered - it having rained a little - that it wasn't holding water as it had two additional 'oles in it, so I'd left it on it's side to dry out.

Today I patched up all the newly discovered holes, and set it up on it's blocks again.There's no rain forecast for tonight, so there should be plenty of time for it to dry out.


Here's the new and improved lean-to: much reduced, much, much safer - not that I plan to use it much, especially on windy days! - and all nicely swept out.

So far it's proving useful as a small storage area for odd bits of wood that will be made into benches at some point.

And there's a small old office table that I found thrown out, which might well be useful for potting up on.

I also spent a little time continuing with the job of wiring up the gates: I had a lucky find of some green plastic mesh, just the thing for keeping the bunnies out and so much classier than horrible old chickenwire.

Here is the right-hand half of my main gateway, with the mesh attached. From more than about ten feet away, it's completely invisible, which is great.

I have another piece of the mesh, which hopefully will be big enough for the left-hand section of the gate, that's the one that I open to drive in and out. If that is the case, I should then be bunny-proof,  and will be able to start moving plants in as soon as I get the agreement signed.

Finally for today, ultimate annoyance: one week back in shorts and already I have two lovely insect bites on the back of my left ankle.

Tasty, huh?

Who would have thought I would need insect repellent, in March?? 


Did you enjoy this article? Did you find it useful? Would you like me to answer your own, personal, gardening question? Become a Patron - just click here - and support me! Or use the Donate button for a one-off donation. If just 10% of my visitors gave me a pound a month, I'd be able to spend a lot more time answering all the questions!!

Wednesday 23 March 2011

Wed: Sunshine, glorious sunshine!

Sigh, one of those days when it's just soooo good to be alive, and working outdoors.

Lots more weeding this morning, but first I want to show you some more composty bins: this time, under the general heading of How To Do It Properly. (well, nearly!)

As you can see, we have three compartments, which is the correct number to have.

And they are a good size, but not overlarge. And there's a handy water tank to the left so that in dry summers, I can water them.

This garden, by the way, is so large that these are the "small compost bins": we have the "large compost bins" at the other end of the garden, this time built with sleepers and not as high, but each one being four times the size: plus we have the "grass pits" , another set of three, this time out in the meadow with a handy grassy slope leading up to them, so the client (or technically, the client's husband!) can run the big sit-on mower right up to them, and dump out the grass cuttings without having to get off, and without having to lift them! Very sensible.

These bins have the front wall in two sections, so when I start to empty them, I can get so far, then take off the top section so I can reach in more easily.

The only bad thing is the long batten nailed across the fronts.... I have repeatedly explained about banging my forehead on it when emptying the bins, but to no avail. But otherwise they are so lovely that I don't complain.

And then I saw my first Peacock butterfly of  the year, here he is having a taste of a big old-fashioned daffodil!

Now I'm hoping that we don't have any sudden sharp frosts again, which might kill off both the early butterflies and the daffs...

So, work today included weeding, admiring butterflies, and nipping off some of the dead wood from the fruit trees, and from the Vibutnum opulus, that's the one that makes big white puff-ball flowers.

This is a good time of year to do it, you can clearly see where the buds are, and which twigs are not showing any attempt at budding, and can therefore be neatly nipped off at their nearest junction. It all helps to reduce congestion amongst the branches, which in turn helps with air circulation, keeping the plant as healthy as possible.

Another milestone of the spring is when the Epimedium versicolour 'Sulphureum' starts to flower.

Here it is as it looked this morning: a domed mass of leaves, held about a foot off the ground by wiry stems, and after a hard year the leaves go a lovely purple colour, as you can see here.

But there is a surprise hidden away inside the foliage - the flowers are just starting to open, but sadly they rarely grow high enough to be seen above their canopy of leaves.

So, at this time each year, I carefully go in with my secateurs and snip out the old leaves, to reveal the delicate flowers.


Here's a close-up of the flowers, so you can see what little beauties they are.

In this situation, they are on top of a wall at about four feet high, so we can get really close to them.

It always looks heartlessly bare when I've just done it, so to keep it looking nice, I leave a "fringe" of foliage to the rear, forming a sort of informal backdrop to the centre of the clump.

As a picture is worth a thousand words, I took a picture to illustrate that, but it's out of focus, so you will have to settle for my description of it.

After lunch I was once more lifting and moving shrubs in the Circles garden, but we're making good progress, and the worst of the back-breaking part is over.

And, joy of joys, the clients have bought a new wheelbarrow!!  I can't describe to you how horrible it is to have to work with a naff wheelbarrow. I've had all sorts: ones where the body is so low that you bang your shins on it at every stride: ones where the handles are so close together that you can't walk comfortably: ones where the hands are so bent that you have to bend double to pick it up: ones with no tipping bar at the front, which ought to be compulsory on wheelbarrows: rusty metal ones with holes in, that BANG and RATTLE at every step.... the list goes on. I didn't mention flat tyres, but you know that I am thinking it... (*mutters darkly*)


Did you enjoy this article? Did you find it useful? Would you like me to answer your own, personal, gardening question? Become a Patron - just click here - and support me! Or use the Donate button for a one-off donation. If just 10% of my visitors gave me a pound a month, I'd be able to spend a lot more time answering all the questions!!

Tuesday 22 March 2011

Tues: oh my aching back!

All that work yesterday afternoon heaving scrap metal around and looking for wood left me stiff and aching this morning.

But at least I'm wearing shorts, and by an hour into the morning, I had thrown off my jacket, and the fleece as well! Can't be bad.

More mulching of the beds today, lots of weeding - where do all these weeds come from? -  and a bit of lifting, splitting and moving of plants to fill in gaps.

Spent the afternoon at the Yard, sorting out the water supply and getting very wet when the connections kept popping off! Tried out my new water meter, it works very well, so that's ok: I just need to slightly alter the box I made to cover it up from the weather.

Discovered that my water butt/tank is indeed still leaking, so I turned it over to have a look at the bottom, and discovered two more holes. Drat!  Decided to leave it on it's side to dry out, so that it will be easier to apply the silicone sealant stuff. I am quite determined to make this tank work! There's a huge roof area from the converted barn, and all the rainwater funnels down to one down-pipe which just happens to be in my Yard. I can't bear to waste all that water, not when I am going to have to pay for every litre that I take from the tap!

I also spent an hour or so adding anti-bunny wire to one of the three gates which represent weak spots in the security of the Yard. And I forgot to take photos, sorry! Will do so next time.

Monday 21 March 2011

Mon: Weeds, weeds, and more weeds

Yup, four hours hard labour weeding the Prairie beds.

But oh! so worth it, the left hand one is now completely clear, chopped and weeded, and I've made good progress round the right hand one. If the weather holds - and I was in shorts today, yay! - then on Friday I should be "finished" in those beds.  "Finished" in quotes there, as no doubt there will be a new round of weeds springing up in no time at all.

Talking of springing up, here's a nice example of what some large grasses get up to as they grow:

This is a Miscanthus sinensis Variegatus, and you can see clearly how it is forming a circle of new growth.

This is a well-established clump that is at least 5' tall through the summer.

This is what the books are talking about when they recommend that we lift and split grasses, keeping the outside parts and discarding the inner section.

Last year I did exactly that to three of the many clumps of this grass, replanting the outer sections only, and they are all making good strong new clumps this year.

Of course, it doesn't work on all grasses: Stipa gigantea, Spanish Oat Grass, just gets combed through and has a haircut for neatness, and the very large Miscanthus sinensis Zebrinus doesn't work like this at all: or at least, it does, but not for many years.

And now another word on the subject of composty bins, under the general heading of How Not To Do It, But It Still Works Anyway.

When I started in this garden four years ago, I asked for composty bins, because, well, I'm a gardener, it's what we do. We make compost.

There wasn't much urgency to begin with, as the beds were completely over-run with thistles and couch grass, so I explained that at first, we wouldn't be producing much in the way of compostable material, as there is no point putting couch grass onto a compost heap, unless all you want is couch grass forever more.  However, eventually we would reach a stage where we were producing "normal" weeds that could be composted to replenish the beds.

Despite drawing a sketch, with sizes, and a clear explanation that I wanted three bins, each about a yard square, this is what I got: two utterly enormous containers, each about 8' square and 4' high.

Oh well.

This means I can't do the preferred rotation: you know, one to be filled now, one to be left rotting, one that is being emptied and spread around now.

Instead I have had to pile the material against one side of the bin for 6 months, then against the other side. Not optimal, but it seems to work. See how small the right-hand bin's heaps are? They were up to the top of the walls when I stopped adding to them - that's how much a compost heap will shrink by!

Spent the afternoon fruitlessly searching for wood to use for benches etc at my Yard: you know that situation where a  kind person points to a large area piled high with "stuff" and says "help yourself!" and you think you'll be able to fill the car... but at the end of the afternoon, there is practically nothing to show for it? Well, that's how I spent the afternoon! 


Did you enjoy this article? Did you find it useful? Would you like me to answer your own, personal, gardening question? Become a Patron - just click here - and support me! Or use the Donate button for a one-off donation. If just 10% of my visitors gave me a pound a month, I'd be able to spend a lot more time answering all the questions!!

Friday 18 March 2011

Fri: rain stopped play

Well, that was a short day!

It didn't seem that cold, so I went out in shorts, with just a hint of drizzle in the air.

Arrived at the garden, planted out some forget-me-not kindly donated by yesterday's client: yes, most people want me to weed them out, but today's client actually wants them, and complained that they weren't available to buy anywhere!  So I transplanted five good sized clumps, and no doubt I will spend the rest of my time there trying to remember NOT to weed them out...

Barely had I finished plonking them in carefully planting them, when the drizzle suddenly started hitting the back of my jacket with wet splots, so it was time to pack up and run for home. Ten minutes work.... drat.


Still, I have some updating of my website to do, I have more plants on offer this year - in particular I have a lot of Smilacena racemosa,  or False Solomon's Seal, picture of mature plants right.

They start off just like Solomon's Seal: at present they are just poking their noses out. The stems and leaves are very similar, but the flowers are very different - these guys have these funny fluffy balls of flowers.

Great for shade, and they clump up in no time, which makes them good value as well. All the books say that they prefer acid soil, but I have them growing in very ordinary Oxfordshire clay soil, and growing very successfully in common or garden B&Q compost.

I also have some lilies that were very badly labelled: I think they are"Black Beauty" but I'm not 100% sure, so I can't either label or sell them until they flower, which is a bit irritating. They aren't supposed to flower until August, so I have a while to wait yet: although they are sprouting so quickly at the moment that it seems impossible that they won't be ready for months!

Thursday 17 March 2011

Thurs: Back to longs, boo!

Well, it was only 3 degrees this morning (chorus of "When will I see you, again") (I was singing it in my head all morning...) so I went out in longs, and it stayed cold and quite damp all morning. However, that didn't stop me doing a lot of lifting and replanting, which is always satisfying.

As Bob Flowerdew - you remember, the one with the extremely long plait - used to say, if a plant isn't thriving, give it a ride in the wheelbarrow. He meant, move it elsewhere until you find the right place for it.

And that is very much what the client and I have been doing here: lots of plants have moved around, and the designer came in on Friday and finished off the job on what used to the Left Hand Shrubbery: it is now a neat area, covered in bark, with turf making a new - and much improved - front edge. I completely forgot to take a photo - I'll try to remember next week. Although it is a complete and startling change from how it used to be, the client and I both agreed that actually, the bare, minimalistic look was, well, quite nice!

Now the Sad Tale of the Penstemons: is it me, or are they over-breeding them? Penstemons used to be tough as old boots, they flowered for months on end, lovely.

Now they are all colours of the rainbow, but they can't survive the winter. OK, I know the last two winters have been harsh, but still...


So this is where they ended up: yes folks, another bonfire pile. Not quite "all my own work" but nearly...

Then there were more leaves to be cleared - yes, in March! Ridiculous, I know. Blame the snow: it held all the leaves down through the worst of the winter, then left them in sodden masses, so instead of blowing away, they have remained in sulky heaps, and I have had to clear them up wherever I have been working.

After lunch I was working in the garden next door, and do you know, I could still smell the bark...

Despite that, I evicted an old Viburnum tinus which has been unsatisfactory for many years: the client and I agreed that it had had every chance, and it was time for it to go. The leaves were completely riddled with beetle holes, despite our regularly spraying it. So it had to go.

And when I dug it out, guess what I found? A rotted stump, riddled with honey fungus, yuck! It would appear that the plant was a side-shoot from an original plant that died off some years ago, and the infection seems to have weakened the modern plant, which might explain why it was never able to fully recover from beetle damage twice a year.

It's gone now.

And at 2.30 when the sun suddenly came out, I really regretted wearing longs. Perhaps I'll go back to shorts tomorrow...


Did you enjoy this article? Did you find it useful? Would you like me to answer your own, personal, gardening question? Become a Patron - just click here - and support me! Or use the Donate button for a one-off donation. If just 10% of my visitors gave me a pound a month, I'd be able to spend a lot more time answering all the questions!!

Wednesday 16 March 2011

Wed: Blue knees are in fashion, right?

Another misty, November-looking start to the day, but after yesterday, when by mid-morning I was regretting not wearing shorts, I decided to be brave and start the day in shorts.

My car - beautifully clean after being serviced and sort-of-valeted - told me that it was 7 degrees. And by the time I arrived at today's garden, I was having to use my windscreen wipers! Luckily it was not actual rain, just low cloud, so I thought I'd give it a go and see how the morning went.

It wasn't too bad, actually: and it's always funny to see the look of shock on people's faces when they see me back in shorts on a day when most people are adding layers and thinking about hats! Mind you, I was fully thermalled: long sleeved t-shirt, socks, gloves, and the fur-lined waterproof boots.

Which, incidentally, are no longer waterproof, they have started to crack and split just exactly where the last pair did. I begin to see why Town & Country stopped making the Charnwood boot.... it's quite clearly either a faulty design, or faulty materials. I will probably glue the cracks closed with StormSure glue, as I did with the other pair, just to make them last a bit longer, until I can get back in leather boots full time.

 Today was mostly cutting back and weeding: here's an example of a bed which is mostly green, as you can see, but which should be mostly purple, as it is supposed to be a mat of Bugle, Ajuga Repens.

Last year this large bed was a bit neglected towards the end of the summer, and the False Geum (Geum urbanum, also known as Wood Avens) set seed, and now I am having to weed out all the little rascals before they get too big.

It's really annoying, as this bed has been practically no maintenance for at least four years: nothing could get a foothold between the mass of Bugle. But this year it's really suffering, and I wish I'd found the time to pay it some attention last year. Oh well, can't win them all.


The rest of the work was cutting back the various Dogwoods, and the unlovely Hypericon or Rose of Sharon.

I know it's supposed to be pronounced "sharrUN" but I always find myself saying "SHARR'n" as in sharon-and-tracey... I also think of it as what I call a builder shrub - you know, something that builders put in to new houses, where they've specified something very tough, with minimal maintenance, that will look good until they sell the houses.

Anyway, here's where it ended, on the bonfire heap. Yes, it's taller than me. Yes, so was the last one I showed you. Is there a general theme emerging? Yes - big gardens generate a lot of waste, and require large composty bins, and a big bonfire pile!

Home for lunch, temperature having risen to 8 whole degrees, whooo! I have to say that I don't feel the cold in my legs in the same way that I do in the rest of me. I mean, I would rather be wearing shorts, long-sleeved t-shirt, a fleece and a jacket, than be wearing longs and a t-shirt. I'm odd that way.

Off to my afternoon garden, to be greeted by the client with a request that warmed my heart: "The weeping willow up by the compost heap is so low that it's making it difficult for me to mow under it." So far, so good: I am well known for my dislike of low sweeping branches that bop you on the head when you try to walk or work underneath them. Also I love chopping trees about! Then came the good bit: "Can you work your magic on it?"  How kind! That means, can I chop off enough to make it user-friendly again, but in such a way that the client's partner doesn't particularly notice that I've done it. This requires a mix of skill, experience with trees, and planning, to take out the right branches without leaving obvious "stubs". So that was the first job of the afternoon.

After that, I was back to the Circular Garden, and spent the rest of the afternoon continuing to move large shrubs: this client had their garden professionally designed and installed a couple of years ago, and it's a bit - well, how to say it kindly? The client herself calls it "municipal" and that's as good a word as any. Big blocks of 9 moth-eaten Viburnum. Big blocks of 5 thuggish Rosa rugosa. Massive block of  7 boring Broom. Another massive block of at least 8 quite nice Spirea.

So we are now moving pretty much everything, to spread the interest out among the beds.

Back-breaking work, and the soil is really, really heavy clay... but it should be worth it when we're done.


Did you enjoy this article? Did you find it useful? Would you like me to answer your own, personal, gardening question? Become a Patron - just click here - and support me! Or use the Donate button for a one-off donation. If just 10% of my visitors gave me a pound a month, I'd be able to spend a lot more time answering all the questions!!

Tuesday 15 March 2011

Tues: endeavouring not to fall in the lake.

Another cold, misty start, so I went out in "longs", muttering under my breath: can't wait to get back in shorts full time! Checked my diary, it was the 22nd March last year, so I suppose I shouldn't be grumbling.

Spent a merry morning barrowing compost and mulching the beds: and here's a reminder for all of you with composty heaps - DO NOT put the following onto your bins:

Plastic. In any shape or form. It does not rot!
Biodegradable plastic bags: there is a difference between "biodegradable" and "compostable" and the difference is that biodegrading can take several years, and often requires a high temperature. Garden composty heaps don't get that hot, and are needed within a year. So please don't use them!
Citrus: orange peel, lemon peel, grapefruit peel: send them off in your Food Waste bins for the council to compost in huge great heaps.
Eggshells: see below.

Here we have Exhibit A: a massive composty stack, just look how thick and black this compost is.

Now just look at that pile of eggshells, revealed as I was cutting into the compost to use it.

Entire, aren't they?

And this compost is about as dense and rich as you could hope to get, so if this heap can't reduce egg-shells, then no home composty bins can.

So please, send your egg-shells off to the council as well!

There is an urban myth that the water in which eggs are boiled is nutritious for plants, as it contains the "goodness" that has boiled out of the eggshells. I haven't been able to find any scientific support for the theory, but it does sound logical. So by all means use the egg-boiling water (cooled, of course) for the plants, but please don't put the shells onto the compost. Even if you crush them up in your hand into little flakes - a year later, the flakes are all still there.

Right, that's my Gardener's Note for today......

And here is the result of that hard labour, the lowest terrace of the Grand Bank is now beautifully mulched (I weeded it first thing) and as you can see, the various herbaceous perennials are starting to fluff up - lovely time of year!

As you can guess, there is a considerable slope above this terrace, and weeding it can be quite an adventure.

At the moment the brambles are taking over on the second and third layers up, so with fear and trembling, I am soon going to have to clamber up there and do battle with them. Again! My client tells me (quite often!) that when they moved in, the whole bank was one solid mass of brambles.  They had the sturdy log terracing put in, which got rid of a lot of them, but they are very persistent and just keep on coming back.

I think I've been digging them out for as long as I've been working there!  Trouble is, it's very hard to get all the root out when working on a one-in-one slope, clinging on with one hand, and digging into very friable chalk with the other.

Just to make a change from all the barrowing, my client asked if I would do a bit more Iris maintenance: all the dead leaves from last year are still lying on the new growth, looks awful!

Here's a typical section: you can see all the dead stuff just lying around looking messy.

So I got the rake, told my boots not to dare slip too much on the decking, and started heaving it out.

Lovely job - the bottoms of the leaves are wet and soggy, so if I swing them into the wheelbarrow too quickly, I get soaked!
After lunch, a quick change into shorts and I headed back to "my" yard, and with Jim's help again - thanks, Jim! - we took the horrible rusty tin roof panels that we disassembled yesterday, and used them to bunny-proof the gate that I won't be using.

Smart-looking, huh? Actually, very "in keeping" with the derelict barn, I thought.

That's Jim on the left, checking to see how many bunny-sized holes there were in the barn wall...
 Here it is from the inside, fairy 'orrible, but if it does the job.. and will also stop nosy people walking dogs in the field from looking in.

And yes, we know there is a gap or two, that will be taken care of in due course.

The important job was to get the incredibly noisy, dirty, unwieldy panels in place while there were two of us to do it:  not a one-person job!
Final job for the day, yesterday we dragged an old trough into place under the guttering, and today we replaced their downpipe with a bit of old stuff that I had in my garage.

Shame that we got it all set up before noticing the hole in the side... you can just see it, bottom far right hand corner.

So I went back after tea with a tube of waterseal silicone stuff, and did a bit of a repair.

Now I need it to rain, to see if it works!

Monday 14 March 2011

Mon: Back to work, and the sun is nearly out again.

First the good news - Yes! I saw the man about the land, there is indeed a little piece of land that might be mine to rent for a while, if I can sort out a few problems with it.

Firstly I spent a merry morning weeding: yup, now that those prairie beds are nicely cut down, all the weeds are clearly visible and need sorting out.

The client came out mid-morning to say hello: "Don't you get backache?" she exclaimed, "You've been bending over like that all morning!" Answer, yes, I do get backache, but not as much as I used to when sitting behind a computer all day....

Here's one of my thistle roots, by the way, showing the importance of digging them out on the right sort of day - just look at the length of that root!

And it wasn't even a particularly big one...


But after a few damp days, they just slide out of the ground, so satisfying.

Well worth the backache.


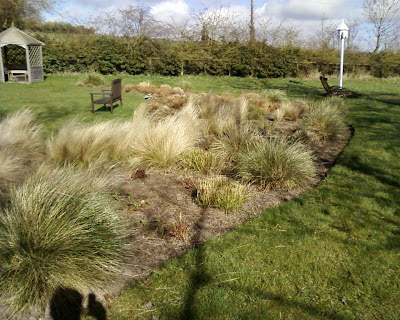
And here is the left-hand crescent, or prairie bed, all neatly cut down and now mostly weeded.

It looks a bit bare, but things are starting to show: last year we added a lot of  Lysimachia ciliata 'Purpurea' and some of my favourites, Eupatorium purpureum 'Riesenschirm' so I'm very much looking forward to seeing how they turn out this year.

Oh look, there's my shadow in the picture - how  unprofessional!!


Here's the other crescent bed, you can see from the clumps of green Spanish Oat grass towards the right-hand edge that I cut them down a couple of weeks ago.

Already they are losing the tight clipped look, and starting to get shaggy again.

Always a relief!

I have more trouble with the fluffy, flowing grass - the one that looks white in this picture, it's Stipa tenuissima and it's very hard to manage, as the clumps so often die off.

Over the winter I rake through the clumps every so often to remove the dead fronds, and show the new green stems, but it seems that when they reach a certain size, they just keel over. Luckily they self-seed all over the place, so I just have to keep replacing them with newer ones.

After lunch, I have the afternoon off to go and inspect "my" new yard.

My mate Jim comes along to lend a hand: here's one of the two  main problems - there's a derelict barn to the northern edge of the yard, and what you can't see from here is the huge gaping hole in the roof on the far side.

On the right is an awful tin-roofed lean-to that is, as you can see, leaning rather more than it is supposed to.

My problem was to decide if it was possible to prop it back up so that I could use it for potting and storage of tools - with the addition of some sort of door on the front - or whether it was so far gone that it would be safer to take it down.

Jim and I looked at it, poked it, prodded it, and admired the woodworm in the rafters. We noted how the joists at this end didn't actually make contact with the main part of the building. And the way some of the joists had had extra bits of scrap wood nailed to them... so we pulled it down. Carefully, bit by bit, saving all the nails as we went (you never know, they might come in handy later on).

And here's the result, actually it's not leaning quite as badly as this picture would suggest, my phone has distorted things a bit!

Without the sagging roof, we could see a good firm concrete base and a solid back fence, so it seems my best option is to buy a shed and place it here.

But first I will have to remove that one remaining upright post, somehow, as it's flopping about and is a real nuisance. The wood has completely rotted away, but there's a metal bar going into a hole in the ground.

Still, that's a problem for another day!

The first problem - the lean-to being the second - is the lack of water: there's no water point within the yard, I have to find a way of bringing the water in from one side or the other. But again, that will have to wait for another day.


Did you enjoy this article? Did you find it useful? Would you like me to answer your own, personal, gardening question? Become a Patron - just click here - and support me! Or use the Donate button for a one-off donation. If just 10% of my visitors gave me a pound a month, I'd be able to spend a lot more time answering all the questions!!

Friday 11 March 2011

Fri: Prairie Pruning - and some land!

Yes, I was back in the prairie beds this morning, and thankfully all the grasses have now been cut down, weeded around and generally tidied.

It was again very cold first thing, but as soon as the sun came out it got a great deal warmer. I was soon removing the fleece and rolling up my sleeves!

The client commented that there were some thistles starting to show in the wildflower meadow, so I trouped over there and got on with weeding them out. It was a perfect morning for it, the soil was damp from overnight rain and they came out really easily, mostly with great big long tails on them.

The big excitement of today is that I have indeed been offered some land, it's a small yard, mostly enclosed with high brick walls or gates, and it could be very nearly perfect. Time will tell!

Lots of odd jobs for this afternoon, potting up of Spanish Oat Grass for a start, so I'd better go and get on with it.

Did you enjoy this article? Did you find it useful? Would you like me to answer your own, personal, gardening question? Become a Patron - just click here - and support me! Or use the Donate button for a one-off donation. If just 10% of my visitors gave me a pound a month, I'd be able to spend a lot more time answering all the questions!!

Thursday 10 March 2011

Woolstone Open Gardens

(*heaves sigh*) It's raining! Milder, but very windy so although there's not enough rain to properly water the plants, there is plenty enough to make it unpleasant for working in it.

So I have the day off...

This morning I have spent some time updating my website, including a link to this blog, and some information about a Plant Stall in Woolstone on the 3rd July.

Woolstone is a very pretty village just a couple of miles away, it's right under the famous White Horse of Uffington, and the participating gardens all compete as to who has the best view of the White Horse.

I love doing this Open Gardens day, I'm fortunate enough to be invited to have my stall in the garden of Penny Spink, who opens her garden regularly through the year, and very generously opens it for charity as well. It's a prime position - my stall is in the paddock at the end of her formal garden, right next to the refreshment tent, and immediately opposite the car parking field.  This means that visitors appear with their tongues hanging out for a cup of tea, and their purses in their hands, so they are already in the purchasing mood. Best of all, being so close to the cars, they don't have to carry their plants far!

This will be my fourth appearance at this annual event, and I'm already looking forward to it.

Less good news is that although Letcombe Bassett are doing Open Gardens this year - unlike Woolstone, they go every other year - the client who usually lets me have my stall in her garden is not opening this year, and she not only has a lovely garden, she has a big paddock where the cars used to park. So I will need to find out where the cars are going to be, and then see how close I can get to that location.  If that's not possible, then I will probably ask another client in the village - how lucky I am to have a choice! - if I can have my stall in her garden, and we will just have to see how much of a difference it makes, not being next to the cars.

In the meantime, this afternoon I am going to see a  man about some land: yes, another instalment in my search for a place to grow plants, as my own garden is tiny. So, fingers crossed, there might be something interesting to talk about later.

Wednesday 9 March 2011

Wed: Sun! I saw the sun!

Yes, this morning I actually saw the sun, and what a lovely sight it was. Still very cold, I went out fully thermalled, but it was sunny, oh joy!

My morning client greeted me with the news that she's expecting visitors next week, so we agreed on a couple of jobs to be done first: edging the lawns - always makes the place look neat - weeding of the front courtyard, and de-mossing the back steps.

First job, the edging: I love edging, I know a lot of people don't, but I find it easy enough to do, and it makes such a difference to the look of a garden.

I can bore for England on the subject of compost, and I could probably bore for one of the smaller Home Counties on the subject of edging.

I like good clear cliff-edges: none of this feeble grass-trailing-off-into-the-bed lark. I like sharp, crisp edges, nice flowing lines: if they're straight lines, then I like them to be straight, and most of all I like them to be AT LEAST 2-3" deep.

There's a very good reason for this, and it's called Couch Grass. Oh, don't we love our couch grass. It's ok in the grass, in fact it gives strength and structure to a fine lawn, and as long as you keep on cutting it, you'd never know it was there.  But once it gets loose into a bed - oh dear!  If you've ever tried to dig out couch grass, you'll  know that it makes great long stringy roots all over the place, and they go down at least a foot and a half.

However, when it is growing in a lawn, it sends runners out pretty much parallel to the lawn, and only an inch or two down.

Now do you start to see the reason for my insistence on cliff edges? Chop off those runners every time you edge, and they never get into your beds.

Plus, of course, a neat edge makes the lawn look as though it has just been cut - so if you haven't got time to do the whole thing, do the edges, you'll be amazed at the difference.

Here's one of the beds I was edging today.

Can you spot the deliberate mistake?

Yes, there's a dirty great kink in it. This is a perfect example of the sort of thing that annoys me: there's no "design" reason for the bed to have a kink in it, and it just looks untidy.

In this case it was caused by the Caryopteris, I'm not sure which one it is, incana I think: anyway, it's become a good-sized shrub and in summer, it overshadows the grass and caused it to die off just below. A common problem with big shrubs.

This led to a "bite" being missing from the lawn at the point, and all through last summer and autumn I was gradually trimming back the lawn to make a strong edge that wasn't too close to the Caryopteris.

Aside: Gardener's Lessons: when a shrub or other plant hangs over the lawn and spoils the grass, there are three options:

1) Move the plant back from the edge of the lawn.
2) Chop the plant back hard so it doesn't interfere with the lawn.
3) Reshape the lawn edging to accommodate the shrub, ie enlarge the bed.


Of course, there is always the fourth option, ie put up with it, but I like neat edges, so I rarely go for that one.

In this case, moving the shrub was not an option, it's too big: cutting it back hard wouldn't work, I've been carefully training it for years and it's now a woody framework about 4' high, I chop all the "fronds" right back to stubs each autumn: over winter, it looks rather like a well-pruned vine! So I couldn't cut it back any further without taking out the framework, which would spoil it.


(Of course, it shouldn't have been planted so near to the edge of the bed, but it's easily done: people often don't realise how big things are going to get.)

So, the best option was to recut the lawn edge. Two minutes quick work with the edgers, and lo! and behold, a nice neat edge.

In case you are wondering about the planting in this bed, it's known as the Perfume Bed, and was originally just filled with Philadelphus. Weigela, Vibernum opulus (Snowball tree) etc. Underneath was pretty much bare, so when I started here, the client and I decided to fill the space with easy-care aquilegias and polemonium. Then we decided it was still a bit bare in winter, so we started off a few Hellebore Orientalis - and this was quite a big thing, as my client didn't like Hellebores at that time. I persuaded her to give them a try, and we put in a few dark red ones, and a couple of white ones.

They did well!  Over the last two years we have also added snowdrops, Eranthis hyamelis (winter aconite, which we have in abundance elsewhere in the garden) and daffodils, and now it's a picture:

 And best of all, my client is completely converted to Hellebores now!

We talked about it this morning, and we think that she didn't like them because of the coarse, brown, battered leaves. But I "manage" her Hellebores: I cut off the majority of the old foliage just as they start to flower, so you get the slightly strange effect of the flowers on their sturdy stalks, emerging straight from the ground. Not to everyone's taste, and I can remember it "coming in" as a fashion, but I think it makes them much more appreciable, if there is such a word - instead of a mass of dark leaves, you can see the flowers much more clearly.

And they looked lovely today: they've spread over nearly the whole bed - judicious lifting and splitting on my part, and the preservation of any good seedlings - and the colours are still strong dark red, and some clumps of white, which just shine by comparison.

After all that excitement, I did the other jobs, and weeded around the Vegetable Garden, so all is neat and ready for visitors. 


Did you enjoy this article? Did you find it useful? Would you like me to answer your own, personal, gardening question? Become a Patron - just click here - and support me! Or use the Donate button for a one-off donation. If just 10% of my visitors gave me a pound a month, I'd be able to spend a lot more time answering all the questions!!

Tuesday 8 March 2011

The importance of clearing the verges

Lucky me, being self-employed I can choose whether to go out to work or not... of course, no work = no pay, but I'm happy with that responsibility.

This morning, again, we had bright sun but sharp frost, so I put off my morning job until the afternoon, knowing that it involved some planting: yes! Some of the leftover plants from one client are going to another client! I love it when this happens.

My Tuesday lady wanted to add some snowdrops to the grass verge at the top of her property: she is very generous with opening the views of her garden to the public passing by, as her garden contains a lake which is at a much lower level than the road.

Most years I get an instruction at some point to chop down the tallest shrubs and trees that edge the road, to clear the view. I'm expecting it any time now... but for today, it's planting of snowdrops "in the green" which is the only way to do it, and clearing back the road edge where the shrubs overgrow the lane.

Here it is shortly after I began: the shrubs are a nice mix of some evergreen common laurel, and some mahonia, along with Forsythia - flowering now, such a shame to have to cut it - Buddleia, and Philadelphus.

It's a narrow lane in the first place, the ground is banked highly up on the right, as  you can just about see: the house up on the right is a good 10' higher than the lane!

My instructions were to cut back the road edge - a request from other villagers, apparently! - such that the 30mph sign could be seen.

What 30mph sign?  I couldn't find one, and couldn't remember seeing one.... there's a telegraph pole, hidden in amongst all the stuff, but no road signs....

Shrugging shoulders, I set to work and hacked back the over growth.

There, much better.

I'm actually standing in the layby to take this photo, and of course that's where I planted out the snowdrops. But I forgot to take a picture of them, so you'll have to imagine it.

When I'd got to this stage - four wheelbarrows full of cuttings later - I was able to look down over that white fence, and would you believe I found the 30mph sign, it was lying in the garden about 20' down the bank!

It was quite a scramble to get it, but I did, and then I found that the telegraph pole had a holder on it! So I climbed up on the fence and replaced the sign.

Then I stood back to look at it - and couldn't see it for the laurel...... so I had to chop another section down, this time in height rather than in depth. I couldn't quite get it fully visible, but it's clear that we have tried. I say that, because we got in trouble a couple of years ago: a letter from the police arrived, instructing us to cut back the shrubs further up, near the drive, as they were causing a hazard to drivers, and if we didn't do it within 10 days, the council would do it and we would get the bill.

Needless to say, we rushed to obey, and have made big efforts to keep that part clear ever since.

Hopefully in this case, as we've obviously done our best to clear the signs, we won't get any more complaints.


That generated another two barrow-loads of waste, which I trundled up to the bonfire heap.

As you can see, it's getting quite big now.

I left a note for the client, saying "time to burn the bonfire again!"

And yes, that is a summerhouse in the distance, and yes, our heap is taller than the roof of the summerhouse.

I imagine it's quite exciting when it's lit - usually I turn up one week to be greeted by proud smiling faces and "we did the bonfire!". When I go up there to have a look, I find a huge black area, with scorched branches all around and above it, and a big pile of ash. This always pleases me, as I use the ash to fill in the various sets of steps in the garden: bonfire ash is brilliant for that, as it's sterile (no weed seeds) and being dry, it doesn't go mushy and muddy the way ordinary earth does.


Did you enjoy this article? Did you find it useful? Would you like me to answer your own, personal, gardening question? Become a Patron - just click here - and support me! Or use the Donate button for a one-off donation. If just 10% of my visitors gave me a pound a month, I'd be able to spend a lot more time answering all the questions!!

Monday 7 March 2011

Digging is warming work.

Best laid plans..... on Friday I spoke merrily about completing my big Prairie beds today.

No such luck, woke up to a thick frost, and it didn't go over until well after 11am. If the grass is frosty there's no point me going out to work - treading on frosted grass kills it, and you are haunted by yellow footprints for weeks afterwards. Plus of course there's no point trying to week when the ground is frozen solid!

So, a nice quiet morning catching up on paperwork, then out in the afternoon for an extra session of lifting plants,.

As hoped,  Mary Ann le May was in at the same time: she'd been called in by my client to redesign the shapes of the two shrubberies.  We hadn't seen each other for a couple of years now, and the first thing she said was "I nearly didn't recognise you without your shorts on!"

That's me - live and die in shorts. I hate wearing longs, and put off the day as far into the autumn as I can.


Before she arrived, I dug out a few last perennials to be rehomed, and fortuitously found an extra clump of Crocosmia "Lucifer".  That's what they look like in summer, in case you can't think off hand: the big, strong, bright red ones. Some people think the foliage is coarse, compared to the normal Crocosmia, but I love them for the strong red colour.

At this time of year they are invisible, just some dead brown stems if you are lucky, so finding  this was particularly good news, as my client had told me that she'd given away all the ones we found last week, and that if there were any more left over, I was most welcome to take them myself.  I'm thrilled with that, as I've been growing them from seed in my own garden, and haven't got them to flower yet.

Twenty minutes in to the afternoon, I was overheating in my full thermals, so I had to take off my fleece: when Mary Ann arrived, well bundled up, she was astonished to find me gardening in a long-sleeved (thermal) tee-shirt and a sleeveless jacket! Well, I always find that digging is a very warming occupation, and the sun was out!

And what a joy it is to see the sun again...

Friday 4 March 2011

Fri: Prairie Pruning.... again!

Well, it's a big job... this morning, despite a cold start, I started tackling the left-hand bed. I would have preferred, in some ways, to have finished weeding the right hand bed first, but when I left last time, the Client commented on it - and if a Client comments, then it has to be done!

Such are my rules of Being A Professional Gardener: it's the clients' garden, not mine, and I remember that at all times.

So what was I doing today? Continuing to chop down all the huge grasses in the bed, clear up the debris, and dig out as much couch grass as I can get to. When the grasses are in full growth, I can't get to their bases - especially the Spanish Oat Grass, which seems to have needles at the end of every frond, and a heart-stopping capability of finding where my eyes are.

When these beds were created, the designer's contractors didn't pay much attention to removing the perennial weeds, and I have spent the last three years battling with the thistles and the couch grass. The thistles are pretty much beaten, but the couch grass has found safe havens in the large grasses, and it's a fight every year to get out as much as I can through the winter.
 
This winter, of course, it's been horrible, horrible weather and I am way behind schedule: I like to have all the grasses cut down by mid Feb at the latest, otherwise they shed their dead leaves - this is mostly the Miscanthus - and make a mess.

Well, this year I'm having to pick up the mess, and believe me, it is a mess! The only good thing is that by not cutting down the clumps, they have acted as barriers and have caught most of the leaves.....
 
Here's a fair example of what the beds looked like before I got round to them - a mad tangle of grass fronds, stalks, Verbena bonariensis etc.

And I would like to point out that the Verbena has stout stalks which are pretty much square in cross-section, and every edge has sandpaper on it. Well, not really, but that's what it feels like, and I generally get scratched to depth when pruning them.

That is possibly another good thing about not having done them in autumn - at this time of year I am well bundled up in lots of layers, so I didn't get any scratches!

Here is the Spanish Oat Grass, Stipa gigantea: there are at least 20 clumps of it in the two beds, and they just get bigger and bigger... I have to say, they do look fantastic all through late summer into autumn, but once the flowering spikes start to dry out they quickly get quite scruffy.

In this garden, my plan is to go round them about once a week and snip out any damaged flowering spikes, leaving as many as possible for as long as possible.

Then over the winter, they get their annual haircut.

Firstly I cut out all the stumps of the broken flowering spikes - this involves getting the secateurs right inside the clump, while being slashed from all sides. You can't pull them out, otherwise clumps of roots come out as well.


Having got rid of them, I then give the whole clump a haircut - here's the same one 10 minutes later - then rake through the shortened clump to get out as much of the dead stuff as I can.

I am always in two minds about cutting Stipa gigantea in this way, as it's one of the few evergreen grasses, but in this particular garden there are paying guests all year round, so I like to keep it as neat as possible.

Also, the fronds hand out over the grass - the designers planted several of these grasses way too close to the edges of the beds - and it ruins the grass. So by cutting them back hard in winter, it gives the grass a chance to green up before they re-grow. You can just see the edge of the lawn on the bottom left hand corner of the photo - that shows just how close they planted the grasses to the edges!

I have been moving some of the worst positioned clumps, but it's very heavy going. I am growing on seedlings of the Stipa gigantea at home, and I plan to replace overlarge clumps with new, smaller ones, over the next year or two.  This is also a necessary move as most of the original clumps are infested with couch grass and indeed with ordinary grass, and it's not possible to get them completely cleared without lifting them. And if I'm going to lift them, then they might as well be replaced a bit further in to the bed, and they might just as well be replaced with a strong, younger plant.

Here is one of the many clumps of Miscanthus, I'm not sure which one as they don't have a planting plan.

It's one of the sinensis group, and it's definitely a variegatus, but as you can see, they are a lot bigger than most of the variegatus !

This clump is higher than my head, and there are probably a dozen of them in these two big beds.

A couple of years ago I had to lift one clump that was badly infested with couch grass, and I split it into half a dozen smaller ones, replanting them around the beds. They are now all as big as this one! It never ceases to amaze me that you can take two bigs plants side by side, split one of them into tiddlers, and in no time at all you can't see the difference.

Talking of seeing the difference, here's that clump, chopped down to neatness.

Again, you can see just how close to the edge they all are - and last year I recut the left hand edge of this bed, taking it back at least a foot.

This is such an elemental mistake, to plant big plants too close to the edge of a bed, and I am still amazed that it was done by a professional garden designer.

Mind you, many of the smaller grasses - the Festuca glauca, those pretty little blue grasses in particular - were what I call "mound planted", where whoever planted them didn't bother to make a deep enough hole, so the original root ball ends up sitting proud of the earth. The first year I worked in this garden, I spent some time each week lifting the little grasses and replanting them at the correct depth.

Right, that's my grumble over for today!

So, in case you are thinking about installing some Prairie Planting,  the maintenance procedure is to rake up the worst of the dead leafage around the clump, put in wheelbarrow.  Cut stems, put in wheelbarrow. Rake out as many dead stems as possible. Dig around the clump to loosen the soil, and to find the couch grass runners. Pull gently to get as much out in one piece as possible. Leave "soft" weeds for next time. Empty wheelbarrow. Repeat. Repeat. Repeat.

Oh, I missed out Return from bonfire heap and laugh at the blackbird and the robins who have swooped down in my short absence to have a good scavenge around the newly exposed soil.

One whole morning later, back just starting to ache, I'm well over three-quarters of the way round the left hand bed, should be able to finish this phase of the job on Monday, weather permitting: only it's getting colder, and frost is forecast, which might slow me down.

Then, when this phase is done, I have to go over the entire bed again, weeding. I prefer to do that separately from the chopping down, in order to keep couch grass and hard stuff on the bonfire heap, not in the composty bins. 


Did you enjoy this article? Did you find it useful? Would you like me to answer your own, personal, gardening question? Become a Patron - just click here - and support me! Or use the Donate button for a one-off donation. If just 10% of my visitors gave me a pound a month, I'd be able to spend a lot more time answering all the questions!!