Tuesday 30 March 2021

Cercis: the seed pods of Doom!

This is what, as a gardener, you might call "a nuisance just waiting to happen"


Cercis siliquastrum still holding those darned seed pods!

What, exactly, are we looking at?

It's a Cercis, siliquastrum, a small flowering tree, which is still, despite the tremendous winds and bluster we've had this month, holding on to about a thousand seed pods.

Yes, those blackened, dangling things are the seed pods of this tree, looking rather like mange-tout on steroids, but far less appetising.

In summer, this tree looks like this:


Fabulous, isn't it? 

The trouble is, that every single one of those beautiful pink blossoms will, in time, turn into one of the blackened mange-tout-from-hell pods... which will then hang about on the tree for month after month, gradually falling onto the area below.

I've tried shaking the tree (couldn't budge it), I've tried poking at them with my extending spring rake (virtually no impact - maybe one or two fell) but they are firmly stuck up there, haunting me, taunting me, threatening me: "We're going to faaaalllllllll!"  "We're going to wait until you've raked up every last one of us from the grass and from the beds and then we're going to faaaaaaalllll!"  and - worst of all - "We're going to faaaaaalllll - but no more than thirty at a time! Yah boo sucks!"

I have a feeling that I'm going to be clearing them up for months.... and months....


Did you enjoy this article? Did you find it useful? Would you like me to answer your own, personal, gardening question? Become a Patron - just click here - and support me! Or use the Donate button for a one-off donation. If just 10% of my visitors gave me a pound a month, I'd be able to spend a lot more time answering all the questions!!

Monday 29 March 2021

Rainshadow: what exactly is it?

This was an interesting question, which came in the other day: (*waves to James*) - what exactly do we mean by rainshadow,  does it only apply to buildings, and is there anything at all that we can plant in an afflicted area?

So, a three-part question. Let's start with "what".

We all know what a normal shadow is - it's an absence or decrease in sunlight, in a particular area, caused by an obstruction between the sun, and the ground. 

In the same way, a rainshadow is an absence or decrease in rainfall, in a particular area, caused by an obstruction between the rain, and the ground.

It is usually found, as James already knows, at the base of a wall or solid fence - in gardening terms, it's that awkward, dusty, bone-dry strip of soil in which nothing much will grow. It's a nuisance when people want to cover a wall or fence with a climber, because they invariably want to plant the climber right at the base of the wall, in order not to take up any valuable border space: but that's when the problems arise, because many climbers will struggle, when planted right slap up against the wall.

If you don't think that you've ever seen a rainshadow, then next time it rains, walk round the outside of your house, and look closely at where the walls meet the ground: which of them has a narrow dry strip? Usually the eaves of a house - the bits with gutters on them - project beyond the walls, so you would expect to get a bit of dry ground there, but you might be surprised at how dry gable ends are, as well.

Even a fence, or garden wall, with no projecting eaves at all, will create a narrow strip of rainshadow. Depending on which way the wall runs, you may well find that one side of it is quite damp, while the other side is bone dry - this is because the rain rarely falls absolutely straight down - it usually has a bit of a slant to it, and in the UK, the prevailing wind is from the south-west, so the dry strip is "usually" (Rule One of Botany!) on the north or east side. 

Were you aware of that?  It's the reason why those yellow oilskin hats worn by fishermen are called Sou'westers... that's where the worst of the winds come from.

Trees also create their own rainshadow - again, there's a reason why we would shelter under a tree, if caught out by a sudden shower: the leaves catch the rain, and provide a sort of umbrella, although not a very good one: or at least, not for very long, as you'll know if you've ever had to shelter under one. 

And if you have, you'll know that broadleaf or deciduous trees are not very good shelter - but conifers are Grade A waterproofing, which is why hardly anything will grow at the base of a conifer tree or hedge - the rain is all directed outwards,  and the area immediately around the trunks is usually bone dry.

Here - left - is an illustration of how even a small shrub can create a rainshadow.

This is the base of a perfectly ordinary Box ball, after a short but heavy shower.

You can see the ring of light, bone dry, soil, all around the base of the plant.

So that's the answer to the second part of the question - yes, things other than walls (or fences) can create rainshadow areas.

And this leads us into the third part of the answer: what on earth will survive in those areas?

Well, the lack of rain obviously makes the area dry: but it's worse than that, because dry soil does not contain much in the way of worms or other soil-living creepy-crawlies. This means it doesn't get aerated or "churned about" by worm activity, plus it doesn't get all the usual amount of dead insects, bugs, worms etc, which together make up - normally - 45% of "good" soil. This leaves it not exactly sterile, but very deprived of nutrients.

That's why it's hard to get a "pretty" underplanting in this sort of area. There are not many plants which can survive in this very harsh environment.

Unfortunately, the weeds aren't as fussy as our cultivated flowers,  and they will somehow manage to grow in the least promising of places... however, all is not lost, if you have an area of rainshadow - there is always Iris unguicularis.

I know, I know, not the nicest of names... but it's one of the few plants which really will thrive in the otherwise inhospitable rainshadow area.

Here's a couple of clumps:

As you can see, growing hard up against the house wall - and I forgot to mention, a brick wall will absorb heat while the sun is shining on it, reflecting it back onto the soil and plants immediately adjacent: so as well as the rainshadow, we have the oven effect, to contend with...

Luckily, our Iris unguicularis don't mind in the slightest, in fact they positively thrive in arid, low-nutrient areas.

Just look at all the stones! Not the best of soils, by any means...

This group of I. unguicularis are planted all the way along the house wall, tucked under the eaves: south facing and baked: and to my sure and certain knowledge, they never, ever get watered or fed.

Here they are, flowering in November - above - and by late March:


...they are still flowering! 

As you can see, being rapidly taken over by the foliage, but still flowering.

All I do, to get this sort of display, is to cut the foliage back to barely ankle height as soon as they've finished flowering, and then again in late July or August - I absolutely slaughter them, but at those times of year, they're covered by the plants growing in the front area of the border. 

It seems harsh, but if you don't cut the foliage back in time, you will find that you can barely see the flowers, because their stems are shorter than the the length of their leaves. Another example of why gardeners have to be cruel to be kind!

There are other plants which will manage to make a go of it: Beth Chatto has made a whole career out of them. But dear old Iris unguicularis is cheap, easy to get hold of, and - in my experience - never, ever actually dies........


Did you enjoy this article? Did you find it useful? Would you like me to answer your own, personal, gardening question? Become a Patron - just click here - and support me! Or use the Donate button for a one-off donation. If just 10% of my visitors gave me a pound a month, I'd be able to spend a lot more time answering all the questions!!

Sunday 28 March 2021

How to crown lift: not just for trees!

This is a really simple, "quick fix", which can make a lot of difference to a small garden, or a narrow border.

Firstly, what do I mean by "crown lift": well,  it's nothing to do with hairdressing, it's where you prune off all the lower limbs of a tree or large shrub, in order to give it a clear stem at the bottom.

You can clear the bottom few inches, or you can clear several feet: it all depends on how big the tree is, and the reason for crown lifting it: for access, for beauty, to create light/space underneath it: there are all sorts of reasons, each dictating a different level of clearance required.

Generally speaking, if there is grass around it, then I like to clear the lower branches, up to the point where whoever is mowing, can do so without being poked in the eye or bopped on the head - I have a bit of a "thing" about making life easy for the mower!

Crown lifting almost always results in a shapelier tree: and the uncluttered trunk allows more light to reach the grass at the base of the tree, which in turn helps the grass to grow better.

There are only three real "tricks of the trade" which you need to consider:

1) Always start at the very bottom, and work your way up: stopping frequently to check on progress.

2) Some trees have branches which loop downwards: so in order to get the area clear to head height, you may need to cut off branches which originate a lot higher than head-height!

3) Cut them off as close to the trunk as you can - don't leave sticky-out bits, as they are often very sharp, and will be a hazard to anyone walking or working close to the newly-cleared trunk.

Right, that's trees taken care of - what about shrubs?

This technique is excellent when you are a bit short of border space, and it's full of holly...

Here's a great example: this lady's border was completely filled with Holly.

She liked the Holly, but found it was making a nuisance of itself when she was trying to cut the grass, because it had grown out so far that it would scratch her, as she mowed past it.

She had tried to cut it back, but had made that mistake of only nipping off the very ends, instead of doing a proper job: and every time she nipped a bit off, it re-grew twice as fast, with twice as many branches. 

You can see in the  photo, how it is bulging out at the lower level, exactly where she does NOT want it, and exactly where she had been nipping bits off.

So I was sent in to try and reduce it.

The original idea behind planting the Holly just there, was for privacy: as you can see, the wall is quite low, and the owner wanted to screen off a rather ugly view at that exact point.

Which means that we don't really need any of the branches at below-wall-height, now do we?

So, out with the secateurs, and in I went, Brave Explorer Number One, on hands and knees, being stabbed from all sides.

Jolly prickly stuff, holly!

I took off all the lower branches, right back to the original trunk: then removed some of the slightly higher branches. Not many, just one or two, and only ones which were pointing forwards, ie towards and over the lawn.

Twenty minutes later, there we go: mission accomplished.

We have retained all the upper growth, so the privacy aspect has been respected: but now the person mowing is safe: the holly is no longer making a bid for freedom across the grass: we have saved the straight line of the edge of the grass: and the owner will no longer have to keep nipping bits off, every time she passes it.

And, best of all, we have revealed and created a whole new area for planting!


Did you enjoy this article? Did you find it useful? Would you like me to answer your own, personal, gardening question? Become a Patron - just click here - and support me! Or use the Donate button for a one-off donation. If just 10% of my visitors gave me a pound a month, I'd be able to spend a lot more time answering all the questions!!

Friday 26 March 2021

Keyline planting - in the depth of Oxfordshire

 While out walking last autumn, I  stopped to check where the path went, and my eye was caught by this view:

 Ignore the finger post, look beyond it to those very neat rows of hedges.


Looks weird, huh?

Is it a very minimalist maze?

Did someone plan a very, very long-term proposal in morse code, intended to be viewed by drone, when the time was right?

No - this is called Keyline Planting, and it's all about using the natural contours of the land to assist with irrigation, to reduce soil erosion, and so on.

Not the sort of thing I would expect to see in the depths of Oxfordshire.... but then I thought to myself, why not? *pauses to scratch head* Why was I so astonished to see it?

After giving it some thought, I realised that I was surprised because it's an expensive method of agriculture: it involves redesigning your entire field layout, in order to make your fields align with the natural contours of the land. So it's not something for the average farmer: and despite the house prices, south Oxfordshire is not a wealthy area. Why, in my own town, two of our "pound" shops went bust, a couple of years ago! (We still have two others, though.)

And that's why I was surprised to see it.

 Looking at the map once I was back at home, I'm pretty sure that this is all part of Sheepdrove Farm, an establishment which definitely has eco-credibility! They also do natural burials, and weddings, so they have pretty much cornered the market, from one end to another. One of my friends was their Head Gardener for some years, and I was privileged to be taken on a tour, which was very interesting.

It seems likely that they would embrace Keyline planting, or something very similar, and that's what I think it is.

So, next time you are out walking in the Lambourn area, keep an eye out for strange hedge formations!


Did you enjoy this article? Did you find it useful? Would you like me to answer your own, personal, gardening question? Become a Patron - just click here - and support me! Or use the Donate button for a one-off donation. If just 10% of my visitors gave me a pound a month, I'd be able to spend a lot more time answering all the questions!!

Wednesday 24 March 2021

Technology in Gardens II - PIR sensors

Recently, I wrote about how technology is changing our gardens, and I've noticed another change in how gardens are arranged, as a result of technology. This time, it's not just irrigation (which has been around in some form for centuries) and the aerial view, but the rise in outdoor lighting, and the PIR units which control them.

Lighting often requires digging of channels, running of cabling etc, so it entails a bit of forward planning - let's decide where the path is going to go, before we put the lighting in, eh? - and a bit of record keeping, so we don't accidentally dig up the cabling at a later date: especially when lights are placed in beds!

Then we had the advent of outdoor lights with PIR sensors, so for the past several years I've been up ladders or on steps, keeping the foliage clipped back around those lights and around their sensors.

And now there are new cars with parking sensors!

I seem to spend half my time these days clipping back the plants growing along the side of drives, so that overhanging foliage doesn't set off the “beep - beep - BEEP-BEEP-BEEP!”  of an indignant Park Pilot, trying to warn the driver about obstacles, whether they are real, or merely foliage.

This is in direct contradiction with the way most Clients want the foliage to “soften the hard edges” and there isn't much that's a harder edge that the side of a driveway... so now I have to find a way to retain the nice shape of plants, while still allowing clear passage for the cars.

Ho hum!


Did you enjoy this article? Did you find it useful? Would you like me to answer your own, personal, gardening question? Become a Patron - just click here - and support me! Or use the Donate button for a one-off donation. If just 10% of my visitors gave me a pound a month, I'd be able to spend a lot more time answering all the questions!!

Saturday 20 March 2021

How (not) To Plant A Bay Tree

You know how some people are better at explaining things, than others?

As a tutor - I teach gardening privately, and I teach Tree Identification for the Field Studies Council - I have always made a point of teaching the task, the whole task, and nothing but the task.

Well, I struggle a bit with that last one, "nothing but the task", to be fair, as I am easily diverted... and in gardening and botany, subjects are rarely clear-cut and discrete, they are usually interconnected and quite complicated - but in principle, that's how I work: full disclosure.

In fact, one of my Clients said to me, the other day, "Are you teaching your student all the tricks of the trade?".  I looked at them, and replied, "No - I'm teaching them The Trade."

This goes for my regular, year-long Trainee as well: I don't teach them shortcuts and cheats, I teach them how to do a proper job.

Now, I don't think that this -  my philosophy of teaching "properly" - is particularly unusual, or outstanding: it's what I do, it's what I assume everyone else does.

But apparently not...

I was recently instructing a private student in how to plant a small tree. We covered all the usual things: correct preparation of the plant: how to prepare the planting hole: how to physically plant it, how to stake it, how to water it, and what after-care is required. 

Nothing earth-shattering there, you'd think.

And then I remembered this little Bay Tree:


It's a happy little fellow, wouldn't you say?

Nice and shapely (that would be down to me pruning it), good and healthy-looking, quite a nice addition to a garden.

Also, quite a well-established little tree: nearly as high as the rotary drier which you can just see, off to the left.

The planting hole needs a bit of tidying-up, in this particular photo, but generally speaking, it's a happy little Bay Tree.

Or it it?

Take a closer look at the base:


What can you see, there at the base, just at the tip of my secateurs, which are there for scale?

No, not the unwanted shoots, they're about to be removed, as part of the "clearing out the planting hole" job. 

But you can have a housepoint for  noticing them.

No, can you see that black plastic line?

It's the remnants of the plastic pot - the one in which the plant was grown, in the nursery, before it was sold to whoever planted it here...

...yes, the person who planted it,  failed to take the tree out of the pot before planting it......  *shrieks hysterically*

You have to laugh - it's either that, or cry.

It's far, far too late to think of removing the plastic pot now - as you can see, it's embedded in the trunk. But I do sometimes despair, at the idea that someone, somewhere, bought a plant in a plastic pot, and planted it out - without removing the plastic pot first.

And my Trainee sometimes looks at me, as though to say "I'm not daft, you know," when I explain in detail every small step that we take, why we do it, which steps are necessary, which ones can sometimes be disregarded, and why.

Well, that's why I do it!


Did you enjoy this article? Did you find it useful? Would you like me to answer your own, personal, gardening question? Become a Patron - just click here - and support me! Or use the Donate button for a one-off donation. If just 10% of my visitors gave me a pound a month, I'd be able to spend a lot more time answering all the questions!!

Friday 19 March 2021

Garden archaeology: amazing what you find

Yesterday, I had my Trainee, along with my secondary Trainee (yes, the Trainee Placement is getting bigger!), working on a planting hole around a small tree.

Planting holes are the cleared spaces which you should have, around trees which are planted in grass.

Two main reasons: firstly because grass is significant competition  - it sucks up all the rainfall, and pinches all the nutrients, so the tree has to compete for them. This is very important with newly planted trees - not so important for well established ones, like this one.

But the second reason applies to both new, and old, trees: by having a clear space around the base of each tree, the mower won't be scraping up against the trunk, as the operator tries to get all the long grass. And if the grass regime includes strimming, then it's even more important to keep the strimmers away from the trunk of the tree.

This particular tree was looking a bit swamped by grass, so we decided to make a proper, neat, planting hole around the base. 

Right! First job: lift the turf, in a neat circle. It started well, but then there was a "clang!" as someone's spade hit an obstacle. 

Hmm, what's that, we all asked?

Probably a stone, we said.

Look, we can see it, it's a stone. It's a big stone. Hmm, it's a BIG stone! Having poked around with the faithful daisy grubber, we located the edge of the stone, and levered it out.

It was part of a concrete roof tile.

Hmm - interesting. But oho, what's this? Underneath it was a big orange plastic bag. An orange plastic bag?

We cleared the soil away, but were unable to pull up the plastic bag - it just wouldn't move. So I cut along the top, and lifted up the flap, and it turned out to be an entire compost bag, ie quite a big one, filled with broken concrete tiles,  half bricks, and assorted other rubble.


 Here's me, lifting the top flap of the plastic bag, to reveal the innards.

Lovely!

So what was going on here, we all asked, scratching our heads, then wishing we'd taken off our muddy gloves, before doing so.

After some thought, we came up with a likely scenario:  someone - probably a landscaper, rather than a proper gardener, had been asked to plant the tree, so they dug a nice big hole, brought along a bag of compost, and enriched the soil.

They planted the tree.

Meanwhile, they had found/encountered/dug up a load of builder rubble, and used the empty compost sack to contain it. For easy disposal afterwards.

But then - something happened! The bag was left lying at the base of the tree, and somehow when the hole was filled in, whatever idiot did it, simply piled the soil over the bag of rubble. Then they slapped the turf on top, then they went away and left it, thinking "job done". 

Meanwhile, presumably, the landscaper was wandering around, saying "Anyone seen that bag of rubble?" not realising that it was buried barely 2" below the grass.

I started pulling the bag out, only to discover that it was a very big bag indeed, and it ran backwards under the turf. And that there were massive voids within the part of the bag which was under the turf - so if we were to try to pull the whole thing out, we'd end up with a bit 'ole under the lawn, which would need careful filling and compressing, otherwise we'd find the mower disappearing down the 'ole, next time anyone mowed.

So we decided to cut off the plastic bag at the edge of our planting hole.

Right, decision made. 

I cut off the back, and started heaving out the rubble.

But oh dear, we ran up against a similar problem: the stack of rubble went way, way back under the turf, and it had a lot of voids in it - so if we started pulling it all out, we'd again end up with a massive hole.

So we took an executive decision, and removed just the top layer, about 8" or so of it, leaving the rest in place. 

This is how much we took out: a third of a plastic bag, a brick, three half-bricks, and a number of concrete roof tiles.

Then we went and got half a barrow of topsoil, and stomped it down well, into the hole.


Finally! Now we could get on with the planting - we had some rescued tulips from elsewhere in the garden, and of course primroses, because we have masses of those.


And here - right - is the finished result.

One nice neat hole, with no sign that, underneath that black bucket, there is the tail end of the orange plastic bag, and a big pile of builder's rubble!


Did you enjoy this article? Did you find it useful? Would you like me to answer your own, personal, gardening question? Become a Patron - just click here - and support me! Or use the Donate button for a one-off donation. If just 10% of my visitors gave me a pound a month, I'd be able to spend a lot more time answering all the questions!!

Wednesday 17 March 2021

Top Tip: herringbone block paving

 Top Tips: a series of short, very short, articles featuring Things Which You Might Not Already Know.

Herringbone block paving - love it or hate it (type "block paving" into the search box, top left of the page, to draw your own conclusions about my feelings on the matter...) - it's here to stay. 


Good points: it's stylish, it's elegant, and it allows rainwater to dissipate gently, without flooding your house, your garage, or your beds, depending on what is downhill of your drive. 

Downsides: if you use a pressure washer on it, the blocks all come loose and jiggle about, which is annoying, and expensive to fix.

It also needs an annual scrub, which has to be done by hand. The least back-breaking way to do this is with a long-handled wire brush.

Now, here's the tip: don't buy one whose bristles are in a rectangular block:

...like this one, left.

Can you see how the bristles all stick up vertically, like soldiers on parade?

A brush like this will not clean your block paving for you!

Instead, look for ones whose outer rows of bristles have been set at an angle, so that they meet in more of a point, along the centre of the bristle block.


Like this one - right.

This one will slide quickly and neatly into the cracks,  rather than gliding annoyingly over them, as the one above does.

Ask me how I know: a Client's neighbour bought one for her drive, having watched me zipping around on the one next door.

She then stopped me, one day, to ask how I did it so quickly. ("Quickly" being a comparative term, it used to take me a good 2 hours.) She said that her beautiful new brush was really hard work and didn't make a neat job of it at all.

She showed me hers. I gave it a go. I handed it back. I went and fetched "our" one, and showed her the difference. She took hers back to the shop.

End of Top Tip. Although I do rather like the concept of the little metal scraper on the one in the picture - I've never had one of those, I wonder if it works? Or if it just sets your teeth on edge?


For more Top Tips, either type "Top Tips" into the search box at the top left of the screen, within the black strip: or go to the right-hand pane and scroll down below the Followers section (checking to see if you are there, as you go: what? You're not a Follower? Shocking! Follow me, immediately! *laughs*), then select Top Tips from the list.


Did you enjoy this article? Did you find it useful? Would you like me to answer your own, personal, gardening question? Become a Patron - just click here - and support me! Or use the Donate button for a one-off donation. If just 10% of my visitors gave me a pound a month, I'd be able to spend a lot more time answering all the questions!!

Monday 15 March 2021

Tree Peony - what to do with a badly-leaning one

 The other day, I was asked about this poor creature:

It's a tree peony: proper name Paeonia lutea var ludlowii, also known as Paeonia delavayi var ludlowii.

Whatever you choose to call it, it is the commonest one, the one with the beautiful bright yellow flowers.

For  your information - you know how I strive to educate and entertain *laughs* - you can also get Tree Peonies in pink, in dark red (I have a very small one of those in my own garden, it's lush!) and even in white: one of my Clients had a beautiful white one, and I collected seed from it, but alas, not one single one germinated.

*sigh*

By contrast, the yellow one germinates all over the place:  

Seedlings pop up here, there, and everywhere! You don't even need to bother taking seeds home to germinate - just look underneath the original plant, and rescue some of the self-set seedlings.

Here - left - are a couple of seedlings under their parent plant. As you can see, they are surprisingly long in the stem, so they need to be dug up with care: but once carefully potted up, they grow on into good sized plants in no time.

(Although they take a couple of years to get to flowering size.)

Anyway, getting back to my problem Peony: it's leaning. 

Badly. 

Either it has been blown over by the wind - which is possible: it's in a rather odd location at the side of the building, so there is a bit of a wind-tunnel effect there.

Or, it's been growing avidly towards the sun, which is also possible, although a little bit less likely.

Either way: what do we do with it?

First question: is it actually a problem? Has anyone noticed that it's leaning? Does anyone care?

Well, that would be yes: this particular area of the garden is stuffed full in summer: masses of Hollyhock, Soapwort, and all sorts of Poppy: but in winter, alas,  the skeleton of this plant is extremely visible. And if the Client has mentioned it, then yes, they've noticed, and yes, they care.

In which case, what are the options?

1) Try to train it to be more upright

2) Dig it up and replant it

3) Radical pruning.

Let's look at those options one by one.

1) Training: we could hammer in a large stake to the right of the plant, then use soft plant ties to gradually ease it into a more upright position. This means me having to check it, every couple of weeks, and tighten the ties: it also means we have to look at a rather ugly stake for several weeks, possibly a couple of months, until the combination of foliage and perennials have covered it up. 

2) Dig it up, and replant it in a more upright position. Sounds drastic, I know, but it can work surprisingly well. The trick is to use a spade to chop around it, at a fair distance from the central stems, in order to get up a biggish block of soil, with the roots intact. This can then be repositioned, and very firmly tamped down. Sometimes, as with a biggish shrub like this one, staking might be required. See point 1).

3) Radical pruning. Let's take a closer look: we have three main stems, all leaning to the left, and one short newish stem going beautifully upright.

All of the three leaning stems have a good lot of buds on them, low down.

In which case, this is the sort of drastic pruning which suggests itself - left.

Yes, those red lines are where I would cut the stems.

This would leave us with one younger, upright, stem,  and three cut ends, which would quickly sprout new growth: plus, there are all those buds at lower levels. 


 Let's take a closer look, for some of those buds: I've ringed them in yellow.

As you can see, plenty of them!

So, there will be plenty of growth on this plant, even if we do chop off the upper parts of the three main stems.

But will it flower, I hear you ask?

Well, maybe not this year.

So the question is really, are we prepared to sacrifice the flowers for one year, in order to get a much more shapely plant for the next 10-15 years?

And the answer, as always, is likely to be a compromise:; I will probably cut off the left-most stem, the one leaning the most, next time I am there. 

As soon as it has flowered, I'll chop off the middle one.

Then in autumn, when the foliage dies down, and we can see it clearly again, I'll chop off the third and final leaning stem. 

This compromise should give us two-thirds of the amount of flowers we would otherwise get: it gives the two lowest stems a chance to make some good new growth this year, which will bear flowers next year: there won't be any ugly stakes or ropes to look at; and by next year, hopefully no-one will notice that it has even been cut.

So there you have it: three ways to deal with a badly-leaning shrub, plus a sneaking insight into what I will actually be doing with it!


Did you enjoy this article? Did you find it useful? Would you like me to answer your own, personal, gardening question? Become a Patron - just click here - and support me! Or use the Donate button for a one-off donation. If just 10% of my visitors gave me a pound a month, I'd be able to spend a lot more time answering all the questions!!

Saturday 13 March 2021

Smiling Box Face - Update.

 A while ago, I wrote about creating a new piece of Box topiary, from a very ragged Box ball.

The Box plant in question had become very overgrown:


That's it, on the left, behind the Acer, whose branches appear to be being eaten by it.

Worse, it was so huge that people - and the wheelbarrow - could barely squeeze in between it, and the water butt.

This was very annoying for everyone, so my first job was to reduce it in size.

This is always a scary job, because you have to really hack into them, back into bare stems. It's always advisable to make sure the Client knows what you are about to do, and to reassure them that it will green up again!

Luckily, my Client trusts me, so this was the first stage - and now we are looking at it from the other side.

I did this - right - in June, and within a month, it had greened up quite nicely, although it took another year before it was a solid green ball again.

To be perfectly  honest with you, I rather forgot about it for a year or two, because now that it was no longer in the way... I just didn't particularly notice it!

But then last year, I looked at it again, and decided to do something interesting with it.

This particular garden has a swimming pool, and in summer there is a constant stream of young visitors coming to use the pool, and they enter the garden along the side passageway.

So they see this Box ball, on their way in.

Aha! I thought to myself. I'll do something amusing, to make the kids laugh.

So I re-cut it into a happy smiley face:

This - left - is what it looked like on the day I first clipped it, which was in March of last year.

Oh, and see that water butt on the right? The gap is now wide enough for the wheelbarrow, whereas before I started this project, the box was projecting well over the edge of the grass.

So you can see that I had to reduce it quite substantially, before I re-shaped it. 

And there it is, a happy smiley face.

Not bad, eh?

I left it to re-grow, and by mid-summer it was looking quite fluffy.

The problem, if you can call it that, with topiary is that you do have to keep on at it - you can't just cut it once, and that's it. You have to continually revisit it, with a little bit of secateur attention from time to time, and a full re-clip, usually twice a year.


Here we are in September of last year: just a couple of months after first clipping it, and now it's really starting to look quite well-defined.

Of course, 2020 was the year of Covid-19, so there weren't actually any visitors to the pool... which is a bit of shame, but at least it gave me time to develop this piece of topiary!


Did you enjoy this article? Did you find it useful? Would you like me to answer your own, personal, gardening question? Become a Patron - just click here - and support me! Or use the Donate button for a one-off donation. If just 10% of my visitors gave me a pound a month, I'd be able to spend a lot more time answering all the questions!!

Friday 12 March 2021

How technology is changing our gardens.

Technology is changing our gardens in strange ways.... not just the breeding of the plants, the complex irrigation systems, but the very layouts of our beds.

Back in the old days, posh houses used to lay out parterres: complicated designs of beds and low hedges, which could only really be appreciated from the upper floors of their mansions.

Then aeroplanes were invented, and suddenly we could all see the gardens from above: but only on a very large scale, from way, way up high. Then some bright spark took a camera up in a light aircraft, and the whole business of selling framed aerial shots of your property was born. Do you remember those? A chap would come knocking at the door of your large house or farm, would show you photos, taken from above, and offer them to you for a fairly high price. If you said no thanks, they'd often drop the price!

But that didn't happen all that often, and certainly not to us lower life forms, in our small suburban houses.

Then google earth came along, in 2001, with their complete aerial survey of the whole country, and suddenly we could all see who had the biggest garden on our street, and where a neighbour had cunningly moved their fence, and had stolen a bit of land from someone else. There were other surprises to be seen - wow, what a lot of trampolines! And a surprising number of bright blue swimming pools, far more than I would have expected in rainy old Britain.

We all know that, in stately homes, parterre gardens and knot gardens were designed to be viewed from the windows of the posh house above them. Sometimes you can't even see the whole design unless you can view it from above - and who would have thought it, but the advent of Google Earth means that now, even quite modest garden layouts can be seen from above.

Which means that they now need to be a bit more accurate!

Some years ago, I started work at a house with a very large garden, containing two enormous crescent-shaped beds, with a summer house at one end as a focal point, and room for croquet in the middle.

Very nice.

However, the Clients had outgrown their croquet ambitions, and instructed me to plant a Liquidamber in the middle. Adhering to sound design principles - well, my own personal ones, at any rate - I positioned the tree by eye, then got the tape measure out to check, before digging the 'ole.

Now for the odd part - the tape said it was off-centre.

I then had to work out where the actual centre of the lawn was: it took me quite some time - which was unusual in itself - and then when I put the pot in the actual centre, it looked wrong.

That evening,  I looked at them on google earth, and noticed that they were not actually symmetrical. You couldn't see this from the ground, but from above it was really noticeable:


Look at that!

The central part is certainly not a circle, which is ok - but it's not a proper oval either.

Plus, the beds are bulging unevenly.

When I told the owners, they were horrified (personally I didn't think it mattered all that much, but there you go), and they tasked me with evening them up.

Armed with pegs, string, and my surveyor's tape measure, I re-cut the edges and made them properly symmetrical.

(Incidentally, while doing this, I discovered why the expensive design firm who installed them, had not done a proper job: there was a tree root across one section, and they had “adjusted” the shape of the bed so they wouldn't have to dig it out in order to get the plants in....  lazy swines...)

But we would never have known without google earth - and presumably now that drones are becoming cheap to buy, we will have to see our gardens from above more often, as they buzz overhead, filming us.

So this is a somewhat unexpected way in which technology is changing our gardens - they not only have to look lovely from the “front” and the “back” as it were, but now they have to look lovely from above as well!


Did you enjoy this article? Did you find it useful? Would you like me to answer your own, personal, gardening question? Become a Patron - just click here - and support me! Or use the Donate button for a one-off donation. If just 10% of my visitors gave me a pound a month, I'd be able to spend a lot more time answering all the questions!!

Thursday 11 March 2021

Cercis: not just a tree!

 Recently, I wrote about the interesting inside of a Cercis branch, after I'd cut a limb from a small tree.

It's not always grown as a tree - a few years ago, I met an interesting use of a plant in the "wrong" place:  Cercis canadensis (pronounced sir-kiss, by the way) had  been planted below the kitchen window (!) and the owner could barely see to do the washing up, not to mention being unable to see out of the window, so I was asked to remove or reduce it.


As the leaves are rather lovely, being a plump heart-shape with an elegant point, I thought I would try a form of coppicing, in order to encourage better foliage at eye level.

Accordingly, the next autumn, I cut all the main branches down to waist height, removed some of them altogether, and I brutally pruned off all the small branches, leaving just a short, drastically thinned-out skeleton of a shrub. 

 One of those jobs that you do with your heart in your mouth, as drastic pruning can sometimes kill a shrub... but worth the risk, as the owner was in favour of removing it altogether.

I do love it, incidentally, when a garden owner trusts me enough to let me do things like this...

In this case, fortune smiled upon me, and it worked like a charm: we now have a nice, small, bush, of lovely luxurious leaves, and washing up is once again easy to do. 

Not to mention being able to see across the garden, for the first time in years!

That autumn, and every autumn since, I have therefore pruned it again, brutally! savagely!, removing all the new growth and taking it back to the skeleton - and throughout the summer, I keep an eye on it, and chop off any exuberant new growth, before it blocks the kitchen window again.


 And now for the magical bit:  this is what happens, in spring - right.

Can  you see all those little dark pink blobs?

They are the flowers: Cercis is a flowering tree or shrub, and it flowers on old wood, on the oldest of the old wood: it even flowers on the main trunk which is rather weird-looking, but there's a name for it - ready for some botany?

Cercis canadensis is cauliflorous, meaning that it is normal behaviour for flowers to appear on the trunk, and stems. Cauliflory is derived from Latin, and allegedly means ‘stem flower’ but I think it means 'looks like a cauliflower, ie growing without a stem'.

The real magic occurs a few weeks later, when the flower buds open fully, to give this fabulous display:

Isn't that great?

Just look! It has now produced flowers all over,  on the main trunk, and on all those branches which I chop back to nothing every autumn!

The owner was amazed, it had never flowered before: the previous gardener had only ever run a hedgetrimmer over it from time to time, when it got too dark to see in the kitchen.

So you can guess that I shall continue to prune this plant very hard indeed, in order to get a good show of flowers every spring, and to keep the leafy growth low enough to be enjoyable without obstructing the light.

It's still in the "wrong" place, but at least now we can enjoy it! 


Did you enjoy this article? Did you find it useful? Would you like me to answer your own, personal, gardening question? Become a Patron - just click here - and support me! Or use the Donate button for a one-off donation. If just 10% of my visitors gave me a pound a month, I'd be able to spend a lot more time answering all the questions!!

Wednesday 10 March 2021

Bamboo - how to thin and tame a BIG clump!

 I love Bamboo! 

I have a massive clump of the black one - Phyllostachys nigra - which I bought for £60 in a 3-litre pot, about 15 years ago, when it was less than waist-high. Now, it is trying to climb in my upstairs windows!  But I don't mind, I love it.

However, it does need regular maintenance, and a Firm Hand. (I am a great believer in the Firm Hand, when it come to plants, and bamboo in particular.)

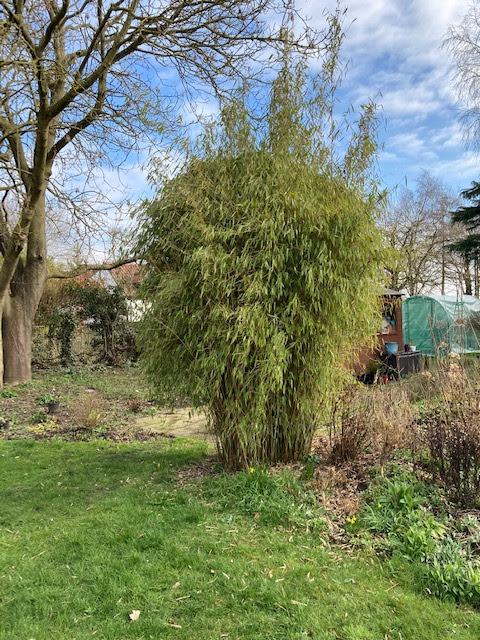
Nicola sent me a picture of her "problem" bamboo  *waves enthusiastically*  (that's me waving, not the bamboo...) and asked me how I would get it under control, and then keep it under control. It's a lovely big clump, but it gets a bit too tall.

Here's what it looks like:


...and yes, that is a bit of a monster.

Lovely, though!

In the past, Nicola has tried trimming the top of it, to reduce it: but as we can see, that doesn't work for long, and it doesn't reduce the thickness of the clump.

So, what would I advise?

Firstly and most obviously, I would say 'Stop chopping the top of it!!'  Well, you all knew I was going to say that, didn't you?

Next, I would suggest assembling a few items to make the next job possible: get some goggles to protect your eyes, stout gloves, knee-pads (there will be a lot of crouching and kneeling to do), long-sleeved clothing, and a pair of loppers. 

Not secateurs, loppers.  


I have - as you would expect - a selection of loppers: for most jobs I use my Big Orange Loppers,  which are mighty, all-powerful, and wonderful: here they are - right - and yes, they are as big as a wheelbarrow, they are ratchet loppers, and I can get through almost anything with them.

However, for bamboo, they are the wrong tool, because of the ratchet-ness: every chop takes four motions, so although it's effortless, it's a bit frustrating.


Instead, I would turn to my "ordinary" loppers, which I hardly ever use these days.

When I first started gardening professionally, you couldn't buy short-handled loppers, so I used to buy these ones, and hacksaw off the handles so that they would fit into my work bag.

Also, the longer the handle, the further apart you have to stretch your arms each time you use them, and in enclosed spaces, that was not always easy.

These days, there are masses of short-handled loppers to choose from, and I have to say that Fiskars do some nice ones, black and orange (so you can find them if you drop them), and with a nice smooth action. 

Yes, before you mention it, the longer the handle, the more leverage 'one' has, but there is a trade-off between that, at the accessibility, so on balance I would rather have neat, short loppers, and if the branch is that big, I go and get Big Orange.

This style of lopper is a bypass action, which is by far the least damaging to the plant, so these loppers are most appropriate for things you want to keep: Big Orange is anvil-style, so there is often an element of crushing in their cut, which can be a bad thing. But generally, I use Big Orange for massacre jobs!

Anyway, back to Nicola's bamboo: take a look at the base of the clump:


First job: any stem which is brown, down there at the base: chop it off. As low as you can. One at a time.

Wiggle the blades of the loppers in: insert them slightly sideways if you have to - push them as low down on the stem as you can, then chomp! Off with it's head.

This job is much easier if you have an assistant, who can stand behind you: then, as you cut a stem, pass the cut end back to them, and let them pull it out and lay it down, out of the way somewhere.

Otherwise, pull them out as best you can, and toss them behind you. 

Work your way around the clump at low level, getting out all the brown ones. 

I find that once you start, you can gradually work your way closer to the centre, although you can never cut the innermost ones as low as you can cut the outermost ones. Hence the instruction to cut the first ones, as low down as you can. 

Once that it done, the clump will be quite a bit thinner, but we're not done yet. Far from it!

Next job: look up to the top, and if you can see any canes which have a tuft of foliage near the top - these would be the ones whose tops were chopped - then lean into the clump, find out which cane it is (by shaking, and looking upwards), then trace it down to the very bottom, and lop it off.

Right, now we're getting somewhere.

This next part is also much easier with an assistant: find the tallest canes, and again, lean into the clump and work out which ones they are, one by one: trace them down to their bottoms and lop them off. The assistant comes in handy because they can watch the tops, as you shake the canes, and can tell you when you have the correct one.

By now, your base should have a lot of cut ends, so it should be getting easier to get in and amongst them.

Keep going, taking the tallest one out, each time, until the clump is low enough and/or thin enough to be acceptable.

If you find that you've reduced the height to your satisfaction, but it still looks too "heavy", you could try the stripping technique: starting at the base, work your way up each cane in turn, and strip off the leaves, up to about breast height. 

This is not something I particularly like, personally, but a lot of Clients ask me to do it for them.


Here - left -  is a huge clump of Sasa, having had the thinning-out treatment, but still looking too 'heavy' and cumbersome.

Out come the secateurs, in I go again - "once more unto the breach, dear friends! I may be some time!" - and snip, snip, snip, off come the leaves and any thin, sticky-out side branches.


And here is the same clump, half an hour later.


As I say, it's not to my particular taste, but it certainly does reduce the thing from a monster, into something with a little bit more style, to it.

Once you've done all that lot, you deserve a cuppa!

But first you have to clear up the mess... none of this is compostable, unfortunately: so it all has to go in the Garden Waste bin, down to the tip, or on the bonfire heap.

But before you dispose of it all, take another look at the canes which you cut off. They may have some uses: bigger ones can be used for plant supports, for runner bean wigwams etc: lesser ones can often be used for lightweight plant supports: and whenever I thin out my black bamboo, I know a local flower arranger who comes to pick them up from me, with cries of glee, because she can strip off the leaves and use them in her displays.

Once the canes are tidied up, rake up all the fallen leaves - also, try to rake as many out from the base of the clump, if you can, and then - finally - you may go and have a rest.

Or you can take a chair out into the garden, and admire your handiwork!

And as for aftercare, for Nicola's bamboo: once a year or so, just repeat the above steps. Cut out any dead, brown canes: cut out any which are growing too high: and - if you want to - strip off the lower leaves.

All this may seem like hard work, but the alternative is to dig up the clump and only replant some of it - and I can assure you, with bamboo this big, that is one heck of a horrible job!


Did you enjoy this article? Did you find it useful? Would you like me to answer your own, personal, gardening question? Become a Patron - just click here - and support me! Or use the Donate button for a one-off donation. If just 10% of my visitors gave me a pound a month, I'd be able to spend a lot more time answering all the questions!!

Saturday 6 March 2021

Lawn edges: How To retrieve a damaged edge.

Are you old enough to remember how our grandparents used to turn sheets "sides to the middle"?

I was somewhat shocked that my current Trainee is too young to remember this! In case you're likewise, a mere youngster, it was what people did before the invention of fitted, cheap, polycotton sheets. They would use their thick, flat, white cotton sheets until they had worn a thin patch in the middle, then they would cut them up the middle, through the thin bit: sew together what were the two outside edges, hem the "new" outside edges, and lo! and behold, nice thick cotton to sleep on again, and best of all, we assume, a clear line of division down the middle, to show whose side was whose. 

Apparently this could extend the life of a sheet by 5-10 years! 

Why am I telling you this?

There is a garden application to this principle: where you have a large foliage plant, which is overhanging the lawn, and causing the nice neat edge of the grass to die.

There are basically only two options for this situation: move the plant, or move the edge of the grass!

In this case, it was a very large clump of Spanish Oat Grass (Stipa gigantea) which looks moderately magnificent in summer, but which was killing the grass. I wasn't allowed to remove it: and the Client didn't want me to reshape the edge of the lawn.

So, unable to do either of the options, I had to find a third course: and that means replacing the grass, and accepting that it will die again, next summer.

*grumbles slightly*

Anyway, the principle is very simple: peg out a line, to show where you want the edge to be.

Cut and lift the damaged edge of the grass, going quite a long way back into the lawn, until you reach good solid turf.

Lift each turf, rotate it around 180 degrees, and plop it down with the cut edge level with your string. This moves the damaged part to the inside, giving you a firm, solid "edge" which will remain stable while the roots are knitting back together.

Stamp down well. Water, if necessary. Keep an eye on it for the next few weeks, and water if needed.

Here - left - you can see a couple of points of interest.

1) see the string, stretched out between two pegs, to give us a reference line. This is very important!

2) you can see the extent of the dead grass, which shows just how big Stipa gigantea gets. Every year.

3) you can tell from the bare soil edge, that I have actually chosen to move the border, sneakily, out into the lawn, slightly. This is because the Stipa is already over the original lawn line, so there is little point trying to get the grass to establish itself under the spread of the foliage.  So I made an executive decision, and moved it out,  by about a foot.

4) There is nowhere near enough grass to fill the gap. That's ok: there are a few tricks to help out in this situation. The obvious one is to fill in the gap with soil, then add grass seed. Yes, but that takes weeks to grow... quicker and easier is to go to one of the other borders, which has been over-run with grass, and weed out the strongest clumps of lawn grass, relocating them in the bare area. 

Note: do not transplant couch grass and other horrors! Just the normal lawn grass, there's usually lots of it, infiltrating the beds, at this time of year (Feb/March), and if you know your garden, you'll know where there is a backlog of weeding to be done. 

5) Yes, we could have bought in some turf, or we could have lifted some turf from a different part of the garden. But by using the damaged turf wherever possible, you are maintaining the "local" grasses, as it were: the new edge will match the rest of the grass.

Of course, if the grass is in really terrible condition (which it might well be, having been struggling and dying in the shadow of the Stipa for a year or two),  then there is nothing for it, but to move turf from elsewhere. 

6) Spades should not be left lying on the grass this way up (the Trainee got a black mark for this!) because, as with rakes, if someone treads on the end of it, it will ping up and hurt them. Always leave tools lying face down, so they are "safe". End of lecture.
 

Typically, I don't have a picture showing how quickly and how well the grass recovered. But I can assure you that it looked "ok" for the rest of last year; and, as predicted, it is now once again in poor condition, with a bite-shaped chunk of missing grass. So I guess my current Trainee and I will shortly  be repeating the process!


Did you enjoy this article? Did you find it useful? Would you like me to answer your own, personal, gardening question? Become a Patron - just click here - and support me! Or use the Donate button for a one-off donation. If just 10% of my visitors gave me a pound a month, I'd be able to spend a lot more time answering all the questions!!

Wednesday 3 March 2021

How to Pollard Cotinus coggygria for the best foliage

At this time of year - early March - there's still time to give Cotinus coggygria the annual pollarding, where I chop off all this year's luxurious growth, in order to promote large-leaved foliage for next year.

Pollarding, in case you don't already know, is a form of pruning where you keep the main trunk(s) of the chosen shrub or tree, and chop off all the new growth every year.

Why? Well, we pollard trees and shrubs for two main reasons: firstly because it allows us to keep them down to a manageable size, and secondly to promote super-large foliage.

Pollarding is quite different from just "lopping off half of all the branches to make it smaller". That practice is known as "topping" or, in my world, "butchering". A tree or shrub which has been topped, or - in gardening terms - "lollipopped" or "bunned" *shudders theatrically* can be ruined for years, as each cut branch will throw out a mass of new growth, which then sprouts untidily at the tips.

It is just so illogical: if the reason for cutting back the limbs was to make it smaller, well "Fail!" as the  kids say, you've just forced it to grow super-fast, and right at the extremities, not to mention spoiling the outline or "form" of the tree.

So normally we would do the classic RHS "one in three" style of pruning, where you remove about a third of the oldest stems right down at base  level, each year. This keeps the shrub down to a manageable size, it retains the original form of long arching branches, and if it's a flowering shrub, then regardless of what time of year it flowers, you will always have two-thirds of it flowering.

Pollarding,  however, is where you want to keep some height, but you want to keep the overall size as it is, and not allow it to get any bigger.

The other reason for pollarding a shrub - or, for that matter, certain trees - is that it promotes huge, juvenile foliage.

So if you have a shrub, or tree, with particularly appealing foliage, then pollarding is the way to go.

Some years, I pollard my Cotinus (plural of Cotinus, anyone? Cotini? Cotinusses?) in late autumn, but some years this job gets left until Feb or even March: it rather depends on the weather, partly because the weather affects how soon the leaves drop, and there's no point trying to do this with the leaves still on it, and partly because if the weather is very wet (as it is this year) I can't get onto the beds without ruining the soil and getting mud all over the lawn.

This is, in fact, one of those useful gardening jobs that can be saved up until conditions are right!

Here's one which I do every year - this is what it looks like over winter, once the leaves have fallen:

...so I go round and chop off every single one of those long lanky shoots, right back to the main stem.

Bearing in mind that I do this one, without fail, every single winter, you can see just how much it can grow in one year. 

The main parts of this shrub are at eye-height for me: so those lanky stems are easily 6-7' long.

If you didn't prune it every year, imagine how big it would get!

I say that, but actually, the act of pollarding, or hard-pruning, promotes growth, so if you were to leave it unpruned, it would not really make this amount of growth every year: growth would slow down each year.

But it would soon become an over-large shrub. So I pollard it, every year, and this - below - is what it looks like when I'm done.


Brutal, huh?

It is now a typical pollard, with knobbly lumps where I have repeatedly shortened the new growth, as hard as I can.

It grows back every year, trust me!

Pollarding like this has another couple of benefits: the weather can get to the soil around the base, so it gets water, and frost, and other natural climate ingredients.

The removal of the branches allows me to get in there and weed: so it doesn't become infested with bindweed or other noxious weeds.

And, not least, it allows an underplanting of bulbs and early spring flowers, to brighten up the area.

So there you go - how, when, and why to pollard your Cotinus bushes.


Did you enjoy this article? Did you find it useful? Would you like me to answer your own, personal, gardening question? Become a Patron - just click here - and support me! Or use the Donate button for a one-off donation. If just 10% of my visitors gave me a pound a month, I'd be able to spend a lot more time answering all the questions!!

Monday 1 March 2021

Pond maintenance

You know how people sometimes start off a conversation, or an article, with phrases such as:

"[insert theme]: ah, a subject dear to my heart." ? 

Well, pond maintenance is about as far from my heart as it is possible to get. I loathe pond maintenance!

I still do it, mind you, when I am paid to do so: but it's a horrible, horrible job! *laughs* 

No - it's not that bad. I'm joking. But there are a couple of drawbacks about working in ponds...

Firstly, it's a wet job: as they say at Alton Towers: “You will get wet, on this ride”. OK in summer, not so nice at any other time of year. 

It is always a smelly job. Always. Without exception. Ponds stink - or, to be accurate, the decomposed sludge within the pond, stinks. And that always leads to sorrowful faces and mock accusations from fellow workers, concerning who let loose the smell...

Then there's the fact that it is, invariably, a slimy job. I hate slimy things *shudders theatrically* so I have to wear gloves to do it, which reduces the fun: I have a pair of super-long waterproof gloves... 


 ... which at least mean that you can make a desperate lunge, without inadvertently going in too deep, and getting water up inside them. 

And if, on the way back from clearing out the pond, 'one' should discover a cow having trouble to expel a calf...well, it's good to have the right tools for the job. 

Please note: That Is A Joke. 

I also normally try to wear my waders; it's no good the Client saying "oh, it's only about a foot deep", if I step inside it with wellies on, I can guarantee that the tide will come in, and I'll end up with water - and possibly slimy things - down inside them. And that's why I'd rather wear my waders, right from the start! 

I have also found, over the years, that one person will bravely step into the pond to lift out the baskets, but then they won't be able to lift them properly, and the one on the bank will lean out to help.... disaster has been known to strike. So on balance, on go the waders, then I can step one leg - or more - into the  pond, to help, if necessary.

Thirdly, or possibly fourthly, there is no good time to do it - it's immensely disruptive for the wildlife in the pond, no matter when you do it. So I always have to ask the Client to arrange for plastic sheeting beside the pond, so that we can leave all the debris out, overnight, which gives the wildlife the opportunity to crawl, slither and slide back into the water, once we've all gone away. 

Most books will say to do it either in spring or autumn, but frankly it's a huge upset for them, at any time, so we just have to grit our teeth and get on with it, saying to ourselves that we'll probably only do this sort of job once in ten years or so. 

And that leads on to the other problem: it leaves the Client with a huge sodden pile of material to be disposed of: material which, by definition, won't rot, so there's no point trying to compost it. 

I have completely forgotten to mention the perils of the phrase "we can repot some of the [insert name of aquatic plant]" which is invariably said, lightly, about half an hour before it becomes apparent that the existing [insert name of aquatic plant] has grown into a man-eating thug of a plant, while they weren't looking, and has eaten the basket in which it was planted, and has knotted roots with two or three other nearby baskets, so when you try to lift one of them, you find they are all linked together, with a combined weight of, oh, about a ton.  

Getting them out of the baskets is often quite a struggle, and usually leaves you with one sadly deformed, or badly broken basket,  and enough roots to fill at least ten of them. How did they all fit in that one basket? And as for getting them out - well, that's when you suddenly realise why you should have held on to that old breadknife.

So, all in all, it's not the most pleasant way to spend a summer afternoon. But at least it's fairly safe, if you are careful: in fact, the biggest danger with pond work (apart from falling in) is when people bring new plants in, which they often do, once it's been cleared out. That can bring invasive weeds into the pond, which is disastrous. 

To avoid this, I always advise Clients to put new purchases into a tub of water for at least a month, to see if they have anything nasty growing on them, before adding them to the pond. 

In summary, then: if you have to clear out your pond, lay in a stock of plastic sheets, long gloves, possibly waders,  and a couple of assistants. Oh, and a bread knife.


Did you enjoy this article? Did you find it useful? Would you like me to answer your own, personal, gardening question? Become a Patron - just click here - and support me! Or use the Donate button for a one-off donation. If just 10% of my visitors gave me a pound a month, I'd be able to spend a lot more time answering all the questions!!