Tuesday 29 May 2012

Barn Owl pellet dissection: a new hobby?

Up at my yard, one of the tumbledown buildings which edges the yard has been used as a roosting spot by a local Barn Owl for a while now.

I sometimes see him if I walk past the fields above the farm in the early morning, or at dusk: he swoops silently up, across and down the field in a regular flight pattern, presumably one approved by the local Avian Aviation Authority as producing the most efficient fuel-to-food ratio?

If you've ever seen documentaries of owls eating, or seen them live, then you'll know that they swoop down on unsuspecting small mammals such as voles, shrews, field mice etc, and swallow them whole. After a few hours of digestion, they regurgitate the bits they can't use, which is basically just the fur, feathers and the bones. Oh, and beetle shells. This lot comes up as a neat cigar-shaped pellet, which they spit out and which falls to the floor beneath their perch. Oh, stop going "Eeeeuuuw!", I can hear you!  It's only because they don't have hands as we do, so they can't carefully pick out the bones. Instead, they have an extra section to their intestine, the gizzard: first the prey item goes into the stomach where the meat and yummy bits are removed: the good stuff goes down into the small intestine for digestion, and the sharp, dangerous bones etc are moved into the gizzard where they are compressed into a neat package, with feathers and fur on the outside, so that they don't do any damage on the way up.

The owl then "heeuck"s up the pellet, safely and neatly.

These pellets can be dissected, which is not only kinda fun to do, but great for grossing out the kids: and let's face it, kids of any age just love icky revolting things. This is a great project for schools, of pretty much any age, as there is so much that you can teach the kids while they are going through this process.

So, how to do it.

Firstly, obtain your owl pellets. They're not actually that easy to get hold of,  unless you happen to know someone with access to some tatty old barns (*preens slightly*), although you can buy them on ebay. No really, you can buy them on ebay, imported from either France or the USA: I have no idea why there are no UK sellers.  Hmm, that's an idea, perhaps I could become the main UK seller of barn pellets! No, too many Health and Safety implications... the ones for sale are advertised as being sterilised "in the approved manner" (without actually telling us what that entails) so there are bound to be strange restrictions.

Sensibly, all you need to do is either wear protective gloves, or make darn sure to wash your hands very thoroughly afterwards.  I found that I didn't at any time actually touch the pellets or the bones, I used two lolly sticks - oh yes, nothing but the best here - for the initial breaking open of the pellet, then I went to tweezers and a dissection probe left over from my A level dissection kit. I knew I'd kept it for a reason. Two pairs of tweezers would work, or cocktail sticks: anything small and pointed, as it's very fiddly work to gently get all the hairs off the bones.

Which are tiny! Tiny!

So, I collected a couple of pellets, they look just like poo, but they are not: they are firm, solid, dry, non-smelly, and quite inoffensive. The options are to dissect them dry, by freezing them - what! Owl pellets in my freezer?! No thank you! - or wet, by soaking them for a couple of days.

As you can guess, I take the easy option, and pop them into a small jar of water (right) and leave them for two days.

At this point, life caught up with me: it stopped raining, and I was overloaded with work, lots of gardening to catch up on,  lots of seedlings to pot on, courgettes to harden off, french beans to germinate, etc and that's not even mentioning having to entirely redecorate my downstairs cloakroom, quite literally from ceiling to floor, taking in walls, skirting boards and pipes along the way after a "simple" plumbing job turned out to be not quite that straightforward after all... anyway, long story short, it was about a week later than I went back to the jar.

Pooey whiff! Oh boy, did it smell.  Not the fault of the contents, but of my fault for leaving it so long.

Here is the result, once I'd got rid of the green and foul-smelling water: one nice soft owl pellet.

As  you can see, it doesn't look like much!

In fact, I have to be honest, it does look a bit like a poo, but you have to keep telling yourself that it's not a poo, it's a pellet that has been carefully regurgitated. And in case you were wondering, yes, owls do also poo in the normal way.
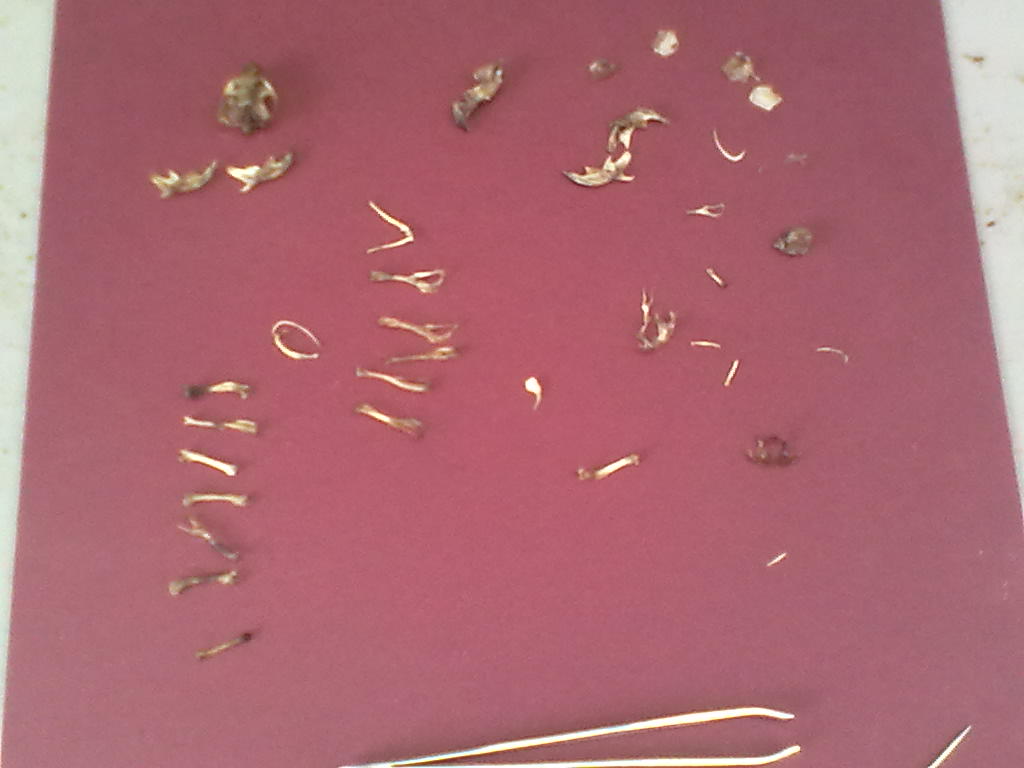
First stage then - take two lolly sticks, and break open the pellet.

Oh look! Bones!

Drat, I should have added a ruler so that you could see the scale of these things. Sorry.

The pellet was about 2" long, so you can see - what? oh blimey, you youngsters: all right, it was about 5cms long. So you can see how tiny these little bones are.

Now for the fun bit - using a probe and an old pair of tweezers, I carefully went through the soggy mass, extracting everything solid.

You do have to keep saying to yourself "it's fur, it's not poo" but after about five minutes I had completely forgotten the "ick" factor and was utterly absorbed in not missing the tiniest, tiniest bone.

I found it was actually a big help doing this on a metal base - in my case, the shelf in my porch - as you can hear the difference between soft fur, and the bones and hard parts

Here is my sheet of extracted bones:  I haven't made any attempt to sort or reconstruct, other than to group them roughly together by shape. It's immediately apparent that this night's hunting contained two small mammals, as I have two tiny skulls, and four little lower jaws. My guess is voles, judging by the skulls: probably field voles.


Apologies as always for the quality of the pictures, taken with my camera-phone; next time I will get out my real camera and see if I can do better.

So there you go, a fascinating new hobby, except that I am so busy that I might collect some pellets and keep them until next winter, when I will have more time to deal with them.

Monday 28 May 2012

Farewell to the Pear Lady - Death of a Statue

Is it a statue if it's made out of wood? *scratches head* Perhaps "sculpture" would be better?

OK, take two: Death of a Sculpture.

Some while ago I wrote about the sad deterioration of the Pear Lady, a "sculpture" *exaggerated pronunciation* in the garden of one of my clients. She's so-called as she is made from pear wood (I am talking about the garden ornament here, not the client) (but you'd already realised that, hadn't you?) and she's been in this garden longer than I have.

Alas, poor lady, she's been rotting away for the last couple of years, but this week when I turned up for work, look what had happened:


Oh dear!

My client remains upbeat about it though, and has decided to leave her just lying there: she says the Pear Lady looks very peaceful, at rest in the long grass and Symphytum officinale (Comfrey). Although there's a bit of rogue blue Alkanet (Pentaglottis sempervirens for those who are interested) at her feet that is going to need removal - last year it was a pretty sprinkling, but this year it's turned into a complete thug and is threatening to take over the area, so I have been instructed to wage war on it.

This suits me, as I hate the stuff - I think the leaves are coarse and ugly, and are rough and scratchy to the touch. Please bear in mind that I work in shorts for most of the year - my motto: Live And Die In Shorts - so I tend to dislike anything rough at ankle height, not that I try to influence my clients at all, no, no. I do agree that the flowers are indeed a lovely strong blue colour, but well, pfff *raises eyebrows and makes mock-Gallic gesture with hands* is it worth it? For what is basically a forget-me-not on steroids? And one which quickly generates a big strong parsnip-like root....

Anyway, there you go, not quite a sad farewell to the Pear Lady, but I expect that by next year she will have disintegrated down into nothing and will be nothing but a fond memory.

Monday 14 May 2012

"You Can't Always Trust the Label"

Ever had one of those experiences when you buy something that is not in flower on the basis of it's label, then find it comes up a different colour altogether? I encounter this quite a bit when planting out new gardens, and I've had many people tell me that they have bought "white" agapanthus, for example, that have come up blue.

Here's another example of this annoying phenomenon.  See this? Clearly labelled "Chaemomeles speciosa Nivalis" and the label continues "pure white flowers April-May".  As they say: What is Wrong with this Picture?


I don't know about you, but I wouldn't call those white flowers, would you? Coral, possibly - Peach, maybe, possibly even Pale Apricot, but certainly not white.

This particular plant has a sad and sorry history anyway: it was bought by one of my clients about three years ago, and we planted it in the narrow but sheltered, south-facing front garden of her house. It faces the road, and is not particularly sunny, but the vine does well there, and we have always been careful to regularly add compost and feed for the various plants there.  The Hebes are huge, the roses are quite wonderful, and in early spring the whole area is thickly carpeted with bluebells. OK, most of them are spanish ones, but you can't have everything, and they do come up in blue, white, pink and shades of lilac....

This plant, however, stubbornly refused to grow, and refused to flower.

Earlier this year I was instructed to rip it out: it had had it's chance, it had failed to perform, and was consigned to the bonfire heap. It came out without even a struggle - the roots had barely made an effort to expand beyond the "pot" shape of the original compost. But somewhere between the front garden and the bonfire heap, I softened towards it, and instead of binning it, I took it home, potted it up, and left it in the yard where it received no attention at all.

Then a couple of weeks ago, it started to flower! Just like that. Covered in flowers - of the wrong colour, of course - as cheerful as you like.

Makes you wonder, doesn't it: three years of careful attention: nothing. Three months of neglect in my windy yard: full flowering.  How maddening!

Thursday 10 May 2012

Circular growth, Purple Hazel and Oak v Ash

I'm sure you've read this many times in gardening books: "after a few years, a perennial will lose vigour and will need to be lifted and split. Discard the centre section, and replant strong new sections from around the edges."

Some while ago I wrote about a Solidago (goldenrod) clump that was doing its best to form a circle but had been thwarted by the nearly Yew hedge, so it only grew in a semi-circle. *rummages through earlier blog entries: nope, can't spot it, sorry. Haven't time to read each entry - golly, what a lot I've written! Memo to self:  must make blog titles more descriptive of what they contain.*

Last week I spotted this growth ring in a patch of Lysimachia ciliata purpurea:


How's that? Nearly a perfect circle!

I brought these plants into this garden about two years ago - the dark purple, and the height, are perfect for the composition.

But look how neatly they are demonstrating the "grow-in-a-ring" principle.

This clump - and several others just like it - started off as sturdy plants in 2 litre pots, and they have spread themselves superbly.  So much so that I am now able to dig out sections, and move them to other parts of the bed, to enhance the effect.

I love a certain amount of purple in a garden - I think it breaks up the "green" monotony if there are not many plants in flower at a particular time, and it provides a lovely backdrop for something feathery and green -  like Cosmos foliage, for example.


My favourite purple-leaved plants have to include Physocarpus opulifolius "Diablo", (right) - a fabulous and under-used shrub.

I have these for sale but I am secretly hanging on to a few for myself.. . wonderful foliage, and it also does rounded clusters of pinky-white flowers, but I grow it for the foliage.  Great name, isn't it? Physocarpus is just a name, but "opulifolius", well, that's clearly opulent foliage, isn't it? And "Diablo" just reeks of the devil, wouldn't you say? So it's devilishly opulent - irresistible.

I also love Cotinus coggyria "Royal Purple", the purple-leaved Smoke Bush - again, I grow it for the foliage, and luckily all of my clients who have this shrub think the same, so I get the opportunity to give them a really hard prune every spring, for the really strong flush of those lovely round leaves, all through the summer.

Today I have been potting up a batch of purple leaved Hazel - Corylus avellana purpurea - which I'm planning to grow on, and eventually plant out in a double line to make a walkway.

I'm lucky enough to have a friend who has several mature trees of this tree, and they seed themselves liberally throughout her garden. She kindly invites me to turn up with my fork in spring, and to help myself to as many as I can find and retrieve.

This is so much more reliable than collecting and planting acorns - you can assess the depth of colour of the new leaves, and reject any that are a bit too much on the green side.

We discussed, today, the question of whether the variability occurs because the purple hybridises with the common green, or whether the purple merely has very variable seedlings.  As we can't realistically insulate the purple ones from every green one for miles around, we will probably never know!

This friend also reminded me of the old country saying about forecasting the summer based on which trees achieve leafage first, Oak or Ash.  The saying goes something like "Oak before Ash, we're in for a splash: Ash before Oak, we're in for a soak."

As a modern interpretation of this saying, I wondered if it should be updated to "Leaves on suckers, get out your Muckers, Leaves on crown, prepare to drown." ha! ha!

I did a little research on the subject, it transpires that it is not an accurate saying: the Woodland Trust have been checking records over a period of 158 years, and apparently it is usually Oak first, and it does not appear to have any connection to the amount of rain in the following summer.  In fact, Oak trees are sensitive to temperature, so they don't put out their leaves until we reach a certain degree of warmth (which could explain why there are none to be seen on any tree round here) but Ash respond to the amount of hours of daylight, so they tend to put out their leaves very much at the same time each year.

So much for country lore, huh?


Did you enjoy this article? Did you find it useful? Would you like me to answer your own, personal, gardening question? Become a Patron - just click here - and support me! Or use the Donate button for a one-off donation. If just 10% of my visitors gave me a pound a month, I'd be able to spend a lot more time answering all the questions!!

Wednesday 9 May 2012

Rhubarb - wish I liked it!

Yesterday, squeezing in a couple of hours' work between the showers, my client asked me to pull some rhubarb for her: she's an elderly lady, and can no longer manage the "twist-and-pull" without falling over and hurting herself, so most weeks when I work there, I pull her a handful.

She always offer me some, as there is usually quite a lot to be pulled.

Here is the selection from yesterday:


...and I wish I had left a glove or something next to them, as a scale: they don't look anything special in the photo, but they were huge! Massive leaves, stems at least twice as thick as anything I saw last year, certainly thicker than anything I've seen for sale in the supermarket - and mostly a good red colour, as well.

I'm not sure if redness equates to flavour - if anyone knows, do feel free to enlighten me. It seems unlikely, as the large leaves form a dense canopy over the crown, so I can't imagine that the stems are reddening in response to the sun....

Here is part of the rhubarb patch, after pulling - as you can see, lush green growth and I barely made a dent in it by taking out a big double handful.


And the really sad part is that I always say "no, thank you," as I don't care for rhubarb at all - the flavour of it is merely "well, ok", the texture of it is usually a bit on the mushy side, and you have to add a shocking amount of sugar to it, which makes my puritan soul rebel!

So alas, free rhubarb but I don't take any.

Plums, now, that would be a different story...


Did you enjoy this article? Did you find it useful? Would you like me to answer your own, personal, gardening question? Become a Patron - just click here - and support me! Or use the Donate button for a one-off donation. If just 10% of my visitors gave me a pound a month, I'd be able to spend a lot more time answering all the questions!!

Thursday 3 May 2012

Biodegradable pots: no, they don't

I've referred to this subject before: I have what you might call Doubts about so-called biodegradable pots on the grounds that they are either soggily impossible to work with, or they simply don't degrade.

Here we are in the compost heap, digging out some of our Lovely Stuff to spread around on the beds, and what do I find?

Yes, it is one of those blasted coir pots, which has been on the compost heap for many months, and which has - as you can clearly see here - totally failed to rot.

I feel at this point that I ought to be composing a lecture on the subject "The Difference between Compostable and Biodegradable."

I can't tell you how many time I have found plastic bags on the various compost heaps in my charge:  and although a fair proportion are of the "slapped wrist" variety, quite a few are clearly printed as being suitable for adding to compost heaps.

However, there is a big difference between something labelled Biodegradable, and something that will actually rot on a normal domestic compost heap. Those ecover packets, for example: although they try to say that they are biodegradable, they need the very high heat generated by commercial composting facilities.

So even though something might be labelled as Biodegradable, or even Compostable, I would strongly suggest not wasting your time adding the following to your compost heap:

Corn-starch bags. They are perfect for the council's biowaste which goes to anaerobic digestion plant, or to what is called "in-vessel composting" which is held by law at over 60 degrees for a minimum of 48 hours. We just can't achieve that in normal garden compost heaps.

Ecover wrappings, biodegradable fabric washing-up cloths: I am forever fishing these out of compost heaps and throwing them onto bonfire heaps.

Eggshells: how many times to I have to say this? EGG SHELLS DO NOT COMPOST!  They remain intact, perfect, for months, years, maybe even decades. Don't believe me? Please see Exhibit A, below:


Yes, those are eggshells, a stack of them, inside compost that has been there so long that it has formed a compressed, peat-like mass. And yet the eggshells are completely undamaged. Or should that be "composed", as apposed to "de-composed"?

Anyway, yes, I have heard all about the quantities of good minerals and vitamins ("vitamins?") that are to be found in eggshells, and I have no doubt that they do contain at least some minerals: but not in any form that can be transferred to your domestic compost heap.

There is a small possibility that this would work if you crushed the eggshells up into tiny fragments, but frankly you are better off putting them in the food waste bin, and instead, pouring the water in which they were boiled over the compost heap. Or your potted plants. Once it has cooled down, of course.

I shouldn't have to say this, but just in case there are any casual viewers out there: here is my patent list of what NOT put on the compost heap:


What Not To Put In:
  1. No plastic, glass, metal....I shouldn't need to say this... this includes wine bottle corks, by the way.
  2. No plate scrapings - no meat, cooked or raw, it will attract RATS - and that includes bones, whether cooked or raw.
  3. No grease, cheese, butter, oil, or fat.
  4. No cat poo, dog poo,or nappies.
  5. No bindweed, ground elder or couch grass: otherwise everywhere you put the compost, they will appear.
  6. No egg shells - I know every book says to add them, but even if crushed finely, they don't rot!
  7. No citrus - that means grapefruit/orange/lemon/lime peel - they don't rot!
  8. No potato (that means no peelings either) or tomato - for risk of blight, plus you will get little plants everywhere the compost goes. 
There, are we all clear? Good!

Wednesday 2 May 2012

Is this for real? "How to rake up pine needles"

OK, I'm staggered: I'm sitting down, but I'm still staggering.

While doing some research during my studies yesterday, I came upon a webpage entitled "How to Use a Landscape Rake for Pine Needles."

Now at first sight, you'd think "What's a landscape rake, exactly? I know how to use a normal rake, or a spring rake, on pine needles, surely no-one would need instructions on how to do that, so it must be a special tool."

All agog, I started to read.

"Pine trees are a familiar sight, especially around the holiday season."

Huh? I thought pine trees were a familiar sight all year round. This was a good start.

It goes on to describe how terrible it is when pine needles spoil your lawn or your yard.  However, panic not, they have some reassurance: "Fortunately, you can remove large quantities of the pine needles with a landscape rake" they say.

Ooh, ooh, tell me more.

First you have to assemble some essential items for the job: 1) some gardening gloves. OK, that I can believe. 2) a garbage bag.  Ah, we're American, then.   Where's item 3, the landscape rake? I'm hoping for a photo, but I'm disappointed.

Now we get to the instructions:

Instructions

1  Wear a pair of garden gloves to protect your hands during the raking process. OK, sounds good so far.

2   Remove debris from the area you will be raking. This includes sticks, rocks, branches and other large, heavy items. Removing these items will make the raking process easier.  Errr, a little patronising, but still sensible.

3  Start at one end of the area and work in small 3- to 4-foot sections at a time. Place the landscape rake with the teeth side against the ground. Really? Teeth downwards? Have I stumbled on Gardening For Complete Thickies, by any chance? This has to rate with "green side up" for laying turf...

4  Drag the rake slowly across the area in a straight line. You may have to drag the rake over the area multiple times until all the pine needles are removed. Continue raking the area to remove the pine needles. I am sniggering somewhat at the suggestion of having to do it multiple times, but to be honest, they are correct, and if you are addressing someone who really does know nothing about gardening - which would seem to be the case - then this does make sense.

5  Lift the landscape rake up and move it a few inches next to the area that you just finished raking. But, but, do I move it to the left, or to the right? *worried face*  (yes, I am joking)

6 Repeat Steps 3, 4 and 5 until you have raked the needles into a pile. "Repeat steps.." lovely, absolutely lovely. Then, to finish the job up properly:

7 Pick the needles up with your gloved hands and place them inside a trash bag. Dispose of the pine needles, place them in your compost pile or use them as mulch around your plants. 

Well, I don't know about you, but I would never put pine needles on a compost heap: for a start they are full of lignin and resin canals, and I imagine that they would take forever to break down.

However, the one reason that everyone knows - "it makes the compost too acid" looks as though it could be an urban myth. I've found several articles on the internet - like this blog entry - which indicate that  it's  not actually true.

Incidentally, I've done some research on this idea about using leylendii cuttings for ericaceous compost, and it is beginning to look like another urban myth.  I am now going to do my own research, using the garden of a client who has a number of very large conifers scattered around a large garden: so watch this space, I will publish the results as soon as I have them.

And in the meantime, if you don't believe me about raking pine needles, here you go, check it out for yourself!

Tuesday 1 May 2012

A barrow full of Mulberry

Oh, what a lucky gardener I am: in my care, I have two superb specimens of Mulberry - Morus nigra - which require regular attention.

Traditionally, the rule is that you don't prune Mulberry after about mid-February, otherwise they "bleed" sap for a long time afterwards, which can lead to infection and death.

However, this spring I have noticed with both of the Mulberries in my care that a really high proportion of branches are quite, quite dead.

It's easy to tell: at this time of the season, the buds are swelling and the twigs should be firm and plump. If the buds are shrivelled and brown, and the twigs look like fingers that have been in the bath too long, then they are dead, and should be removed.

Why remove the dead stuff? Usual RHS rules apply: we remove dead branches because they congest the tree unnecessarily, which can lead to disease: and, as always with Mulberry, there is a danger of dead branches breaking off, leaving rough wounds which, again, can allow disease to get in.

The additional, unofficial reason is "to allow your gardener to clamber around inside and under the canopy more easily, without being constantly poked by dead branches."

Yes, I really am Rachel the Selfish Gardener. Well, sometimes.

So, today I took my trusty bowsaw and my current secateurs into the breach (dear friends) and removed several barrows of dead wood. Here's one of them:


As you can see, some of these branches are so dead that they are black - some are green with moss and lichens; and some are white with fungal growth, yuck.

There were also a few bucketfuls of small twigs that were "nipped off" with the secateurs.

Result: cleaner, better-looking lower canopy, much more pleasant for working under - and there is yet more weeding to be done there - and best of all, as all this wood was already dead, no bleeding of wounds.


Did you enjoy this article? Did you find it useful? Would you like me to answer your own, personal, gardening question? Become a Patron - just click here - and support me! Or use the Donate button for a one-off donation. If just 10% of my visitors gave me a pound a month, I'd be able to spend a lot more time answering all the questions!!