Sunday 30 January 2022

There's nothing to do in winter, you say?

 People who don't have gardens often say that: "what do you DO with yourself in winter?" they ask, "when there's nothing to be done in the garden?"

*shakes head, sadly*

Ah, how little they know.

Among the long list of jobs which it IS possible - and often necessary - to do in winter, is the pruning of evergreen shrubs, which don't particularly mind being pruned in winter, and which we didn't get around to doing back in the summer...

Here's a nice little job, for a cold winter's day: my Client asked me to tidy up this Bay multi-stemmed shrub, because she didn't want it getting any taller.

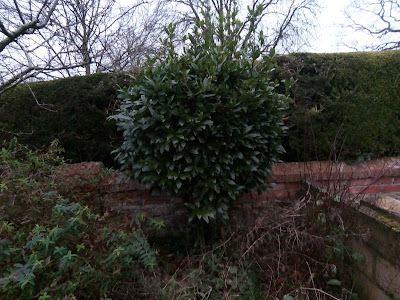
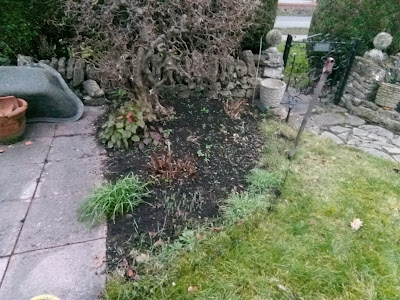
As you can see, it's throwing up long shoots at  the top, and what you probably can't see is that it's also putting up a lot of suckers from ground level, which are cluttering up the stems

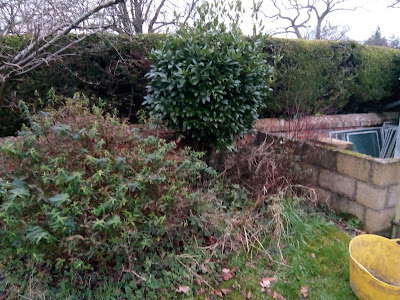
There are also a few weeds and things around the base of it: this bed has apparently been a little bit neglected this year, so it needs a bit of tidying.

First job, then, is to do the weeding: otherwise I'll be standing on them in order to do the Bay, which will make it harder to weed them out afterwards.

They turned out to include some quite well-established nettles which required a bit of digging to extract: and I spotted quite a bit of bindweed towards the back of the bed, but I decided I'd come back to that on another day - I didn't want to dig too much, otherwise I'd get very muddy, plus it would "fluff up" the soil nicely, only to have it trampled down and compressed by me walking around the Bay.

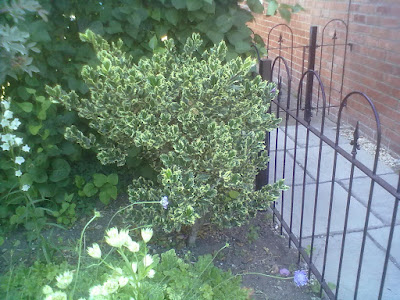
Once the weeds were done, I found that the shrub to the left - 

- a bulky and insignificant Hypericum (St John's Wort) - was getting in my way, and as it had no berries on it at all (highly unusual!) I gave it a quick all-round haircut.

I didn't bother with the usual one-in-three, because I could see - when I looked inside the bush - that it wasn't particularly congested inside, plus I could see where it had been cut the previous year, so I just trimmed it back lightly, and cut out some of the dead stems towards the centre.

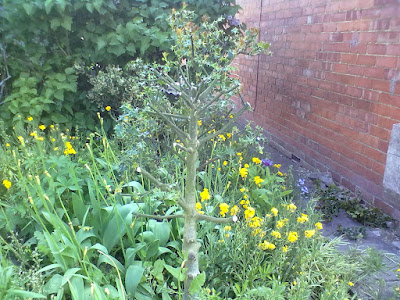
This allowed me to get to the Bay, at last.

First job - nip off those over-long shoots. 

Simple enough, just go round it step by step, leaning in and up, taking each long stem in turn, and cutting them off with secateurs, but don't leave a stub sticking out: push the secateurs down well inside the "outline" of the top section.

Once they were dealt with, I went down on hands and knees, and cut out all the root suckers and shoots which were springing up from ground level. There were plenty of them, some as high as my waist!

In a perfect world, "one" would spot these new ground level shoots when they were still buds, and rub them off: this prevents them from growing. Having to cut the rather stout shoots off at ground level is "pruning", which means that the cut ends will sprout again in spring, so I will have to keep an eye on this shrub.

Next job,  I checked inside the top section, and found a patch of dead leaves, so I tracked those stems back and cut out the dead sections altogether.

This, predictably, left a hole or void, so I pulled some of the other branches in, to fill the gap, and trimmed them as necessary.

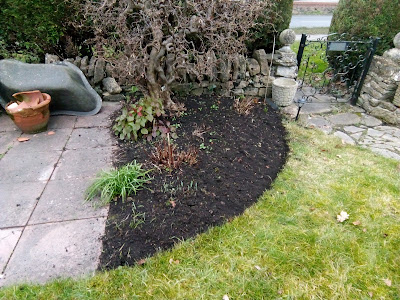
Nearly done: now it's time to stand back, and check the overall shape from all sides. Sure enough, I'd missed one of the top sprouts (every time!) so out that came, and then I felt that a couple of the lowest branches could do with a trim.

And there you go, all done.

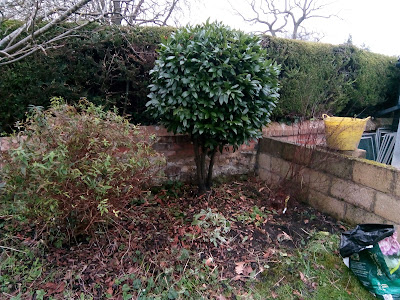
You will note that the top of the Bay is not laser-clipped to an artificial smoothness: with large-leaved shrubs such as Bay, I much prefer the "natural" shaping, where individual leaves are not clipped with shears - partly because those clipped leaves then go brown where they were cut, which I think is really ugly.

And partly because I think it looks more natural, this way.

Next time, I'll go along the front of the bed and tidy up the newly-revealed grass edge, which has deteriorated considerably, as you can see.

But for today, that was enough, and the Client was happy!


Did you enjoy this article? Did you find it useful? Would you like me to answer your own, personal, gardening question? Become a Patron - just click here - and support me! Or use the Donate button for a one-off donation. If just 10% of my visitors gave me a pound a month, I'd be able to spend a lot more time answering all the questions!!

Friday 28 January 2022

Edging a bed - it's the little things that make a difference

This bed has been annoying me for weeks: 

Just look a that horrible ragged edge!

So this week, I took out my border spade and re-cut a gently curved edge to it.

This took about two minutes: I did it by eye, but if you feel that you are not very good at judging curved lines, then you can use a length of hosepipe to mark out where you want the edge to be.

Hosepipe has the advantage of making a strong, gentle curve, so it's much better than, for example, string.

But I've done it so often that I can do it by eye: and once it's done, you can always tidy up the edge afterwards, if it's a wee bit ragged.

This bed was very easy to re-edge, because I could see where the edge of the lawn used to be. 

In some cases, you might have to make a decision as to where it "ought" to be: if you are not sure, then look at either end of the bed, and see if there are any features or edges which the lawn "ought" to line up with.

In this case, there were some slabs to the left, so I started the edge level with the edge of the slabs: and to the right, I made sure to leave a strip that was wide enough for the mower (the grass slopes down to the path, the angle is slightly deceptive), as there is nothing more annoying for whoever does the mowing, than to be faced with a tiny little bit of grass which is narrower than the mower.


Having cut the edge with the spade, all I had to do was hand-dig out the clumps of coarse non-lawn grass, odd weeds, and bits of moss that were the wrong side of the line, and hey presto!

Nice neat edge.

Suddenly the whole area looks kempt again. (As opposed to unkempt, of course.)

Doesn't that look better? 

Total time taken: ooh, say ten minutes. Improvement to that area? Immense!

So go on, get out there into your garden, and take a look around - there might be a similar job waiting to be done: small, but giving an instant result!


Did you enjoy this article? Did you find it useful? Would you like me to answer your own, personal, gardening question? Become a Patron - just click here - and support me! Or use the Donate button for a one-off donation. If just 10% of my visitors gave me a pound a month, I'd be able to spend a lot more time answering all the questions!!

Tuesday 25 January 2022

A novel torture device for the garden...

How's this for an unusual garden feature: 

...it looks like a medieval torture device for plant pots, doesn't it? Apparently these short towers of metal, with spiked rings, are vintage bottle drying racks, used in the wine industry, and probably French in origin.

However, they make perfect terracotta pot drying racks - or possibly, the biggest earwig-catcher I have ever seen.

“Earwig-catcher?” I hear you say, in confused tones. 

Yes, in case you haven't heard of that gardening trick, if you stuff a small plant-pot with straw or dead grass, then hang it upside down on a garden cane, pushed firmly into the ground, your earwig population will climb the cane and set up home in the straw, allowing you to dispose of them en masse from time to time.

I don't think this rack is being used to catch earwigs, but it certainly is a novel and decorative way to store small terracotta pots without them crushing each other.

And I suppose that if you wash out your pots, as we are all supposed to do, then it does indeed make a perfect drying rack for them.

Has anyone else come across something being, er, what's the trendy word, “upcycled” into use in the garden? 


Did you enjoy this article? Did you find it useful? Would you like me to answer your own, personal, gardening question? Become a Patron - just click here - and support me! Or use the Donate button for a one-off donation. If just 10% of my visitors gave me a pound a month, I'd be able to spend a lot more time answering all the questions!!

Saturday 22 January 2022

Lawns and Snow

Well, we've been lucky with the weather so far this winter, and personally I think we're going to get away without any snow this winter: but people keep asking me about damage to the lawn, so here are my comments. 

Firstly, some reassurance - your average lawn is completely unfazed by snow. 

Although to us, it looks like a thick blanket, and although we have all seen shrubs bent or broken by the weight of snow...

*points to my bamboo, left: normally it's up to the upstairs windows, but after a moderate snow fall, there it was, curtseying down to the ground...*


....but as far as the grass is concerned, it arrives in a gentle, even layer, snuggling down beside the upright blades of grass, and not actually harming them.

Light penetrates the snow easily, so the grass can continue to photosynthesise and is actually quite comfy and happy down there under the snow: you will notice that once the snow goes, the grass often looks more lush and green than it did before.

The problem arises when we tread on the snow.

Walking across a snow-field compresses it into ice: not nice clear, glass-like ice, but cloudy, murky ice, through which the sun can't penetrate. Worse, the pressure snaps the blades of grass, causing them irreparable damage. So when the snow goes, brown footprints remain.

This goes double for frost: a hard ground frost occurs when the dew freezes, so each blade of grass is also temporarily frozen, and treading on them shatters them, so you get those brown footprints afterwards. Not straight away, I should say - usually 2-3 days after thawing. 

There's a reason that golf courses implement what they call “Frost delay”, and don't allow members to play on frosty mornings!

So, whether it's frost or snow, what can we do about it? The kids are determined to make a snowman, the birds are looking desperate and you need to get to the bird feeders... but there are a few steps you can take.

1) On snowy days, don't let people trample about on the grass unless necessary. Let them enjoy it from inside, then drag them out to the local park to make snowmen and run about in it. Local parks keep their grass cut very much shorter than we do: they use a much harder-wearing grass seed mix than we use on our domestic lawns, and it can cope with the damage much better than our small lawns can. Furthermore, they usually have acres of grass, so a small amount of damage is easily lost in the sea of greenery.

2) If you have to have snowmen at home, don't let them sit there for days after the snow goes: as soon as the snow is fairly gone, break up what's left of them, to allow the grass underneath to recover sooner, rather than later.

3) When it's frosty, again, try to keep people off the grass as much as possible. Put in stepping stones across the lawn to get to the bird feeders, the shed, the greenhouse, or wherever you might need to go: this will also save the grass through the summer months.

And what if you just can't prevent it? Well, grass is remarkably resilient and will recover in time - usually, after two or three mowings, the guilt-inducing footprints will disappear. So if it happens, don't panic: keep calm, and carry on mowing! 


Did you enjoy this article? Did you find it useful? Would you like me to answer your own, personal, gardening question? Become a Patron - just click here - and support me! Or use the Donate button for a one-off donation. If just 10% of my visitors gave me a pound a month, I'd be able to spend a lot more time answering all the questions!!

Sunday 16 January 2022

“Make up your mind!”

“Make up your mind!” 

So said a Client, to me, one fine day back in summer.

Why? 

I'd been campaigning for two years or more to remove a stunted, ugly Holly bush which was permanently swamped by a Clematis, was routinely hacked back by the Client because it was overhanging the path, and which prickled me to death every time I tried to cut back the Clematis, or weed around it.

Finally, they agreed to let me remove the Holly, because the Clematis had died. (No, I didn't kill the Clematis, honest!) 

In order to dig out the dead Clematis, I removed all the holly stems up to 18” above the ground, to give me room to work, without being stabbed to death.

I then trimmed the remaining, top, stems, to just a few inches.

Again, so that I could work close to it, safely.

In case you're wondering why I didn't just cut it down to ground level, I always leave a stump, when working with trees, to make it easier for me to heave it out.

And in this case, I wanted to leave it looking at least halfway decent until I could finish the job, which would be at my next visit, so I cut it into a sort of Ultimate Hat-rack shape.


 A month later, this had happened:

 Yes! This brave little Holly had put out a lovely flush of new leaves on all those cut stems, and turned out to be rather prettily variegated. 

And suddenly, rather shapely!

So I suggested that maybe we should keep it now, for no other reason than the replacement Clematis would take quite some time to grow big enough to cover the fence again.

And that was what sparked the remark - “Make your mind up!”

Which led on to the thought that actually, in gardens, we do not have to Make Our Minds Up and stick to it.

We are allowed to change our plans as we go, as passing seasons alter the view, as different times of day or year reveal new vistas and combinations; as we grow tired of a particular plant, or as we change our ideas on what we like.

As an example of this, one of my Clients had, when I first went there, whole beds full of roses. Ten years in, she decided she didn't like the roses any more, so they all had to go, and we planted Hydrangeas instead. (I say “we” but you know I mean “I”....) For another five years we had lovely Hydrangeas, and then last year: guess what? Yes, she decided that there were too many of them, so most of them had to go, being replaced with.... some new roses!

Gardening is, in fact, all about change.

Which is rather lovely, don't you think? 


Did you enjoy this article? Did you find it useful? Would you like me to answer your own, personal, gardening question? Become a Patron - just click here - and support me! Or use the Donate button for a one-off donation. If just 10% of my visitors gave me a pound a month, I'd be able to spend a lot more time answering all the questions!!

Friday 14 January 2022

How to tidy up the garden: Deciduous Ferns

It doesn't feel like it, but we are well past midwinter (which occurred, technically, before Christmas) and that means that Spring is very nearly here.

Well, it means that Spring is just around the corner.

OK, maybe Spring is just a far-off concept at the moment, but that's no excuse to leave your garden looking messy, and in fact, it's quite nice to wrap up well, on a cold well-past-Midwinter's day, and get outside for twenty minutes or so.

At this time of year,  the Hellebores are just starting to come into their own, so it's time to get rid of the dying Fern fronds from last year. 

How to tell if they are deciduous ferns? If the leaves have gone black and horrible, or look as though they have been flattened by an elephant, then they're deciduous!

I'm always banging on about cutting back once, cutting back hard:  and this certainly applies to Ferns. 

Once you are certain that they are “over”, cut each frond back right to the very base, right to the knobbly brown bit: don't just grab a handful of fronds and hack them off several inches above the base - all that does is leave you with a tuft of untidy dying stems to catch wind-blown leaves, and to spoil the look of the bed. 

This - left - is what I mean: what's that all about? It's neither one thing nor the other. It looks a mess, and you are still going to have to go back in at some point, and cut off all those dead bits.

So do it properly, the first time!

And, what's more to the point, if you don't cut back hard, you won't be able to see the wonderful new curly fronds as they start to unfold in spring.

So cut back right to the base: they don't need to retain the old leaves for frost protection (unless you live in a very exposed and particularly frost-prone part of the country), and leaving the dead fronds in place might be a slight benefit for over-wintering insects, but is more likely to create Slug Hotels, and personally I have quite enough slugs and snails eating away at “my” gardens, without encouraging them!

You will often read phrases like “when you see new fronds emerging, you can clear away the old fronds...” but this is really bad advice: for a start, with the old fronds cluttering up the place, you can't easily see if your new fronds are emerging. And you will then find it really difficult to gently snip off the dead fronds without damaging the tender new ones, so it's better all round to do them once they are no longer attractive to look at. 

Here - left - is one of my enormous ferns, a very old and knobbly fellow: as you can see, some of the leaves are actually still quite green, but they are lying down instead of standing up like a shuttlecock, and this means that they need to be removed.


This photo - right - shows you how hard I cut them back.

You can see that the fronds are now all removed, revealing a large number of tight, tan-coloured knobbles which are this year's new fronds, just waiting to start unrolling. 

 (It also reveals a mass of moss which I then had to carefully tease out!)


 This one, left, is a much younger and smaller fern, and I stopped to take a photo halfway through the process.


I'm not quite sure why, but I never put dead ferns onto the compost - they always go on the bonfire heap. 


I think I worry about all those spores... and I suspect that fern fronds, like Hellebore leaves, are a bit too “tough” to make good compost. Although I'd be interested to hear your comments - do you compost your fern fronds?

In the meantime, all we have to do is wait for the first of those fabulous knobbles to start unwinding itself!


Did you enjoy this article?

Did you find it useful? Would you like me to answer your own, personal, gardening question? Become a Patron - just click here - and support me! Or use the Donate button for a one-off donation. If just 10% of my visitors gave me a pound a month, I'd be able to spend a lot more time answering all the questions!!

Wednesday 12 January 2022

Box Rust - not Blight! - How To Spot The Difference

We've all heard about Box Blight, which is ravaging across the land, ruining decorative clipped Box hedges left, right and centre:


This is a fairly typical example of a really bad infestation - left - which is going to result in the death of this stretch of hedge, and probably of most of the other Box hedging in the vicinity.

As you can see, it's horrible: the foliage dies off completely, leaving swathes of dead twigs. There's not a lot you can do, once it gets to this point, other than rip the whole lot out of the ground, and start again, preferably with something else.  (Because if you have Blight in the garden, then any new Box plants which you install will probably fall to the disease as well.)

But it's worth mentioning that there are more diseases than just Blight, and not all of them are as bad. 

Last year I was asked to look at a sickly hedge, whose owner had assumed was being ruined by Blight - she was panicking about having to rip out the wavy hedge that has taken years to clip to shape, just exactly how she wanted it. 

The leaves were going brown and blotchy, and she was convinced that the whole lot would have to go.

Rather than reaching for the axe, we took a very close look at the damage. 

At first sight, it did not look good.


As you can see, left, the hedge has a lot of light brown foliage, instead of being green all over.


... and a closer look shows the leaves to have round straw-coloured areas, which appear to be gradually spreading across the leaves. 

Nasty!

Turning to the underside of the leaves...


Urgh!

The underside of the leaves had lots of raised black pustules (“lovely!”) as well. 

However, now for the good news:

This is not Blight - this is Box Rust.

It is superficially similar to Box Blight, but very treatable: we sprayed the hedge with Bayer Fungus Fighter (there are other products out there, I'm not being paid by Bayer, honest!) and left the hedge for a month or so: I then clipped it as normal, taking great care to shake all the loose clippings - which were, of course, mostly the affected foliage - out of the plant, and to clean up the debris really well afterwards. 

The owner had one of those garden vacuum things, so we used that to do a really good job: and of course we didn't put any of the debris onto our compost - no, it all went onto the bonfire heap.

The hedge recovered and now looks superb - so if you find areas of brown foliage on your Box, don't panic too quickly: get a hand-lens or a magnifying glass and take a close look at the leaves, particularly on the undersides. 


Did you enjoy this article? Did you find it useful? Would you like me to answer your own, personal, gardening question? Become a Patron - just click here - and support me! Or use the Donate button for a one-off donation. If just 10% of my visitors gave me a pound a month, I'd be able to spend a lot more time answering all the questions!!

Monday 10 January 2022

How to: recognise Broom, Gorse and Whin


“That's not Broom, is it?” 

 ...said the visitor, 

“Broom isn't a climber, surely? It grows on heaths, doesn't it?”

Yes it does - but in certain circumstances, and with certain species, it can also grow on walls! 

The photo shows Pineapple Broom, proper name Cytisus battandieri (a name which always makes me think of Flamenco for some reason... or cake), which makes a good wall-trained shrub but needs to be in a sheltered area, as it is not fully hardy.

Isn't it lovely? I could see her confusion, though: a lot of people aren't sure about the difference between Broom and Gorse anyway, and she asked me to explain it to her.

Never one to miss an opportunity to discuss botany, I explained that when discussing Broom, we always have to start with the question:

Broom, Whin or Gorse?

All three are more-or-less evergreen shrubs, bearing yellow, pea-like flowers which explode when insects alight on them, thus pinging the pollen all over the hapless insect. They all grow in the wild (except for the above-mentioned tender Pineapple Broom) on disturbed soil, often at roadsides, on scrubby, dry heaths and on rough grasslands. So how do we tell the difference?

Let's start in reverse order, with Gorse, whose proper name is Ulex.

This is a bit close to Ilex, which is Holly.... and both of them are prickly!

Ulex - Gorse  - have no "normal" flat leaves at all, other than on very young plants: mature plants are covered in branching green spines, which provide photosynthesis and protection all in one. 

You can see in this photo, which is a close-up, that there is nothing but spiny pointed things. 

And you can see (hopefully!) that some of the spines have more spines upon them, and this is what is meant by "branching spines".


Next: Whin. "Whin" is one of those common names which is often used for all three of these plants. However, properly speaking, Whin means Genista.  


This photo - right - shows Genista anglica, or Petty Whin, which is the one you are most likely to find while out and about. The "petty" part refers to its size - as you can see, it's quite a small plant.

Genista have green leaves which are oval or oblong, along with a few simple (unbranched) spines. 

The leaves are sessile, which means stalk-less: they are attached directly to the stems, one by one. 

They have some spines - not that many, just enough to make them unpleasant to pick, and painful if you sit on them.  

The spines of Genista are brown, not green - and sometimes the spines have leaves growing on them.

Now we get to Broom: 

Broom's proper name is Cytisus, and they are completely free of spines.  

They grow as rather erect shrubs, with long green five-angled stems, on which the foliage is usually quite sparse, so you get an effect of green, but leafless, branches.

If you screw your eyes up a bit, you can just about imagine cutting a big handful of it, and using it to sweep the floor - at least, I assume that's why the common name is broom! 

The leaves, when they do appear, are stalked, and are what is called tri-foliate leaves - that means each leaf has usually three leaflets, rather like Clover - and they generally appear on younger stems. 

Older stems tend to be bare of leaves.


Like everything to do with botany and gardening, the confusion arises because we all use the common names, and we often use them wrongly. For example, the names gorse, furze and whin are all used interchangeably to mean gorse - which is Ulex. But officially, whin is Genista: it's a different genus, it has leaves, and few spines. And in Scotland, “broom” is Ulex (gorse - or whin, or furze) whereas actually Broom is Cytisus, which has very different leaves and no spines at all!

Still confused? It gets easier: Genista (Whin) likes limestone grasslands, which are alkaline in nature: whereas Gorse (Ulex) prefers acidic soil, such as heathlands. So, if you know what sort of underlying soil you have, you can make a guess as to whether you are looking at Gorse or Whin. And if has tri-foliate leaves, it's neither!

They all have very similar flowers, but flower at slightly different times. Both Broom (Cytisus) and Whin (Genista) flower in the early summer, from May to June. The two less common types of Gorse - Dwarf Gorse, Ulex minor and Western Gorse, Ulex gallii - flower later in the summer, from July to September. But common Gorse, Ulex europaeus, flowers pretty much all year round, if it's fairly mild. 

Which lead to a popular folk saying: ‘When gorse is out of blossom, kissing’s out of fashion’. It’s a knowing wink to the fact that, in milder areas, common gorse can flower all year round - so kissing never goes out of fashion. 

Which is nice!

To summarise, then: Gorse (Ulex) have complicated green spines, but no leaves. Whin (Genista) have simple brown spines, and leaves. Broom (Cytisus) have leaves, but no spines. There you go! Simple!

And finally, a quick word about Broom in popular culture: back in the 1800s, the Victorians were accustomed to using flowers to send secret, coded messages during a time when young ladies were not allowed to fraternise with young men (ah, how times have changed!), and liaisons had to be arranged discretely and modestly. Sending a Broom flower represented Humility and Neatness: presumably at that time, those were desirable qualities. Not so much, these days!


Did you enjoy this article? Did you find it useful? Did it make you laugh? No? Really? Not even at the kissing part? Oh well... *shakes head*  Back to the plot - Would you like me to answer your own, personal, gardening question? Become a Patron - just click here - and support me! Or use the Donate button for a one-off donation. If just 10% of my visitors gave me a pound a month, I'd be able to spend a lot more time answering all the questions!!


Saturday 8 January 2022

In praise of shingle. or: How To Avoid Mowing Grass

I love shingle in the garden: you can walk on it all year round without getting wet ankles, it looks great in the rain, it's not damaged by frost and snow, and it holds and reflects both heat and light from the sun, allowing us to grow plants which might struggle in heavy damp soil. 


It's ideal for very tiny gardens, like mine (left - taken in early summer) where a lawn would be more trouble than it is worth: and it's perfect for those odd corners close to the house, where maybe there is too much shade for grass to grow, or where you have to walk across it frequently. 

Sometimes a rather dark, dank and unlovely corner can be transformed into a Mediterranean style courtyard, especially if you can paint the surrounding brickwork in a warm colour.

And if you want a contemporary look, you can't beat a neat, hard-edged geometric shape of lawn, with a sweep of shingle all around it.

OK you can't easily walk on it in bare feet, but it's easy enough to include a few plain stepping stones at strategic points: in my own tiny back garden, as you can see in the previous photo, I have no lawn at all, just shingle, and in summer I do a sort of barefoot adult hop-scotch to get across to my bird feeder. 


You can see my stepping stones in this photo, right: I leap gracefully from one to the other, which gives endless amusement to Noisy, the cat - not my cat, by the way - who lounges on my decking in attitudes of exhaustion while I attend to the birds, for her entertainment.

Shingle does not mean not having any plants - far from it. 

Planting through the shingle is really easy, you just rake back a good wide area down to the membrane, then use a knife or old scissors to cut two slits in a cross, in the membrane. After loosening the soil, insert the plant through the slits, fold or trim back enough membrane to give it room to spread, then rake the shingle back in place. Instant perfection!

Virtually any clumping grass looks good when planted through shingle, and it lends itself to styling: add some rounded rocks and a couple of dwarf bamboo and you have the minimalist Japanese look: or fling in a large piece of driftwood and some airy Verbena bonariensis to create a mini-Jarman look (you know, that chap who created a garden on the shingle banks of Dungeness). 


In my garden, I have a row of bright red tulips along the back fence, which push their way through the shingle each year, round about April time: simple, but elegant, and gives me a splash of colour while I'm waiting for everything else along that fence to start growing.


It is a particularly good background for Black Mondo, Ophiopogon planiscapus 'Nigrescens' which is one of my favourite small plants, but which can easily be lost against the dark soil of a bed or border. 


Against shingle, it looks fantastic all year round, and even better when wetted and shiny.


And if you're not quite sure what sort of “look” you want, you can put the plants in pots, which has the huge advantage that you can move them around, to get the best dramatic effect, to change the colour combinations, or to give each pot a turn in the “best” spot.

Pots on shingle look very natural somehow: maybe it's the way you can scrunch them down into the depth of the shingle a little, so that they are part of it, rather than standing over it. Talking of being natural, it's far from being a barren desert: shingle is not like solid concrete or tarmac - it forms a matrix with thousands of tiny gaps, allowing air and water to mix, and allowing small invertebrates free passage. I am always amazed at how many worms I find in my shingle - and considering that my front yard has no lawn, no beds, no bare soil at all, just shingle and a concrete path, it is home to worms, common newts, great crested newts, several frogs (who eat the slugs), visiting hedgehogs, and even a grass snake. Not bad for such a tiny area!

And although you might think that laying shingle is cruelty to the soil, it's not: the rain permeates gently through the membrane, and whenever I change my mind and dig up a new area for a temporary bed, the soil is less compressed than you would think, and is full of worms and raring to go.

And best of all - no more grass to mow! 


Did you enjoy this article? Did you find it useful? Would you like me to answer your own, personal, gardening question? Become a Patron - just click here - and support me! Or use the Donate button for a one-off donation. If just 10% of my visitors gave me a pound a month, I'd be able to spend a lot more time answering all the questions!!