Thursday 28 November 2019

How to do topiary to Ceanothus

Topiary is not just for Yew and Box: there are many shrubs which can be clipped into decorative shapes, and they don't always have to be formal boxes or cones, or strange lumpy animals.


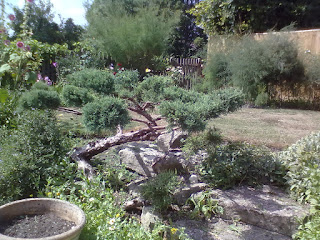
A few days ago I wrote about a Juniper which I've been patiently Cloud pruning for the past few years (left),  and today I'd like to share a different sort of shrub which I have been working on for a few years: this time it's a Ceonothus.

There are many types of Ceonothus, it's a wonderfully varied genus: most of them are evergreen, but some are deciduous: most of them have blue flowers, but you can get white or pink ones: some flower in spring, some in summer, some in autumn: some are small, some are taller, some - like the one I'm about to share with you - can grow into small trees, if they are supported and pruned when they are young.

This means that if you really, really like blue flowers, you could have them nearly all year round!

This particular one is semi-evergreen, which means that in a mild year, they will hold their leaves all through the winter. It was planted slap up against a fence, which gave it support and shelter, so by the time I got there, it had become quite a monster, pushing itself out over the grass, interfering with the rotary washing line and swamping everything below it.


 Here it is in May, flowering magnificently, but rather top heavy and in fact, one branch on the left had broken under its own weight, leaving a rather odd gap.

My original plan was to reduce it in two phases: this year I would chop off all the front-facing branches, leaving just a high canopy.

Then, when it had started to re-grow, I would chop off the top, leaving a chest-high bush, which would be much more manageable.
So, step one: remove all the front-facing branches.

Here we are - right - having revealed the trunk, which had not seen the light of day for several years.

To my surprise, it was rather shapely: one central trunk, soon branching into three quite nicely balanced branches.

After looking at it for a couple of weeks, I was getting to like it like this.

One day, the owner needed a dead tree removed, and I'd recommended Rob, who is my go-to-guy for all the jobs which are too big, or too heavy, for me to do, or which are going to generate a ton of waste, as he has a waste licence and a big trailer!  Rob duly turned up to have a look at the tree, and while he was there, he commented on this Ceonothus.

I explained that it was only phase one, but he said that he liked it as it was, and that I should consider leaving it.

As I had already decided that I liked it, I thought I would go with this suggestion!

So, I left it.

Over the summer, the trunk sprouted a lot of new growth, which I removed, to keep the trunk clear.


Here it is in Feb of the following year, and just see the shadows on the fence, which mean that the rest of the fence, and the bed below, are now getting the benefit of some sunlight.


Here it is in June of this year - flowering over (it was wonderful!) and looking a bit pale, so I gave it some general Growmore feed.

You can see a few bits of regrowth at the base, they had to be cleaned off, and I trimmed out a few of the dead sections in the upper canopy while I was there.

I had also noticed that the canopy was a bit unlevel  - the left-hand side was lower than the right, so I adjusted that.

You might also be able to see that now there are plants growing underneath it: some nice white Astrantia on the left, and some lush deep red hollyhocks on the right.

Those hollyhocks are actually a wee bit too tall to fit under the canopy (remember, I originally planned to remove the canopy and make it back into a bush), so they are going to be moved next year.


 And finally, here it is as of last week: it had sprouted a tangled mass of growth at the base, so all that had to be cleared away again, and now you can see how level the canopy is.

Everyone who visits the garden admires it, and now that the bed below it has recovered, I can think about what to plant underneath it, to extend the season of interest in this rather neglected corner of the garden.

For the time being I've moved a lot of Hollyhock seedlings in there, just to keep them safe until I can see if they will come true from their parent and be a beautiful dark red, or whether they'll come up in any-old-colour, which is always the issue with open pollinated hollyhock.

So there you have it, topiary is not just for Yew and Box!

Update: Here it is, flowering in May of this year:


Nice, eh?!


The Hollyhocks underneath came up well, although the original one on the far right was too tall, as I've mentioned above. 

So I will be moving the Hollyhock over the winter, and I'll be thinking about what else to underplant.

The border is still a bit "skinny" there, so I might widen it, maybe put in a nice curve, or maybe I'll keep the straight edge, but give it another foot or so, which will allow me more space for underplanting.


Did you enjoy this article? Did you find it useful? Would you like me to answer your own, personal, gardening question? Become a Patron - just click here - and support me! Or use the Donate button for a one-off donation. If just 10% of my visitors gave me a pound a month, I'd be able to spend a lot more time answering all the questions!!

Tuesday 26 November 2019

Paw prints in the brickwork - again!

Back in April 2015 I wrote about a brick I'd seen which had a pawprint in it.

Here it is, in case you can't be bothered to follow the link - two overlapping pawprints, probably from a cat or something with retractable claws, ie not a dog.

Well, today I received an email all the way from Minnesota  *waves vigorously in order to be seen that far* from Greg and Julie.

They have a house which was built in 1868 which, as they say, is  "old for this part of the country".

Not so much for us here in England, but for America, yes, that's pretty darned old!

They were doing some building work and found this;


How's that for a lovely old hand-made brick?

And how's that for a nice fat paw-print?

Again, it would appear to be something with retractable claws, so if I were shown this photo I would probably say "cat" but there may well be (or have been) other sorts of critters out there at that time,  with which I am not familiar.

Unless the person in the UK who made the "fake paw onna stick" for imprinting bricks also exported one to America...  *laughs*

If anyone else has photos of pawprints in bricks, do please send them in!


Wednesday 20 November 2019

How to: start a Cloud pruned Juniper from scratch

Warning - this article is not for the faint-hearted....*laughs*

Have you ever admired those complicated cloud-pruned conifers? You know the sort of thing...


They cost a lot of money (the above one is 2'/60cm high) because they take a long, long time to train and prune.

Here's another specimen:


Check out the price - ten thousand pounds!!!

OK it's 230cm high (I can't work that out in my head but it must be about 10' tall) but still, that is an awful lot of money.

Both of these are Bonsai, which means "grown in a pot".

What's that?  Are you raising your eyebrows at me, and saying "Actually, 'bonsai' means little tiny trees carefully trimmed to look like big trees, but in miniature. That's what 'bonsai' means."

No it doesn't.

"Bonsai" means "grown in a pot."

There is another word for "young trees carefully trained and trimmed to look like really, really ancient trees" and this word is niwaki. It can mean just "a tree which is growing in a garden, as opposed to a tree growing in the wild", but it can also mean something like "the essence of a tree", so a tree which has been trained and pruned in the niwaki style means that someone has dedicated several years, into the training and pruning, the "sculpting", if you like, of the tree.

I love topiary, as all my Clients/Trainees/Students,  past and present, know. (In fact, one local gardener once said that she always knew, when she went to a "new" garden, if I'd ever worked there, as there would be some piece of slightly unusual topiary... I suppose that's fame?)

And I love the niwaki style, although I rarely have the luxury of dedicating four or five years to one single specimen.

I've always wanted to have a go at creating one of  these cloud-layer trees, the ones with pads of foliage on long bare branches, and I got a chance, back in 2016.

This is how it happened... in one of my gardens, I found a rather nondescript, nothing-in-particular Juniper (type of Conifer) growing in a rockery.


 As you can see - left -  it had been somewhat swamped by the neighbouring Asters growing up through it.

(The Juniper is the greyish-green bit...)

So the first job was to dig out some of the Asters, to give it breathing space.


This left me with this - right - a rather ugly, scruffy, conifer with no style, no "form", no nothing really.

The only thing you could say about it, is that it's green all year round.

So I decided to give it a radical prune. The Client didn't care what I did to it, so I thought aha! Perfect! I'll have a go at niwaki, see if I can convert it to a cloud pruned form, and if it all goes horribly wrong, I'll dig it out and throw it away.


So I started removing branches.

This is the back view (yes! They have a pool!), and I worked my way in at ground level, removing all the stems which were growing horizontally, because they were too close to the ground.


One wheelbarrow full later....

At the front again, now I am starting to see the shape of the branches.

There are some fabulous ones, shooting off at all sorts of odd angles.

I particularly love that right-angle on the left!

Perfect!

*snip snip snip*


Another couple of barrow-loads of branches later, it was done....

... and this is what I ended up with.

Weird bare stems, at odd angles, with "pads" of foliage on the tips.


Here we are two years later, in August.

As you can see, the foliage is growing back nicely, and is making quite shapely, thick, pads.

All I did was continue to clip back the pads as they grew. Quite easy, really!

This - left - is what it looks like today, in 2019.

The pads are all thickening up nicely, and in fact I'm now looking at it and thinking that I could remove a couple of them.

When I first did it, I was a wee bit cowardy-custardy when it came to removing branches, and I didn't quite take enough off.

Next spring, I'll go over it again and remove a couple of the more congested ones.


Here's the view from underneath, as it were.

You can still see that original interesting angle of the main stem, and you can see how the branches are fairly close to horizontal.

Not quite as horizontal as they would be if I were training a tree in my own garden, as I would be using guy ropes, canes and weights to pull them down to absolutely horizontal.

But considering this is in someone else's garden,  and I'm only there once a week, it's not bad, eh?


And in case you are wondering, this was the inspiration for the project: a Japanese print belonging to the Client.

So there you have it: how to take an anonymous conifer blob and turn it - over a couple of years - into a thing of Japanese style and beauty!


Did you enjoy this article? Did you find it useful? Would you like me to answer your own, personal, gardening question? Become a Patron - just click here - and support me! Or use the Donate button for a one-off donation. If just 10% of my visitors gave me a pound a month, I'd be able to spend a lot more time answering all the questions!!

Thursday 14 November 2019

Asparagus - time for the autumn clearout

At last!

The Asparagus fronds are finally turning yellow so it's time to cut them back for the winter.

This is a job that rates as "easy peasy" and is very satisfying to do, especially on a cold grey morning when everything looks a bit sad and tatty...

First job, then: cut down the top growth.

Out with the secateurs, and off we go: cut each stem low down, just an inch or so above the soil. 

Here you can see that I've made a start, there's already a barrow-full of cuttings.

In my case I also had to remove the supporting strings around the foliage: this particular Asparagus bed is next to a path, and the foliage tends to flop, so I put some hooks in the fence behind, and run lines of string around the top growth to keep it well back off the path.

As these are all male plants, they don't have any seeds, so it's safe to put all the material straight onto the compost heap.

Cutting off the tops reveals the horrors of the weeds underneath - during the late summer,  it's impossible to weed between the close-packed stems, so I just leave it until autumn and deal with it all in one go.

So having removed the tops, I can then step into the bed to get all the weeds out. Now you can see why I leave an inch or so of the stems - so that I can see where the crowns are. This prevents me from damaging them by accidentally weeding too deeply or energetically around the crowns.

They are mostly annual weeds, but in this garden we also have bit of a problem with bindweed and ivy creeping over from next door.

The ivy is simple to deal with: any that comes over the top of the fence gets firmly pushed back onto their side, and any that tries to creep through the slats of the fence is gently pushed back through the slats, using my faithful daisy grubber.  It's important to stop ivy trying to sneak through fences, as once it gets through, the stems will fatten and eventually will break the fence.  But if you catch it while it's young, it's easy to just poke the new stems back to "their" side of the fence.

The bindweed, however, is a bit more of a problem, so I deal with it here by keeping a strip about 2' wide (60cms) bare at the base of the fence, to give me access during spring and early summer.

Here's what it looks like in June, when we have stopped cropping the Asparagus and are allowing it to grow out.

You can see my trampled area where I walk along, digging out or spraying any bindweed that I can find.

It's almost impossible to get rid of bindweed creeping through from next door: all you can do is keep on top of it, by removing or spraying every tiny shoot that dares to show itself.

Here, it's a particular nuisance because I can't dig it out if it gets into the Asparagus crowns, so it's essential to catch it while it is small, and this means I have to check every week.

If I'd been there when the neighbour replaced their fence, I would have asked them to add a couple of extra planks/gravel boards at the base of the fence, sinking them down about a foot (30cm) below ground level. This would have prevented their bindweed sneaking into "our" garden. Too late now! If it were my own garden, I would just do it: I would dig a trench on my side of the fence, at least a foot deep, and fix boards across, making sure that they either overlapped, or were fitted very close together, with no gaps.

Heyho!

Back to the plot: out come the annual weeds, and they all go on the compost heap: out comes a big bucketful of bindweed roots and shoots, and they go on the rubbish pile.  If you don't have a bonfire pile, they can go into your council green waste wheelie bin: it's ok to put them in there, as they get processed at high temperature which kills them. But never put them onto your compost heap, otherwise you'll end up with a compost heap full of bindweed....

And here we are, job done: weeds out, top growth cut back, all nice and clear ready for mulching.

Then I just leave it alone until next year, when we start to crop the asparagus again.

Easy peasy!


Did you enjoy this article? Did you find it useful? Would you like me to answer your own, personal, gardening question? Become a Patron - just click here - and support me! Or use the Donate button for a one-off donation. If just 10% of my visitors gave me a pound a month, I'd be able to spend a lot more time answering all the questions!!

Wednesday 6 November 2019

Putting teabags in the compost - no thank you!

I have had several people asking the same question recently - "Is it ok to compost tea bags?"

The answer is, I'm afraid, a resounding "No!"

"But my tea bags say they don't contain plastic and are compostable?"

They might say that on the box, but it's not accurate!

There are two aspects to this question: firstly, what is in the actual teabag, and secondly, what do we mean by compostable.

First question first, then.

1) Most tea bags are stuck together using glue which contains plastic. This is not biodegradable, and they should NOT be put on the compost.

There are some brands which claim to be plastic-free, but in most cases, this is not actually true: if you read the pack, you will see that the manufacturers are making teabags using what they call "bio-plastic".  This is a type of plastic made from plant material rather than from oil.

It is still plastic.

Side issue: all plastic is bio-degradable at some point: it just might take a long, long, long, time. Bio-plastic is far better at bio-degrading, but it is still NOT compostable. See question two.

2) "Compostable", to you and I, means "we can put it on our compost heaps at home".   This is not the same as "bio-degradable" which means "will rot if processed at a commercial facility with very high temperatures".

Normal tea bags, whether advertised as "plastic free" or otherwise, will  NOT rot on a domestic compost heap. Commercial facilities are much, much hotter than our little home-made heaps: they are carefully monitored and controlled to achieve the conditions needed to break down the contents. If you want to know a little about how it works, check out my article on commercial waste processing.

Properly speaking, "bio-degradable" should be the term we use for everything that will rot, but which needs commercial facilities to do so, and "compostable" means items which will rot in the small, cool, home composting bins - unfortunately, the terms "bio-degradable" and "compostable" are used interchangeably, and this is where the confusion stems from.

From personal experience I can assure you that tea bags do not rot, in a normal domestic compost bin set-up: when you empty out the bin a year or so later, there they are, still looking at you, along with all the egg shells (they DON'T rot!!), plastic labels and citrus peel.

Now, I did some research on so-called plastic-free tea bags and found this information, on the six best-selling brands of teabag:

Twinings: contain plastic. Some of the "tag" teabags are "plastic free" - they are made from a plant-based paper material that is folded and stitched with cotton.
How do you dispose of them? Normal ones = the bin. Tag ones - put them in the kitchen waste bin, to go to the council recycling facility.

PG Tips: contain plastic.  Its website states that it is moving towards "fully biodegradable teabags" and we know what that means.
How do you dispose of them? The bin.

Yorkshire Tea: contain plastic. They are moving towards "plastic free" which means bio-plastic. I have grave reservations about this
How do you dispose of them? Normal ones = the bin. When they go "plastic free" put them in the kitchen waste bin, to go to the council recycling facility.

Tetley: contain plastic.
How do you dispose of them? The bin.

Pukka: claims to be "plastic free" as they don't glue, they stitch them together.
How do you dispose of them? Put them in the kitchen waste bin, to go to the council recycling facility.

Clipper: This company rather sneakily describe their teabag as "plastic free", but the bags contain a "renewable, plant-based bio-polymer" - also known as a bio-plastic. It says it is exploring a number of green packaging initiatives, including improving recyclability and reducing packaging weight.. but for now, they do still contain plastic. Even if it's plant-based, it's still a plastic.
How do you dispose of them? Put them in the kitchen waste bin, to go to the council recycling facility.

 
And as a further incentive, to avoid putting tea bags on your domestic compost pen:  if you think about it, paper dissolves in water, and what do you do with a tea bag? Answer: dunk it in water. The paper is full of chemicals to prevent it dissolving, and do you really want to introduce a full range of chemicals to your compost heap? 


Did you enjoy this article? Did you find it useful? Would you like me to answer your own, personal, gardening question? Become a Patron - just click here - and support me! Or use the Donate button for a one-off donation. If just 10% of my visitors gave me a pound a month, I'd be able to spend a lot more time answering all the questions!!

How to Plant Bulbs - the easy way.

Now, ask any of my various Trainees, or students for that matter, and they will all tell you that I pour scorn upon most garden gadgets.

There is a lot to be said for using "right tool, right job", but against that you have to balance having to carry around a car stuffed full of tools, most of which are only used once in a blue moon.  So, rather than having a gadget for every job, I prefer to use the minimum number of tools, with as many as possible of them being multi-functional (just use the "search" facility at the top to see my views on the dear old Daisy Grubber!).

When it comes to gadgets, one of my least favourite is the bulb planter.

You know the thing:


The product description says:

"Make bulb planting more enjoyable! This product easily removes and ejects soil, allowing you to plant bulbs with ease. It has a comfortable grip, depth gauge and easy release handle."

The idea is to push it into the soil, pull out a plug of soil, pop in the bulb, then pop back the plug of soil.

Sounds simple, huh?

Firstly, this only works if your soil is as soft as sponge pudding mix. (Don't look at me like that: I spent 14 years working for a lady whose soil had been so well mulched every year that it was JUST like sponge pudding mix - and chocolate sponge at that. Wonderful.  *sigh*)

Secondly, it only works if there is no grass growing on top of it - or, to be accurate, if there is any grass, it has to have been cut super-short, otherwise the bottom end of the planter simply can't cut through the grass.

Thirdly, if the gadget does actually manage to cut through the grass and sink into the soil, the soil then needs to be sufficiently "claggy" to stay together in a plug, and not just tumble out in loose blobs all over the grass, your feet, the pack of bulbs etc.

Fourthly, if you've managed to achieve all that, you then have to get the plug of soil out of the gadget in order to replace it in the hole. Allegedly you "just" squeeze the sides of the handle and out it pops. Yeah, right. In my experience, soil which is "claggy" enough to stay in a plug, is therefore "sticky" enough to stay lodged inside the gadget, and has to be poked out with a stick or a Daisy Grubber, whereupon it would normally fall apart and be useless for plugging the hole.

And finally, this means you can only usually plant one bulb at a time.

(I am tempted to add that, just as you get the hang of using the wretched thing, it breaks, but that might be considered unnecessarily pessimistic.)

So how do I do it?  I take my small border spade, and use it thus:

1) Make a flap.

Dig one vertical slit, then another one at right angles.

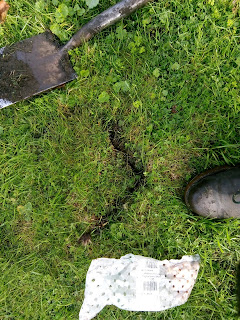
Lean the spade back from the vertical - that's what I'm doing here -  and push it under/across.

Rather as though you were lifting a particularly generous "turf".


2) Peel back the flap: don't cut it off, just fold it back.  It doesn't matter if the flap partially tears - just flap it out of the way.

If you are planting bigger bulbs and think the hole isn't deep enough, wiggle the spade blade around in the base of the hole to make it deeper.

3) Then sling in the bulbs. Here you can see I'm doing crocus, which are small, so I toss in a handful.

No, I don't set them carefully the right way up, I just toss them in. With bigger ones, I do normally try to get them right side up, unless there are hundreds and hundreds of them....  in which case they get shoved into the hole willy-nilly, a small handful at a time, and are left to make their own way up to the light. 

Don't worry, they all make it. Ask any professional gardener, and they will tell you tales of finding bulbs which had been planted on their sides - or even completely upside down! - but whose shoots had found their way to the top, and were flowering regardless.

4)  Fold the flap back to cover them, press down well with the foot.

I tend to stomp quite heavily, this helps to prevent squirrels and other rodents from digging up the bulbs and eating them.


5) Move a short distance away, and repeat.


That's it. Quick, simple, easy, not as backbreaking as doing them individually, works equally well on big bulbs such as species Daffs, and on tiny ones such as Crocus.


I find that this technique leaves a series of "pointy brackets" on the lawn, which are easy to see while you are doing it - this makes it easier when planting out the rest of the bulbs, as you can see where you've been.

But after a couple of days, the slits disappear completely.

I always use this technique for small bulbs, as they are ludicrously tedious to plant individually - plus it produces natural-looking clumps, rather than individual soldiers on display.

And I also use it for larger bulbs, again, to get a more natural grouping effect, with three or more bulbs in each pointy-bracket patch.

It works particularly well if you have a fellow gardener, or an interested Garden Owner, on hand, so that one of you does the spade work, the other pops the bulbs in place, as that saves having to keep letting go of the spade, then picking it up again. I'm all in favour of efficiency!

If I have only a few to plant, I used the same technique but with my hand-trowel: make a vertical slit, make another slit at a right angle, lever up the flap, push in the bulb, press down well.

All of which is a great deal easier and simpler than faffing about with the gadget!


Did you enjoy this article? Did you find it useful? Would you like me to answer your own, personal, gardening question? Become a Patron - just click here - and support me! Or use the Donate button for a one-off donation. If just 10% of my visitors gave me a pound a month, I'd be able to spend a lot more time answering all the questions!!

Monday 4 November 2019

November: time to start feeding the birds

There was a poem I did once at school, it had a line about “No sun...no moon... no morn... no noon...”  and it ended "der dum, der dum, der dum, November."

Clearly I've forgotten most of it, including who wrote it  (errr, Thomas Hood: thank heavens for the internet!) but I'm pretty sure it doesn't have a line about “no worms, no seeds... no bugs on which to feed...” but that's probably what the birds are thinking.

As the days (and nights!) get colder, life gets harder for our feathered friends, and you might well be thinking that it's time to start feeding them. If you haven't put out bird-food in the past, maybe this year is the time to start: the news is full of stories about how wildlife is suffering in our modern, tarmac-and-concrete world, how the loss of green space is adversely affecting their lifestyles, etc, so if you've never fed the birds before, now is a good time to start.  And there are a couple of things about bird psychology which are helpful to know, if you've never done it before.

First and foremost, they want to feel safe. For birds, this means scouting out the area before landing - and that means having high perches, which are a safe distance away from the feeder. Trees are perfect, either in your garden or in that of your neighbour.

Secondly, once one comes, they all come. No-one likes to be first... so if you can lure just one bird into your garden, he will soon be followed by others.

Thirdly, birds are not very bright. It often takes them a long time to realise that you are putting food out for them.

Fourthly, different birds eat different food, and in different ways.

Fifthly (if there is such a word) birds are creatures of habit. They have “rounds”, and will circulate from one favoured feeding area to another. You'd think that, having found a bird feeder full of yummy food, they would stuff themselves until they could barely fly, but actually, it doesn't work that way: they like to have a variety of places to feed, and they like to eat a little at each place.

So, how does this relate to the real world, and our real gardens?

Firstly, feeling safe: look at your garden and check for high level scouting positions.  Do you have trees? They are best, but posts will do, and that includes the washing line. Birds love fences with trellis on top of them, which are also quite good for discouraging cats from jumping into your garden -  or, at least, it makes them scramble through the trellis, which gives the birds a bit of warning.

Secondly, luring in the first bird: try putting out a little bread, for a few days.  It's the worst thing to feed birds (where would they find processed food in nature?), but it is very visible, and it certainly attracts the “wrong” ones such as pigeons, and they, in turn, will signal to other birds that this is a feeding area. At first you might only get a few odd birds coming to your feeders, but in a while, the numbers will increase, so be patient.

Thirdly, getting their attention: when you proudly hang out your first bird feeders, don't fill them. Leave them out there, empty for a couple of days. I know, I know, it seems daft, but read on. Then put a small amount of food in them, and be prepared to replace it if it's not eaten in a week. As I said, it takes them a while to notice the new feed station, and there's nothing more depressing than buying six different types of seed, nut, suet and fat ball feeders, then finding them untouched and mouldy after a month. Also - and this is only my opinion - I think that birds are repelled by the chemical smells of a new feeder, so letting them “air” for a couple of weeks gives them time to lose that factory smell.

Fourthly, decide which type of bird you want to attract: if you want finches, you will need a tall narrow seed-feeder, for example, and they like it hung high up. Dunnocks won't fly up to a bird feeder at all, and only eat from ground level. Tits of all types are agile and enjoy hanging off a fat ball or a half-coconut, but robins prefer something they can grip with their feet, such as a wire cage with loose fat balls inside it.

And fifthly (still not sure if that's a real word), once you start - keep on going. Regularity is what the birds want more than anything else, and once you have trained them to come to your feeders, you will need to keep up the good work. In my garden, I always refill my feeders first thing, then I sit and eat my breakfast while looking out at the garden. "My" birds have learned to come early, to beat the pigeons, so I get the benefit of watching them while stuffing in the porridge, and they get first peck, instead of just getting the leftovers.

Finally, a quick word about hygiene - yes, I know every article on this subject says it, but it really is best to keep feeders clean, with fresh food in them. To make this easy, I have two sets of hanging feeders so that every other week or so, I can bring in the empty one for a scrub, putting out the other one instead. This gives the feeders time to be properly cleaned and dried, while maintaining the “service” in my garden.
And yes, I have the joy of a constant stream of feathered visitors!


Did you enjoy this article? Did you find it useful? Would you like me to answer your own, personal, gardening question? Become a Patron - just click here - and support me! Or use the Donate button for a one-off donation. If just 10% of my visitors gave me a pound a month, I'd be able to spend a lot more time answering all the questions!!

Saturday 2 November 2019

How to prune Contorted Hazel - Corylus avellana 'Contorta'

"Contorted Hazel?" I hear you say, "that doesn't sound very nice?"

Well, it's not my favourite, but it's very popular: it's a species of Hazel, Corylus, but with twisted leaves and branches, hence the name.


And when I say "twisted", I do mean twisted!

The other common name is Corkscrew Hazel, and you can see why it got this name.


The branches grow in a strange, lumpy, looping fashion, leading to spectacular gnarled old branches and a wonderful silhouette in winter.

When they are small, they are adorable, and here's a photo of a typical small one, in a pot, making a statement and giving some style to someone's garden.

Planting them in a pot keeps them small, and manageable: in fact, did you know that "Bonsai"  does not mean "pruned to look like a miniature of the full-size thing" it actually means "grown in a pot" so all of us with anything in pots, grow Bonsai plants!

But if they outgrow the pot and you plant them in the garden, they will - slowly - grow into a proper tree-sized tree:

And here's a fairly typical example of a "full-sized" contorted Hazel, and as you can see, it's not quite as stylish as when it was small.

So why do I say that this is not my favourite small tree?

Ans, because the leaves are also contorted, and I always think that they look limp and diseased.

Personally I prefer the contorted Willow, proper name Salix matsudana ‘Tortusa’, sometimes called Salix babylonica 'Tortuosa', sometimes called Salix babylonica var. pekinensis 'Tortuosa'. Whatever you call it, Curly Willow has elegantly contorted stems, but the leaves are long and narrow, and quite normal-looking.

There's another reason why I prefer the willow, and that's because Corkscrew Hazel is extremely difficult to propagate, so most of the ones you find for sale (and in peoples' gardens) are grafted.

And this leads on to the subject of this article, pruning them.

The main part of the tree doesn't "need" any pruning at all, unless it outgrows the space, or unless a branch is accidentally damaged.

But all grafted plants - trees, roses, anything - have an annoying tendency to throw up shoots or suckers from below the graft union, ie not from the "pretty" part which we paid a lot of money for, but from the "unpretty but vigorous" rootstock.

In the case of contorted Hazel, the upper part is wonderfully contorted, but the rootstock will be plain old normal Hazel, dead straight and super-vigorous.

So it's vital to keep checking them, and removing any of these dead straight shoots as soon as they appear.  If you don't, you end up with a curly tree, half of which is straight: and as the straight wood is more vigorous, in a couple of years it will take over, choking out the contorted stems, and ruining the whole thing.

So, last week I was asked to sort one out, and the garden owner kindly said I could take photos throughout the process.


 Here we are at the beginning: quite a large Contorted Hazel, and it doesn't look particularly bad, just a bit unbalanced, and a bit congested lower down.

Ah, but take a closer look....

Here at the base, you can see a whole mass of straight, upright shoots.

These are the ones from the rootstock, they are not curly, nor will they ever become curly.

So I go in on hands and knees, armed with a pruning saw, and cut out those stems as low to the ground as I can.

In a perfect world, the owner (or their regular gardener) would have checked this plant every couple of weeks, and would have rubbed out any buds or shoots from this low down on the plant. Still, it's not quite a perfect world, and at least it keeps me in work!

Here we are, half done: you can see that to the left, the trunk is clear, whereas to the right, it is closely surrounded by a mass of straight, upright shoots.

It's tricky to do this without damaging the main trunk, not to mention having to be scrumpled up under the tree, trying not to trample on the surrounding plants, and being stabbed by other branches while trying to concentrate.

Heyho!  The life of a Gardener!

Here's something else to look out for: as I worked my way around the trunk, I found one new stem which was not from the rootstock, but was a genuine curly one.

Can you see the one I mean? It starts close to the trunk and moves diagonally outward, behind the straight one.

These curly stems can be left uncut, as they are replacement branches - unless they spoil the look of the trunk.  In this case I left the curly stem until the very end, then decided it was out of proportion to everything else, so I went back in and cut it off.


Here's a shot of the mass of cut stems: this tree has clearly been a bit neglected for several years, which is why there are so many of them.

Additionally, I can see that earlier gardeners have merely chopped off the well-grown straight stems, having not spotted them when they were tiny.

Unfortunately, cutting biggish stems just leads to the cut stems re-growing. This is what will happen with these ones, but hopefully now the garden owner knows that they should check around the base of the tree maybe once a month, and should rub off any and all new growth from any of these cuts. That will prevent them re-growing.


Here's the finished article: all those untidy jangly straight stems are gone, and now we can see the main curly trunk it all its beauty.
These are some of the bits which I removed - this shows how long and vigorous the shoots were!

All this straight growth (taller than me!) was hidden among the curly foliage throughout the summer, and thereby lies the danger - it's hard to see, so the owner tends not to realise that there is a problem.

Until it's too late..... ha ha, it's never too late, you can always retrieve them. 

And here's a closer look at the ends - you can see how I have made just one cut, but each one which I cut has several stems sprouting out from it.

This is the sign that previous gardeners have left it too late to rub off new growth, and have had to saw it off.

It also shows that I am far more diligent than any of them, as I have managed to cut the stems much lower to the ground, which leaves a more pleasing appearance, rather than having a ring of sticky-up chopped-off sprouts around the base of the tree. *smug mode engaged*


And here's the final thing, all the unwanted straight growth has been carefully removed, and maybe just one or two of the upper, curly, branches have been tidied up, to make a better shape, or to enhance the appearance.

So there you have it - how to keep a Contorted or Corkscrew Hazel safely under control: check it regularly for new growth from the base, and either rub the new buds off, pull off the shoots if they are small enough, or if not, cut them off as low to the ground as you can.

Simple!


Did you enjoy this article? Did you find it useful? Would you like me to answer your own, personal, gardening question? Become a Patron - just click here - and support me! Or use the Donate button for a one-off donation. If just 10% of my visitors gave me a pound a month, I'd be able to spend a lot more time answering all the questions!!