Showing posts with label Willow. Show all posts

Monday, 12 April 2021

How to: plant a potted plant, into the ground

 How's that for a complicated title?

I had a question this morning, from Ovez:  "Is it possible to plant the Kilmarnock in the ground still in a pot"?

There are two questions, here, and I'm not sure which one Ovez is asking, so I'll answer both of them.

1) If you buy a Salix Kilmarnock in a pot, is it possible to plant it in the ground?

Yes.

All you have to do is dig a suitable hole, take it out of the plastic pot, and plant it in the ground. Water well, keep an eye on it for the first year, and it should be fine. No, it won't get any taller: it's a grafted tree, as per the explanations in my various posts about Salix Kilmarnock. (Or just type "Kilmarnock" into the search box, top left.) So it will get stouter, over the years, but it won't get taller.

However: and it's a big "however" - it is essential to keep checking the tree to ensure that it hasn't reverted (again, check my previous articles for details on this) otherwise you will end up with a massive Grey Willow tree, taking over your garden and sending roots all over the place. 

If you take care to always rub off any buds, leaves, or signs of growth from below the graft, then planting out a Salix Kilmarnock shouldn't cause any problems with roots etc, but with willows, it's always better to be safe than sorry, so have a care about where you plant it: not too close to the house, not too close to any underground drains, etc.

2) Can you sink a potted plant into the ground, still in the pot?

 This might sound like a daft question, but actually, there is a long history of putting plants in pots into the ground. It's known as "plunging" and it does have a few benefits.

The idea is to take the plant in its plastic pot: then sink the whole thing into the ground, still in the plastic pot. 

Why? Well, it gives the roots protection from extremes of cold, and of heat. It can give stability to a rather top-heavy plant, where the top growth is out of proportion to the roots: it can allow you to give a bed or border a very mature look, instantly, but allows you to move the plants around, if you don't like the arrangement: particularly if  you spread a decorative mulch over the surface, so you can't see the rims of the pots.

It works well for tender plants, that can't stay out all winter, because it's easy to heave them out at the end of summer. And it means you can change your arrangement quickly, if  you need to: for something like a wedding or a garden party, you can plonk a lot of mature plants in pots into the beds, to get the effect you want, then later on, they can be pulled out and either returned (if hired), sold, or planted elsewhere.

Another aspect of this strategy, is to leave the plastic pot in place in order to contain the roots, to stop the plant or tree from spreading: there are two main reasons for this, the first is to stop the spread of rampant plants such as Mint, or Bamboo: the second is to keep the plant small, to bonsai it. ("Bonsai" means "grown in a pot", by the way, it doesn't actually mean "tortured to look like a miniature version of the proper thing")

So it's possible that Ovez is thinking that by leaving his Kilmarnock in the pot before planting it, it won't grow too much.

Well, Ovez is partly right: but in my experience, most trees will bust their way out of the pot, by sending down roots through the drainage holes, then enlarging those roots until they destroy the bottom of the pot. And once they have their roots free, they are off! See this article, about a Bay Tree, for details of a full-sized tree which has escaped from the pot in which it was planted....

And in the case of a Salix Kilmarnock, it won't get any "bigger", ie taller, anyway, so it probably does not need to be restrained in this manner.


Did you enjoy this article? Did you find it useful? Would you like me to answer your own, personal, gardening question? Become a Patron - just click here - and support me! Or use the Donate button for a one-off donation. If just 10% of my visitors gave me a pound a month, I'd be able to spend a lot more time answering all the questions!!

Sunday, 16 August 2020

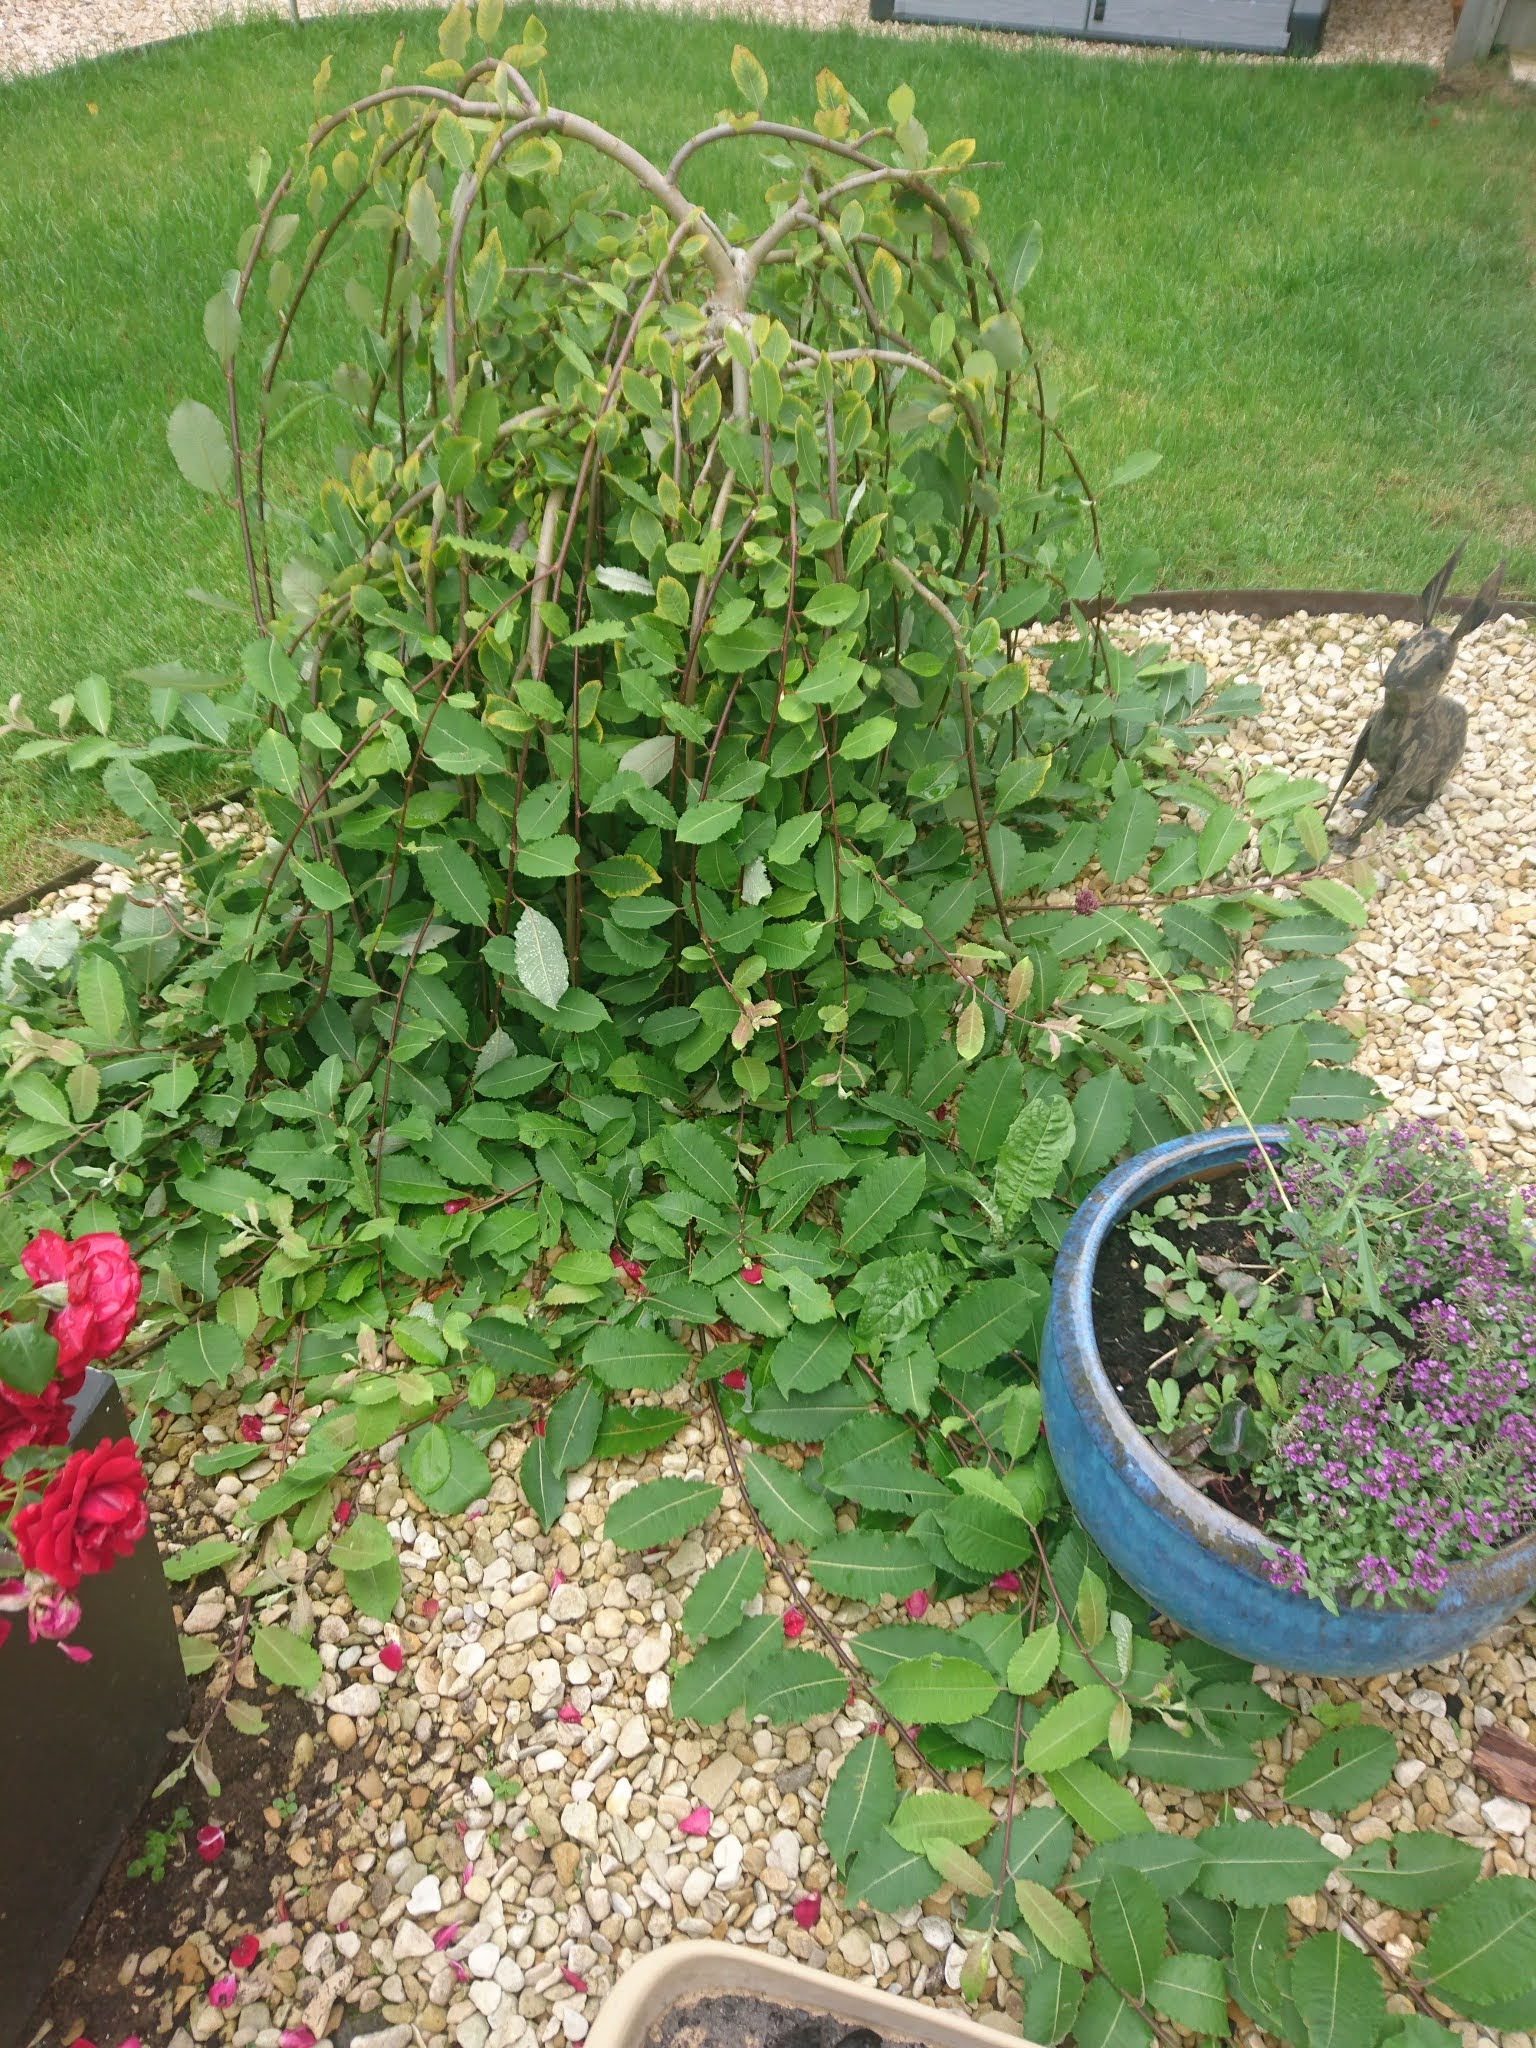
Another Salix Kilmarnock is making a break for freedom!

A short while ago, Helen ("Hi, Helen!") commented on an earlier post about a pair of Salix Kilmarnock miniatures, which were missing their catkins, saying that on hers, the branches have gone a little wild and are trailing several feet along the ground. 

She asked if it is ok to lop a lot of that growth off now - in high summer - as she's concerned about accidentally killing something which is otherwise thriving.

Helen then sent me a picture of her tree:  

What a dear little thing! 

Helen is not alone, we've seen this before, where these dwarf versions have turned into muppet-like crawling creatures, attempting to take over the bed and possibly the entire garden.

I can't do better, really, than to point Helen, and anyone else with the same problem, to my earlier article about How To Recapture a Runaway, where I describe in detail how to tackle the pruning of this sort of creature, and suggest a couple of ways of improving it.

In a nutshell, yes, you can trim off those lower branches to stop them trailing across the ground. 

There are ways to do it which will leave a more natural-looking tree - see the above articles for details - because if you just take the scissors to it, you'll end up with a "pudding bowl" haircut, which always looks ridiculous.

So there you go, Helen - yes, you can trim off those trailing branches, and yes, you can do it at this time of year.

Hope that helps!


Did you enjoy this article? Did you find it useful? Would you like me to answer your own, personal, gardening question? Become a Patron - just click here - and support me! Or use the Donate button for a one-off donation. If just 10% of my visitors gave me a pound a month, I'd be able to spend a lot more time answering all the questions!!

Saturday, 1 August 2020

Salix 'Kilmarnock' yet again - The Case of the Missing Catkins!

I had a question in from Amol the other day ("Hi, Amol!"),  asking about two ornamental Kilmarnock willows which were bought together, earlier this year: one of them is growing much faster than the other, and they are not producing catkins.

Here's a picture of the pair of them:


Right, first comments: I love the stout planter-boxes! Excellently chunky.

Second comment: good staking! Short stakes, good angle, rubber ties. I can't see how well the ties have been fitted, but let's assume they are done properly.

To answer the two questions:

Firstly,  I see what you mean about them not looking similar any more. One is definitely doing better than the other  But that's ok, there's no problem, they are both definitely Kilmarnock, because they are both weeping. If one was something different, or had reverted, it would be growing upwards, instead of growing downwards.

They are both growing downwards beautifully.

So I wouldn't worry too much about that: it looks as though one of them is forging ahead, while the other is lagging behind, and this could be for many reasons: it's possible that they were not from the same "batch", so one is older than the other and therefore more mature.

They could have been supplied to the sales outlet by two different nurseries, and could therefore have been in different growing conditions before they were sold. 

It's also possible that one gets more light/water than the other,  even though they are in the same garden.

And even though they appear to be planted in identical planters, which were presumably built and filled at the same time, the soil/compost within the two boxes might not be the same (bought-in compost/topsoil/organic matter is very variable, even from one bag to the next, regarding the amount of nutrients it contains), and the ground underneath the planters might be different - one might drain more readily than the other.

To remedy this, Amol could give the poorer one a light dose of general-purpose plant food, such as Growmore, or Fish, blood and bone, or a small handful of slow-release fertiliser. Scatter it on the top of the soil, not too close to the trunk, and gently "scratch" it in to the surface of the soil.

Secondly, catkins, or lack of.

There are several aspects of this: first and most obvious is watering. Willows love water, they need it, it makes them grow lush.  So check the irrigation, or check your watering regime: go out there now, and take a small hand tool such as a trowel, go to one of the corners of one of the planters (so as not to damage the roots), push the trowel in vertically, then lean it over sideways, and look at the cross section of soil which this reveals. Does the loose soil immediately fall into the hole? It's very dry, water it more. Can you see a dark line of damp soil  just half an inch or so down from the surface? You are not watering enough, give them more. Is the soil uniformly dark and damp all the way down? Well done, you are watering perfectly.

On the subject of watering, if you're not quite sure about it, I've published a set of four articles on the subject, this is the first one, and it contains links to the other three. Read and learn.

Next is sun: willows need a fair amount of sunshine in order to flower, and the catkins are the flowers. These ones look as though they have plenty of space around them, they don't appear to be overshadowed, so they are probably not suffering lack of light.

And then there is physical damage: birds sometimes get a strange urge to pick the buds off the trees, early in the year. Allegedly, this behaviour is provoked by lack of food, but having observed the little birdies in my own garden, my personal opinion is that sometimes they just do it for mischief. Anyway, there is a possibility that birds - bullfinches and sparrows are the usual culprits - might have damaged the buds as they were forming.

It is just about possible that if "one" had pruned "one's" willows at the wrong time, ie very late last year, then "one" might have accidentally eliminated this year's crop of catkins:  but that's certainly not the case here.

That leaves us with the final and most likely answer: it's mid summer now, and the catkins appear very early in the year. They won't have catkins now, not until next spring. It is even possible that back in March, they had finished their show of catkins for the year, so the answer to that question is to be patient, Amol, and wait for next spring.

Before I go, I would just say that the "better" one of the two could do with a light prune: I wouldn't let the branches sweep down onto the soil, for many reasons, all of which have been covered in the several earlier posts about this plant. Just type the word 'Kilmarnock' into the search box - top left of the screen - to read more about pruning them.

And for that matter, the other one could also do with a bit of tidying, it's quite cluttered at the top: in fact, both of them are a bit dense and if there were mine, I would thin them out, just a bit, at the top. Again, check this article, and this one,  for pruning a Kilmarnock willow.

Oh, and don't forget to check on them at least a couple of times a year, to make sure that the tree ties are still fitting correctly - adjust them if they are too tight, too loose, or are slipping out of place.

There, hope that helps!


If your willow branches remain bare until the tree leafs out, you’ll be wondering how to get catkins on pussy willow. The first thing to check is irrigation. Willows love water and grow well near rivers and streams. Those planted elsewhere need plenty of irrigation to thrive. If you have been letting your willows deal with drought on their own, or have simply forgotten to irrigate during a dry spell, the trees may be water stressed. If there are no catkins on pussy willow trees, be sure the trees are getting enough water. Is your pussy willow not flowering because it isn’t getting enough sunshine? It might be. Willows need sun and may not flower if they are in deep shade. Birds love to eat the catkins before they open, especially bullfinches. If it has been a hard winter for birds, it is possible they munched all the pussy willow catkins during the winter. It’s also possible that, by pruning at the wrong time, you eliminated this year’s pussy willow crop. Prune your willow just after the catkins begin to fade.

Read more at Gardening Know How: Pussy Willow Catkins: How To Get Catkins On Pussy Willows https://www.gardeningknowhow.com/ornamental/shrubs/pussy-willow/get-catkins-on-pussy-willows.htm
If your willow branches remain bare until the tree leafs out, you’ll be wondering how to get catkins on pussy willow. The first thing to check is irrigation. Willows love water and grow well near rivers and streams. Those planted elsewhere need plenty of irrigation to thrive. If you have been letting your willows deal with drought on their own, or have simply forgotten to irrigate during a dry spell, the trees may be water stressed. If there are no catkins on pussy willow trees, be sure the trees are getting enough water. Is your pussy willow not flowering because it isn’t getting enough sunshine? It might be. Willows need sun and may not flower if they are in deep shade. Birds love to eat the catkins before they open, especially bullfinches. If it has been a hard winter for birds, it is possible they munched all the pussy willow catkins during the winter. It’s also possible that, by pruning at the wrong time, you eliminated this year’s pussy willow crop. Prune your willow just after the catkins begin to fade.

Read more at Gardening Know How: Pussy Willow Catkins: How To Get Catkins On Pussy Willows https://www.gardeningknowhow.com/ornamental/shrubs/pussy-willow/get-catkins-on-pussy-willows.htm
If your willow branches remain bare until the tree leafs out, you’ll be wondering how to get catkins on pussy willow. The first thing to check is irrigation. Willows love water and grow well near rivers and streams. Those planted elsewhere need plenty of irrigation to thrive. If you have been letting your willows deal with drought on their own, or have simply forgotten to irrigate during a dry spell, the trees may be water stressed. If there are no catkins on pussy willow trees, be sure the trees are getting enough water. Is your pussy willow not flowering because it isn’t getting enough sunshine? It might be. Willows need sun and may not flower if they are in deep shade. Birds love to eat the catkins before they open, especially bullfinches. If it has been a hard winter for birds, it is possible they munched all the pussy willow catkins during the winter. It’s also possible that, by pruning at the wrong time, you eliminated this year’s pussy willow crop. Prune your willow just after the catkins begin to fade.

Read more at Gardening Know How: Pussy Willow Catkins: How To Get Catkins On Pussy Willows https://www.gardeningknowhow.com/ornamental/shrubs/pussy-willow/get-catkins-on-pussy-willows.htm
Did you enjoy this article? Did you find it useful? Would you like me to answer your own, personal, gardening question? Become a Patron - just click here - and support me! Or use the Donate button for a one-off donation. If just 10% of my visitors gave me a pound a month, I'd be able to spend a lot more time answering all the questions!!

Friday, 3 July 2020

Salix Kilmarnock - pruning and rusty leaves!

I've just had an email from Lisa (*waves enthusiastically*), who recently planted two very nice Salix Kilmarnock trees, and had a couple of questions about annual pruning, and rusty leaves.

Here's a photo of one of them:

Lisa says that when she bought them, they came with instructions to prune the branches down to 15cm (errr, errr, 30cm is a foot, so that'll be 6" in real life) just after the catkins have fallen, which would presumably be in late spring.

She didn't do so, and is worried that she's left it too late, so what should she do?

My advice is to leave them this year - they look fantastic, perfectly demonstrating the "light airy waterfall" which all Salix Kilmarnock owners should be aiming for.

I personally think that pruning it all back to 6" is a bit harsh, but willows are very fast growing, and if Lisa had chopped this one back as instructed in about April or early May, it would probably be very nearly back to this stage by now.

The idea behind the hard prune is to keep the tree airy and uncluttered: left to their own devices, these sweet little grafted trees do tend to morph into massive leafy bushes, lacking both shape and style, so a firm hand is often required.

If it were mine, I'd leave it for this year, but next year I would prune probably about half of the branches down to the suggested 6". And when I say half, I mean taking out one, leaving one, taking out one, leaving one... I don't mean chopping off all the ones on one side or the other! 

Then, the following year, I'd prune out the ones that didn't get done this year, and I would repeat this process every year. This would have a net effect of creating a tree where none of the branches are more than about two years old, so it should remain small and shapely for many years to come.

Just to remind anyone who hasn't read any of the many other articles I've written on this topic, these trees are GRAFTED, that means that the single upright trunk belongs to one species of willow, and the graceful weeping branches at the top belong to a different species.

So the tree will never get any taller, it will just get thicker!

This is the second reason for an annual prune: with grafted trees, it's important to be able to see the base of the tree clearly, because they are little devils for sending up suckers from the rootstock, ie the bottom half. Sometimes they are true suckers, sprouting up from soil level: sometimes they are buds on the main single stem. But every one of them must be removed as soon as it is seen, otherwise your shapely weeping tree will turn into a massive upright "normal" willow before you can say lickety-split.

Lisa's second question was about rust on the leaves: this is a fungal infection, which causes discoloured spots on the leaves. There are thousands of types of Rust, some are specific to a particular species, some are less fussy. So I don't know which type of rust is infecting Lisa's trees, but all rusts are fungal, they spread by spores - so they are pretty much everywhere, in the air - and their idea of a good time is to find somewhere moist and warm so that they can replicate. Something like Athlete's Foot, but for trees.

Their favoured conditions tend to occur in a tree with dense branches, which has been watered from above: sprinklers are a particularly bad way to water trees (or anything, for that matter, but I'm a bit scathing on the whole subject of using sprinklers to water your garden, so don't get me started!).

So how can we help? We can help by maintaining a good air flow within the tree, which means pruning it regularly to prevent it getting too dense. We can also help by clearing away weeds and other growth around the base of the tree:  and by watering only from below.  Obviously we can't prevent rain falling on them, but we can avoid extra unnecessary "rain" !

If there are only a few leaves with rust spots, it's worth gently picking them off and destroying them - don't put them on the compost, otherwise you will be spreading the spores wherever you use the compost. Put them into your council green waste wheelie bin, or take them to the dump. Or burn them, if you are lucky enough to have space for a bonfire.

And in autumn, make sure you clear up all fallen leaves - again, bin or burn them, don't put them on the compost -  and leave the ground absolutely bare underneath them, to help prevent the spores from multiplying and making it worse next year. It's also worth adding a thick layer of mulch around the base of the tree, once you have cleared up the last of the fallen leaves: this will prevent any spores on the soil from being splashed back up onto the tree.

If you find that rust keeps reoccurring, it might be necessary to spray the foliage with an anti-fungal agent: but it's important to start spraying as soon as you see any sign of rust: or preferably, before any of it appears. Those of us who strive to be organic and not use unnecessary chemicals will have to make a decision whether to spray early, or to wait, and hope that it won't be needed.

So there you are Lisa, hopefully that has answered your questions!

If you want to read more about these trees, you can either type the word Kilmarnock into the Search box - which is at the top left of the screen, in the black banner. Or you can read this article, which in turn refers to several of the others!


Did you enjoy this article? Did you find it useful? Would you like me to answer your own, personal, gardening question? Become a Patron - just click here - and support me! Or use the Donate button for a one-off donation. If just 10% of my visitors gave me a pound a month, I'd be able to spend a lot more time answering all the questions!!

Sunday, 19 January 2020

Salix caprea - dead or alive?

I had an email from a chap called Eddie yesterday - Hi, Eddie! *waves*.

He has a couple of really sickly-looking miniature weeping willows (the grafted ones) and he's wondering if they'll be  live again, or whether they are dead.

Here's the first photo, and oh dear, it does look a bit sad, doesn't it?

Mind you, almost everything is looking sad, or beyond sad, at the moment, which is not unreasonable considering that we are just about in the middle of winter.

(What do you consider Winter to be? I think Winter is Dec, Jan Feb, spring is then Mar, April, May: summer is June, July and Aug, and autumn is Sept, Oct and Nov. Seems fair to me?)

Here's the other photo, the right-hand tree is also looking very sad.

So, what do I think?

Well, first the good news: there are some small branches there, Eddie, which are pale brown in colour, can you see them? There's one going across in front, in this picture. Those are almost definitely still alive.

More good news: all willows look like this at this time of year. Usually they drop the dead leaves, so they don't look quite so alarming.

So, what would I advise?

Firstly, "wait until spring" - whatever you do, don't be tempted to chop anything off, just because it looks dead. With these little grafted trees, cutting them back ruins their form, and if  you are too heavy-handed, you could lose all the lovely weeping branches altogether. So don't try to "tidy up" the upper part.

But in the meantime, you can make them look better by very gently cupping your hand loosely around each branch, and running it downwards to gently nudge off the dead leaves.

Sweep them all up, get rid of them.

Then look at the surface of the pots - they are both covered with green stuff, and from this distance it looks like mostly Marchantia, or Liverworts. This is really not helping the trees, as they are stealing all the nutrients and a lot of the moisture, and willows need their water!

So, get something like an old pencil and see if you can get rid of them. I'd put the pot up on a bench or table to make it easier to work with, and wear eye protection or just be careful not to get a branch in the eye. Lever our the top layer - you'll probably find that you can peel off whole slabs of Liverwort, which is strangely satisfying.

Get it all off, then very carefully and gently check around the trunk, at ground level, to make sure you got it all. If you leave just one bit, it will regrow. You might need to use a fingernail to very, very gently remove the Liverwort from the base of the trunk. I'm trying not to use the word "scrape", as you really don't want to damage the bark.

Top up the pots, as you will have removed a good inch of the top layer, with some fresh compost, and maybe a layer of mulch on top.

Remove those labels: labels with elastic ties can often strangle a small plant, because the wind makes them twizzle round tighter and tighter, and those plastic tickets will degrade in sunlight, so one day you'll come back to find bits of fractured plastic all over the ground and no sign of the label.

I always suggest that people get themselves a Garden Notebook, in which they can make notes of when they buy plants, stick in the labels and the receipts, print out photos and stick them in, write comments about parts of the garden which are really good one year, or which are not so good, etc. So pop the labels in your Garden Notebook. 

Then replace the pots, having taken the opportunity to sweep away all the debris around and behind where they were standing.

If you can barely lift the pots because they are so heavy, put them up on a couple of bricks to aid drainage. (Or those nice little decorative "feet" for pots.)

If they are so light you nearly drop them in surprise, then after mulching, give them a good watering.

Now wait until spring, and see what happens. Willows are very tough, and will do their best to recover from any amount of damage and/or neglect, so there is every chance that they will produce buds and then leaves, and  be lovely again this year. Be patient!

Oh, and you might like to reconsider where they are standing: to be covered with Liverworts like that suggests that they are somewhere a bit damp, and a bit shady. They might grow better and recover faster, if they get a wee bit more sun?

I hope this helps, Eddie, and do send me pictures in spring!


Did you enjoy this article? Did you find it useful? Would you like me to answer your own, personal, gardening question? Become a Patron - just click here - and support me! Or use the Donate button for a one-off donation. If just 10% of my visitors gave me a pound a month, I'd be able to spend a lot more time answering all the questions!!

Thursday, 4 April 2019

Willow - still time to coppice it

Yes, it's that time of year again: last chance to coppice or pollard your domestic willows, before they start growing again.

What's the difference, between pollarding and coppicing? Only a matter of height, that's all. Coppicing is generally done at ankle height, where you chop all the stems off right down low, all at the same time. This causes the plant to throw up a whole heap of nice clean new shoots, all at the same time, so they grow all together, long, thin and straight.

Perfect if you want to grow your own fencing, weaving, or burning material, as long as you have sufficient number of plants to do them on a 7-year cycle, ie cutting just one section of them each year (a different section, of course).

Pollarding is exactly the same thing but higher: these days, we mostly see it done on street trees, the ones that are savagely cut back by the council every year or two, until they are just a trunk with a bunch of knobbles on the top. That's pollarding, and it's done to keep them down to a manageable size.

Back in the day, it was done for a different reason - to prevent the new shoots from being eaten by livestock. Trees would be pollarded at one height if there were cattle in the area: somewhat higher if there were horses, with their longer necks.

In one of "my" gardens I have two rather different pollarding jobs: both on willow trees, but very different in appearance.

The first one is a medium sized multi-stemmed tree (left), next to the lake, which gets so big that it obscures the view, so every second or third year I pollard it.

Here it is in the "before" state, and you can see that the end of each trunk has a fan or bunch of branches all sprouting from the same place - this shows where I have pollarded it in previous years.


Here's a close-up of what it looks like part-way through the job: you can see that there are stems of various sizes, some are spindly little pencil-thick things from last year, some are as thick as a thumb, they'll be two years old, and the fattest ones will be three years old.

It didn't get done last year, so it's been three years.

As you can see, all I do is snip/cut/lop/saw off every single twig or stem, as close as i can to the main trunk.

It can get a bit tricky to reach all the way round: please note the watery background, which tells you that this willow is half in, half out of the water. In order to reach the branches growing out over the water, I have to shin up the trunk, cling like a monkey and lean as far as I dare.

When my bravery runs out, I go and get one of my long-handled tools and do the rest from the bank: it's not quite as "good" as doing them by hand, as it's not possible to see what you are cutting, but willow does not seem to mind...

And this is the finished job, please note the long-handled saw leaning casually against the trunk.

To give you an idea of scale, it's 8' long.

And you can see here, just how much of it leans over the water!


The other willow, the far side of the lake, is quite different: it's a small one, just a little bit more than head height, and in summer, it forms one attachment point for the lakeside hammock, so it is vitally important to keep it in good condition!

This means that I pollard it every year, to keep it small and sturdy.

It may be a lot smaller, but the treatment is exactly the same: secateurs in hand, I snip  off as many of the branches as I can reach, using a lopper for the bigger ones.

I then wriggle round the back of it to snip off the rest, taking great care not to fall in the lake.


 Here's the finished article: you can see how strange and lumpy it looks, but that's what happens when you pollard regularly.

And no, that's not a missed twig sticking out the top - it's a completely different tree, way, way in the background!


Did you enjoy this article? Did you find it useful? Would you like me to answer your own, personal, gardening question? Become a Patron - just click here - and support me! Or use the Donate button for a one-off donation. If just 10% of my visitors gave me a pound a month, I'd be able to spend a lot more time answering all the questions!!

Friday, 25 January 2019

Ants in the pants

A while ago, I had an email question from Karen ("Hi, Karen!") who was concerned about ants moving in on her Salix Kilmarnock: I answered her at that time - wouldn't want you all to think that I don't answer my emails!! - but it was a good question, so I thought I'd share it here.

My first reaction to the question, I have to admit, was "Ooh goody, this makes a change from questions about pruning the darned things!"

Karen had noticed ants congregating on the tip of each leaf, in vast quantities. She noted that none of the leaves appear to have been eaten or damaged, but obviously no-one wants to have ants all over the place.  She'd tried traditional bug spray, and she'd tried blasting them with the hose pipe but they kept coming back: so her question was in three parts:

1)  how to get rid of them
2)  will they cause any harm to the tree
3)  is it safe to use ant powder on a tree

So here are my answer, in reverse order:

3) yes, you can use ant powder on trees.
2) No, it won't cause any harm to the tree, as long as you use it in moderation.
1) see below for detailed instructions!

Right, firstly, ant killers: ant powder is the usual stuff, it comes in a flexible plastic puffer pack: it looks like talcum powder, and you puff it out where the ants are to be found. They walk through it, as they march around on their unfathomable business (where are they all going?  Aren't they supposed to have a nest in one place, then send out troops to find and bring back food? Why are they going in both directions yet not carrying anything?), then carry it back to the nest where it kills them, the others, and the queen, thus getting rid of your ant problem for good.

Ant powder is what I always recommend for ant in the lawn, and ants in patios. As a non-chemical alternative, you can use boiling water on patios, but I would not suggest doing this on plants!

However, ant powder is nasty stuff, and being a powder, it can blow around all over the place, so a better option for trees is to find the gel version. It's sold for getting rid of ants in the house:  you squeeze out a thin line of the gel along a threshold, or across a marching line, and it works in the same way as the powder, ie they get it on their feet and trample it back into the nest.

(At this point I always have a vision of the Doorman Ants fussily saying "Wipe your feet! You don't know what you've been walking though, honestly, my  nice clean nest, harruumph")

Secondly, why are there ants in our trees anyway? Generally, the ants only colonise a tree if there are aphids, or certain types of insects, in it. Ants like aphids (and those other insects: if you're that interested in knowing exactly which ones, you can look up a  list yourself!) because they produce a sweet sticky fluid called honeydew, which ants really enjoy. So if the aphids are there, the ants will move in and "farm" them: they'll guard them and look after them, and encourage them to produce more honeydew.

So having used ant powder to get rid of the ants, it's worth taking a close look at the tree to see if there are any other inhabitants that need removing. As far as I can tell from personal experience (and a quick internet search), ant powder does not kill aphids, so you'd need to address them as a separate issue.

Generally speaking, my advice about ants and all creepy crawlies on my small trees is to get the hose out, close the nozzle well down, and jet wash the plant, to blast off as many of the pesky little blighters as you can, then pouf a ring of ant powder around the main stem, fairly close to the ground, so that everything marching up or down has to go through it.

Refresh the ant powder every couple of days, particularly if it rains: and lo! and behold, in a couple of weeks, you should be ant-free!


Did you enjoy this article? Did you find it useful? Would you like me to answer your own, personal, gardening question? Become a Patron - just click here - and support me! Or use the Donate button for a one-off donation. If just 10% of my visitors gave me a pound a month, I'd be able to spend a lot more time answering all the questions!!

Saturday, 7 July 2018

Salix Kilmarnock: suffering in the heat

A nice lady called Wendy sent me this picture of her Salix Kilmarnock:

...along with the comment that some of the leaves had started to go yellow and drop off and - worryingly - she could see a lot of what looked like tiny black eggs on the undersides of some of the leaves.

First things first, the dropping of the leaves: this is nothing to worry about in early July 2018, after three weeks of solid sun and no rain, with no rain forecast for at least another week.

All it means is that the tree - along with the rest of us - is getting a bit stressed by the continued heat, and is probably a wee bit short of water.

During periods of drought, many trees shed their leaves to conserve water, then when the rains come again, they put out a whole batch of lovely new ones.

So that's the leaves, now what about the things that look like tiny black eggs? Well, they are probably tiny black eggs... *laughs*... and they are probably from aphids. If you have time, they can be removed: either you can jet-blast them off with the hosepipe (a perfectly valid way of cooling down, as there will be a lot of back-splashing, ha!ha!), or you can gently wipe each leaf individually, squashing the eggs and destroying them. It is perfectly permissible to wear gloves to do this.

Whether you manually remove them or not, it is best to give the tree a going-over with the bug spray.

There are two main types: organic ones using “fatty acids” and non-organic systemic ones using chemicals. There is a difference in the way they work, and the way in which they are applied, so it's worth checking which one you have.

Organic bug sprays, using those odd-sounding “fatty acids”, work on contact by smothering the bug. So it's very important to get it all over the plant, including the undersides of the leaves. Yes, I know we all read those instructions, then blithely spray from above - but if you don't wet the entire surface, top and bottom, then you are leaving safe havens for the little buggers bugs to live and breed.

So be prepared to get the spray all up your sleeves, down the back of your neck, and all over the place - but it's worth it, to get rid of the pests.

Non-organic bug sprays are "systemic", which means that they are absorbed by the plant, then when the sap-sucking insects arrive, and bite the plant, they are poisoned. This means that the damage is often done before the bugs die... but it does at least mean that each insect only gets one sip!

Systemic sprays don't need to be applied to every part of the leaf in quite the same way that organic ones do, but you do need to ensure that the leaves are well wetted. And do bear in mind that it takes a day or so for the “poison” to work its way through the plant, hence the instructions on the packs to spray at the first sign of pests - that is, don't leave it until your plant is a heaving mass of aphids before applying it!

And in all cases, read the instructions on the pack, and follow them: they will tell you how to apply it, and when to re-apply it. There is no point spraying the same plant five times in one day - follow the instructions.

Right, that's the dropping leaves, and the aphids: what else is there to mention? Oh yes, take a look at the top of the pot: it seems to have a few weeds and mossy bits growing there. Always best to remove them: a tree in a small pot like this needs all the water and nutrients it can get, so don't make it fight the competition.

Clear out the top layer of soil along with all those weeds, and then add some fresh soil or compost: this is what is called “top dressing”. It's a chance to get rid of weeds along with the tired old top layer of soil. When I top dress, I take the opportunity to drop in a handful of granulated balanced feed such as Growmore, underneath the new layer of soil.

If you don't like the look of bare soil around the base of your potted plant, you can add a mulch of gravel, shingle, stones, slate chips, anything you like: these hard mulches have another advantage, in that they allow the water to soak straight in to the soil when you water it, rather than pouring over the sides of the container.

The disadvantage is that once a year or so, you will need to scrape them all off so that you can top-dress the soil underneath. This is a good time to wash the hard mulch to get rid of moss, algae, lichen etc. You'll usually find that, over time, the mulch becomes incorporated with the top layer of soil, which makes it look untidy, and allows weeds to grow - so it's a good exercise once a year, to clean it all off. It's also a good time to check that nothing has taken up residence in among the hard mulch - they can be a haven for slugs, snails, ants, woodlice, you name it!

Going back to the pot, Wendy's pot is a good shaped one: straight sides are far and away the best, they give the biggest amount of soil and are the most stable.

Second from worst (bear with me!) are pots with wide tops which slope elegantly in at the base, such as this one - left.

They look lovely but as the roots grow downwards, they are in less and less soil: and these pots tend to tip over quite easily. They don't hold as much water as a square-sided one, and have a higher ration of "side" to content, as it were, so the roots get baked by the sun all the way down.


Worst of all are those lovely Ali-baba style pots:

...this one (right) looks lovely, but it combines the top-heavy wrongness of the narrow base with a narrow neck, which makes it impossible to get the plant inside it out, if you need to repot it.

Well, I say "impossible", nothing is impossible, but it took me the best part of a whole morning to wrestle this particular fig out of this exact pot, a few years before this photo was taken, in order to straighten it up.

So, squat and square-ish are the best shapes for a pot in which you are growing a tree, and as always, the larger the better in order to give the tree the most amount of soil, and the best possible "water bank", ie the amount of water that remains in the soil between watering.

Wendy's tree is in a pot that is just about big enough; if it were mine, I would probably get a pot that was a couple of inches bigger all round, but I like to give trees room to stretch a little.

Bearing in mind that these Salix Kilmarnock trees are top-grafted, they won't get any bigger, just stouter: so you might think that by keeping it in a smallish pot, you are restricting its size, but that's not the case. I've written about these trees here, here and here (and several other times! ), so if you want more details about the intricacies of top-grafted Salix Kilmarnocks, check those articles, and you can also use the "search" facility at the top left of the page.

And finally, a general point for all pot-grown trees, we are expecting them to do a lot of work for us, for not much payment: so if you grow a tree in a small pot, remember to give it a feed every few weeks through the summer. Top-dressing in spring, with the addition of a small fistful of granulated feed, will get it going nicely: and add some liquid feed to the watering can from time to time through the summer: I use liquid seaweed, but any liquid feed will be better than nothing.

Oh, one other point:  during a hot, hot spell like the one we're having currently (in a couple of weeks' time, when the clouds come back, and we're sitting indoors glumly looking at the raindrops splashing in the paddling pool we rushed out and bought, we'll no doubt be wondering if we dreamt about five weeks of endless sunshine), you can make life easier for your potted tree by putting a large saucer underneath it: if it's up on feet, take the feet away, and let it sit directly on the saucer.

This means that when you water it, the water will go through the pot and will collect in the saucer, where it can gradually be re-absorbed. This is particularly helpful if you've accidentally allowed the plant to dry out too much: you know that horrible situation where you pour on the water only to see it gallop straight through the pot and out the bottom. By putting the pot on a saucer, that wasted water has a chance to get back inside the pot.

I wrote about re-watering over-dry pots at length here,  so check it out for more details.


Did you enjoy this article? Did you find it useful? Would you like me to answer your own, personal, gardening question? Become a Patron - just click here - and support me! Or use the Donate button for a one-off donation. If just 10% of my visitors gave me a pound a month, I'd be able to spend a lot more time answering all the questions!!

Friday, 2 February 2018

Salix Kilmarnock: what to do with a very old one.

I've written several articles about this pretty, weeping tree, but here is a slightly different question regarding their pruning and maintenance.

A nice lady called Marie sent me photos of one which they had inherited: it was very old, and was lying down instead of standing up.

Bravely, they heaved it upright, knocked in a firm stake, and propped it up. Here's the result:

There are several points to mention: firstly, a lot of people ask me about the grafting point, and here's a perfect example, as you can very clearly see the graft - that's the big lumpy bit, just above the angled stake. That's where the weeping part has been grafted on to the upright non-weeping trunk, and it marks the point below which nothing must be allowed to grow.

This must be a very old one indeed - just look how thick and gnarly it is!

Secondly, I would normally faint with horror at the idea of knocking a metpost in quite so close to the trunk of a tree: usually, if you tried to do this you'd be unable to get a stake in the ground at all, as there would be roots all round the tree.

However, in this case there was the rotted remains of the original tree stake, which meant that Marie was able to hammer the metpost in to the old stake's rotting base: so there was already a vertical "tunnel"  in existence, which the tree roots would have grown around.  .

(In case you don't know what a metpost is, it's a metal square-section stake , with a hefty four-angled point which is well over two feet long: you hammer them into the ground (*faints with horror again*) then you add the wooden stake. Brilliant for fenceposts, as it saves having wood underground, which tends to rot. Not usually used for tree stakes, but when the devil drives....)

Right, back to the plot: point three: the prop. If you have to have a temporary prop such as this, it's a good idea to pad the trunk of the tree with some fabric, to reduce damage to the bark. No matter how firm the stake, the tree will move slightly in the wind, and will rub across the top of that prop. So a bit of padding will reduce the damage. I use old dishcloths, or towels: something fairly thick and squidgy, and preferably something cotton. And, of course, remove the prop as soon as it is no longer needed.

Four: the actual ties around the stake. They will need to be tight, as they are holding up the whole weight of the tree: this is good, as it means they won't be rubbing the bark. On the other hand, you will need to check them every month or so to ensure that they are not too tight. It's easy to forget about them, and two years later you find that the trunk has tried to expand, and now bulges above and below in muffin-top fashion. This is very bad for the tree! So - and this applies to EVERY tree you have which is staked - it's important to periodically go round and check that the ties are not cutting in.

Usually at this point I feel compelled to mention the importance of having a separator between the stake and the trunk, to ensure that they are not rubbing together: but in this case the tree is leaning heavily away from the stake, so that's not a problem! Also, there is a twist in the tie, which is perfect, as it works as a buffer, and also creates a little slack in the tie to allow for a bit of expansion.

Fifthly (still not sure if that is a real word or not) I should mention that there is an inherent danger in trying to straighten a leaning tree: there is a very real risk of damaging the roots. Half of them are going to be bent at a sudden angle, and the other  half are going to be ripped out of the ground, in order to get the trunk upright again. Sometimes this is fatal, sometimes not so much: if the straightened tree is very firmly staked, and the loose earth well pressed down, then the roots will often be able to recover from the shock, and it will re-root in the new position. Fingers crossed for this one: it was done a month ago and it's showing signs of buds, so that means "so far, so good".

Next, Marie asks how to prune the canopy to get it back to looking lovely again.


As you can see, now that it's upright, the canopy is extremely lop-sided, so it is going to need a fair bit of work.

The first thing to do is to remove as much of the dead wood as you can.

How to know which bits are dead? They will be grey and hard, rather than any shade of browny-green, and will be slightly soft to the thumbnail. Dead wood won't have any buds at all - so if you are not totally confident of your ability to tell the difference, wait a couple of weeks until the buds begin to break open.

Once you can see that some of the branches have buds visibly opening, it's easy to find the ones with no buds at all, and remove those ones. Start at the tip, and follow the branch back and back and back until you find some buds: if there are none, then you will follow it right back to the trunk, and that is the point at which you cut it off.

There is no point leaving dead wood on a tree: it will rot, and may lead infection into the rest of the tree.

Having removed all the definitely dead material, it's then time to step back, take a look at the overall shape and decide how best to make it even.

As described in detail in the other articles, this is normally done by crawling underneath it to remove inner wood, leaving the outside - which is the most actively growing material - to form the canopy.

In this case, at least the owners won't have to crawl on hands and knees!

I would certainly want to get all the smaller branches well clear of the ground, and in this case that will mean taking a fairly drastic amount off the "downhill" side. Don't just chop across like a pudding-bowl haircut, take the time to remove individual branches, leaving the shorter, fresher ones.

We are aiming for a "light, airy waterfall",  so although it might seem a bit drastic to remove a lot of the wood, it will soon grow back: all Willows are famous for their speed of growth.

And by reducing the lop-sided mop, it will take a lot of weight off the trunk, which will help the roots to stabilise, and will thus mean that the ugly diagonal prop can be removed as soon as possible. (If it were mine, I'd paint that prop dark brown, or at least smear it with mud, just to reduce the impact of it.)


Is it possible to see a bit of almost Bonsai-like oriental grace in those twisty stems?

It's certainly an unusual view!

So, having cut off the dead stuff,  shortened the over-long ones, thinned out the remainder, what is left to do?

Answer, give it a good fistful of food - a balanced food such as Growmore, or a watering-can full of  seaweed feed, or fish, blood and bone - and a good drenching.

Continue to water it twice a week from now until mid summer, even if it rains, and feed it once a fortnight or so.

Hopefully, it will be invigorated and will put out a good flush of new growth: and Marie, do please send me a photo of it in mid-summer, I would love to see how it performs!

Did you enjoy this article? Did you find it useful? Would you like me to answer your own, personal, gardening question? Become a Patron - just click here - and support me! Or use the Donate button for a one-off donation. If just 10% of my visitors gave me a pound a month, I'd be able to spend a lot more time answering all the questions!!

Sunday, 15 October 2017

Salix Kilmarnock - Dwarf version

Well, here we are talking about Salix caprea 'Kilmarnock' again: this time, a dwarf version.

A while back, a nice lady called Sally sent me some pictures of her tiny Kilmarnock, with a question about pruning, and why it hadn't grown any taller.

I've done several articles about this particular tree: it's very popular, but it's not a "normal" tree, it's a very specialised type of tree where the nursery takes one type of willow - a weeping form, whose branches droop decorously and languidly downwards - and graft it onto the trunk of a normal upright willow.  Why? Two reasons; the weeping type of willow is HUGE: and secondly, they take many, many years to reach a size where they weep properly.

And most people don't want a HUGE willow tree, they want something small and manageable, hence the grafted tree.

The nurseries can choose how high up the trunk to set the grafts, so they can dictate the height of the tree: the idea is that the main trunk never grows any higher, so the tree never outgrows the garden.

But the branches do continue to grow (because they think they belong to a tree which is 60' off the ground) and this can lead to confusion, and to armadilloes crawling into the shrubbery. (see link for explanation!)

Here is Sally's super-dwarf Kilmarnock:

As you can see, it's been planted as a feature at the edge of a small bed, surrounded by a colourful mix of what look like Begonias etc.

Frankly, it's a bit lost.

And as you can see in the photo above, the branches of the tree are so long that they are crawling across the paving.

Sally was concerned because she wanted to prune it -  understandably, not too keen on the whole crawling-across-the-paving look - but wasn't quite sure how, and didn't want to make it any shorter than it already is, as she was a bit disappointed that it wasn't making as much of a feature as she had hoped for.

Here's a close-up - right - of the top part, showing how the grafted weeping branches curl straight over and head for the ground.

You can also see the label, which describes it as growing to 1m high. That's only a little over 3', so actually the tree is doing exactly what it should be doing.

However, please note the picture on the label:


Not a very clear picture, but you can see that the seller has presented the plant as being in a pot, all alone, with the stem clearly visible and nothing else around it.

My advice to Sally, therefore, was that she should consider digging up the little tree and putting it in a large, decorative pot, in order to see the true beauty of it.

She could also consider putting the pot on a stand or a pedestal of some kind, to give extra height, and to bring the flowering portion of the tree up to eye height, instead of being down there at knee level.

She will then be able to carry out the "under-pruning" which I describe in detail in the armadillo article, which should leave her with a feature tree that looks very much like the one on the label.

Instead of looking like an armadillo crawling off into the hedge!


 Did you enjoy this article? Did you find it useful? Would you like me to answer your own, personal, gardening question? Become a Patron - just click here - and support me! Or use the Donate button for a one-off donation. If just 10% of my visitors gave me a pound a month, I'd be able to spend a lot more time answering all the questions!!

Monday, 21 August 2017

Salix Kilmarnock: How to recapture a runaway

Willow just loves to grow.. and sometimes, they can outgrow themselves.

I was recently sent a picture of a Salix Kilmarnock which was desperately in need of a haircut, as the branches were so long that they were lying along the ground.

Here he is: looks a bit like an armadillo, escaping into the shrubbery!

To remind you, this is a grafted tree: the nursery take some "weeping" willow branches and graft them on to a short upright trunk of a different, non-weeping willow.

It is usually a weeping form of Salix caprea (Goat or Pussy Willow) at the top, by the way, and this is quite different from the proper Weeping Willow - Salix babylonica - which is familiar to us all from riverside walks and willow pattern plates.

They can be made at almost any height - and they never get any taller, because it is not the trunk which is growing, it's the weeping branches which grow, and this photo is a perfect illustration of this phenomenon: the tree is four years, the trunk is still only about, what 3' tall, but the branches are now twice as long, and have hit the ground, and are now having to lie down, instead of swinging freely.

Is this a problem? No, not really, but it's not a good idea to leave them this long, as they prevent air and light reaching the trunk, which might lead to disease, and will certainly lead to the owner being  unable to see what weeds are lurking underneath there.

The thing to avoid here is going round cutting every single branch an inch above ground level - what you might call the "pudding basin" haircut, as that will look awful.

Instead, aim to end up with each branch at a slightly different height above the ground, so that they all swing clear, but are not all the same length. And the real trick is to not have any cut ends at ground level, which requires a bit of skill - we'll come back to that in a minute.

So,  how do you catch this runaway tree? Firstly go round it right now at ground level with the secateurs, and cut off everything that is touching the ground:  cut each of those branches just an inch or two above the ground, to get rid of the weight

Once that's done, get on hands and knees and duck inside the canopy, which I imagine will feel like a small dark cave... look up inside, and see if there are a mass of dead brown branches with no leaves on them. If so, carefully cut them off, as high up as you can, inside the "cave". Dead branches are no use to anyone, and harbour fungal diseases. Clear them away, along with any weeds and dead stuff on the ground at the base of the trunk.

Tip: the first time you do this, choose what looks like a dead branch but before you cut it, circle it with finger and thumb: then slowly run your hand downwards until you get to the very end of it, to make sure there is no live growth further down. No live growth: cut it off, as high up as you can.

Now, crawl outside, stand up, and take a look at it - does it still look very dense? Duck back inside, and see if you can thin out the canopy by removing a few of the inner branches right up at the top, inside. (It's a bit hard to describe this!) If you are nervous about doing this, start by taking out one from each quarter, ie just four branches. Nothing too drastic.  Choose a branch, trace it back to the centre, then once again circle it with finger and thumb,  run your hand slowly down it, pulling in all the side shoots on that one branch. If you gently pull them towards you (while you are crouched, sat, or kneeling inside the cave), you can see what would happen if you were to remove that one branch, before you actually cut it: if it leaves a gigantic slash in the canopy, then don't cut it, choose another one.

Now we move on to the advanced work, and this next part also applies if there are only a few big branches, and you don't feel brave enough to chop any of them off in case they leave a big hole. Instead you can thin out the growth by a technique called "undercutting".

As always, it would be much easier to demonstrate this than to describe it (memo to self: must get a GoPro headcam some time) but I'll try.

Let's imagine that your weeping Kilmarnock tree has been cut in half, right through the middle and has turned into a cartoon on the way.

This is what it might look like: central single trunk, tuft of growth at the top (I didn't draw in all of the branches) and each branch curves out and down from the top.


You will see, on your tree, that each main branch has side shoots growing from it, and because it is a weeping form of willow, they all ("mostly") grow out and down. This means that if you take the tip of one branch, where it touches the ground, and trace it back up, you will find that it is actually not one branch running all the way to the top, but is a sort of compound branch, with side shoots springing outwards from it.

Undercutting means to cut out the inner, lower, section, leaving a usually thinner, lighter shoot. As per the diagram.

You can see that if you cut it there, underneath where the side shoot springs out, you have shortened it, but you have retained the natural look. If you repeat this a couple of times up the same branch, as per this cartoony sketch, you can see that you have take out two branches from the "inside" but have left the growth on the "outside".

Do it right, and from outside it doesn't look very different, but you will have removed up to half of the weight of the branches, allowing what remains to swing freely and lightly: plenty of air can circulate, and it does not look as though it's been hacked with the kitchen scissors.

Best of all, by doing so, you should have removed several of the overlong shoots which were cut off first of all - so instead of having a bunch of chopped ends all at roughly the same length, you should now have mostly non-cut ends, all at different lengths, giving a much more natural look.

That is the technique of undercutting: you cut away the material that is "under" the outer layer of branches.

The final job is to check around the base of the trunk - hopefully you can now see it, and get to it! - to see if it is putting out any shoots: any such shoots must be removed immediately, as they are not "weeping" growth but are from the original (ordinary) willow trunk, and if you leave them, they will quickly grow straight  up, through the canopy, out into the light, and will completely ruin your Kilmarnock.

You can easily identify them because they will be growing from ground level or just above it, and they will be dead straight and heading upwards. If they are tiny little sprouts, rub them off. If they are just a couple of inches big, rip them off. Go on, it won't hurt the tree. If they are bigger than a couple of inches then you will have to cut them off with the secateurs, but be sure to cut them off as close to the trunk as you can, and be aware that by cutting them, they will probably grow back, so in a month or so you will have to check again and rub off any new growth. Literally, rub it off with your thumb while it is tiny.

If  you find new shoots springing up from the ground around the base of the tree, you will need to remove these ones as well: gently scrape away the soil until you can see where they are growing from, and pull them off: as above, if you can't pull them off (either because they are too big, too tough, or are sprouting from too far underground) then just cut them, but be aware that you will have to keep rechecking every couple of months, because Cuts Will Re-grow. 

There you go, that's How To Do It: firstly do a rough cut to get rid of all the trailing branches, cutting them just an inch or so above the point where they touch the ground.

Check inside, and remove any dead branches.

Thin out the canopy - just a little, if you are nervous or haven't done this before.

Undercut the longest branches to restore a more natural "hem" to the tree - aim for a light, airy waterfall.

Check the base of the trunk for shoots and remove any that you find.

Clear away the mess, take a photo, job done!


Did you enjoy this article? Did you find it useful? Would you like me to answer your own, personal, gardening question? Become a Patron - just click here - and support me! Or use the Donate button for a one-off donation. If just 10% of my visitors gave me a pound a month, I'd be able to spend a lot more time answering all the questions!!

Sunday, 28 May 2017

A new Fedge!

Back in February I spent a very productive morning installing a new Willow Fedge - straight and simple, nothing complicated, but hopefully it will be the start of something much bigger. More of that later...

Right, first things first: what's a Fedge? It's a cross between a fence and a hedge. Usually made of Willow, sometimes referred to as Living Willow. The concept is very simple: you plant a row of willow wands (or "branches"), you weave them together, and you end up with something as good as a fence, but which is as alive as a hedge. Each year you cut them right back to the bone, to reveal the original framework, so in winter you have something decorative, rather like an ornate trellis. And in summer you have a wildly fluffy, green hedge. What could be simpler?

What is the secret of making a good Fedge? As with many things in the garden, preparation is key, second only to "start with decent materials" and then followed by "ongoing maintenance".

The preparation means lifting a strip of turf - it's best to remove all the competition, and grass is hungry stuff - and laying down a strip of water-permeable membrane. This helps to suppress the growth of weeds, and the re-growth of grass.

Here is my Client, measuring carefully and making slits in the pegged-out membrane, at regular intervals.

She bought a "kit" of materials, having simply told the supplier how long the Fedge was going to be - and they calculated how many of each thickness would be required. Very easy!

On arrival, the willow wands were unpacked and stuffed into a dustbin of water, cut ends downwards. This keeps them fresh and alive until you are ready to install them: obviously, the sooner after delivery the better.

In go the first row of stout uprights.

It's very easy - you literally just push them into the ground, through the membrane.

Once you have done all the uprights, the instructions on the kit tell you to tie a row of "binders" along the top at head height. This keeps the  uprights all the same distance apart, and helps to keep them upright once you start the weaving.

When I am making Fedges, I prefer to do the weaving before the binders, as it's a lot easier to do the "over under, over  under" routine with the loose end of the weaver being able to slide in-between the uprights, rather like those agility dogs you see going between the bendy poles.

But it is a lot harder to keep the Fedge upright if you do it that way: easy for me, because I have done any number of them, but much less easy for a beginner and as, this time, I was demonstrating how to do it so that my Client could do other Fedges by herself,  I thought it best to follow the instructions and do the binders nice and early.

Having done the binders, we start the first row of diagonal weavers.

"Over, under, over under!" we chanted as we worked.

Yes, it really is that easy.

The tricky part is getting to the end and coming back the other way - it's easy to get "lost" in the over-unders, and ending up on the wrong side of an upright.

Frankly, this isn't critical: by the time the leaves have arrived,  you won't be able to see any minor mistakes in the weaving.

When all the weaving was done, then came the job of tying in all the joins, where they cross: this helps to strengthen the Fedge for these first few weeks, while it is starting to grow, and it helps the branches to graft themselves together, which is what gives a Fedge its strength. Yes, those individual thin willow wands will "glue" themselves together where they cross, and as they grow the Fedge will become stronger and stronger.

Tying in is our chance to even up the lattice, making the gaps as regular as we could. And that's all there is to it. A bit of snipping of odd sticky-out ends, one last check that all the junctions were tied, and time to clear up the debris and have a cup of tea.

And here is a photo of the Fedge in  April, greening up nicely! 

As you can see, the Client has installed an additional chicken-wire fence - this is to keep the chickens on the grassy side, until the Fedge has thickened up enough to work as a hen-proof fence. I know it doesn't look as pretty, but it's only for the first year or two.

So what were those three points again? Firstly, start with decent materials: don't think that you can chop a few branches off a handy Willow, and make yourselves a beautiful Fedge for free.

The kits that you can buy online are from the "right" species of Willow, which is long, thin and flexible. Buying a kit ensures that it all the same species, so it all grows at the same rate - if  you chop a few bits off one Willow and a few off another, you'll end up with something of a mish-mash, with some sections growing tall and thin, with others trying to grow bushy. Plus they might well be different colours, although that is not a bad thing in itself. More to the point, it is very rare to be able to find "free" Willow wands that are both long, and thin: the frustration of trying to weave over-stiff branches quickly makes you realise the value of buying in the right materials. And of course it becomes a crop: you buy them once, and for ever afterwards you get an annual crop of prunings which you can use to build more Fedges, or to make willow sculptures, or to weave plant supports: you could easily recover the cost of the materials over the next few years!

Second point, Preparation: clear the ground in a strip, and make life easier for yourself by laying down membrane, which helps to suppress weeds around the very base of the willow.

Third and final point, "Ongoing maintenance". At installation, water it well. For the first year, water it well. Willow is thirsty stuff, and the more you water it, the quicker it will grow.  Keep the base as clear of weeds as you can: not only does that reduce competition, allowing the Willow to use all the water and nutrients available, but it looks nicer!  The "ongoing" part is the annual maintenance: at some point over the winter, go over the whole Fedge with secateurs and trim off all the long new growth, leaving just the original lattice. I know these seems cruel, but it's  not like a tree that we want to grow and grow: we want it to stay more or less the same size. Left  unpruned, every single wand will turn into a tree, which would be a bit overwhelming in a garden. 

Having pruned off the new growth, inspect the lattice to see if there are any dead wands: it's perfectly normal for a few of them to fail to grow,  or to grow well at the bottom, then die off a bit higher up. When you spot one, all you do is take one of then pruned-off wands, and slide it through the lattice to take the place of the dead one. Work it right down to ground level and push it as far in as you can, water well, and with luck it will "take" and will replace the dead one. I reckon to do a dozen or so replacements every year for the first few years, it doesn't take long and you don't have to buy any new willow, as you have your own wand-producing factory already in place!

And as mentioned, all those leftover wands can be used for other projects. In the first year, they are likely to be quite spindly and not very long, but after the second or third year, you will be getting a crop that is equal in size and quality to the wands that you originally bought.

You can let the top grow a little higher, if you want more shelter or privacy, but don't let it grow unchecked otherwise you end up with a hideous mess like this one:

 This train-wreck of a fence (which adjoins one of my Clients' gardens) has not been trimmed every winter for several years, all they do is lop off the top growth, and they don't bother to check the lattice at all.

So instead of winter giving us an attractive trellis-like thing to look at, we have this rather  ugly, top-heavy thing with huge gaps in it.

And of course it gets worse every year, as the top knobs get stronger and stronger, while the lower growth gets weaker and weaker. They are, in effect, pollarding it so in a few more years, they will have a line of single willow trees, instead of any sort of fence. What a waste.

So there you have it: how to install a simple willow Fedge, how to maintain it, and how to enjoy a living fence in summer, an attractive trellis in winter, and an ongoing source of free willow!


Did you enjoy this article? Did you find it useful? Would you like me to answer your own, personal, gardening question? Become a Patron - just click here - and support me! Or use the Donate button for a one-off donation. If just 10% of my visitors gave me a pound a month, I'd be able to spend a lot more time answering all the questions!!

Saturday, 29 April 2017

Where there's a Willow, there's a Way...

Yes! Fedge building again!

I love building Fedges - or should that be planting Fedges? *pause while I consider the question...*  Well, it's planting, obviously, as they are live plants - but there is an element of "building" as they have to be structurally sound, and they should have a pleasing aesthetic appearance. No-one wants a Fedge that flops over, or is lumpy and irregular.

As a reminder, a Fedge is a cross between a fence (dead wooden slats) and a hedge (live woody plants), made out of Willow,  which elegantly combines the best elements of both: it works as a fence to delineate and separate areas, creating a physical and visual break: but as it is a living thing,  it provides change throughout the seasons, with leaves in summer, often with catkins in spring, and a completely different look in winter when the leaves fall and you can suddenly enjoy the shape of it again.

It's created by planting rows of willow stakes, or wands, interweaving them so that they graft together to form a rigid, sturdy construction.

A Client from several years back contacted me a few weeks ago, and after some general gardening work and some design consultation, she decided to use a Fedge to split her vegetable garden extension from the rest of the garden. The idea was to enlarge the veg area, but without using heavyweight ugly fences.

This is where it starts:

We marked out the straight lines, I lifted the turf to remove competition for the new willow trees, and then we pegged out the water-permeable membrane.

Here's my Client, carefully measuring and marking where the Willow was going to go.


Having marked out the gaps, we then cut slits in the membrane, made a hole for the first row of willow, and pushed them firmly in - you need to get them at least a foot underground, to give them a good chance of rooting properly and being stable in the meantime.

Once the uprights were in place, then came the tricky bit, planting and weaving the diagonals.

It's not rocket science, it is mostly over-under-over-under but, like many things, it's not quite that simple, and it's worth taking a bit of time to get the diagonals all going at the right angle.


First we went from left to right, then from right to left... and lo! and behold, there's our basic Fedge.

Finishing touches include neatening up the top, so they are all more or less the same heights: and tying in the crossings, to help the stems to graft together. The sooner they graft, the better, as it gives the Fedge strength as well as stability.

The next step for my Client is to install a run of chicken-wire fence close to Fedge, to stop the chickens pushing through it into the main garden.

Here's a photo showing progress just two months later:


...as you can see, the willow wands are all growing fantastically, and the Fedge already looks pretty!

The chicken wire fence is in place, and will have the added benefit of preventing the chickens from scratching around at the base of the Fedge (they will be on the grassy side), which might have damaged the growing stems.

Maintenance is minimal now: a bit of care with watering in the first year or two will help them to establish good roots, and there will always be the annual pruning in late autumn, where we will take off all the new growth, taking the Fedge back to the original framework.

For the first year or two, this autumn work is also a good time to look closely at the Fedge and check if any of the wands did not root properly: I often find that a couple of them fail to take off, in which case all you have to do is take one of the prunings, and weave that in to take the place of the one that died - you certainly don't have to go and buy more willow!

Best of all, as I always say when talking about Willow Fedges, in further years, the prunings will become bigger and stronger (they are often a bit thin and weedy for the first year or two) and can then be used to build more Fedges or other structures.  In this garden, we were thinking of creating a willow dome to be a playhouse: and I suggested making a second line of Fedge about a yard inside this one, but instead of making another upright Fedge, we could bend the woven wands over to make a low tunnel.

Think what fun the children, and the chickens, could have with a tunnel to scramble along!