Wednesday 29 June 2022

Removal of suckers - Hazel

Here's a lovely example of a mature Hazel whose owners, many years back, didn't know about rubbing out the buds of suckers appearing at the base, and who - instead - just cut them off, once they were well sprouted.

So they re-sprouted.

So they cut them off again.

This is pretty much the definition of coppicing - to repeatedly behead a tree  at the same point. With coppicing, this is done on purpose in order to produce a crop of same-size shoots, all equally long and straight. 

With an ornamental tree such as this one, it results in a mass of stumps at the base:

Not exactly pretty, unfortunately, and the normal root flare is completely covered with this mass of old, cut, shoots.

This can be a bit of a problem, because it means we can't inspect the base of the tree, to check for damage, rot, etc.


Here's a close look at the mass of cut sprouts.

Hmm, it's a bit of a jungle, and it's not really what I would want to see at the base of a tree.

Why is that?

This mass of upward-pointing cut-off shoots collects water, and provides a haven for boring beetles (as opposed to really interesting beetles, ha! ha!) which leads to rot: and of course once you get any form of rot near to a tree, there is a risk of it spreading to the main trunk. 

Many of these dead shoots have evidence of woodworm, which is definitely bad: the good news is that  some of them are dead and dried-up, which meant that I was able to pull a few of them off completely, which at least allows some air back into the area.

And here in close-up, you can see that the old, dead-looking sprouts are still capable of producing buds, which are going to sprout into a new thicket of suckers.

At this stage, they are so very easy to remove: a gloved thumb or finger will do the trick, and they won't grow back from that exact point, so it's well worth taking the time to rub out as many as you can, while they are still tiny.

This will preserve the base of the tree, and will prevent the formation of this odd formation of truncated shoots.

This particular Hazel is a normal one, not a contorted one:  I've written several times about the necessity for rubbing out new shoots on grafted contorted Hazel - just go to the Search box, top left, and type in Hazel to see them -  but the same rules apply to normal Hazels.

So there you have it - get out there every spring, check around the base of your Hazel - contorted or otherwise - and rub off those buds while they are tiny!


Did you enjoy this article? Did you find it useful? Would you like me to answer your own, personal, gardening question? Become a Patron - just click here - and support me! Or use the Donate button for a one-off donation. If just 10% of my visitors gave me a pound a month, I'd be able to spend a lot more time answering all the questions!!

Monday 27 June 2022

How to: propagate a Fig

Back in July of last year, I was teaching my Trainee how to take cuttings of Fig (Ficus carica) because they are very easy to do, and I like to encourage my Trainees with tasks that are likely to be successful.

We were summer-pruning a wall-trained Fig:  there was plenty of material to be removed, so we selected a good handful of likely-looking cuttings.

Then we found some plastic plant pots, which we filled with clean compost - I prefer to use standard multi-purpose compost, the sort you buy in big bags, because it is pretty much sterile. If you use home-made compost, or garden soil, you will get weeds in the pot...which is not to say you can't do it! It just means you have to check the pot every week, and carefully tease out the weeds, without disturbing the cuttings.

It's ludicrously simple: all you do is select a cutting that is about as thick as a felt-pen (not the tip, the barrel part) then make a clean cut across the stem, just below a node: if you're not sure what a node is, it's the slightly knobbly joint where a leaf joins the stem. 

Now remove the first few leaves above your fresh cut, just snip them off very close to the stem.  Aim to end up with about 5" (13cm) of clear stem. Then move up to the next available leaf, and snip off the rest of the stem, above this leaf.

So  you end up with a finger-thick stem, with a nice clean cut across the bottom, and one leaf at the top.

Push this cutting into your compost-filled plant pot: while you are at it, do five or six cuttings in each pot, and put most of them around the very edge of the pot. I am not entirely sure why, but they seem to root better. Logically, the newly forming roots would be hard up against the  sides of the plastic pot, so they would be exposed to extremes of temperature, instead of being insulated by some soil/compost, but *shrugs* it seems to work.

Here is my pot of cuttings:

Six or so cuttings. and please note the label!! 

Always label your cuttings, so that you know what they are... and when you started then.

Then water the pot well, and leave them outside to get on with rooting. 

You will need to keep an eye on the pot, to make sure that they have enough water - lift up the pot to check how heavy it is. If it weighs nothing, and you nearly fling it over your head, then it desperately needs water. If it weighs a ton, then it's possibly slightly over-watered. We are aiming for that "goldilocks" situation of enough water to keep them alive, but not so much that they rot.


Almost a year later, here is that exact same pot:

As you can see, just one cutting has flourished!

This is not a failure, this is par for the course: and this is why we don't take just one cutting, we take lots of them.

And before you ask, yes, sometimes every single cutting "takes", as they say, and you end up with far too many plants, but that's not a problem, you just plant out as many as you can fit into your garden, and then sell or give away the rest!

This particular little fellow is doing very well, he's made some good new growth, the original green stem has toughened up and turned brown, with two new green shoots growing out from it, so I am well pleased.

As I don't have room for a Fig in my tiny garden, I am going to pot this one on, which means that I am going to transfer it to a bigger pot, and let it grow bigger.

If more than one cutting had "taken", then I would have turned out the pot, and gently teased apart the roots, so that I could pot on each of the cuttings individually.

So there you have it: taking cuttings from Fig is super-easy, so if you have one, why not give it a try?


Did you enjoy this article? Did you find it useful? Would you like me to answer your own, personal, gardening question? Become a Patron - just click here - and support me! Or use the Donate button for a one-off donation. If just 10% of my visitors gave me a pound a month, I'd be able to spend a lot more time answering all the questions!!

Friday 24 June 2022

Turning Lemons into Lemonade - Silver Linings in the garden

I'm sure you've all heard that phrase about how, if life gives you lemons, you should make lemonade. It's supposed to mean the same as the one about all clouds having a silver lining, ie that we should all take what we are given and make the best of it. 

 Not a bad philosophy for gardeners. 

Actually, I rather liked the conversation that ran thus:

A: "Oh dear, 2022 is probably going to be a terrible year, I'm dreading it: what do you think will happen? 

Me: "There will be flowers, in 2022." 

A: "Flowers? How can you be so sure?" 

Me: "Because I am planting flowers."

A deeply philosophical answer, huh?

Anyway, a while ago one of "my" gardens acquired a new fence: the old one fell down, and the uphill neighbour (whose fence it was) finally paid out and got a nice new one installed.

The guys who installed it were, er, how can I say this? "Horticulturally inept." They stomped all over the plants in our border before I could stop them, and they actually used a powered jack-hammer to make a post hole, right through the roots of "our" mature Ceanothus. Whether it survives or not, only time will tell. 

(NB Update from several months later: no, it didn't survive. It spent the following six months slowly dying...)

As you can imagine, I was pretty peeved about this, and a few other shortcomings such as leaving a mess of hardcore all over the surface of our border: tossing bucketfuls of assorted waste onto our rubbish heap (luckily they didn't spot the compost pens otherwise I'm sure it would all have gone in there) (I'm not joking: at another garden, a contractor came in to clear moss off the flat roofs and gutters, he dumped the lot - moss, dirt, grit - in a foot-deep layer on my compost pens. I was not happy); and leaving so many gaps at the foot of the fence that I had to ask my garden owner to get her own handyman in to fix it. 

However, I have managed to find a silver lining in all this. 

Where they trampled the soil on "our" side, there is now a hard-compacted strip about two foot wide, running alongside the new fence.

I am treating this is an access path, allowing me to get along the back of the asparagus bed to tackle invading bindweed, ivy, and other weeds, which are already tending to creep under the fence from next door. 

So there you go - strive to find a silver lining in every apparent problem or catastrophe, and life will become full of lemonade!


Did you enjoy this article? Did you find it useful? Would you like me to answer your own, personal, gardening question? Become a Patron - just click here - and support me! Or use the Donate button for a one-off donation. If just 10% of my visitors gave me a pound a month, I'd be able to spend a lot more time answering all the questions!!

Wednesday 22 June 2022

Finding Dead Things in other people's gardens...

That moment when...

...you are happily weeding around a Client's garden, and you venture round the back of the gazebo, an area which doesn't get a lot of attention, but you thought it was time it had a quick weed-round...

...and you find this:

Ummm.... what's this then? 

Too small to be a dead sheep.

Too big to be a dead rat.

Wrong colour to be a dead fox/badger.

Too furry to be a dead bird.

Oh dear, it's the Client's dog's favourite chew toy, affectionately known as "Teddy" (the chew toy, not the dog) (because to have a dog called Teddy would be very strange) (mind you, I have a friend with a cat called Henry, and if I were being totally honest with you, I'd admit at this point that, many years ago,  I briefly had a cat called Kevin, so who am I to talk?).

Poor Teddy had clearly been dragged round the back of the gazebo, and heartlessly abandoned, and now he was all soggy and horrible.

Well, at least I didn't have to clear up a dead sheep/rat/bird/fox/badger!


Did you enjoy this article? Did you find it mildly amusing? Would you like me to stop writing about non-gardening things, and to answer your own, personal, gardening question? Become a Patron - just click here - and support me! Or use the Donate button for a one-off donation. If just 10% of my visitors gave me a pound a month, I'd be able to spend a lot more time answering all the questions!!

Monday 20 June 2022

How to: spot a Rose which is suckering

Here's what you might call a FAQ: "how do I know if it's a Rose sucker, or just a proper shoot?"

I'll be writing about grafting and Roses again soon, but in the meantime, here's a quick reminder: many modern roses are grafted, ie they are two plants, joined together. The top part is the "beautiful" plant, bearing the flowers: the lower part is the "rootstock", which is usually something tough and sturdy, such as Rosa canina (Dog Rose).

It's really important to remove suckers which sprout from below the graft, because they won't be "beautiful" roses, they will be rootstock roses, ie common old Dog Rose. Which will speedily outgrow the "beautiful" rose!

How to tell the difference? 


Here's a very old Rose, which is throwing up a couple of suckers at ground level.

"Where ?" you cry.

"How can you tell?" you cry.


Patience, my pets, I will annotate it for you.


There, that sprout under the pointy red arrow, that's a sucker.

How do I know? At first, the leaves on this plant all look the same, but if you look closely, there are a couple of differences.

And once you've seen them a few times, it gets very easy to spot them.

Firstly, make a general comparison between the leaves on the upper growth, and on that lower growth.

The leaves on the indicated shoot are a much paler green than those of the upper leaves, and they are much smaller, 

Can you see the difference?

OK, so now you are shouting at the screen "But they might just be newer, and paler because they are small!" which is a valid point.

So as well as looking at the general colour and size, count how many leaflets there are on each leaf.

"Hang on," I hear you say, "What's all this leaf and leaflet business?"

Well, Roses have compound leaves - instead of having one big leaf, each of their leaves is divided into smaller parts, which are called, with a surprising clarity, not often to be found in botanical terms, leaflets. 

And proper leaves have - usually - five leaflets.

Here is one of the leaves from the upper part of this Rose, and I have numbered the leaflets to make it clear.

There are five of them, one at the tip, and four more in pairs along the central rib.

Of course, sometimes leaves become damaged, and there might be a leaflet or two missing, but if you check a few of the leaves, you will find that, generally speaking, there will be 5 leaflets. 

Now let's have a closer look at that sucker:

Aha!

There are 7 leaflets!

This is not an infallible indication: nature is very variable, and not all suckers will show 7 leaflets. Likewise, not all "proper" leaves will have 5 leaflets!

But on average, generally speaking, the number of leaflets is a good clue to look for.

So we can take these three elements together: the paler colour, the smaller leaflets, and the increased number of leaflets, and this can help us to decide whether new growth is a proper shoot, which should be encouraged: or whether the shoot is a sucker, and needs to be removed.

And once you've done it a few times, you will find it easier and easier to spot the infiltrators!


Did you enjoy this article? Did you find it useful? Would you like me to answer your own, personal, gardening question? Become a Patron - just click here - and support me! Or use the Donate button for a one-off donation. If just 10% of my visitors gave me a pound a month, I'd be able to spend a lot more time answering all the questions!!

Friday 17 June 2022

How to: water during a hosepipe ban

Every winter, in the UK, we have so much rain that our gardens turn to mud and we seriously consider developing webbed feet. And yet, nearly every year, we have hosepipe bans to contend with. We're not quite there yet, but on what is supposed to be the hottest day of the year so far, I thought it might be timely to talk about hosepipe bans now.

So what does a hosepipe ban mean to gardeners? 

Annoyingly, gardeners don't generally waste water: it's non-gardener types who put the sprinkler on the lawn who give all of us a bad name. 

Sprinklers, along with washing the car and filling the pool - or, in these increasingly affluent, "don't talk to me about poverty, how much do you spend getting those horrible fake fingernails/eyebrows done, and why don't you just put the kettle on and make your own coffee instead of paying £3.50 for a single cup of the stuff in some pretentious shop" times, filling the hot tub - where was I? Sorry, got into a it of a rant there, I do apologise.

Sprinklers! That's where I was: sprinklers, along with washing the car, and filling the pool/hot tub, are the biggest wasters of water. 

But we gardeners get the blame, and have the finger of shame wagged at us, as soon as there is any sign of a water shortage. 

It's so unfair!

However, there are things we can do, and steps we can take, to preserve our gardens and our plants, without having nosy neighbours reporting us to the Water Police.

To start with, if you read the small print of the hosepipe ban - and not just the screaming headlines - there is usually a list of what you are not allowed to do, and what the exemptions are, and it's well worth reading this carefully. 

Firstly, all hosepipe bans refer to hoses fitted to mains water taps: if you collect rainwater in butts or tanks, you can use that water via a hosepipe, as this is “gravity fed” rather than mains pressure.

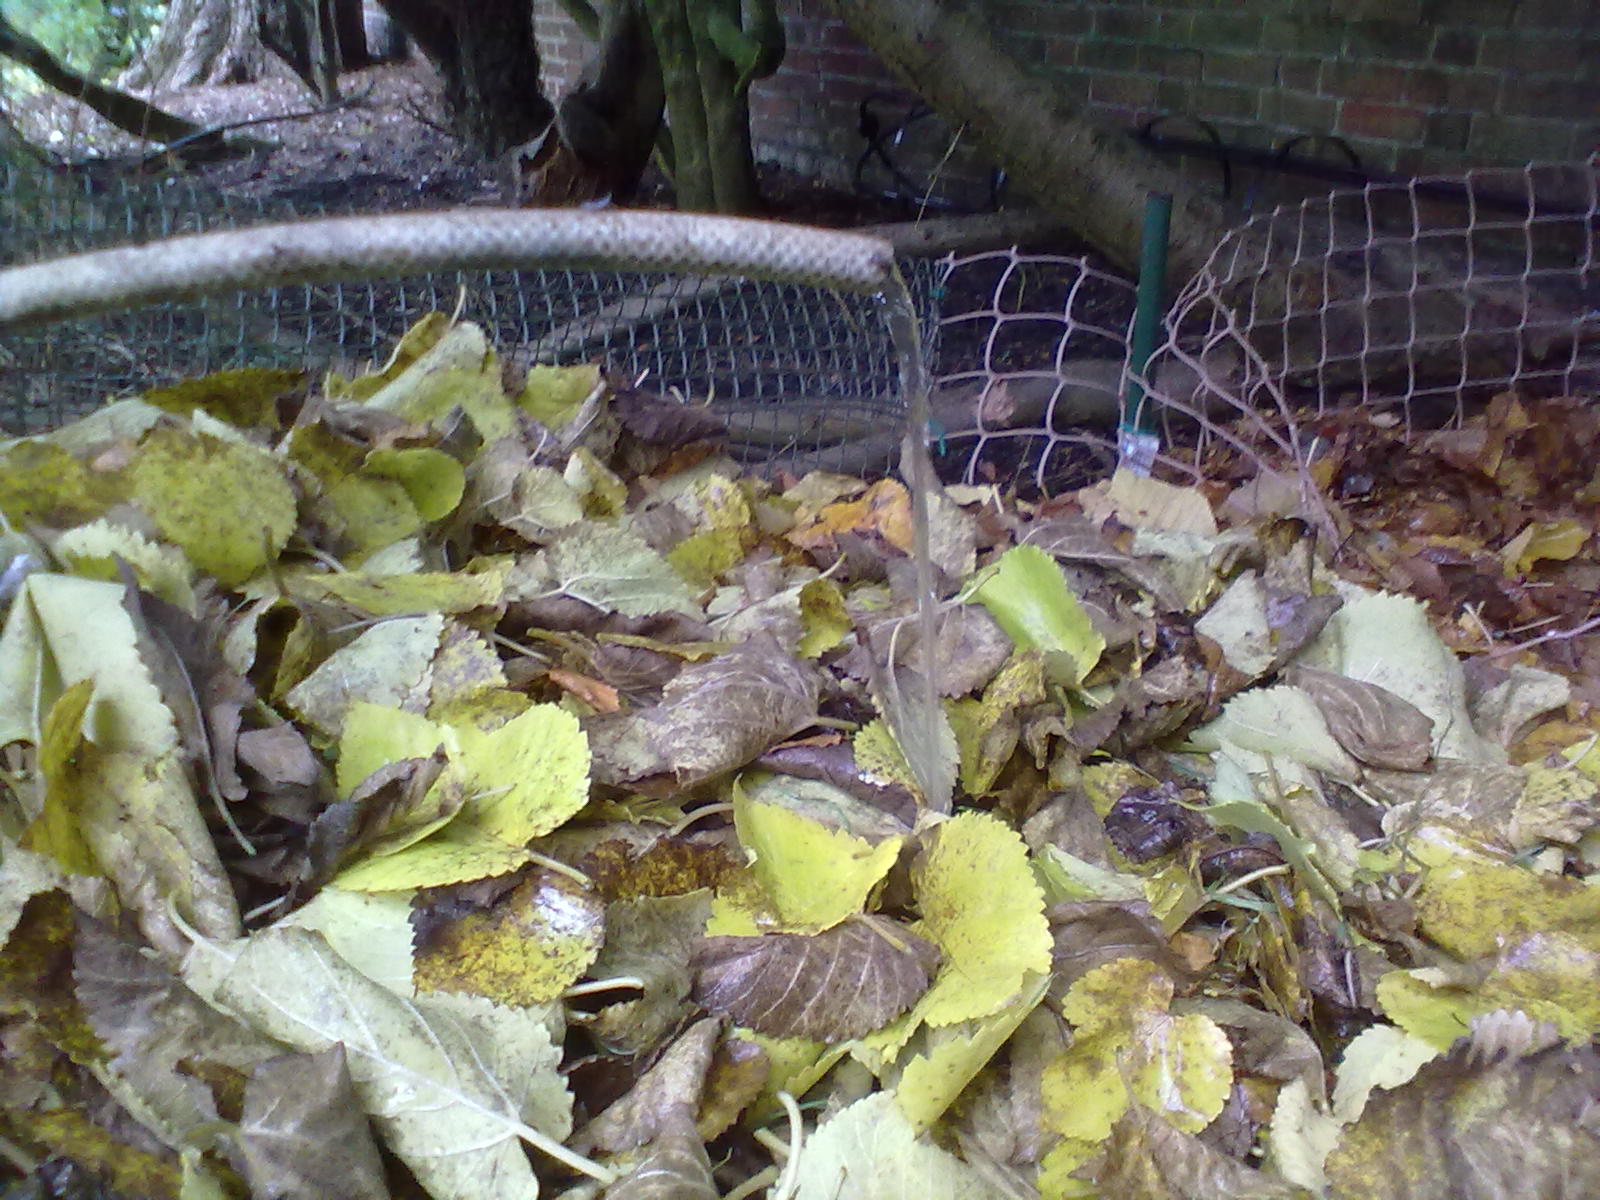
Here's one I built some years back, for a Client: the water butt is raised up on a pile of old bricks, and is there to catch water for watering the leaf mold pens, which are to the right and to the left - you can just see the corner posts and the chicken wire, of which they are made. 

At first I used to water the leaf mold using a watering can, but it was slow work: so I fitted a short length of old hose to the water butt's tap, which allowed me ....


 .... to take the hose round and into the leaf mold pens.

As you can see from this photo - right - the water does not gush out, the way it does from a mains tap, but there's a good flow of water nonetheless, and I can set it going, then leave it for 15 or 20 minutes, while I go and do something else in that area of the garden. 

As long as the end of the hosepipe is below the level of the water in the water butt, it will continue to flow gently out. And it's free water!

This is all well and good if your water butts are close to where you need the water, and of course, they usually are not: almost by definition, the water butts are beside the buildings, where the gutters and downpipes live.

But if your garden slopes away from the house, even by a small amount, you can transfer water from water butts up at the house, to a water butt down in the garden, by simply putting a length of hosepipe on the outlet tap of the "house" butt and leading it out to the "garden" butt. It might not fill to the top, of course, but at least you can move some of that free water down to a more convenient location.

Another cunning plan to make watering from the butts easier, is to run a length of hose out to where you need the water, and put a squirty nozzle on the end of it: then take two watering cans, and allow the water to fill one, while you are emptying the other onto the plants.

Like this - left. 

Because the water is not at mains pressure, it takes some time to fill the watering can. By alternating between the two can, you don't waste time standing there waiting for it to fill: you can be using one, while the other one fills. 

This also means you don't have to keep trogging back and forth to the house to refill the watering can.


Grey Water: this is water that's been used, but is too good to waste down the sewers. It's water from baths, showers, washing machines: and if you save your bathwater and use a hosepipe (usually with a pump or a syphon) to move the grey water out to the butt or garden, that is fine: but remember there are a couple of drawback to using grey water, and it does need a bit of forethought, and a bit of management.

Firstly, don't even try to collect grey water if you don't use plant-based, "eco" detergents. 

Secondly, it needs to "sit" for a day or so before you use it, to give micro-organisms a chance to digest the unwanted chemicals in the water, and to allow contaminants to settle to the bottom. If you generate a lot of grey water, you might need to look into filtering systems, but the easy way is to have a dedicated water butt - or two, or three! - for the grey water. So you can fill one butt, over a few days, then leave it to settle for a day while you start to fill the next one.  Having three butts would be the truly efficient way to do it: one being filled, one settling for a day, and one with "settled" water, being used. 

And clear labelling, so you know which is which!

 Complicated, huh?

Thirdly, it shouldn't be allowed to "sit" for too long, otherwise it will smell! So you need to either use it within a couple of days, or you will have to let it out, down the drain. This seems like a shame, but it's better to do this, than to have stinky water sitting around the place.

Fourthly, don't put it directly onto the plants: it's better to put it to one side of the plants, so that the micro-organisms in the soil can continue to work on breaking down those unwanted components. You can sink plastic pots into the soil around the plants, then pour the grey water into the pots, rather than onto the surface of the water. This also helps  your plants/veg to develop good root systems, as they are having to go deeper to get the water, rather than having it poured on the surface only.

Fifthly (still not sure if that is a real word...) never run your grey water through your normal hose pipes, or through an irrigation system. Even after it has been sitting for a day, it will still be "contaminated" with meat and dairy debris from washing up dishes, along with bacteria from bathrooms and washing machines - so you don't want those items sitting around in your hoses, nor do you want the particles clogging up your irrigation system.

Talking of irrigation systems, hosepipe bans usually specify that although hoses are banned, irrigation systems are not: the crux point is that irrigation systems must drip the water onto the soil, not spray it or mist it around. 

So if you have an irrigation system with a combination of drippers and sprayers, turn off the sprayers (or replace them with drippers for the duration) and you will be fine.

Most hosepipe bans are gradual: they start with banning sprinklers and using a hose to water, but allow us to fill up water butts with the hose, and usually we are allowed to water pots with a hose. But as the water shortage bites, these privileges will be taken away. So it's best to keep checking the website for updates, and it's often worth having a gentle "moan" about it to your neighbours, to make it plain to them that you have checked the rules of a current ban, and are not breaking them!

Bizarrely, there is often an exception for Blue Badge holders: that person (and no other) is allowed to water with a hose. But don't think this means that you can hire a local Blue Badge holder to come and water your garden for you! They are only allowed to water their own garden. And as the shortage continues, the restrictions will change to say that they are only allowed to use a hose if they live alone, on the grounds that if they have a partner/lodger/child living in the same house, then that person can jolly well get out there with the watering can.

As you can see, there are a few things we can do, even in the face of a hosepipe ban, and I hope that this article has given you some ideas!


Did you enjoy this article? Did you find it useful? Would you like me to answer your own, personal, gardening question? Become a Patron - just click here - and support me! Or use the Donate button for a one-off donation. If just 10% of my visitors gave me a pound a month, I'd be able to spend a lot more time answering all the questions!!

Monday 13 June 2022

Beware of strange infiltrators in the garden.... Houttuynia cordata, to be exact

Here's an odd thing: one of "my" gardens has what we call the "wild border", which is a north-facing border, backed by a low wall and a high hedge, which contains a few solid shrubs, a big Hazel tree, two slightly over-large Hollies, and an underplanting of Hellebores, Solomon's Seal, and Primroses.

We call it the "wild border" because I don't weed it very much (as per instructions), in order to give the wildlife somewhere to lurk, and a way of getting from one side of the garden to the other, without having to brave the open lawn.

Every so often, though, I am directed to tidy it up, to prevent it from returning to the wild, and last week, while weeding, I found a new plant growing there.


At first sight, this sent me into a bit of a panic, because it looked a bit like Japanese Knotweed (Fallopia japonica), whose leaves have a very characteristic blunt-bottomed spade shape - rather like the sort of spade you see on American movies, when they are burying corpses.

Not like our coal shovels.

You could also describe them as shield-shaped: technically, botanically, they are cuspidate (ending abruptly in a long point) and truncate (ie chopped off, not flaring gracefully in to the petiole or stalk).

And if you look at that plain green leaf, it does indeed appear to be truncate, and the stem looks kinda reddish, which is another feature of Japanese Knotweed.

Why did the possibility send me into a panic? 

Because Japanese Knotweed is a terrible, dreadful thing: don't take my word for it, look it up for yourself. It is invasive, thuggish, fast-growing, destructive, impossible to kill, and it can - seriously - make your house un-sellable. There are photos on the internet of houses with the stuff growing up indoors, through patio doors, through walls -


How to cope with Japanese knotweed | Bricks & Mortar | The Times

In this photo, it's actually growing through the cladding on a house, from the inside outwards!!

However, after a few minutes of thinking about it, I realised that it was not Knotweed.

How do I know?

Firstly, those leaves - most of the leaves on my invading plant were properly heart-shaped ("cordate" as we botanists say), only a few of them were truncate. 

Secondly, the stems were more or less straight, whereas Knotweed stems have a distinct zig-zag to them, as you can see in the photo above. 


Thirdly, quite a lot of the mystery plants were variegated - right - which Japanese Knotweed definitely is not.

And the variegated ones looked very familiar, although for some reason I was expecting them to be red... ah, that's it, it's Houttuynia cordata, which is a thug in its own right, but nowhere near as bad as Knotweed. 

I've encountered the red one - Houttuynia cordata 'chaemeleon' - many times, and people either love it, if it's well behaved: or they hate it, if it is attempting to take over their garden.

As a final confirmation, Knotweed is a lot, lot bigger than Houttuynia: it can grow up to ten feet tall (3m), whereas Houttuynia cordata is barely ankle height.

So, phew! what a relief, I won't need the flamethrower: but I am going to have to dig, did, and thrice dig in order to get this infestation out before it swamps the entire bed.

As for where it came from, the Client and I looked at each other in total bemusement, because we had no idea. 

No new plants had been introduced to that bed for at least several years, so it didn't sneak in amongst the roots of a bought or donated plant - which is how many weeds find their way into our gardens.

And it seems unlikely that a bird or a squirrel dropped some of it: as far as I know, it doesn't spread by seed, it spreads by rhizomes - underground stems which extend in all directions, unseen.


 These rhizomes - left - can be yards long, and are deliberately and maliciously fragile: so if any bits break off, they will immediately sprout and become new plants.

But I can't quite imagine a squirrel bringing a mouthful of it into this garden? Or a bird, with a big beakful of it, flying in and dropping it? 

Well, this week I undertook the task of digging it all out, which took me most of the morning, as it included lifting every single plant in the bed - a very special dark-flowered Bergenia, a lot of Hellebores, and a small Viburnum - shaking off as much of their possibly-infected soil as possible, and potting them up into clean soil, pinched from the vegetable garden.

These potted plants were moved into a quarantine area, rather than just heeling them in (gardeners' jargon for "temporary planting with intent to heave them out again within a few weeks") (how is it different from proper planting, I hear you ask? Well, to be honest, it's no different, apart from not having to worry about the proper spacing, between plants, on the grounds that "one" will be digging them up again before they reach their potential) where was I? Oh yes, plants in pots, in quarantine, to avoid the risk of transferring any fragments of those rhizomes into other areas of the garden.

Then I was able to dig over the whole bed, and lo! and behold, there was definitely an epicentre to the infection. 

 I found, about 6" down, a drainage plate - a flat plastic tray with short legs, the sort you find in those so-called self-watering pots - with a load of broken crocks on top of it. Above that, a dense tangle of Houttuynia roots: a real mass of them.

The only explanation I can come up with, is to suggest that at some point in the past, a plant had been grown in a self-watering pot, and had been planted out in the border. The plant in question must have had a sufficiently pot-bound root system that, when it was de-potted, the whole thing came out in on go, and was planted, including the drainage plate and the layer of crocks above it.

We can only assume what whatever the original plant was, it eventually died: but unbeknownst to anyone, it had some Houttuynia roots in with it. Once the original plant died, the Houttuynia was able to grow and grow, and eventually to start spreading out in all directions.

To finish the task, we are allowing the bed to lie fallow (more gardeners' jargon:; this just means that we won't replant anything in it, we'll just leave it blank and empty) for a couple of weeks, so that we can spot any small fragments of Houttuynia growing back: despite my policy of Dig once, Dig twice, Dig thrice, I doubt that I got every single scrap of root out!

Then, once we are sure it's not coming back, we can replant the quarantined Bergenia and Hellebores, and hopefully all will be well.

And let this be a lesson to you, dear Reader: so-called "wild" areas are a nice idea, but you still need to get your gardener to check them out, at least once or twice a year!


Did you enjoy this article? Did you find it useful? Would you like me to answer your own, personal, gardening question? Become a Patron - just click here - and support me! Or use the Donate button for a one-off donation. If just 10% of my visitors gave me a pound a month, I'd be able to spend a lot more time answering all the questions!!

Friday 10 June 2022

Forget-me-not: definitely time to pull them out!

It's that time of year that every professional gardener dreads...

Yes, my gloves, my sleeves - actually, nearly all of me - is/are now covered in small seeds, which adhere with the tenacity of velcro.

Why?

Answer, because the lovely Forget-me-not, a staple of English flower beds, has started to finish flowering, if you see what I mean.

Every year, we all go through this: the Client sees only that the Forget-me-not are still flowering, so they won't let us pull them out yet.

"No!" they shriek in horror, pointing to the still-blue flowers - right.

"They are still flowering! Not yet!"

"But, but," I protest, feebly, "They are nearly finished, and, and, if I get them now, you won't have them seeding everywhere..."

"But I LIKE them seeding everywhere!" they thunder back at me.

I sigh.

Every professional gardener knows that once you have Forget-me-not in the beds and borders, you will never be without it, and there really is no need to protect it, or promote it... but still, the Client is always right (well, you know what I mean) so I bravely allow them to live for another week.

The Forget-me-not, not the Client.

Here we are, a week later -  a typical late May/early June (depending on the weather that year) situation: the Forget-me-not are clearly more grey than blue now, so I finally get permission to heave them out.

It's a very simple job: you just take hold of each clump in turn, and firmly pull them out. 

There is no need to dig them out, as they are annuals, and don't have much of a root system: just tug, and out they come.

And in the brown bin they go! Not on the compost, oh no, and why? Yes, well done, top marks, because they are FULL of seeds, and everywhere you put that compost, in a year or so, will immediately sprout a thick layer of Forget-me-not.

And it is possible, believe it or not, to have too much of a good thing! 

Oh, I should also mention the mildew - left.

Forget-me-not are very prone to mildew, not least because they form such dense growth: reduced air flow means that diseases such as mildew can spread rapidly, once it starts.

And of course there is always the risk of the mildew spreading to other plants, so this is another perfectly good reason - in my view - for pulling out the Forget-me-not as soon as they start to look the least bit grey, in flower or in foliage.

And that's why we dread it, even though everyone enjoys seeing a mass of Forget-me-not, it's a classic late spring into early summer flower.

I happily admit that they fill up the bare spaces wonderfully, they are a standard "cottage garden" style plant, they pop up fresh every year (I was about to say "fresh as a daisy" but I think that might be insulting to the Forget-me-not Fairy, if there is one?), but they do seed tremendously generously.

And it is almost impossible to get them off.

 Here is my fleece - right - after vigorously brushing at it. 

Oh dear, still lots of seeds!

And it's not just the gloves and the fleece, it's also my boot-laces, socks, hair, etc,  which means that unless I am prepared to spend twenty minutes with sellotape wrapped around my hand, I am going to be shedding Forget-me-not seeds everywhere I go for the next few days!


Did you enjoy this article? Did you find it useful? Would you like me to answer your own, personal, gardening question? Become a Patron - just click here - and support me! Or use the Donate button for a one-off donation. If just 10% of my visitors gave me a pound a month, I'd be able to spend a lot more time answering all the questions!!

Monday 6 June 2022

Hellebores - time to deadhead them!

The Hellebores have been lovely this year, but now - late May, early June - it's time to start clearing them away for the year. And if you're now thinking “haven't I heard all this before?” then no, usually I am talking about the winter clearing of Hellebore leaves, where we chop off all the nasty dead brown leaves, ready to see the flowers.

 But now the flowers are nearly over, so it's time to think about the spring cleaning. 

Here's a good example: you can see the nice fresh new leaves coming up, those are the "clean" looking, darker green ones: but above them we have an untidy mess of yellowing, blotchy old leaves, along with the fading flowers. 

There are two halves to this job: leaves (again), and dead-heading.  

Firstly, the leaves: cut off any remaining old leaves - these are the ones that are brown, partially brown, or have big brown spots on them. 

You can leave the fresh new leaves, they're fine, but all the old ones need to be cut out, as low down as you can. 

Even if you followed my suggestion, earlier in the year or late last year, to remove all the leaves before flowering, it's worth looking again, partly for any that you missed back then, and partly to find any new ones which have already gone brown.

This is partly for the visual effect: who wants to look at dead brown stuff? But also for garden hygiene: dead leaves harbour pests and diseases and should be cleared away, and this is particularly important for Hellebores, which are prone to Hellebore Leaf Spot (proper but unpronounceable name Microsphaeropsis hellebori), a nasty and common fungal disease which – as the name suggests - causes brown spots on the leaves.

For this reason, Hellebore leaves should never be put on the compost heap: if you can, burn them, which is a sure-fire way (ha! ha! Little pun, there!!) of destroying the fungus: if you don't have a bonfire heap, make sure you put them in the green-waste wheelie bin, or take them to the tip. Commercial composting occurs at a much, much higher temperature than our domestic composting, so it's ok to pass infected material on to the council. 

If you are interested in what happens to the content of your green-waste wheelie bin, by the way, read all about it in my series of three articles dealing with household waste. This is the one about green waste, and what happens to it... it's quite interesting!

Getting back to our Hellebores - once you get brown spot in them, the only way to get rid of it is to ruthlessly cut out and destroy any leaf which shows any sign of going brown. Harsh, but worth it.

Secondly, the dead-heading: now, we all love free plants, and seedlings are generally a joy to find: but Hellebores are particularly generous with their seeds, and if you leave them, you will find your original plants will be swamped by a mass of seedlings. 

Most of them won't, alas, be as lovely as the originals, particularly if you have a range of colours in the bed, or if you bought really “special” ones.

Even if you don't mind what colour they come up, the seedlings won't flower for usually three to five years ("Five years!!!"), and in the meantime they make the bigger plants congested, so it gets hard to weed around them, and hard to cut out the dead leaves.

For these reasons,  it's better all round to carefully weed out all of the seedlings, especially the ones which are growing right in amongst your original plants.

If you want to thicken up your display, leave a few of the biggest ones, well spaced out: or take them out and pot them up, then you can grow them on until you see what colour they are, before deciding to plant them back in the bed.


So, where does dead-heading come into it? 

To avoid the rather tiresome job of having to meticulously winkle out every tiny seedling, just dead-head them now, before the seeds are released. The seed pods take several weeks to fatten, then they start to dry, and then they split open: and generally, the flowers are well past their best before this happens, so it's no loss to the garden to remove them. 

If you are not quite sure how to tell if your Hellebores have gone to seed yet, tilt up the flowers, and if you can see fat segments like this - left - then yes, they have gone to seed.

Sometimes, the colourful part - technically, bracts, but many people think of them as "petals" - still looks good, and you might want to keep them for as long as possible: in my photo, these Hellebores are a pure clear white, and they still look good, so I'm leaving them for as long as I can. 

If you aren't ready to cut yours back yet, that's fine: just keep checking them every few days, and when those chunky seed pods start to go brown, or to feel "dry" and crispy, then you know it's time to get the secateurs out. Luckily, usually, the bracts start to go brown, and look rather lifeless and ugly, as the seed pods enlarge, so it becomes an easy decision.

As with the leaves, cut them right down, as low down their stalk as you can, taking care not to snip off any fresh new leaves.

And again, as with the leaves, don't put them on the compost unless you want Hellebores absolutely everywhere in your garden... and don't forget, they take 3-5 years to flower....


Did you enjoy this article? Did you find it useful? Would you like me to answer your own, personal, gardening question? Become a Patron - just click here - and support me! Or use the Donate button for a one-off donation. If just 10% of my visitors gave me a pound a month, I'd be able to spend a lot more time answering all the questions!!

Saturday 4 June 2022

Gigantic ivy stems

I've written about ivy, many times, ("many, many times...." as Betty Marsden used to say) (and no, I'm not old enough to remember Round the Horne, but I was given some audio cds, years ago, and I am now word perfect...) but this one is, I think, worth sharing with you.


There.

What more do you need me to say?

What a whopper, eh?!

With pruning saw and secateurs for scale, this has to be one of the largest ivy plants I have ever encountered: it has multiple stems, each of which are larger than any normal ivy plant.

How old it is? 

I have no idea, because ivy doesn't have annual growth rings, in the way that trees do, so there is no way to accurately judge the age of the plant.

Probably a considerable number of years, I would have thought.... and it is adjacent to water, so the growing conditions are possibly nearly perfect?

Whatever the reason, is that not the biggest ivy root/stem you have ever seen!


Did you enjoy this (brief!) article? Did you find it useful? (probably not...) Would you like me to answer your own, personal, gardening question? Become a Patron - just click here - and support me! Or use the Donate button for a one-off donation. If just 10% of my visitors gave me a pound a month, I'd be able to spend a lot more time answering all the questions!!