Monday 30 May 2022

How to: be a better gardener. Or: The Devil Is In The Detail

This is the sort of small detail that makes all the difference between being a gardener who is merely average, and one who is wonderful, and appreciated. Like me. (She said, modestly.)

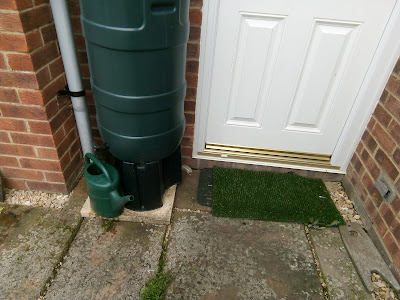
Question: what is wrong with this photo:

No, not the fact that the patio needs weeding: those are (mostly) Erigeron, and the Client likes them. 

No, not the astroturf mat: frankly, I think that using it as a doormat is an excellent use for the stuff, far better than using it instead of real grass.

All my trainees, and every student I have ever had, will know the answer, instantly.

It's the empty watering can, blowing about in the wind. And empty.

My philosophy on watering cans is quite simple: they should always have water in them.

A bucket, now that's a different thing: buckets have many uses, and often we need them empty, for putting things in.

But a watering can is only ever used for watering:  even if you decide it's time to feed the roses, you will still need water in it.

And leaving it always filled means that it doesn't blow around in the wind, so a) you avoid the noise of it, in the middle of the night: b) it removes the rather untidy look, and c) it stays where you leave it, ie right next to the butt, instead of vanishing down the garden or round the back of the garage.

Plus, there are bound to be occasions where you have lost track of the time, are rushing to finish, and have just moved a plant: and it must be watered before you leave it.  Aha! There's the watering can, already full! (This is one occasion where you can break the rule about always refilling the can - if you are in a hurry to depart.)

So watering cans are never left empty, to fall over and blow about. No, they are always left filled with water - or, if the Client is elderly or a bit frail, half-filled - and ready for use. 


Like this!


Did you enjoy this article? Did you find it useful? Would you like me to answer your own, personal, gardening question? Become a Patron - just click here - and support me! Or use the Donate button for a one-off donation. If just 10% of my visitors gave me a pound a month, I'd be able to spend a lot more time answering all the questions!!

Friday 27 May 2022

Compost - Fail!

I wrote, a short while ago, about compost: well, to be honest, I'm always writing about compost! I am quite obsessed on the subject, as any good gardener is.

I made a comment about how delightful ("not") it is to be asked to sort out failed compost heaps, and how sometimes it's a stinky slimy mess, but how more often, it's bone dry and rock hard.

Here's a case in point, from some years back: this Client had a set of three large compost pens, which ought to have been perfect.

I wanted some compost to spread on her beds, and was told that there was plenty of it, look - three whole pens full of it!

My first reaction was "oh no, they have carpet on top".

My second reaction was "oh blimey, all three pens are equally full."

And of course my third reaction was a sinking feeling, because I knew what I was about to find.

To explain: first reaction - oh no, carpet. Why? Compost heaps do not need carpet on top. This is an old allotment-holder's practice, and I still don't know why. The theory is that the carpet keeps the heat in, thus helping the heap to rot, and - more to the point - to get hot enough to kill weed seeds. But in real life, far more compost heaps fail for being too dry, than for being too wet, so in my opinion, putting carpet on top is not only a waste of time, but it often causes the heap to fail altogether.

Plus, in summer, you often find harmless grass snakes lurking underneath the carpet: it's dry, warm, and often has rats and other small rodents living there, thus creating perfect living conditions for snakes. Now, I don't mind snakes as such, but I'd rather have good compost in my pens, than snakes.

Second reaction - all three pens are full.  This is very bad. The "correct" way to make compost - and I put that in quotes because in gardening, there are no hard and fast rules, there is no right or wrong, there are just many, many ways to do things.... anyway, my own personal "correct" way is to have three pens.

One of these is the Active one: the one which you are filling now, the one with all the green stuff in it.

The second one is the Resting one: the one which was most recently filled, has now been retired, and is being allowed to slowly sink down, and turn into compost quietly and without interruption.

The third one is the Ready one: the one with the good compost in it, which we are gradually emptying and using on the garden.

So at any one time, the three pens should all be at different levels. Not all the same.... and one of them should be full of green stuff, one should be brown on top, and the last one should be nearly empty!

Third reaction: yes, it was all going to be bone dry and rock hard, wasn't it? And it was.

What they had done? They had filled all three pens at the same time, instead of doing them in rotation, and when they wanted some compost, they started opening the little doors at the bottom and scraping out some of the good stuff. Seems like a good idea, doesn't it? It's the same principle as those black plastic "daleks" which I hate so much.

But it doesn't work, it just leaves you with a "cave" at the bottom, which then goes rock hard: no more material falls down, so you can't get any more out, and the whole heap is now bone dry at the bottom, bone dry on top, no worm activity, and no more compost.

And in order to fix this problem, and get the composting starting again, I had to - all together now! - empty out all three of the wretched pens, which was a back-breaking job, in the hot summer heat, bearing in mind that I could only do it in instalments, because I had the rest of the garden to attend to, as well. 

Having heaved everything out, I was able to extract a small amount of semi-reasonable compost - not much, but every little helps - and as for the rest, it was thick layers of rock-hard semi-rotted, compressed dry stuff. A bit like chipboard.

I broke it up into smaller chunks, heaped it neatly to one side, and started the process of composting from scratch: I shovelled a layer of it into the pen now designated as the Active pen, watered it well until it was soft and soggy, then started adding fresh garden waste to it.

Each week when I was there, I would add another layer of the bone-dry stuff, water it until it was soggy (yes, I could have watered the entire "dry" heap, but then it would have been heavy to lift: I'm not daft!), then pile on that week's weeds and garden waste. After a while, all the dry stuff had been layered in with the fresh material, the Active pen was full of worms and working nicely, and at last we had a compost system going again. 

I made some labels for the fronts of the pens - "FILL ME" for the Active pen, "DO NOT ADD MORE!" ready to be used on the Resting pen, in due course: and "USE ME" for the third pen, containing the stuff which was ready to be used.

This entire sequence took me several weeks, and was extremely hard work: but at least that's one Garden Owner who is now happy that their compost pens are finally working properly!


Did you enjoy this article? Did you find it useful? Would you like me to answer your own, personal, gardening question? Become a Patron - just click here - and support me! Or use the Donate button for a one-off donation. If just 10% of my visitors gave me a pound a month, I'd be able to spend a lot more time answering all the questions!!

Wednesday 25 May 2022

Steep slopes are not always a bad thing....

Most of us groan and grumble about our sloping gardens, and the expense of putting in terracing and retaining walls, but it can have a surprising advantage: one of "my" gardens is an old thatched cottage, set on a very steeply sloping bank.

The front lawn slopes down steeply toward the house...

...and at some point, someone built a stout retaining wall, to keep the soil back from the house, thus creating a level pathway all around the cottage.

Which had the added benefit of creating a breast-high wall.

Either by luck, or design (I'm not sure which), the top of the wall is just below window-ledge height, which means that when you are inside the cottage, you are not looking out at a blank wall: instead, you are looking across the bed, more or less at soil level.

It's hard to get a photo to show this, as most of it is covered in greenery from the exuberant planting, but in the  photo above, you can just see the tail end of the retaining wall, at it's lowest point, where it edges the steps rising up to the front gate: and the wall rises in height as it goes away from this point of view.


This photo - right - was taken while I was standing on the path: you can see the irregular-width stone slab on the top of the wall.

And you can see that I am looking across the bed -  but instead of looking down on it, it's at eye height !

This makes for easy weeding - no bending over here! Well, not from this side, at any rate - and in spring, we get a chance to see the low-growing flowers up close and personal. 

This effect was achieved by starting with Lavender, Sedum and Hellebores for height, and underplanting with crocus and snowdrops, with Primroses at the near edge. 

In summer, the standard “Samaritan” roses take centre stage, and all this lovely jumble of colour has disappeared completely: instead, we have a couple of large Peonies ("Molly the Witch") and a swathe of sharply upright Iris and Gladiolus.

But early in the year, on a blustery day, the owner can enjoy this view from safely inside the window!


Did you enjoy this article? Did you find it useful? Would you like me to answer your own, personal, gardening question? Become a Patron - just click here - and support me! Or use the Donate button for a one-off donation. If just 10% of my visitors gave me a pound a month, I'd be able to spend a lot more time answering all the questions!!

Wednesday 18 May 2022

Common Spotted Orchid - first signs

Here they come!

The Common Spotted Orchids are on their way up again - this is always such an exciting time, when tiny new sprouts appear, isn't it? 

I'm lucky enough to have a friend who, a few years ago, let me collect seed from the orchids in their grounds, and ever since then I have been growing them on for sale, and it's turning into quite a nice, if rather small, little business. 

I have a very select customer list (that is sales jargon for "small") of wildflower meadow enthusiasts who come to me each year to buy more, slowly building up their meadows, which is the best way to do it.

It takes 2-3 years for them to get to flowering size, so there's quite a pay-delay in growing these little fellas, but I think it's worth it.

I love the idea that now, in a very small way, I am helping to restore wildflower meadows, by selling responsibly-sourced-seed-grown plants - I'm sure you all know that pinching wildflowers from the wild is a definite no-no, in fact it's against the law, so it's good to be able to encourage people to do it properly, and to make a little money along the way! 


Did you enjoy this article? Did you find it useful? Would you like me to answer your own, personal, gardening question? Become a Patron - just click here - and support me! Or use the Donate button for a one-off donation. If just 10% of my visitors gave me a pound a month, I'd be able to spend a lot more time answering all the questions!!

Monday 16 May 2022

Time to check your tree ties.

It's summer (at last!!) well, nearly: it's now "late Spring", at least, and the garden is bursting with life: it's easy to forget about our trees and climbers, in all the excitement, but now is a good time to check up on anything which has a stake supporting it, or which is tied on to any sort of framework. 

 Why? 

Because the stems grow stouter as each year passes - we're all familiar with the growth rings of trees, and let's face it, most of us are getting stouter round the middle as well - and what started out as support can, after a couple of years, become a corset: and if not adjusted, it can then go on to cause strangulation.

All it takes is a quick check once a year, and this is a good time to do it, as they are putting on new growth for this season.

Trees: check that the strap around the stake is not so tight that it is cutting in, by loosening the tie and looking at the bark underneath it. If you can see an indentation, it's too tight: do it up again, but not quite so tight.


 Make sure that there is a buffer - usually a rubber block - between the stake and the tree, so that they don't rub together and damage the bark. 

If there isn't a buffer to be found, undo the tie, and wrap it in a figure of eight around the stem and the post, which allows a bit of movement while still giving support. 

If you're not quite sure about how to do this, check out this article on the correct fitting of tree ties, which should answer all your questions. And if it doesn't, email me your questions!!

Roses, standard: just as with trees, look at where the ties are, and check that they are not too tight. Ties should be firm enough to hold the stems in place, not allowing them to flap about, but should not have a bulge above and below them. Again, they need to have a buffer between the stake and the stem, otherwise the stem will be damaged by being pressed against the stake: and once the stem is damaged, disease can get in, which could kill the entire rose. This is particularly disastrous for top-grafted roses, as any new growth from below the point at which it is tied to the stake will be from the rootstock, and won't be as lovely.

Roses, climbing: check the thicker, older stems to see if their ties are cutting in. Also, you might find that some of the older stems have been tucked behind the trellis or other supports, and are now so thick that they are having a contest with the trellis: either the rose will push the trellis off the wall, or the trellis will win, and the rose stems will be squashed and distorted. Either of these will be bad! It's not usually possible to do much about it while they are in the middle of flowering, but make a note for the autumn, which is a better time to do some serious pruning.

A little bit of attention now could make the difference between a healthy plant which will enjoy a long life in your garden, or a sad strangled thing with dead bits... so if you can, take a few minutes this weekend to do a quick round of your garden, and check your ties.


Did you enjoy this article? Did you find it useful? Would you like me to answer your own, personal, gardening question? Become a Patron - just click here - and support me! Or use the Donate button for a one-off donation. If just 10% of my visitors gave me a pound a month, I'd be able to spend a lot more time answering all the questions!!

Friday 13 May 2022

Squirty Bottle Fail

Does this drive you mad? 

You buy a spray-gun of ready-mixed weedkiller, or aphid spray, or mildew spray: and when I say that, I mean anti-aphid and anti-mildew spray, of course... can you imagine if they sold bottled aphids? You could sneak round to your worst enemy's greenhouse and squirt a dose of them in through the vents.... no, of course you wouldn't. 

Where was I? Oh yes, after a few weeks of perfect squirting,  you try to use the spray-gun again, you can hear that there is still some liquid sloshing around inside, but you can't get any more out. 

This is particularly the case with weedkiller sprays: most weeds are, let's face it, on the ground. Patios, paths, those angles where the wall meets the ground, that's the place where we need the squirty weedkiller, as we can't get to them with a hand tool.

So how does “one” hold the squirty bottle? You point it downwards, of course, because you don't want to spray weedkiller at random all over your precious plants, you want to accurately target the one or two bad 'uns. (You also don't want to waste expensive chemicals, or use chemicals unnecessarily.)

So why can you never get the last bit out of the bottle?

Answer, if you've ever taken the lid off a squirty bottle, you'll know that there's a slim tube that runs inside from the trigger part down to the bottom of the bottle, where it sucks up the liquid.

But it's never quite long enough to reach the bottom of the bottle, is it? And when you turn the bottle at an angle, all the remaining liquid fills up the bottom corner of the bottle, out of reach of the tube. 

I can't find a transparent one to illustrate this problem - probably for the very good reason that they don't manufacture clear ones, otherwise we would see how much we are wasting when we throw them away - but in the picture to the left, I've added some felt pen marks to a standard one, to show you what I mean.

Honestly, I sometimes wonder if manufacturers have a special research department to come up with ideas like this.

So what can we, the poor user, do about it? If you unscrew the trigger part, you can add some water, which brings the tube back in contact with the liquid - just bear in mind that this does dilute the contents, so you have to remember to use twice as much in order to get the same effect - and eventually you reach the “plimsoll line” again. It's probably a good idea to write “Diluted” on the label, otherwise if you forget you've already done it, you find that eventually you are just spraying water!

Another trick is that sometimes, when you unscrew the lid, you can see that the intake pipe has a curve to it, and you can twiddle it round until the curve points “forward” then re-tighten the collar, which means it reaches further into the bottom corner of the bottle.

Both these tricks help to use up as much of the expensive product as possible, but basically it's down to very poor design by the manufacturers

The only real answer is to buy just one squirty gun for each type of spray - ie one for weedkiller, one for aphid/bug spray etc -  and then buy the relevant product in undiluted form, and make up your own. This is what I do, as you would expect: I buy neat Glyphosate (which is pretty much the only weedkiller I will use), and undiluted Rose Clear etc, and refill the squirty bottles, as and when they are needed. This also means that the mixture is freshly made up each time, which means that it works better.

And yar boo sucks to the squirty-gun manufacturers!


Did you enjoy this article? Did you find it useful? Would you like me to answer your own, personal, gardening question? Become a Patron - just click here - and support me! Or use the Donate button for a one-off donation. If just 10% of my visitors gave me a pound a month, I'd be able to spend a lot more time answering all the questions!!

Monday 9 May 2022

How to: deal with Marchantia

Marchantia are taking over the world.....

You might not recognise the name, but you will certainly know what Marchantia (common name Liverwort) are - they form flat plates of shiny green growth on the surface of pots, with strange round suckers or sockets, looking like some sort of organic Lego.

They tend not to be much of a problem in the main garden, in fact I can't remember the last time I found them growing "in the wild", as it were, but in pots, my goodness, they are little devils.

And it's not just the Lego phase:  without warning, they will suddenly send up a miniature forest of tiny palm trees, less than an inch high (oh, all right, less than 2.5cm grumble grumble) but perfect in shape and form. 


Like that - right.

And that's bad news, because those are the, in effect, "fruiting bodies" which spread the spores around.

But those Lego cups are also reproducing, so there is no escaping them.

I suppose that someone, somewhere, must like them, but over the last couple of years, they are driving me mad.

Presumably in response to the pathetic summers that we have had recently, my front garden has been infiltrated by these slimy little bryphoytes (ok, they are not actually slimy, but they look as though they ought to be) and I have spent all summer going round all the pots in the garden on a Forth Bridge basis, scraping them off, and topping up the soil.

I have never been troubled with liverworts until the last year or two: is this a sign of climate change? Or is my front garden getting damper? Am I watering too much? Certainly I have at least two frogs living in it, which explains why I have no slugs... I still have snails though, so if anyone knows a thrush who is looking for a nice place to live, please send them along. Anvil stone provided.

Assuming that the Marchantia don't "march" all over my garden, that is!


Did you enjoy this article? Did you find it useful? Would you like me to answer your own, personal, gardening question? Become a Patron - just click here - and support me! Or use the Donate button for a one-off donation. If just 10% of my visitors gave me a pound a month, I'd be able to spend a lot more time answering all the questions!!

Friday 6 May 2022

How to: plant on a very steep slope

Sloping gardens can be a dreadful nuisance: the soil erodes, the plants fall down, and gardening can become really tiring, because you always seem to be going uphill with a heavy wheelbarrow.

Usually, the only sensible option is to have it terraced:


This is one where the bank was so steep that nothing would grow, apart from brambles, self-set Sycamores, Wild Plum, and an underplanting of nettles.

So the Owner had the main trees cut down - you can see where their stumps interrupt the neat terraces! - and had substantial solid wood log edging installed to break the slope up into 8 level beds, of slightly varying heights and depths.

This was deliberate, to prevent it looking too artificial, and gave me a series of beds to accommodate different plants.

(And yes,  I did have a word with the firm who installed it, and specified that no one terrace was to be more than knee-high to me, so that I would be able to clamber up it!)

Yes, it cost quite a lot of money, but once installed, it opened up a huge area of garden: and as the new terraces were filled with brought-in topsoil, it gave us some wonderful top quality planting areas. And it has lasted for years....

However, not every slope requires this level of construction, not every Client can afford a major landscaping job:  and sometimes the size of the planting doesn't really warrant a lot of work.

But planting on a very steep slope always requires some sort of intervention, otherwise the soil washes away, and the plant either dies of thirst, or falls over and tumbles down the hillside.

Here's one solution:

The slope here was so steep that hardly anything could grow, but the Client wanted some Buddleia and some Mallow, to brighten up the hillside.

Both of these are good choices: once they get established, they are both as tough as old boots, especially the Buddleia.

But they would need some help in getting established, so I decided on a two-pronged approach.

Firstly, I asked the Client to buy small plants - this might seem contradictory, but small plants find it easier to establish, especially in difficult situations. They have less upper growth to support: they are less likely to be blown or pushed over. by weather and wildlife: and they are less likely to die of drought, than a larger plant. 

And secondly, I built some rustic mini-terraces, using some offcuts of half-round edging and some odd bits of wood which I found in the shed. I sharpened the "stakes", and hammered them in, then I chipped out a hole in the hillside behind each one, and filled it with really thick home-made compost.  These chipped-out holes were dug into the hillside in such a way as to be deeper at the "back", ie the left of this photo, than the front edge. The idea being that any rain, or dew, would be caught by the softer soil, and would trickle back into the hole, rather than simply spilling out and running off downhill.

I then planted into those "pockets", and watered until I couldn't get any more water in. And it worked perfectly, the plants established themselves with minimal care from the owner, and for all I know, are still there today.

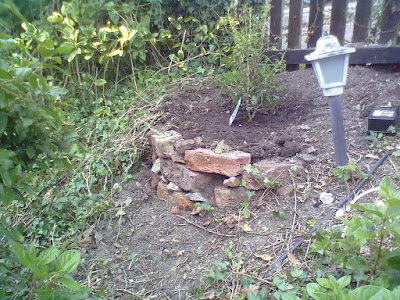
In another situation, I was faced with another very steep slope, and a request to plant an ornamental shrub. This time, I made use of a lot of old bricks and stones which I found within the bank, and built my own mini-terrace:


Not exactly artisan craftsman work, but it did the job: I chipped away some of the bank, until I found reasonably hand earth: I carved out a narrow platform on this hard earth, then built a staggered wall of bricks.

The odd bits of stone were used as wedges, to create a wall which sloped inwards, towards the slope - that's to the right, in this photo. It may appear to be more or less upright, but it isn't! It's leaning inwards.

This was to ensure that the whole thing didn't topple outwards under the weight of the soil. 

Having built the wall, I then brought in some decent soil, with as much heavy organic matter as I could find, to aid with water retention, which is always an issue when planting on a steep slope. I did consider lining the inside of my mini-terrace wall with plastic, to hold more moisture inside it: but in the end, I decided that it was probably big enough to sustain itself.

Once the soil was in place, I simply planted the shrub, watered it in well - very well - and took care to check that the surface of the new plateau was levelled in such a way that all water approaching this area will sit on top of the plateau, and won't run straight off it.

You can easily check this when you water in the plant(s) - if you are trying to water them, and the water is all running off over the lip of your plateau, then you need another layer of walling, or you need to remove more material from the uphill side of it.

Keep adjusting it, until any water runs to the middle of the area, more or less where the shrub is. This ensures that every drop of rain, dew, fog or mists will go where it will do the most good.

In all these cases, the plan is that your temporary terracing will last long enough for the planting to get its roots down into the bank, where it will find firm foundations, and quite possibly will also have access to the water resources of the bank itself. So, by the time the wood, or the bricks, or whatever you have used, is starting to fall apart, the planting is big enough to just keep on growing.


Did you enjoy this article? Did you find it useful? Would you like me to answer your own, personal, gardening question? Become a Patron - just click here - and support me! Or use the Donate button for a one-off donation. If just 10% of my visitors gave me a pound a month, I'd be able to spend a lot more time answering all the questions!!

Wednesday 4 May 2022

How to: keep your curly wurly Hazel curly wurly

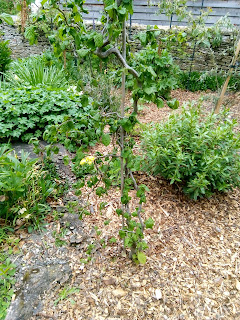
I've written about Curly Hazel many times (if you want to read more, just type "curly hazel" into the Search box, top left of the page), and now here's another one: I planted this rather nice little curly wurly Hazel last year, in the "woodland" bed:

It's doing well, growing nicely, it even has some catkins on it.

But look more closely at the base...


Aha! 


What do we spy, with our little eyes?

Yes, it's a reverted sucker, a non-curly-wurly shoot, which is springing up from the rootstock, below ground level.

(no, that big one to the left of the trunk is the original support cane, it's not a super-thick reverted straight stem, but well done for spotting it.)

This is the problem with all grafted plants: there is always the possibility of the rootstock sneakily sending out some energetic shoots, instead of merely supporting the upper growth. I suppose you can't really blame them: after all, the rootstock is doing all the hard work, while the "posh" upper part gets all the credit. 

So they take revenge by attempting a coup, whenever we are not looking.

This is why grafted plants - many ornamental trees, most standard Roses, plus many others - require constant vigilance. Well, maybe not "constant" vigilance, but they do require regular checking, in order to catch these little blighters while they are still small enough to be removed easily.

In a perfect world, the keen-eyed Garden Owner (or their Gardener) would spot the emerging shoot while it is tiny, and would rub off the buds before they wasted energy in growing. If you've never had to do this before, be reassured, "rubbing off the buds" is exactly what it sounds like, you just rub the bud with a gloved finger or thumb, knocking it off the stem, and preventing it from growing. It does very little damage to the stem, and it usually prevents that particular bud from re-growing.

If you miss the bud stage, and don't catch it until you have an actual shoot (as we have, above) then it's less easy: if the shoots are still fairly small, you can often "pull" them off. Again, as the name suggests, that means pulling the shoot away from the stem. If the shoot is small and still very soft and tender, it comes away easily in your hand, and all is well. But if it's had time to develop some rigidity and strength, then there is a real risk that you will rip the bark of the main stem, or the root from which is it springing, by pulling off the shoot: so you usually end up cutting them off, for safety.

The bad point about cutting off such shoots is that cutting them is, in effect, no more than pruning them: and pruning makes things grow. Yes, they WILL regrow. Often, by cutting off a shoot, you will find that you get two, three, or more new buds popping up on the fresh cut, rather in the style of the Hydra: cut one head off, and seven more spring up.

However, sometimes you don't have a choice: if the shoot is too large to rub off or pull off, then you will have to cut it, and that means you will have to watch it carefully over the following few weeks, for signs of regrowth: and this time, you can catch the buds nice and early, rub them off, and hopefully they won't keep on coming back.

In my case, above, those tiny little shoots were sprouting from an inch or more below the surface, and were quite stiff and strong, so I had to scrabble around underground until I found where they joined the main stem, then cut them off as close to that stem as I could manage.

And yes, now I will be keeping an even sharper look-out, for them to reappear!


Did you enjoy this article? Did you find it useful? Would you like me to answer your own, personal, gardening question? Become a Patron - just click here - and support me! Or use the Donate button for a one-off donation. If just 10% of my visitors gave me a pound a month, I'd be able to spend a lot more time answering all the questions!!

Monday 2 May 2022

Ginkgo - spring is here!

Spring is a lovely time of year, and I am always fascinated by how different plants appear at different times: they don't all burst into life on the same day, but instead they take turns.

Usually we attribute this to the weather, and of course the weather makes a huge difference - a mild spring will obviously bring out a lot of plants earlier, whereas a long, cold, dark, harsh winter will set almost everything back.

Not quite everything, of course, because some plants respond to day length, so they will start budding on pretty much the same day of the year, every year: but most plants respond to temperature, so they respond to the weather.

Every year I say to myself that this year, I will keep a journal of when the various trees in my garden start opening their leaves. So that I can start to get a record of which ones respond to day length, and which ones respond to weather.

Every year, I forget....

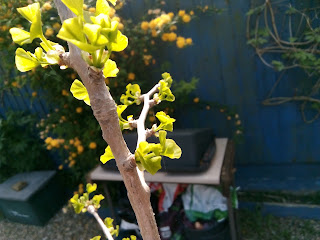
But instead of letting this bother me, I have decided to share with you a simple photo of a simple tree, sending out the first few leaves in my back garden:

There you go, isn't that lovely?

|It's a Ginkgo, I've had it for many years but it's growing in a pot, so it remains quite small.

This is one of those oddments in the tree world: technically it's not a Broadleaf, but nor is it a Conifer. It's one of those hangovers from prehistoric times, often being described as a living fossil (along with the Ceolocanth, a fish which I find utterly fascinating); this doesn't mean that the tree in my garden is 65 million years old, it just means that it hasn't changed or evolved to any great degree, in all that time.

I like my little Ginkgo because the leaves are an unusual shape, and they appear all over the tree, including on the stem: not just on the tips of the branches.

As an aside, how do you pronounce that word? I've noticed that almost everybody - myself included - says Gin-Ko. 

That's not "gin" as in the stuff you drink, it's a soft "g", like the one in "begin". So it's almost be-gin-ko.

Which is, let's face it, easier to say.

But technically, it should be gink-go!


Did you enjoy this article? Did you find it useful? Would you like me to answer your own, personal, gardening question? Become a Patron - just click here - and support me! Or use the Donate button for a one-off donation. If just 10% of my visitors gave me a pound a month, I'd be able to spend a lot more time answering all the questions!!