Showing posts with label Artisan Gardening. Show all posts

Friday, 17 November 2023

Stones in groups... a post-rain phenomenom

Why are the stones in groups after rain? 

 Have you ever noticed this? 

If your garden soil is stony, then after a while you find that the stones have arranged themselves into small groups. 

Here's an example from one of "my" gardens, left: their soil is very stony indeed, and whenever I'm there after a gap of a couple of weeks, and especially if we have had a lot of rain, this is what I find.

In this case, I know that the garden owner is not able to do any gardening herself, so I know that no-one has disturbed the soil, other than me, the birds, the wind and the weather.

 I've seen it time and time again, and I've often idly wondered why, but I've never really tried to find out what's going on, until one of my Clients spotted it in her own garden, and asked me what was going on.

I already know that small stones come to the surface in garden beds: annoyingly! No matter how many you rake off, more will always come to the surface.

This is an easy phenomenon to explain, it's exactly the same as when you shake a bowl of any dry materials, ie cake mix after you've rubbed in the fat, the lumps come to the top.

When potting up at home, I see the same thing: if you shake a tray or bucket of compost, the lumps come to the top.

And if you can imagine it, the whole planet is being “shaken” by geological stress, by gravity, by rotation, etc etc etc, so although we feel that the ground is pretty solid, it's actually being constantly shaken - in slow motion.

This explains why small stones are constantly working their way up through the soil to the surface. Nothing to do with worms pushing them up, as I heard one person say!

But why, once they are on the surface, do they congregate in small clumps? (Not because “the worms push them into heaps” as I heard a different person say...)

I did some research, asked around - yes, other people have noticed it, too - and the best answer I've found so far is that when it rains heavily, the big droplets push the smallest stones to one side or the other. They continue to be moved about by the rain, until they find themselves bumping up against a slightly larger stone, which is too big to be moved by the rain.

So, over the course of several hours/days/weeks of rain, each slightly bigger stone will accumulate a halo of smaller stones around it.

If I had all the time in the world, and enough money not to have to go out to work, I'd like to set up a research bed with cameras to take photos every day, to see just how long this actually takes - wouldn't that be interesting? And can you imagine watching the film afterwards, with the stones invisibly moving into clumps?


Did you enjoy this article? Did you find it useful? Would you like me to answer your own, personal, gardening question? Become a Patron - just click here - and support me! Or use the Donate button for a one-off donation. If just 10% of my visitors gave me a pound a month, I'd be able to spend a lot more time answering all the questions!!

Friday, 28 July 2023

Lavender: the importance of buying named cultivars

I love lavender: I'm perfectly happy to dig out self-set seedlings and grow them on, or move them to better positions around the garden: they are usually fairly similar to the parent plants, and if they have managed to germinate and grow in the beds, borders and shingle paths of that particular garden, then they are obviously quite happy with the local growing conditions.

But when planning a new lavender hedge, or a semi-formal edging to a bed, perhaps, then it is important to buy all the plants at the same time.

They don't have to be any particular cultivar, as long as they are all the same, and I say that because I've always been a bit sceptical when people present me with a dozen plants to plant (a phrase which always look wrong: I do wish there was another generic name for "things which will grow in the garden" other than "plants") and proudly say, for example, "Oh, yes, I bought Lavendula "Hidcote" of course," as though that meant something.

I mean, there's nothing that special about the cultivar 'Hidcot' and - cynically - in my experience, plants from nurseries are often wrongly labelled anyway: I can't tell you how often the expensive white Agapanthus has come up blue... especially that time when a rather posh woman (whose name was not, but really ought to have been, Karen) had bought in two dozen of them, had her gardener plant them out for her,  then - some time later -  sacked the gardener and called me in to "fix" the mess he'd made of her design, because half the darned things turned out to be blue. I found the pots... with the labels... they were all labelled "white" so it wasn't the poor man's fault that half of them turned out to be the common blue ones.

But I digress. (No surprise to regular readers!)

So what am I saying?  Lavender is lavender, they're all lovely, and by all means pick one with a "famous name" if you wish, although personally I'd spend more time reading the small print on the label to see if the cultivar in question fits my needs: is it described as "compact" or "early flowering" or "late flowering", or "white", for that matter... although who would want white lavender? It's not white, it's more of a dirty off-white, but that's just my opinion.

Where was I? Oh yes,

When "one" is planting out a hedge, or a long border of lavender, it really is quite important to get plants that match.

Here's why: Exhibit A, m'lud:

What's wrong with that, I hear you ask.

It's a lovely lavender hedge, I hear you say.

And indeed, most of it is flowering, and looks wonderful.

Ah, but look more closely...firstly, at the particular lavender plant which is closest to us:


 Hmmm.

These flowers have finished: they have turned grey, as all the petals have shrivelled up, and are about to drop off.

The bees are no longer interested, they no longer smell as lovely (although I have to say that, in my opinion, the foliage smells just as much as the flowers do...), so this plant is pretty much "over" for the season.


Next in line is this one, which is one of the ones in full, glorious bloom.

Flowers all over, bees and other pollinating flying insects all over it - fabulous!

And the next one...


...is still in bud,

Not a flower to be seen. Just buds.

Now, why is this a problem? 

At present, as your eye travels along the line of this hedge, you get a general impression of "oh look at the lovely lavender hedge" which is fine.

But the one that has finished now needs to be cut back, to slow down the whole "going woody and falling open" phase. So next week, there is going to be a sudden gap in the hedge, where I've cut that particular plant right back.

Then, in a few more weeks, the rest of them will all have finished flowering, except for that one, very late, one. Which will be in full flowers.

At that point, I will cut back the bulk of the hedge, leaving that one plant to flower in solitary splendour, looking odd and out of place. 

So for the rest of this year, this is not going to be a nice, balanced, even, hedge. It's going to be lumpy and bumpy.

Does it matter?

Well, it does, if the Client has planted a row of lavender specifically to be a "hedge", or to edge a border. If symmetry was the aim, then consistency is important.

If you just have a number of lavender plants dotted around in the borders, then it really doesn't matter if they match: in fact, it would be better to have a variety, because then some will flower early, some will flower late, and thus you will have lavender in flower for a longer time.

But if it's a formal or semi-formal hedge or edge... then it's worth paying for a named cultivar.  And - "Top Tip", as one of my former Trainees used to say - it's worth buying a couple of extra plants at the same time, and putting them elsewhere in the garden, in case you later need to fill in a gap. At least you can be sure it will match!


Did you enjoy this article? Did you find it useful? Would you like me to answer your own, personal, gardening question? Become a Patron - just click here - and support me! Or use the Donate button for a one-off donation. If just 10% of my visitors gave me a pound a month, I'd be able to spend a lot more time answering all the questions!!

Friday, 2 June 2023

Pulsatilla - a plant for more than one season!

Last week, a Client came rushing out to meet me, asking about the wonderful new flower which had appeared in a bed which I replanted for them, the previous year. 

 “What is it?” they cried, grabbing me by the wrist and hauling me round to the bed in question: “We've never seen it before, and it's gorgeous!” 

The “flower” in question was not a flower at all, but the fluffy seed-heads of Pulsatilla vulgaris, or Pasque Flower. 

It had done its duty back in March, producing lovely nodding flowers surrounded by interestingly furry-looking foliage: and now, in late May, the seed heads had fluffed up and were looking quite dramatic. 


Looking good - right - with an underplanting of purple Sedum. And a bit of blue grass, probably Festuca glauca to complement their firework-like spikiness.

Pulsatilla is a plant which can often be overlooked when deciding what to put in a bed or border: it's quite low growing, and appears very early in the year, when maybe we don't want to spend so much time outdoors. 

But it's easy to grow: it is happy in sun or in part shade, and it really thrives in rather poor, light soil. 

You often see them grown in gravel gardens, or growing through shingle, but they're just as happy in a border, as long as it is fairly well drained. 

They usually come in shades of purple and magenta, and - as you can see - a beautiful clear white.

In another few weeks it will be dying back, by which time it will be covered up by the various Astilbe, Sedum (that purple thing which gives it such a good backdrop - good planning by the gardener, there!) geranium and other later-flowering plants.

Then at some point over the winter, all those plants will die down, and I'll cut back all their foliage in time to reveal the furry new foliage of the Pulsatilla, early next year.

All in all, a lovely little plant, for more than just one season!


Did you enjoy this article? Did you find it useful? Would you like me to answer your own, personal, gardening question? Become a Patron - just click here - and support me! Or use the Donate button for a one-off donation. If just 10% of my visitors gave me a pound a month, I'd be able to spend a lot more time answering all the questions!!

Friday, 26 May 2023

Companion Planting - harmonising foliage

"Companion Planting" usually means planting one sacrificial plant, in order to protect something more precious: for example, planting smelly old calendula (marigolds) around the edges of your veggie patch, in the hopes of distracting aphids and other unwanted pests, en route to your edibles. 

But it also means making nice or pleasing associations: I wrote about Tamarisk and Asparagus a while ago, and the other day I saw another unusual but pleasant combination. 


The big plant is Senecio (formerly Brachyglottis) which I generally only grow for the foliage, which - as you can see - is silver-white, and rather lovely. 

The flowers are great coarse yellow things, they don't look good against the silver, and they very quickly go over, leaving a mass of dead grey foliage underneath them.

So I treat it harshly, I cut it back hard every time I see it, which produces a mass of new growth, which is clean and silver-white, lovely! 

(I do sometimes wonder if my various Clients see it elsewhere, flowering, and wonder why theirs never produce flowers....) 

This particular photo was taken in early March, so it's not quite looking its best, but even this early in the year, it still has a nice effect.

And in front of it, we have a very nice cultivar of hardy Cyclamen hederifolium, one of the variegated leaf ones, which happens to be a very silvery colour.

Was this a complete and happy coincidence? Or did the gardener (me) choose to put them in this juxtaposition deliberately?

I'll leave you to think about that!


Did you enjoy this article? Did you find it useful? Would you like me to answer your own, personal, gardening question? Become a Patron - just click here - and support me! Or use the Donate button for a one-off donation. If just 10% of my visitors gave me a pound a month, I'd be able to spend a lot more time answering all the questions!!

Friday, 28 April 2023

Weeping Pear: can they be reduced in height?

I've written about the intricacies of managing a small Weeping Pear a few times, and today I had an interesting follow-up question:

"I planted a weeping pear 20 years ago in my London front garden.  It is now too big for me to reach the higher branches and I need to get a pro in to do it for me. I'm terrified of finding someone who doesn't know how to prune it this way, having seen some mushroom style pruning that I really don't want... any advice?"


This is a very real problem, and to illustrate it, here's a photo from my "Crimes Against Horticulture" folder, left.

This belongs to a lady for whom I work a few times a year: I turned up one day to do the autumn clearance of perennials, to find that her beautiful Weeping Pear had been slaughtered by "the bloke who cuts the grass".

Not a proper gardener, then.

He had, as you can see, pudding-bowled it.

The best you can say - with gritted teeth - is that it is at least neat and tidy, and it is smaller than it was. 

Personally I think it looks awful: some plants look good clipped into shape - Box, comes to mind. Or Yew.

But the whole point of a Weeping tree, whether it be Pear, or Willow, or anything else (you can get weeping Beech, and Ash, amongst others), is to enjoy the waterfall effect of the weeping foliage.

Not to run the hedgetrimmers over it and turn it into a mushroom.

How to avoid this sort of disaster? When you make an enquiry, with a gardener, or an arborist, ask them what tools they will use to do the job. If they say hedgetrimmer, put the phone down. In fact, if they say anything other than "hand tools and a ladder", put the phone down. 

When we (me and my arborist buddy) do Weeping Pears, we use no power tools at all: we use long-reach hand tools - "secateurs on a stick", as we sometimes say. One of us works from the ground, while the other one goes up the ladder, and that way we can ensure that we keep the tree balanced - there is a lot of conversation between us, of the "up a bit, left a bit, yes, that one," type.

The routine for these larger Weeping trees is exactly the same as in the article - first you get out the Three Ds - Dead, Diseased and Damaged.

This entails a lot of work inside the canopy: we put the ladder up very close to the trunk, and sometimes we actually climb up inside the tree, in order to get to the dead material, and there is usually a surprisingly large amount of it.  Often, the Client will ask us what we are doing, as they expect us to prune the outside first, and they wonder why we are taking so long to get going - until they notice the large pile of dead wood under the tree!

This is always an issue with "weeping" trees - the outside branches are leafy and healthy, because they get the sun, whereas the inner canopy dies off but, unlike a normal tree, these dead branches are hidden from view by the "umbrella" of the canopy. 

However, dead material is bad, because it rots, and the rot can spread to the healthy branches: also, dead branches tend to drop out of the tree at inopportune moments, so it's always best to get rid of all the dead stuff, from time to time. 

Having cleaned out the canopy, we then  start on the outside, having already looked at it from all sides, and agreed with the Client as to how much they want taken off. Usually it's a simple case of removing the upward-sprouting growth, to take it back to the height it was last year: and often we need to remove a couple of larger branches to return to a more balanced shape, if it has been growing more on one side than the other. Which is often the case.

When dealing with small ones, I like to keep the branches at least a foot clear of the ground, so that the foliage can swing in the breeze, rather than laying limply on the ground. 

With larger trees, I like to have the lower canopy sufficiently high for the owner to be able to mow underneath it without getting their eyes poked out.

You might be wondering what happened to the pudding-basin tree: well, here it is


 Three years later, it was just starting to regain the weeping form.

So you can see that it's not a total disaster, if you let someone loose with the hedgetrimmers: but it will take three years to grow back.

In fact, it was the following year before we felt that it was ready for some proper pruning: and it has been "properly" pruned every year since then, and it's now lush and shapely once more.

And, to get back to the original question, finding someone who will do it properly will mean asking a few direct questions, and stating categorically that you don't want it turned into topiary.

And the advanced answer is that, once you find that person, you can ask them if they think it is possible to lower the overall height of the tree. This will mean them selectively cutting out, carefully, some of the uppermost large branches. 

But be warned, because most Weeping Pear are grafted trees, they will have to leave a stub of the pruned branch, otherwise the new growth might not be weeping - if they cut into the graft area, they might prompt some dormant buds, from the non-weeping rootstock tree, into action. This means that it's better to cut to a point where there is a downward-growing branch.

Oh dear, so difficult to explain in words... let's try a simplified cartoon.


 Here's a very simplified weeping tree, and the red line shows the total overall height.

The highest point is on the branch to the left, so that's the one we want to reduce. 

We could cut it off just where it joins the trunk, couldn't we: the black line represents where to cut - approximately! (I'm not too good at this image manipulation lark...)


 But oh, that leaves it rather unbalanced.

Yes, it will regrow, but it will take a couple of years to fill in that gap.

Obviously, in real life, there will be more than one main branch, it won't be quite as stark as this, but you see the point - taking off a major limb can drastically change the shape of the tree, and can leave it unbalanced, which might lead to problems later on.

A better compromise, then, is to reduce that left-hand branch, rather than removing the whole thing:


Again, the black line is the approximate cut point - just above a good strong downward-growing branch.

The blue line shows that you have made a reduction in height overall, but if you look at the centre of the tree, you can see that the highest point is now that middle branch - so we have retained some of the left-hand branch, but have still gained the same reduction in height as if we had removed the entirety of the left-hand branch.

This is a much better way to do it: the tree is less unbalanced, we have lowered the height, but there isn't such a hole in the canopy on the left hand side.


 As a finishing touch, I would also remove just a little from the far right-hand side, to make a better overall shape.

And I'd adjust the lengths of a couple of the longer branches - again, just a little, enough to change it from being top-heavy on the right, to being slightly shorter on the right.

That's quite a long answer to a short question, but as you can see, when dealing with ornamental trees, it's not just a case of hacking off a couple of branches.

Well, not if you want to end up with something which looks like a real tree, not a poor butchered thing! 

Hopefully this has answered the question - a) ask lots of questions of any professionals you are considering calling in:  b) make it very plain to them, how you want it done, and how you absolutely do NOT want it done: and c) yes, the overall height can be reduced, in order to bring it back within your own reach, and you will then be able to prune it yourself for another few years.


Did you enjoy this article? Did you find it useful? Would you like me to answer your own, personal, gardening question? Become a Patron - just click here - and support me! Or use the Donate button for a one-off donation. If just 10% of my visitors gave me a pound a month, I'd be able to spend a lot more time answering all the questions!!


Monday, 27 March 2023

The oddities of the Micro-climate

One of my students asked me, the other day, what exactly was meant by the term "micro-climate".

It's a good question: this is a phrase which crops up in all the gardening books and articles, and yet it's rarely explained.

We all know what climate is, even though it's very hard to define it exactly: "errr, it means the outdoor conditions which occur where we live, and which vary from season to season but which are more or less predictable".

Here in the UK, for example, our climate is temperate, which means "not too cold (we get occasional freezing weather for a week or two, but we don't have permafrost and regularly get snowed in for weeks), not too hot (we have the occasional "phew, what a scorcher" but we don't live in a barren desert with nothing but sand dunes), pretty wet (but we don't get monsoons that sweep away the soil), but sometimes very dry (again, not deserts, though)."  Although that description is verging towards "weather" rather than "climate".

And if you are not sure of the difference -  "Climate is, but weather might be".

So, if it's raining one day, and sunny the next, that's the weather: but overall, we have a climate which is generally fairly stable and predictable: it gets colder in winter, it gets hotter in summer.

Within our own gardens, we all know that the north-facing side is going to be shady, damper, and colder than elsewhere in the garden. The south-facing side is going to get a lot more sun - so having a south-facing garden is often seen as a benefit when selling a house. East-facing gets the morning sun, and west-facing gets the evening sun.

So we all understand how the "climate" within our gardens varies according to things like which way it faces.

So what's a micro-climate, then?

Answer, it's the same type of variability, but on a very much smaller scale.

For instance, here's a lovely example: in one of "my" gardens, we have a wooden arch with climbers, at the base of each side we have an edged raised planter, containing a climbing rose. As these beds are a bit bare in winter, we moved a load of winter-flowering cyclamen from elsewhere in the garden. 

The situation, or location, would appear to be identical: the arch and the planters were built at the same time, using the same materials, the same soil to fill the boxes: two matching roses were planted.

The cyclamen came from the other side of the garden: a huge clump of them, somewhat overshadowed by other planting, and which we agreed would be just the thing for the planters. 

I divided them roughly into half, and planted up the two boxes: again, same soil, same plants, same time of year, same growing conditions, both equally watered.

So the cyclamen should flower equally well, shouldn't they?

And yet.... here's the right-hand one:


...and here's the left-hand one.

Quite a difference, as you can see!

One is flowering like a trooper, but the other, while making a good showing of leaves, had only a few flowers.

And the reason for this is micro-climate.

There are subtle differences between the two planters, even though they are only the width of the arch apart.

One is closer to the side fence, so it's just a little bit shadier.

One is more sheltered than the other: the presence of an outhouse to the left creates a wind-tunnel, so the less-sheltered one will be very slightly drier than the other.

One is surrounded by grass, one has a narrow paved path in front of it: so rain will tend to run off the paving and into the bed on that side, rather then being absorbed straight down, as it were, into the grass. This means that one planter will get slightly more rain than the other.

And so it goes: there are many small differences of this type, all of which add up to different micro-climates in areas which may be situated quite close together, yet where plants show differing rates of success. 

This isn't a problem, as such: in fact, the presence of micro-climates means that we can nearly always find "just the right place" for a particular plant; if a plant isn't doing well, dig it up and plant it elsewhere in the garden, until you find that spot where it flourishes.

As lovely Mr Bob Flowerdew used to say: "If a plant isn't doin' well, give it a roide in the wheelbarrer/"  

Or, to put it another way - find it the micro-climate that it needs!


Did you enjoy this article? Did you find it useful? Would you like me to answer your own, personal, gardening question? Become a Patron - just click here - and support me! Or use the Donate button for a one-off donation. If just 10% of my visitors gave me a pound a month, I'd be able to spend a lot more time answering all the questions!!

Monday, 20 March 2023

Codominant stems on trees: why they are bad. And good!

I came across this example of a co-dominant stem, while out walking the other day, and I thought I'd share it with you, partly because it's lovely in itself, and partly because it has a relevance to garden trees.

Here it is: 

... and hopefully you can see for yourselves what "co-dominant" means, even if you've never heard the word before.

Instead of the tree having one central stem, with branches growing out on all sides, it has two stems of very much the same size.

Usually, they grow side by side, and this is disastrous for the tree, because it causes a weak spot in the trunk, where the two stems originate.

Eventually, either one stem will break off, or the whole tree will split into two, which usually causes the death of the tree.

So if you plant new trees in your garden, you should always check, over the first few years, that they growing "properly", with one main trunk. And if you spot them deviating from this, you will need to prune out the lesser of the two stems, to allow the remaining stem to take over and become the "leader".

Unless it's a multi-stemmed Birch or similar, of course! 

In the case of the photo above, because it is a windswept position, the left hand stem was blown to the right of the - presumably - original main stem. Then, in a less windy phase, it grew back towards the sun, resulting in this interesting twining.

Such close contact has caused grafting, where the two stems "stick" together, so this particular tree will probably survive perfectly well: the grafted stem will be as thick, and nearly as strong, as if it had been just one proper trunk.

And the relevance to garden trees? If you have trees in your garden, don't let them start this game... unless you want to deliberately grow a tree with a decorative, twining stem. But be warned, it can take years before you see the result!


Did you enjoy this article? Did you find it useful? Would you like me to answer your own, personal, gardening question? Become a Patron - just click here - and support me! Or use the Donate button for a one-off donation. If just 10% of my visitors gave me a pound a month, I'd be able to spend a lot more time answering all the questions!!

Friday, 17 March 2023

Epimedium - why is it so under-rated?

There are some garden plants that simply everyone has in their garden...what you might call the "usual suspects" which may sound a bit disparaging, but actually it's a compliment: it means they thrive in that particular area, are easy to grow, don't suffer from excessive pests and diseases, and are pleasing to the eye.

Then there are some which are quite rare, but usually for good reason, ie they're difficult to grow.

And then we have the oddities: plants which are fully hardy, easy to grow, lovely, but which - for some reason - are not terribly popular.

In the herbaceous perennial department, that would be Epimedium: I pronounce it exactly as it looks, ie Eppy-medium.  It is a low-growing, slowly-spreading perennial, with interesting heart-shaped semi-evergreen leaves through the summer, and beautiful little flowers in late spring.

Here's my own one, right: squeezed into what I call the Narrow Border. This photo was taken in May of last year, and as you can see, it's a nice neat mound of heart-shaped leaves, fresh and green.

OK, not heart-stoppingly gorgeous, but perfectly acceptable, and very well behaved.

At this time of year - March - the leaves  need to be cut back, hard, because the flowers are forming.


Now, I think that this might be at the root of the problem for this plant, because the leaves don't go brown, which would indicate that they have served their purpose and can be taken off and given a decent burial in the compost heap.

Instead, they take on these interesting shades of coppery/bronze.

So interesting, in fact, that people don't realise that it's time to remove them.

Why this urge to remove them, then? I hear you asking.

The reason is that the flowers of this plant are a bit on the elusive side: their stems are just a wee bit shorter than the wiry stems of these old leaves. 

So if you never remove these old leaves, you may well not realise that it's a flowering plant at all!

In fact, you have to choose between foliage and flowers.... here's mine, again, in my own tiny garden:
 

I took off all the leaves, cutting their stems right down to the ground.

This left it looking rather sad and bare, but a fortnight later, you can see there are now a mass of tiny yellow flowers.

But no leaves.


New leaves appear in no time, though: here's the same plant, another fortnight later:


So there you have it, Epimedium - rather like Happy Medium, I always think - is a neat, interesting little plant, which will spread to form tidy mounds, without swamping the bed or taking over the garden.

But you do need to apply a firm hand, with the secateurs, in mid to late winter, otherwise you won't be able to see the flowers when they appear, as they will be lower than the canopy of leaves.

And that, I suspect, is why so few people have this plant in their garden!


Did you enjoy this article? Did you find it useful? Would you like me to answer your own, personal, gardening question? Become a Patron - just click here - and support me! Or use the Donate button for a one-off donation. If just 10% of my visitors gave me a pound a month, I'd be able to spend a lot more time answering all the questions!!

Tuesday, 3 January 2023

There's good design... and then there's bad design...

And I believe that this one comes under the heading of "bad design"... *laughs*

When you have a large mature Lime tree overhanging your garden, don't plant an intricate Knot Garden with low Box hedging, surrounded by a lumpy bumpy crazy-paving style random stone path....

... because it will drive you crazy every year.


Unless you have a gardener, of course, in which case you just say to them "Oh, clear up the courtyard garden, would you?"

... whereupon they will spend hours patiently raking up the mess for you.

Hours.

And hours.

Week after week......

Year after year...... 

Barrowload, after barrow-load...

What would I have changed, had I been asked?  How would I have made this design "better", if I'd been here when it was first planned?

Well, I would not have gone for the lumpy bumpy path, that's for sure: if they wanted the rustic look, I would have suggested herringbone bricks or paviours.

And yes, you've all heard my diatribes on the sheer hell of herringbone block paviour drives... but I would rather have that, than the lumpy stone crazy-paving above, because you can't rake it, you can't sweep it, and the Lime seed pods get caught in all the deep, soil-filled crevices, and then take root.

(It's also a hellish trip hazard for the rest of the year, but that's only applicable if you have senior folks living there.) 

We even tried jet-washing it, one year, but that didn't work either:  the guy who was employed to do the work blasted so much soil out from between the lumpy bumpy stones that many of them became loose underfoot - thus worsening the trip hazard aspect. And, in point of fact, deepening the "ruts" between them, so even more of the Lime tree debris was caught in the crevices.

I would almost be tempted to put aside my "gardener" hat and say "tarmac the lot!" but no, that's a step too far in the direction of convenience.  But just plain shingle, as is present between the Box hedges, would have been easier to manage than lumpy bumpy stones.

The above courtyard garden is a good example of how what appears to be a "nice" design, or a "nice" idea, is inherently impractical, because whoever designed it did not consider the annual autumn leaf-fest which the Lime tree droppeth gently, from above.

As for the Box hedging, well, I have a soft spot for that, so I wouldn't advise against it: but I would, in this situation, suggest simplifying the design, by removing some of the inner hedges:  this would mean more space in between them, ie easier to rake. 

In fact, I would probably have specified that the gap between the hedges must be wide enough to accommodate the width of the rake!


Did you enjoy this article? Did you find it useful? Would you like me to answer your own, personal, gardening question? Become a Patron - just click here - and support me! Or use the Donate button for a one-off donation. If just 10% of my visitors gave me a pound a month, I'd be able to spend a lot more time answering all the questions!!

Saturday, 31 December 2022

What to do with heavy shade, and tree roots.

I received a question a while back, (*waves* "Hi, Nicky!") concerning a lady wanting to create some planting areas in difficult spot, in a small communal garden.

Nicky said:  "Unfortunately the area is heavily tree lined…lots of roots, it is shady, the grass area is mostly moss or bare and the soil is rock hard or non-existent."

This photo shows one corner of the area - complete with bicycle! - and you can really see the problems.

Just look at those whopping great roots!

The tree roots are growing right on the surface: the thin covering of moss shows how deep the shade is, both by the fact that there is moss there at all, and by the fact that it is bare of grass: and it does look utterly compacted, because even the moss is struggling.

Nicky continued:  "I think the best thing I can do is put some top soil down, so at least the poor plants have a fighting chance and probably put mulch on to keep some of the moisture in. "

Now, there are a couple of problems with that idea.

Firstly, putting additional soil over tree roots is rarely a good idea: when tree roots rise up to the surface like this - as per the photos - it's a response to the compression of their soil, probably from being in between a building, and a road. 

Those exposed roots actually do perform a function: they contain lenticels, and the trees are using them to "breathe". So covering them in soil is not what the tree wants, plus, even if you do, they will work their way back up to the surface.

Next problem:  you will have immense difficulty finding spots soft enough to dig into, because all the best spots are going to have whacking great tree roots running across them. This can make it hard to achieve a tidy, or stylish, or symmetrical, arrangement.

If the problem is "merely" cosmetic (I say that in quotes, because as gardeners, we care a great deal about what things look like!) then a shallow layer of something loose, like bark chippings, is fine: it covers up the ugly roots, makes the surface look homogenous, and because bark chippings are big, they form a matrix - rather than compacting down - which allows the roots to "breathe". In an area that shady, and that compacted, it's often better to give up on the grass, altogether... but adding a layer of topsoil, deep enough to plant into, is not the answer.

All this means that, as Nicky had already spotted, the only real answer is to use planters.

I would suggest combining those two ideas:- use above-ground planters, and surrounding the whole area with a fairly thin layer of bark chippings, so that the lady owner can stroll around to admire the planters, without getting muddy shoes. 

The usual planter rules apply: get the biggest ones you can, get straight-sided ones wherever possible, avoid tapering ones at all costs: the key phrase is "trough" rather than "pot".

Make sure they have drainage holes: put them in place, taking some time to check the arrangements, because they will be too heavy to move once they are filled: then fill them with a 50-50 mix of cheap multipurpose bought-in compost, and either topsoil, or farmyard manure/organic matter, which will give the compost better water-holding properties. 

Starting from scratch like this is a great opportunity to get matching planters: for a simple but stylish look, go for either all the same shape, or all the same colour: this avoids what I call "the fruit salad effect".

Talking of colour, painted planters also brighten up the place in winter, and as it is quite shady there,  a splash of some contemporary colour on the planters might well be a welcome diversion, on a dark winter's day.

As the area is so very shady, a lot of plants might struggle to grow there, so planters offer another advantage, in that it's easy to remove/replace plants if they don't do well. A selection of shade-tolerant plants could be supported by cheap and replaceable bedding plants, both summer and winter,  which also means that the owner can change it every year, if they wish.

One often-overlooked problem with planting under heavy tree cover is that of water - the presence of moss might suggest that the area is damp, so watering won't be necessary, but  trees not only extract all the water from the soil around them, but they also act as umbrellas, keeping the rain off the planters below.

This isn't necessarily a big problem - a simple irrigation system could be installed.

Mind you, having to water the planters does give the owner an excellent excuse to go and walk around them every day!

So there you go, how to introduce planting into an otherwise very inhospitable environment!


Did you enjoy this article? Did you find it useful? Would you like me to answer your own, personal, gardening question? Become a Patron - just click here - and support me! Or use the Donate button for a one-off donation. If just 10% of my visitors gave me a pound a month, I'd be able to spend a lot more time answering all the questions!!

Friday, 23 December 2022

Log stores can be things of beauty

Recently, I built myself a log store in my back garden, for seasoning small logs before burning them in my chiminea.

It was thrown together out of odds and ends of lumber: left overs from DIY projects, odd lengths turned out of other people's sheds, you know the sort of thing. 


 Here it is, not quite finished: the roof will have a waterproof layer on top, and I'm wondering if it needs something like a shower-proof cover across the front, just to keep out the rain if the wind swings round to that side...

But as you can see, big enough for a fair amount of wood, and a special gap for my old recycling box - remember when we all had those? - which contains kindling.

I was intending to paint it, as I find that creations made from "found" wood tend to look horrible, but a coat of paint suddenly renders them beautiful. Much of my garden works on that principle: my fencing is a horrible mish-mash of the original plank fencing, trellis, odd fence posts, and bodged-up joins, but once it was all painted, it looked lovely! 

So, I was going to paint this one, but actually I find that I quite like it in shades of brown, so it might remain like this, for a while.

Well, I was moderately proud of it: it does the job, and it looks ok, if slightly amusing: and then, going out to work for a new Client, I found this:


Isn't that just utterly charming!

The lady who owns it says it was there when they moved in, some 20 years ago, and I just love the idea that someone took the trouble to fit a frame into this otherwise un-used corner, and then to put a proper, beautiful, tiled roof on it.

I now have Log Store Envy...


Did you enjoy this article? Did you find it useful? Would you like me to answer your own, personal, gardening question? Become a Patron - just click here - and support me! Or use the Donate button for a one-off donation. If just 10% of my visitors gave me a pound a month, I'd be able to spend a lot more time answering all the questions!!

Tuesday, 8 November 2022

Deadheading Roses - "hard"

I'm often asked about rose pruning, and one of the aspects which trips up a lot of people is the concept of dead heading.

So let's take a look at this topic: as with many aspects of gardening, it would be easier to teach you this in person - see my page on Garden Tuition for details! - but for now, let's take a quick canter through the basics.

What is dead-heading?

It's the practice of removing spent ("finished") blooms/blossoms/flowers. 

These three - left - are now what I call "going over" which means they have lost their initial beauty, the petals are starting to fade, droop, and curl: the flower has lost it's form, it is starting to look ragged.

Time to dead-head these ones!


Why do we dead-head?

Because once a bloom, or blossom, or flower, whichever name you prefer: once it's finished looking lovely, it will go to seed: it will create a hip (or a haw, I'm never quite sure of the difference), and it will consider it's work done for the season.

Because the whole reason for plants to grow, is to flower, set seed, and die.

But in our gardens, we want them to continue flowering again and again and again, and by removing the seed, we force the plant to produce another flower.

I know, I know, cruelty to plants: and people say to me "Oh, what a lovely job you have, working in harmony with nature..."  They have no idea that I'm torturing plants for a living (*rolls eyes*).

So by dead-heading, on a continual, rolling, basis, we prompt the plants to produce a succession of flowers for us.

How do we dead-head?

Don't just pull off the flower head (shrieks of horror), cut it off, with sharp secateurs or, if desperate, a sharp pair of kitchen scissors.

No, not the ones you use when cooking - an old pair.

There are three aspects of rose pruning which you need to get to grips with, and they are, in brief:

1) the sloping cut. Make your cut just above a bud, and don't cut straight across, cut at an angle sloping away from the bud. So that any water which collects on the cut end of the stem runs away down the stem, instead of being "caught" in the bud.

2) the outward facing bud. When deciding where to cut, pick a bud which is facing outwards: if you imagine yourself looking down on the bush from above, choose a bud pointing away from the centre. This encourages growth in an outwards direction, thus reducing congestion within the centre of the bush, which in turn allows good air flow, which in turn helps to reduce disease.

3) where to make the cut.....

This is the hardest concept for new gardeners to accept. When dead-heading, don't just nip off the dying flower, take off a good length of stem as well.

Here's a simple illustration: looking at this picture, taking that top left-hand flower, if you imagine that the flower is fading, many people would dead-head at the point marked A. 

That is, just below the flower.

It is better to follow the stem down into the bush, and cut it much lower, at the point marked B.

Why?

In simple terms, because if you look at the length of that stem - from B up to A and beyond - that's how long the stem grows before it flowers.

(This is a broad generalisation)  

So, when you take off the flower, the stem will immediately shoot from the next available bud - the outward facing one, if you did it correctly! - and will make that much growth again, before a bud appears.

This means that over the summer, your roses get taller and taller, lankier and lankier, and more prone to snapping and damage, not to mention that the flowers get higher and higher until they are out of sight!

By cutting back hard when you dead-head, you are "re-setting" that particular stem, and the new bud will appear at about the same height as the old one did.

When do we dead-head?

As soon as the flower dies! It's an on-going, continual, rolling process. In many of "my" gardens, I do all the dead-heading, and I do it every week. Sometimes there are many to be done, sometimes only one or two: and sometimes I have to be quite harsh, and remove a particular flower when it is only just going over, simply because I won't be there for another week, and I don't want to leave one which may look "sort of ok" today, but which will be brown and horrible in a couple of days.

In your own garden, you can go round every couple of days, or even every day! You will soon learn how long the flowers last, and how quickly or slowly they go through the process of going over. The weather makes a difference: heavy rain can literally bash the petals off, and soggy rain can make a flower look lank earlier than during fine weather.

The other question,  which one of my former Students asked, was "What's the difference between dead-heading and the pre-winter prune?"

A good question! The answer is, that if you have dead-headed "properly" all through the summer, you won't need to do much pruning in autumn, because you have been keeping the bush in shape. 

I am getting a weird feeling of deja vu as I write this, because I could've sworn I'd already covered it.... hang on...*checks blog*... oh yes, I covered it just last week, in an article on End of Season Pruning:  anyway, it is traditional to prune roses quite hard in autumn, to prepare them for the winter, and the core element of this practice is to prevent wind-rock. 

It's a bit like reefing your sails on a blustery day - by reducing the amount of above-ground growth on the rose bush (this applies to a lesser extent to climbing roses as well). it helps to avoid the plant being rocked by the wind, which loosens the roots and can cause all sorts of damage.

Right, there you have it, the basics of dead-heading the roses.


Did you enjoy this article? Did you find it useful? Would you like me to answer your own, personal, gardening question? Become a Patron - just click here - and support me! Or use the Donate button for a one-off donation. If just 10% of my visitors gave me a pound a month, I'd be able to spend a lot more time answering all the questions!!

Friday, 4 November 2022

The devil is in the detail - granite sett edging

I can hear you saying "Whut? What on earth is she on about now?!"

This might sound like a digression, but bear with me - some years back, my good friends Nigel and Anne were teasing me about my on-going campaign to find a new word for "gardener" because, as I say in my book about How To Be a Successful Self-Employed Gardener (available to download for free if you have Kindle Unlimited) (shameless plug!):

"We all know the difference between a cook and a Chef: anyone can cook, but you need training, experience, and a certain degree of flair, to take everyday ingredients and combine them in interesting, delicious, unusual ways: in other words, to be a Chef. 

"In the same way, anyone can be a "gardener", but those of us who are qualified, experienced, insured, careful, and thorough, deserve to have a job title that makes it plain that we are not amateurs, we are professionals, working with the same 'ingredients' as amateurs, but combining them in new and exciting ways."

They, ever-helpful, came up with the suggestion "Artisan". At first, I laughed, but then I thought about it: I'd seen a recipe just a day or two earlier, whose presentation advice was to "serve with artisan bread."

Now, I had no idea at all what "artisan bread" was, but at the same time, I knew EXACTLY what it was: I knew on which shelf of the supermarket I would find it: it would be bread, but rather than mass-produced white sliced loaves, it would be something hand-baked, non-mass-produced, more expensive than supermarket bread, possibly much tastier, made by someone with experience and/or training in bread making, someone with a bit of artistic flair, possibly using more expensive materials.

This nicely sums up my approach to gardening!

But it also applies to people working in the garden: and now, at long last, we get to the point of this article.  One of my Clients recently had their drive widened, and the builder put in a line of granite setts to edge the drive.

Granite setts are irregular, to say the least: they look more-or-less like square blocks, but they are all slightly different shapes.

And this is how the builder chose to lay them:  with the "straight" edges facing onto the soil.


I was so pleased!

If I'd been there while they were working, that was exactly what I would have suggested: because we can see the edge clearly against the dark soil, but we can barely see the edge against the jangly shingle of the drive.

In fact, I bet that you had to look closely at the photo to see what I mean. 

In case you can't see it, here's a closer look:

There - now you can see that the right-hand edge of the setts are more or less in a straight line.

Whereas the left-hand edges are in and out, shake it all about, quite irregular.

But the irregularity doesn't matter on the drive side, because the multi-coloured shingle disguises it.

However, against the plain dark soil, it would be very obvious.

So this is an example of the devil being in the detail: the builder, who was there to lay the drive, not to make flower beds, could have put the setts the other way round, not even thinking about how it looked.

In fact, in many ways, that's the way that I would have expected a builder to do it - because they were focussing on the drive.

They could have thought, if they had thought at all, "oh, the plants will soon cover it up, it won't matter which way round they go."

But at some times of the year, the plants get cut back....

So there you have it, that builder has now been promoted, in my mind, to an "artisan builder" because he took the time to place the granite setts in an orientation which will be pleasing to the eye for years to come.


Did you enjoy this article? Did you find it useful? Would you like me to answer your own, personal, gardening question? Become a Patron - just click here - and support me! Or use the Donate button for a one-off donation. If just 10% of my visitors gave me a pound a month, I'd be able to spend a lot more time answering all the questions!!

Friday, 14 October 2022

Wheelie Bins & Good Neighbours

Slightly off-topic today: this is something I saw in a garden last week, and it's so wonderful that I want to share it with you.

Wheelie bins: love 'em or hate 'em, they are here to stay. They are big, they are unwieldy, they certainly ain't pretty (!) but most of us have them, and we all have to find room for them in our gardens.

It's always a compromise: generally speaking, we generate the majority of our non-compostable waste in our back gardens, but they are emptied at the fronts of our houses, so we have to choose: do we position them in the back garden, making them easy to fill - or in the front garden, making them easy to put out for the bin men?

Many people compromise by putting them in the side way, where they are an eternal nuisance, as they obstruct the passageway, and you still have to carry waste to them, and you still have to drag them out into the front, on bin day.

But take a look at this:

To explain: the bins belong to the house on the left, and they are sitting in the small alcove formed by the projecting chimney-breast of the house on the right, whose side access is on the other side of their property.

The line of edging slabs shows the boundary: the house on the right has a hedge, and has this tiny space left, which they can't access without going onto the left-hand house's drive.

So it was unused.

The people in the left-hand house asked if they could use the alcove to store their wheelie bins, which happen to fit just perfectly into the space.

The neighbours agreed, so the people on this side put down some slabs to keep it neat and tidy, and lo! and behold, nice neat wheelie bin storage, easy to pull them out and move them down the drive for collection, and they are not blocking the narrow side entrance.

Isn't that just the nicest thing?

A tiny bit of generosity on one side, and a lot of gratitude on the the other!


Did you enjoy this article? Did you find it useful? Would you like me to answer your own, personal, gardening question? Become a Patron - just click here - and support me! Or use the Donate button for a one-off donation. If just 10% of my visitors gave me a pound a month, I'd be able to spend a lot more time answering all the questions!!

Wednesday, 24 August 2022

The happiness of a job, well done..

... is what keeps me bouncing out of bed, in the mornings!

This is the sort of thing which fills me with pride: one of my Clients didn't have any compost pens - I know,  I know, shocking:  so I drew them some plans, they got their handyman in, he did a pretty good job, and lo! and behold, we started composting.

When people are new to composting, it can take a little while to get into the swing of it: and one of the major obstacles is them not knowing which pen to fill.

So I made them a sign:

There you go!

It is just, quite literally, a piece of scrap wood which we can hang on the relevant pen, with the words "FILL ME" written on it, in felt pen.

It won't last forever, but should manage a couple of years, and by then, they will be able to remember the routine.

The trick, with new composting folks, is to make it clear that once we have filled one particular pen, we let it rot down, and we don't go back to it.

There is always a temptation, on their part, to see that the contents are sinking, and to think "Great! We can pile a bit more on top of that one!" but if they do, we could be filling that same pen for another six months, and we therefore won't be able to get any good "stuff" out of it, for even longer. It is far better to let each pen rot down in turn. If you need to know more about this, I have written about compost a ton of times, so just type "compost" into the search box, top left of the screen, and have a good read!


Here's another set of compost pens which I built - and I quite literally built this lot myself, helped by one of my Trainees.

Yes, they are as big as they look - it was a very big garden.

And there's another of my home-made "FILL ME" signs, this one has been in operation for several years now and is still going strong, although I have had to go over the writing a couple of times. 

One day I'll get around to working out the best way to make them more permanent - I've tried engraving (untidy finish and sounded far too much like being at the dentist), and pyrography (couldn't get sufficient difference in colour for it to be worthwhile) and ended up with a good old Sharpie:; the next time I make one, I'll try some varnish, perhaps that might increase the lifespan of the wording.

But in the meantime, the felt-pen ones seem to be doing the job, and the correct pens are being filled.

So proud!


Did you enjoy this article? Did you find it useful? Would you like me to answer your own, personal, gardening question? Become a Patron - just click here - and support me! Or use the Donate button for a one-off donation. If just 10% of my visitors gave me a pound a month, I'd be able to spend a lot more time answering all the questions!!

Friday, 12 August 2022

Bay Tree trimming - how to finish the job properly!

Ah, everyone loves a Bay tree, don't they?

Especially if it's neatly trimmed.

What could be nicer than this - left - a sturdy standard Bay in a herb garden.

Perfect! 

"Standard", in case you don't already know, in this context, means "carefully nurtured to create a single central stem with a tuft of foliage on top" as opposed to a wild shaggy bush, taking over the entire bed, which is what Bay does, if left to its own devices.


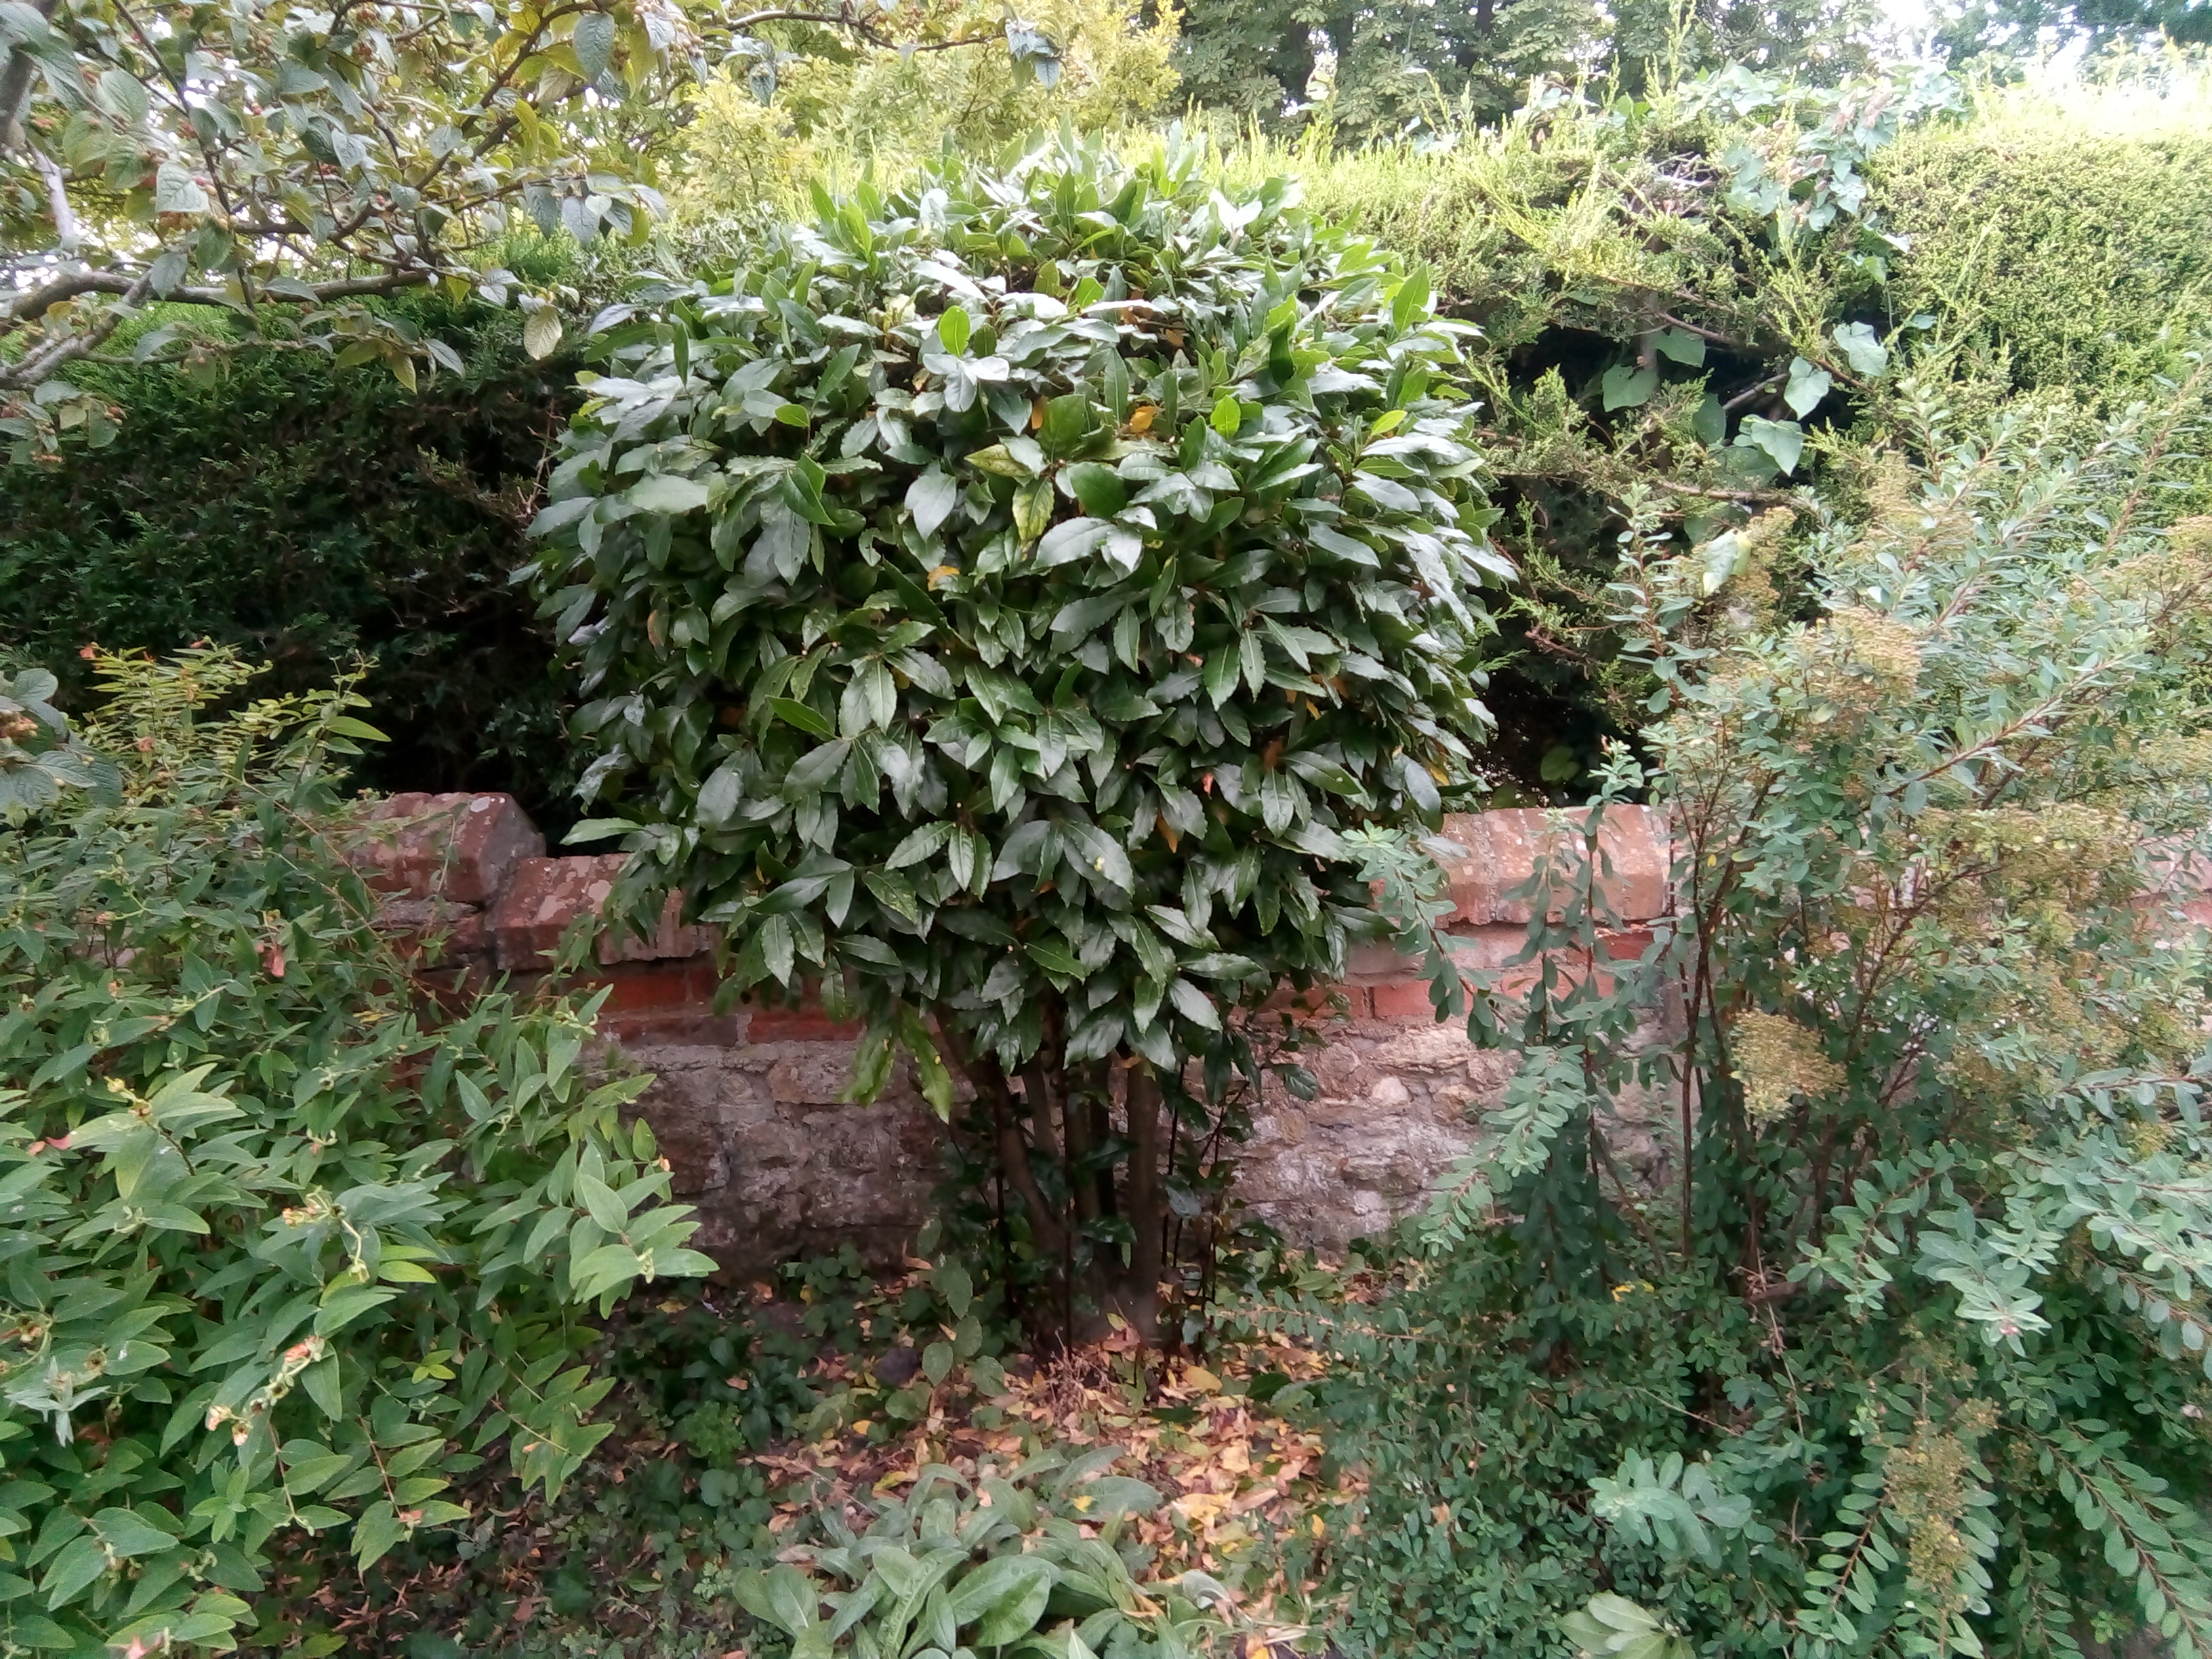
Here's another one, in one of "my" gardens - right - after it's had the first stage of its regular pruning.

The owner doesn't want it clipped too formally: it's not meant to be a showpiece in the way that the one above is, they just want it to be kept under control, away from the hedge behind it, not too big, and not overshadowing the rest of the bed.

So I go in once or twice a year, and trim off about a yard in all directions, to get it back to a round shape, not too formal, but tidy.

I don't do this with shears, I do it with secateurs, one branch at a time, because Bay - like Laurel - has very big leaves, and if you run the shears over it, you end up with a super-neat shape on that first day, but all the cut ends of the leaves go brown, so in a week or so, it looks a right mess.

You might be thinking that shears would be quicker, but actually you're wrong: if you clip, then you have to spend a long time picking up all the bits underneath. But if you use secateurs, you can take hold of each branch as you cut it, and toss it straight in the wheelbarrow: also, cutting individual branches means that you are dealing with "big" bits, which are easy to get hold of - as opposed to clipping with shears, which produces a mass of small bits, which take more effort to collect up at the end.

Having said all that, I will repeat that I never clip large-leaved plants: so my choice of tool is far more to do with horticultural necessity, than cleaning-up-convenience! (I don't want you to get the idea that I'm lazy - I always strive to find the quickest, most efficient ways to do things, but that's not because I am lazy!)

One of Trainees would do a job like this, and would then walk away and leave it, thinking that the job was done: it took me several weeks to train them to finish the job off, by going in on hands and knees to remove the lower sprouts and suckers from the base, which really is part of the job. If you don't clean off all that lower growth, you will quickly lose the "standard" shape.

This particular Bay is multi-stemmed, but the principle is the same: you remove lower sprouts, and any shoots which are springing up from ground level.

And because I like to do a job "properly", I will also clear up all the dead leaves from the nearby Holly, despite the risk to life and limb - well, hands, anyway - from the prickly leaves, eh Nicky? (*grins at fellow gardener who also gets stabbed to death by Holly leaves*)

There we go - left.

Now we have done the job properly: the upper part is shapely and tidy, without being too formal: the multiple stems are clean and clear: and all the nasty dead debris and clutter from below it has been removed.

Having removed the lower sprouts, I've also tidied up the lower edge of the foliage, once I could see it clearly: again, not a topiary clip, not super-neat, just enough to make a nice even shape.

If you can't see the difference, go back and look at the picture above. And if you still can't see the difference, then I don't want you as a Trainee! *laughs*


Did you enjoy this article? Did you find it useful? Would you like me to answer your own, personal, gardening question? Become a Patron - just click here - and support me! Or use the Donate button for a one-off donation. If just 10% of my visitors gave me a pound a month, I'd be able to spend a lot more time answering all the questions!!

Monday, 8 August 2022

How to: get an extra life out of your Flexi-tub

We all have them... sometimes called Gorilla Tubs (I think that's a brand name), sometimes called Tub-trugs (slightly misleading as a trug is, traditionally, an open, nearly flat basket, only of use when raiding the cutting garden whilst wearing a Laura Ashley frock) or sometimes just called a bucket, which is extremely misleading as, although they can indeed be used to carry water, or many other things, they are not really synonymous with "bucket". 


Whatever you call it - I tend to go with Flexi-Tub, or merely "my yellow bucket-thing" - we all have one.

Or more.

Or several.....

And we all have a pile of them sitting in the garage, or in the shed, or round the back of the greenhouse: you know the ones, they have ingrained dirt, and broken handles. 

Like this:


There we go, a classic well-used Flexi-tub, with the handle splitting away from the body.

They all do it! 

And it's not just the fact that the handle is gradually coming off, which forces their retirement - that slit can give you a nasty pinch.

Ask me how I know... yes, I've been pinched a few times. So now, as soon as they start to split, I retire them.

The trouble is, when these Flexi-tubs were first invented, they were super-strong and lasted for years.

Now they are being churned out by every plastics factory in China, it would appear, and the quality has dropped to the point where they start to split in an annoying short time. OK, they don't cost very much, but it's so wasteful! 

A while back, I asked my fellow self-employed Gardeners (we have a facebook page) for ideas as to what to do with the inevitable stack of old Flexi-tubs. Suggestions ranged from

 1. Drill holes in the bottom, then use as a big pot. (trouble is, with broken handles, you can't easily get hold of them...)

2. Mend with duct tape. (does not work. Well, not for long.)

3. Once you have a minimum of two of them, each with one broken handle, put one inside the other, and glue them together. Obviously you have to get a broken handle against a non-broken handle...

4. Sink it into the ground to make a teeny-tiny wildlife pond in suitable place and with appropriate ladders out, plants etc. 

5. Chop the bottom off (keep that bit) and sink it into the ground around or when planting a particularly rampant root running plant heading off where you don't want it to go.

6. Repair it... using a few strips of the same material from another broken one, some small nuts and bolts, with big washers to spread the load. (I tried this: they ripped out in no time, and it did look like the Franken-Tub. Not very elegant!

7. Nail all the duff ones to a big sheet of wood and get people to try and lob tennis balls into them at next year's village fete.  ( I am seriously considering this, for my back garden...)

8. Turn it upside down, cut out a suitable sized entrance, find a quiet spot in the garden and cover it with twigs and branches and you may find a hedgehog taking up residence in this fully waterproof and desirable des-res. (Not a bad idea at all.... just remember to make two entrances, as apparently hedgehogs only like places where they have an emergency exit as well as a normal way in.)

9. Make some new handles, lower down. We have a winner! 

Five minutes with a Stanley knife, two minutes to find a sticky plaster (don't ask...) and there we are, two new handles, broken ones sliced off, and it's perfectly usable again.

It's not as good as it was with the original handles: you can't get as much in, for a start, and it's much less easy to pick it up one-handed, but it certainly works.

Next time, I'll put the cut-outs higher, to make it easier to get hold of, in one hand: I didn't want to cut them too high in case they just ripped straight out.

So far, though, it's doing well: I've been using it for a week with no problems, and it didn't cost me anything at all (apart from the sticky plaster: honestly, you'd think by now that I would have learned how to use a Stanley knife safely...), and the longer it lasts, the longer before I have to break in the new one.

And there you have it - lots of suggestions, with thanks to Avril for the winning suggestion (I didn't feel the need for duct tape round the cut edges, it was actually surprisingly easy to cut them cleanly. Although yes, I did also cut myself, cleanly....), and to Steven for ideas 4-8 inclusive!


Did you enjoy this article? Did you find it useful? Would you like me to answer your own, personal, gardening question? Become a Patron - just click here - and support me! Or use the Donate button for a one-off donation. If just 10% of my visitors gave me a pound a month, I'd be able to spend a lot more time answering all the questions!!