Wednesday, 31 August 2022

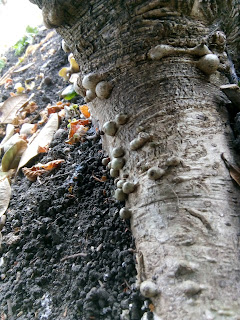
Nodules on an old Hazel tree...what on earth are they?

The other day, I was removing root suckers from a very old Hazel (Corylus avellana) and I noticed these:

No, I have no idea what they are.

They appear to be hard, round, nodules: about the size of garden peas, and scattered all along the base of the tree, where the base flares out.

I've never seen anything like this before, and a cursory internet search ("nodules on hazel tree" "hazel bark galls") didn't throw up any images of anything similar.

So they don't appear to be galls (which I would normally expect on leaves, not on bark, anyway), and they're not burrs, either.

If you have any suggestions, please feel free to leave a comment below, to email me direct - address at the top of the page, in the right-hand column - or to send me the answer on a postcard!!!


Did you enjoy this article? Did you find it useful? Would you like me to answer your own, personal, gardening question? Become a Patron - just click here - and support me! Or use the Donate button for a one-off donation. If just 10% of my visitors gave me a pound a month, I'd be able to spend a lot more time answering all the questions!!

Monday, 29 August 2022

Time to trim the Lavender

It's that time again! 

This is a subject that comes up again, and again.... and again... when, and how, to cut back the lavender.

First question: why do we cut it back?

Answer: because if we don't, the plant gets bigger ("but that's a good thing, surely?" "Listen on, my pet, there's more to it than that,") and with lavender, that means that it gets woodier: and once they get woody, they start to fall open, losing the neat dome shape that we all admire. 

Instead, they flop open, revealing unlovely brown woody stems, many of which are dead.


Here's a fairly typical example - left.

It still flowers, it's still pretty, the bees still love it: but it's sprawling, and untidy, and is starting to flop over the path.

This is what happens if you plant a lavender, and don't prune it for five years...

Did you know that lavenders have quite a short life span? Friends of mine used to run a lavender nursery - yes, a whole nursery, just for lavender!! - and they told me that a lavender plant should be expected to live for five years, that's all. 

Five years!

I can hear several of you shouting at the screen "but I have lavender in my garden that's been there for donkey's years!" and I would agree: I know of many really old lavender plants. My friends commented that, if an individual lavender plant is pruned properly every year, it will indeed last a lot longer than five years. But most people don't prune them properly.

And secondly, lavender do seed themselves quite readily, especially if they are not pruned: so it is entirely possible that the "old" plant is actually one in a series of self-set seedlings, which have grown up around the original plant, which may have died off in the meantime.

I'm not totally convinced, with due respect to my friends: I think that they are confusing "perfect lavender plants" with "ordinary plants in our gardens and we don't mind if they are a bit shabby or shapeless." 

Anyway, back to the point: why prune lavender? To keep it compact, to extend it's life.

How to prune? Grab your secateurs in one hand, get a flexi-tub or other handy garden waste disposal device, and approach the lavender. Gently open up the foliage, until you can see the individual branches. Take hold of one of these branches, quite low down, then slide your hand upwards around the branch, compressing - gently - the foliage as you do so. Wow, I must get myself a go-pro, this sort of thing would be so much quicker if I did a short video of it...  once you have reached the point where you are seeing blue/green leaves, cut off the handful, and drop it in the tub.

I've just re-read that, and it makes perfect sense to me, because I must have done this about a thousand times by now: but it's one of those things which is so much easier to demonstrate, than to describe.

In brief, then, cut the lavender one handful at a time, making sure that you don't cut so far down than you are cutting into bare brown wood, because it won't re-grow from that point.  Always leave some greenery. But don't cut so "high" that you are leaving bare flower-stalks, either: cut them right off. As I say, far easier to demonstrate,  I shall look into the go-pro thing again.

Put all the cuttings into the bin, or on the bonfire pile: they don't make good compost. 

Here's a long lavender hedge, part-done: can you see where I've been?

I meant to do "before" and "after" but, as usual, I forgot to do the first one until I was already half-way down the row! 

However, this is actually quite nice, as it shows you how much, proportionately,  you can take off - and how much to leave behind. 

Enough that it's still green, but without all those sticky-up flowering stalks.


And here - right - is the finished item, a nice rounded shape, all the stems are gone, but there's plenty of green foliage left.

Before you ask, yes, you can, if you wish, do this job with a pair of shears. Many people find it easier to get a neat, balanced shape if they use shears.

(Or even the hedgetrimmers, although I would not recommend that, as a) they are a bit coarse for the job, and b) one slip and oops! All gone!)

The benefit of doing it by the handful, though, is that you don't have to spend half an hour afterwards, picking up all the tiny little bits, which have gone everywhere. Especially on a gravel drive, as it's a nightmare to pick up all the tiny pieces. By doing it one handful at a time, there is no clearing up at all.

And as for "when", that's actually quite simple: when it starts to look "grey".

Lavender flowers are, well, lavender coloured, except for white lavender of course: and when you look across the plants, you should see a haze of blue-purple-lilac-lavender colour.

When you start to see a haze of grey, then that is the time to cut them back.

The actual time depends very much on the weather: I've seen Lavender still flowering right into early autumn, but in a hot and dry year such as this one, they are finished much earlier in the year. So don't go by the calendar, go by your own eye: when they get that "haze of grey" look, get out there and trim them back!


Did you enjoy this article? Did you find it useful? Would you like me to answer your own, personal, gardening question? Become a Patron - just click here - and support me! Or use the Donate button for a one-off donation. If just 10% of my visitors gave me a pound a month, I'd be able to spend a lot more time answering all the questions!!


Friday, 26 August 2022

Hydrangea petiolaris - heading south for the summer!

Sometimes, "one" does not need to look at a compass, to work out which way a garden faces.

Here's a good example - Hydrangea petiolaris, the climbing Hydrangea.

This is a fairly new plant, but quite well established, and growing away strongly.

That upright branch on the far left is tied to a vine eye set into the wall, because although this is a self-clinging plant, it does need a bit of encouragement in the early years.

But all of the new shoots are heading off at an angle of 45 degrees.

What does this tell you, class?  *laughs*

Yes, we are looking at an east-facing wall. South is to the left.  The shoots are heading towards the sun. (And who can blame them?)

What does this mean for us, in our professional capacity?

It means that, if we want a nice even covering of Hydrangea on this wall, we are going to have to be very strict about formative training - that is, training which is done while the plant in question is still young and pliable.

In this case,  knowing that the shoots are going to tend to go to the left, as we look at it: we will have to train the main framework either across to the right, or strictly upright.  Otherwise, the wall to the left - which is actually the kitchen window, you can just see the corner of the windowsill - will be too thickly covered, and the wall to the right will be bare.

Now, this might seem like a bit of a contradiction to that saying about not fighting with your plants: right plant, right place; only grow plants that you know can cope with your soil/weather/conditions, etc etc. But countering phototropism (that's the technical term for  "go towards the light!") is part and parcel of being a gardener, because often, we are restricted as to where we can position our plants, because we might want a, for instance, south-facing wall, but we might not have one!

So, often, we have to make the most of the situations which we have. 

And in cases like this, it just means that for the first few years, we will ruthlessly force the new stems of the climbing Hydrangea to bend towards the right: they will become the (all together now) "framework of old wood" that I'm always going on about (*laughs*).

Then, each year, we can cut off the new, wayward, stems heading south (and, incidentally, covering the kitchen window, which is not desirable) leaving us with a good covering on the wall, which - being "old wood" will bear the flowers, the following early summer.


Did you enjoy this article? Did you find it useful? Would you like me to answer your own, personal, gardening question? Become a Patron - just click here - and support me! Or use the Donate button for a one-off donation. If just 10% of my visitors gave me a pound a month, I'd be able to spend a lot more time answering all the questions!!

Wednesday, 24 August 2022

The happiness of a job, well done..

... is what keeps me bouncing out of bed, in the mornings!

This is the sort of thing which fills me with pride: one of my Clients didn't have any compost pens - I know,  I know, shocking:  so I drew them some plans, they got their handyman in, he did a pretty good job, and lo! and behold, we started composting.

When people are new to composting, it can take a little while to get into the swing of it: and one of the major obstacles is them not knowing which pen to fill.

So I made them a sign:

There you go!

It is just, quite literally, a piece of scrap wood which we can hang on the relevant pen, with the words "FILL ME" written on it, in felt pen.

It won't last forever, but should manage a couple of years, and by then, they will be able to remember the routine.

The trick, with new composting folks, is to make it clear that once we have filled one particular pen, we let it rot down, and we don't go back to it.

There is always a temptation, on their part, to see that the contents are sinking, and to think "Great! We can pile a bit more on top of that one!" but if they do, we could be filling that same pen for another six months, and we therefore won't be able to get any good "stuff" out of it, for even longer. It is far better to let each pen rot down in turn. If you need to know more about this, I have written about compost a ton of times, so just type "compost" into the search box, top left of the screen, and have a good read!


Here's another set of compost pens which I built - and I quite literally built this lot myself, helped by one of my Trainees.

Yes, they are as big as they look - it was a very big garden.

And there's another of my home-made "FILL ME" signs, this one has been in operation for several years now and is still going strong, although I have had to go over the writing a couple of times. 

One day I'll get around to working out the best way to make them more permanent - I've tried engraving (untidy finish and sounded far too much like being at the dentist), and pyrography (couldn't get sufficient difference in colour for it to be worthwhile) and ended up with a good old Sharpie:; the next time I make one, I'll try some varnish, perhaps that might increase the lifespan of the wording.

But in the meantime, the felt-pen ones seem to be doing the job, and the correct pens are being filled.

So proud!


Did you enjoy this article? Did you find it useful? Would you like me to answer your own, personal, gardening question? Become a Patron - just click here - and support me! Or use the Donate button for a one-off donation. If just 10% of my visitors gave me a pound a month, I'd be able to spend a lot more time answering all the questions!!

Monday, 22 August 2022

Plants which thrive in drought-struck lawns

How unfair is this?

It's August of 2022, we've had the driest spring in years, we've had the absolutely driest July since records began, we've had not one, but two heatwaves, with temperatures way up in the 30s (for the UK, that is seriously high, we're not used to it), most people's lawns look like the Serengeti before the rains come...

....and yet, there are a few flowers which are thriving.

This one - left - is not Cow Parsley (*laughs*).

(I'm laughing because non-gardeners think that everything with a white flat-topped flower is Cow Parsley, which is not the case.)

 No, it's Yarrow - proper name Achillea millefolium - which is a pestilential weed of lawns, because it's immune to the only weedkilllers you can use on lawn (Verdone being the one which springs to mind) which means that, once it gets into your lawn, it's pretty much impossible to get rid of it. 

And it will spread out, kill the grass, and take over the lawn.

The only good thing you can say about Yarrow is that at least it's green... and it's pretty much immune to drought - as well as Verdone - because it has enormously long taproots, which can find sub-surface water, when all above is parched and brown.

In fact, there is a school of thought which says that Yarrow should be encouraged in lawns, because the super-long taproots break up a hard clay or chalky soil, reducing compaction, and bringing nutrients to the surface.  

I'm not convinced: if I had a lawn, I would want it to be proper grass. Or, I would give up on grass and go entirely for Yarrow, mowing it once a month to remove the flowers, and allowing just the lush green foliage. It would be a bit lumpy underfoot, compared to proper grass, but at least it would stay green in a drought!

Another drought-tolerant weed flower is the dreaded Ox-Eye Daisy - proper name Leucanthemum vulgare -  which you can see, right, is also green and flourishing, in another Serengeti-like lawn.

In this case, the owner had planted a clump of the stuff in a nearby border, and hadn't noticed how it had seeded itself all over the lawn... until the grass died back, revealing lush green patches.

Before someone says "what do you have against Ox Eye Daisy, it's lovely!" I will tell you that I hate the stuff: the foliage is coarse, the flowers are short-lived and inelegant, it's a dreadful thug and spreads all over the place, including the lawn (exhibit B, m'lud) and it's only in flower for five minutes, doesn't usually re-flower, even if painstakingly dead-headed, and then you are left with an ugly clump of dead stems and coarse foliage. I rest my case.

And, for both this and the Yarrow, because no-one is cutting their "dead" grass, these infiltrators are able to grow and flourish, instead of having their heads cut off once a week.

So where's the silver lining? 

Well, at least you can now see the darned things! So get out there with the daisy grubber, and dig out the Ox-Eye Daisy individually: and as for the Yarrow, now is the time to get the glyphosate spray out, and very carefully spritz just the Yarrow. There is little danger of harming the lawn, because it's mostly dead on top at the moment, but don't spray with gay abandon, target just the Yarrow.

Then, in a few weeks' times, when the rains arrive - which they will, this is the UK - the lawns will quickly green up again, and you will have cleared out these perennial weeds!


 Did you enjoy this article? Did you find it useful? Would you like me to answer your own, personal, gardening question? Become a Patron - just click here - and support me! Or use the Donate button for a one-off donation. If just 10% of my visitors gave me a pound a month, I'd be able to spend a lot more time answering all the questions!!

Friday, 19 August 2022

It's never nice to find Pooh in the flower beds...

...said Avril, fellow Professional Gardener, in response to this picture:

No, your eyes do not deceive you, it's a Pooh Bear, buried in the flower bed.

Well, half buried.

The garden owner's dog apparently swiped poor old Pooh from the bed of a visiting grand-child, and decided that he ought to be buried out in the garden.

For later consumption?

To keep him safe?

Who knows... dogs are strange creatures.

Finding Pooh in this pickle was, I have to say, less of a shock than the at-first-sight thought-it-was-a-dead-sheep episode , which I shared with you recently: but still, awww, poor Pooh!  

The worst aspect was that the dog, having the entire garden to choose from, selected one of the few places which has been watered, as it's the base of a recently-planted Cherry tree.... almost everywhere else in the garden is bone dry and dusty, so Pooh could have been extracted with a gentle pull, shaken, then returned unharmed.

But no, he's been buried in the mud, so now he'll have to go through the washing machine (Cries from Pooh of "Conditioner, please! For nice, soft, fur!"), and the grandchild in question might need counselling, for the emotional trauma.

Taking Avril's comment as an invitation for a caption contest, Steven (another Pro Gardener colleague) offered:

Pooh:  "That stone in the wall up there looks very very loose. Oh bother."

Hmmm, he has a point.  As for me, I was horrified to find him, but relieved that he'd been buried the right way up. 

So that he could....errr...... breathe.....


Did you enjoy this article? Did you find it useful? Would you like me to answer your own, personal, gardening question? Become a Patron - just click here - and support me! Or use the Donate button for a one-off donation. If just 10% of my visitors gave me a pound a month, I'd be able to spend a lot more time answering all the questions!!

Wednesday, 17 August 2022

"It's like Strip the Willow: but with less skipping..."

... and with more blood.

"What?!" I hear you say.

I'm talking about what is normally an annual, winter, job: the Stripping of the Sugar Cane in my own back garden.

This wonderful plant is Miscanthus sacchariflorus, common name Sugar Cane, although in the UK, it doesn't produce any sort of sugar. 

It's a fantastic ornamental grass - yes, despite being over 6-8' tall, it is actually a grass - which makes a really nice screen in the garden: it rustles in the wind, which is very soothing, and it forms a visual screen without being a solid, heavy, sort of thing.

In recent years, I've noticed it being grown for biomass fuel, which is an interesting development. 

There are several fields of it in Baulking, a nearby village, which always catch my eye if I'm out that way. It grows fast and tall, and is cut down to the ground every winter, does not require replanting (because it is a perennial) does not require weedkiller (as it does not seem to suffer from any pests or diseases, plus the dense foliage and thick rootstocks prevent most weeds from growing beneath it) and grows pretty much anywhere, making it a good choice for what is called "marginal" agricultural land, ie land which is not particularly fertile. It's also drought-tolerant, and can withstand a fair amount of winter abuse, ie cold temperatures and soggy ground don't seem to bother it. Sounds like a win-win for the farmers, and it's a lovely crop to walk alongside, as it doesn't produce pollen, or dust, or any other irritants.

In fact, the only bad thing about it is that the leaves are very finely toothed - serrulate, if you would like the technical term - and can slash bare skin with ease, if you rub up against it the wrong way.

And that leads up back to the blood... every autumn, the leaves die off, so at some point I go round it and remove the dead leaves. Some years, this is all done in one day: in other years, the leaves die off slowly, so I might do it in several instalments.

The beauty of removing the leaves as they die is that a) dead leaves are unsightly, and b) the newly revealed bare stems then change colour, over a couple of weeks, from pale green to red or purple, depending on the weather.

On a good year, I'll end up with a stand of reddish/purple stems, still bearing a tuft of green leaves at the top, in late autumn. Then those top leaves will die off slowly over the winter, and by February they are looking sad and brown, so I'll strip them off completely, and cut down the bare stems.

Which, incidentally, provides me with an annual crop of light-weight canes, for use in the garden.

Other years, the leaves will all die off by the end of autumn, so they get stripped at that point, although I often leave the bare stems, if they are still colourful, until they lose their colour, at which point I'll cut them all down. 

And this year, here we are in mid August, and already I've had to go out and start stripping them!


This is what they looked like, yesterday: a mass of dead brown leaves.

Bear in mind that these are only the lower leaves, the top one are green and lush as always (*rushes outside to take picture of the whole stand*)


There you go - right - that's what they look like today, with added water butts:   you can see that, despite the recent weather, it's well above the fence height!

But the lower leaves are all dying off, which spoils the look of it, so it's time to Strip the Sugar Cane!

This means pushing my way in amongst the stems, and taking each leaf in turn, and pulling it gently off the stem.

It's immensely satisfying to do, because after ten minutes or so, you start to see visible progress, as the newly-revealed stems are a clear green, instead of that nasty old dead brown stuff.

Here we go - left - and you can see that it's turning back to a green plant again, instead of a brown one. There are still quite a few to go, but it's too hot to spend much time out there, so I'll do a bit more tomorrow.

Now, getting back to the blood... normally, as mentioned, I do this job in autumn, or in the depths of winter, when I am well bundled up against the cold.

I don't "normally" have to do it in summer.

So here I am, in shorts and t-shirt, pushing my way in among the stems, bending right over to get the lower ones - you have to start at the bottom and work your way up, because of the architecture of the leaves: each leaf has a long sheath below it, which wraps all the way round the stem, and each leaf sheath overlaps the leaf above.  I'm not sure if that explanation made sense, but take my word for it, you start at the bottom and work up.

This means bending double.... and that means that the leaves slide past your arms, as you reach down.

The leaves.

With those serrulate margins.

Teeth.

Sharp.

T-shirt.

OUCH!!  

After twenty minutes, my upper arms were starting to sting, and when I went back indoors, I noticed a matrix of thin slashes. 

Hmmm.  Memo to self: wait until it's cooler, then put on long sleeves before finishing this job!


Did you enjoy this article? Did you find it useful? Would you like me to answer your own, personal, gardening question? Become a Patron - just click here - and support me! Or use the Donate button for a one-off donation. If just 10% of my visitors gave me a pound a month, I'd be able to spend a lot more time answering all the questions!!

Monday, 15 August 2022

Plant Profile - Hardy Hibiscus

 When people say "Hibiscus" they usually mean the exotic, tropical, ones,  but here in the UK we can grow our own fully hardy Hibiscus - H.syriacus.

They are usually a bit of an under-used shrub, mostly because they are what you might call a one-trick pony: they flower just the once, in late July/August, and that's it. 

They are not evergreen, so you don't get winter interest: they are late to come into leaf, so you don't get spring interest, and they don't do anything interesting in autumn, either. 

But for those few weeks in summer when they are in full bloom, they are quite delicious: the petals - in shades of blue, lilac or white - are like crumpled silk, and they have a cheeky clump of stamens in the centre, which seem to be sticking their tongues out at us. 

Being a Mediterranean plant, they need a lot of sunshine - my research suggests that they need at least six hours of sunshine a day to bring them into full bloom, but here in South Oxfordshire, I have several of them in "my" gardens, and as long as they are in a sunny spot (this particular one is against a south-facing wall, perfect!) then they seem to be pretty reliable.

The best place for a shrub Hibiscus is either towards the back of a border, so that their early-season bareness doesn't send the garden owner into a decline (“It's dead! It's dead!”) or standing in splendid isolation, where their stiff upright form can be admired from all angles, and where they get plenty of that sunlight which they crave. 

They are extremely easy to care for: they grow fairly slowly, so you don't need to do any complicated pruning, but they can also be cut back in late winter if they are getting in the way, without causing them any harm. 

Here's what they look like in late autumn, this was taken last November - left.

As you can see, they hold their leaves quite late in the season, but once they start looking like this, I think it's high time for the winter prune. 

Personally, I cut "my" ones back quite hard, every year, at any time from later November to early spring, depending on when I have the time... and when I say "quite hard", here is the same shrub after pruning:


 As you can see, quite a lot of material removed.

I think of it as another "framework of old wood" pruning job: I go back to the same height every year, removing all the growth from the previous year.

(If I didn't, the garden owner wouldn't be able to see out of the window at all!)

In addition, I'll take out anything which is damaged, or obviously dead: and then sometime I might thin it out in a couple of places, if I think it's getting a wee bit too congested.

After this work, I just rake up all the fallen leaves, and that's it for the winter.

They don't need watering, or special feeding, just a bit of patience in spring (“It's dead! It's dead!”). 


In fact, the only thing I don't like about the many Hibiscus (Hibiscusses? Hibiscusi?) in my care is that I have several lilac/blue ones, which send up seedlings all over the place, but the only beautiful white one (which I covet on a weekly basis) has never yet produced any seedlings! 


Did you enjoy this article? Did you find it useful? Would you like me to answer your own, personal, gardening question? Become a Patron - just click here - and support me! Or use the Donate button for a one-off donation. If just 10% of my visitors gave me a pound a month, I'd be able to spend a lot more time answering all the questions!!

Friday, 12 August 2022

Bay Tree trimming - how to finish the job properly!

Ah, everyone loves a Bay tree, don't they?

Especially if it's neatly trimmed.

What could be nicer than this - left - a sturdy standard Bay in a herb garden.

Perfect! 

"Standard", in case you don't already know, in this context, means "carefully nurtured to create a single central stem with a tuft of foliage on top" as opposed to a wild shaggy bush, taking over the entire bed, which is what Bay does, if left to its own devices.


Here's another one, in one of "my" gardens - right - after it's had the first stage of its regular pruning.

The owner doesn't want it clipped too formally: it's not meant to be a showpiece in the way that the one above is, they just want it to be kept under control, away from the hedge behind it, not too big, and not overshadowing the rest of the bed.

So I go in once or twice a year, and trim off about a yard in all directions, to get it back to a round shape, not too formal, but tidy.

I don't do this with shears, I do it with secateurs, one branch at a time, because Bay - like Laurel - has very big leaves, and if you run the shears over it, you end up with a super-neat shape on that first day, but all the cut ends of the leaves go brown, so in a week or so, it looks a right mess.

You might be thinking that shears would be quicker, but actually you're wrong: if you clip, then you have to spend a long time picking up all the bits underneath. But if you use secateurs, you can take hold of each branch as you cut it, and toss it straight in the wheelbarrow: also, cutting individual branches means that you are dealing with "big" bits, which are easy to get hold of - as opposed to clipping with shears, which produces a mass of small bits, which take more effort to collect up at the end.

Having said all that, I will repeat that I never clip large-leaved plants: so my choice of tool is far more to do with horticultural necessity, than cleaning-up-convenience! (I don't want you to get the idea that I'm lazy - I always strive to find the quickest, most efficient ways to do things, but that's not because I am lazy!)

One of Trainees would do a job like this, and would then walk away and leave it, thinking that the job was done: it took me several weeks to train them to finish the job off, by going in on hands and knees to remove the lower sprouts and suckers from the base, which really is part of the job. If you don't clean off all that lower growth, you will quickly lose the "standard" shape.

This particular Bay is multi-stemmed, but the principle is the same: you remove lower sprouts, and any shoots which are springing up from ground level.

And because I like to do a job "properly", I will also clear up all the dead leaves from the nearby Holly, despite the risk to life and limb - well, hands, anyway - from the prickly leaves, eh Nicky? (*grins at fellow gardener who also gets stabbed to death by Holly leaves*)

There we go - left.

Now we have done the job properly: the upper part is shapely and tidy, without being too formal: the multiple stems are clean and clear: and all the nasty dead debris and clutter from below it has been removed.

Having removed the lower sprouts, I've also tidied up the lower edge of the foliage, once I could see it clearly: again, not a topiary clip, not super-neat, just enough to make a nice even shape.

If you can't see the difference, go back and look at the picture above. And if you still can't see the difference, then I don't want you as a Trainee! *laughs*


Did you enjoy this article? Did you find it useful? Would you like me to answer your own, personal, gardening question? Become a Patron - just click here - and support me! Or use the Donate button for a one-off donation. If just 10% of my visitors gave me a pound a month, I'd be able to spend a lot more time answering all the questions!!

Wednesday, 10 August 2022

Plant Profile - Passion Flower

Passiflora caerulea - a popular climber, known as Passion Flower.

This is what each individual flower looks like - exotic, aren't they?

And large, too - the size of the palm of your hand.

Why is it called "passion flower?" I hear you ask. Well, it's based on religion, the Passion of Christ, which was nothing to do with having a good time, but was more to do with his suffering, as it's a corruption of passus sum; "to suffer, bear, endure"

So, like pretty much everything based on religion, it starts off with a mis-quote, and gets worse from here on in.

According to the internet:

"The five petals and five sepals are the ten disciples less Judas & Peter. "  

Hmmm.  So alleged "history"  has actually been twisted, to fit the flower.

I mean, if it only had four petals and four sepals, no doubt it would be "the flower represents the ten disciples (they mean, the 12 disciples, of course) less Judas, Peter, James and another one."

To continue: "The corona filaments are the crown of thorns. The five stamen with anthers match the five sacred wounds & the three stigma the nails. "  I can't comment on the sacred wounds, I don't know anything about them: but as for the nails, up until the Middle Ages - ie closer in time to when these events are reputed to have happened - Christ  on the cross was always depicted with four nails. It wasn't until the C13th that Western art started painting the figure with the feet overlapping, thus only needing one nail instead of two.   So I don't think we can give that resemblance much credence.

Finally, and hilariously, one internet source continues: "This symbolism is not universal however, in Japan it is sometimes known as ‘The Clock-faced Plant’ and apparently has recently been adopted as as symbol for homosexual Japanese youths."  Hilarious! (because of Christianity's well documented lack of tolerance for anything other than white middle-class heterosexuality.)

Right! Let's forget about all that rubbish, accept that the common name is Passion Flower, and move on.

What is it, and why do we love it? It's a climber, it's fully hardy, it can be cut down to the ground every year, or allowed to romp away and take over: in mild winters it stays evergreen, and the flowers are FABULOUS!!  

All it needs is a few wires to get it started, and will climb as high as you wish.


Here's one I grew for a Client: I know it looks a bit like a football goal, but it's actually an old net-covered vegetable frame, stood up on end.

One Passion Flower planted on each side, and by the end of summer, it covers the entire frame, so all you can see are leaves, and flowers.

And it makes a shady bower, in which to sit.


Here's one in my own garden: for various reasons, I had to cut it right back to nothing in early summer, leaving just this one twisty main stem:  this was taken in June 2021. 

And it looks as though it's dead. 

But it's not! 

Within days, it was putting out new leaves, and shoots, and by the end of summer, it had covered the fence as usual, flowering like a mad thing.

Having cut it back so hard in June, I didn't cut it back again in autumn, I just left it:


And here it is in February 2022, after a very mild winter, and it's still lush and evergreen, as you can see. 

This gives you an idea of how sturdy and resilient this plant is, despite the exotic-looking flowers.

I should also say that this one, my one, is growing on a north-facing fence, and it has a tiny patch of really poor soil at the base, with competition from my neighbour's thick hedge, on the other side of the fence. So it's in a pretty hostile situation, and yet it comes up flowering, every year without fail.

There is another twist in the tail (tale?) of this climber: once the flowers are pollinated, a few of them will produce:

Seed pods!

Aren't they glorious! 

Aren't they huge!

They start off bright green, like this, and over a few weeks, they turn bright orange, which really brings another season of interest to this climber.

No, they're not edible, despite what you might read on the internet: inside is a fluffy mass of loose pulp, containing a large number of seeds, most of which will happily germinate.

In fact, if you are new to gardening, or new to propagation in particular, then start with Passion Flower, because they are hearteningly easy to grow. 

All you have to do (don't you love things which start off "all you have to do" ??!!) is wait until the seed pods turn orange, then pick a nice big one, and bring it indoors. Break it open, and by that I mean "insert thumbnails and gently pull apart" because they are soft and squishy: scoop out the pulp and put it in a sieve. Hold it under a slowly running tap while you mush the seeds around, to wash off all the sticky pulp. 

Once they are clean ("ish"), put them on a sheet of kitchen towel, and gently rub them until they are dry, and all the pulp is off. Then put some of them into a pot with some soil, leave it outside somewhere, keep it moist-ish, and either very soon, or next spring (depending on weather etc) you will find a lot of skinny little shoots springing up.

Success!

You have propagated your Passion Flower!

Pot them up, grow them on a bit, then plant them out and lo! and behold, you will have your very own Passion Flower, free of charge, and next year, it will be ramping away up your house/fence/shed/garage, and you will have your own beautiful, exotic flowers to enjoy.


Did you enjoy this article? Did you find it useful? Would you like me to answer your own, personal, gardening question? Become a Patron - just click here - and support me! Or use the Donate button for a one-off donation. If just 10% of my visitors gave me a pound a month, I'd be able to spend a lot more time answering all the questions!!
Monday, 8 August 2022

How to: get an extra life out of your Flexi-tub

We all have them... sometimes called Gorilla Tubs (I think that's a brand name), sometimes called Tub-trugs (slightly misleading as a trug is, traditionally, an open, nearly flat basket, only of use when raiding the cutting garden whilst wearing a Laura Ashley frock) or sometimes just called a bucket, which is extremely misleading as, although they can indeed be used to carry water, or many other things, they are not really synonymous with "bucket". 


Whatever you call it - I tend to go with Flexi-Tub, or merely "my yellow bucket-thing" - we all have one.

Or more.

Or several.....

And we all have a pile of them sitting in the garage, or in the shed, or round the back of the greenhouse: you know the ones, they have ingrained dirt, and broken handles. 

Like this:


There we go, a classic well-used Flexi-tub, with the handle splitting away from the body.

They all do it! 

And it's not just the fact that the handle is gradually coming off, which forces their retirement - that slit can give you a nasty pinch.

Ask me how I know... yes, I've been pinched a few times. So now, as soon as they start to split, I retire them.

The trouble is, when these Flexi-tubs were first invented, they were super-strong and lasted for years.

Now they are being churned out by every plastics factory in China, it would appear, and the quality has dropped to the point where they start to split in an annoying short time. OK, they don't cost very much, but it's so wasteful! 

A while back, I asked my fellow self-employed Gardeners (we have a facebook page) for ideas as to what to do with the inevitable stack of old Flexi-tubs. Suggestions ranged from

 1. Drill holes in the bottom, then use as a big pot. (trouble is, with broken handles, you can't easily get hold of them...)

2. Mend with duct tape. (does not work. Well, not for long.)

3. Once you have a minimum of two of them, each with one broken handle, put one inside the other, and glue them together. Obviously you have to get a broken handle against a non-broken handle...

4. Sink it into the ground to make a teeny-tiny wildlife pond in suitable place and with appropriate ladders out, plants etc. 

5. Chop the bottom off (keep that bit) and sink it into the ground around or when planting a particularly rampant root running plant heading off where you don't want it to go.

6. Repair it... using a few strips of the same material from another broken one, some small nuts and bolts, with big washers to spread the load. (I tried this: they ripped out in no time, and it did look like the Franken-Tub. Not very elegant!

7. Nail all the duff ones to a big sheet of wood and get people to try and lob tennis balls into them at next year's village fete.  ( I am seriously considering this, for my back garden...)

8. Turn it upside down, cut out a suitable sized entrance, find a quiet spot in the garden and cover it with twigs and branches and you may find a hedgehog taking up residence in this fully waterproof and desirable des-res. (Not a bad idea at all.... just remember to make two entrances, as apparently hedgehogs only like places where they have an emergency exit as well as a normal way in.)

9. Make some new handles, lower down. We have a winner! 

Five minutes with a Stanley knife, two minutes to find a sticky plaster (don't ask...) and there we are, two new handles, broken ones sliced off, and it's perfectly usable again.

It's not as good as it was with the original handles: you can't get as much in, for a start, and it's much less easy to pick it up one-handed, but it certainly works.

Next time, I'll put the cut-outs higher, to make it easier to get hold of, in one hand: I didn't want to cut them too high in case they just ripped straight out.

So far, though, it's doing well: I've been using it for a week with no problems, and it didn't cost me anything at all (apart from the sticky plaster: honestly, you'd think by now that I would have learned how to use a Stanley knife safely...), and the longer it lasts, the longer before I have to break in the new one.

And there you have it - lots of suggestions, with thanks to Avril for the winning suggestion (I didn't feel the need for duct tape round the cut edges, it was actually surprisingly easy to cut them cleanly. Although yes, I did also cut myself, cleanly....), and to Steven for ideas 4-8 inclusive!


Did you enjoy this article? Did you find it useful? Would you like me to answer your own, personal, gardening question? Become a Patron - just click here - and support me! Or use the Donate button for a one-off donation. If just 10% of my visitors gave me a pound a month, I'd be able to spend a lot more time answering all the questions!!

Friday, 5 August 2022

How to: confuse the Red Queen with roses

Remember Alice, in Wonderland, asking the gardeners why they were painting the white roses red?

Because the queen - the Red Queen, of course - wanted red roses, was the answer, and they had planted the wrong ones.

Oh no! Off with their heads!

How many times have you bought a plant which was labelled as being a particular colour, then found it not to be so?

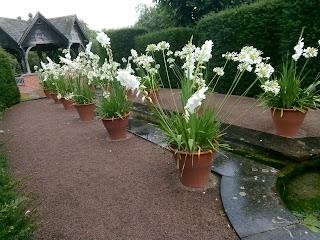
Agapanthus are the usual culprits: blue is the common colour, white is the super-desirable colour, and you can see why, in this part of the garden at Hampton Court Castle - that's not Hampton Court in London, it's a different place altogether, in Worcestershire, just south of Leominster and well worth a visit - where they have planted the pots with white Agapanthus and white Gladioli, of which I am extremely envious. 

Over the years, I have known several Clients who have bought "white" Agapanthus, which have then come up blue, which is very disappointing.

 Particularly the time when a garden designer had bought in 12 matching pots and 12 matching sets of white Agapanthus corms - and four months later, five of them were blue. It rather spoiled the display...


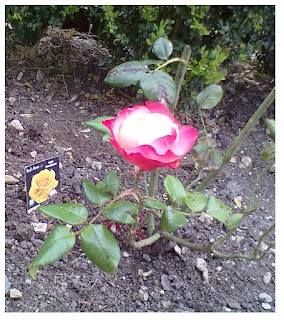
Roses are another story: sometimes they are simply labelled wrongly by the nursery: right.

Well, that's clearly not a yellow rose, is it?! The other two plants, bought on the same day, from the same nursery, were... *sighs*

But that's not the whole story, because sometimes roses do spontaneously produce one or more blooms of a different colour and/or shape: I'm not talking about when a grafted rose sends up suckers (just type "grafted" into the Search box, top left of the screen, to see a few examples that problem), instead I'm talking about a normal Rose stem, which suddenly produces a "sport", ie a rose of a quite different colour.

I've seen it a couple of times, over the years: once was a huge climbing yellow rose, which produced one dark pink flower. Just the one, quite high up.

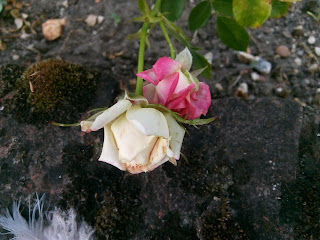
And then, earlier this year, I found this:


How's that for confusion?

On the same flowering stem - honestly, no cunning photography, no glue or sticky tape - we have one white flower, and one pink flower.

Eat your heart out, Red Queen!


Did you enjoy this article? Did you find it useful? Would you like me to answer your own, personal, gardening question? Become a Patron - just click here - and support me! Or use the Donate button for a one-off donation. If just 10% of my visitors gave me a pound a month, I'd be able to spend a lot more time answering all the questions!!

Wednesday, 3 August 2022

Lawns in drought: don't panic, Mr Mainwaring!

This year, we're having August in July, just to make a change: weeks with no rain to speak of, and then a massively hot spell, with temperatures up in the ridiculous, even if only for a few days: and then more dry weather. Cooler, but still dry, and all the water butts are empty.

Most people are looking at their gardens in despair, because they look so sad - apart from the roses, of course, which are having a great year! But everything else is wilting: perennials are browning off and saying "that's it, no more, I'm done for the season!" and as for the grass, well: "crispy" is the word.


Annoyingly, this is when the weeds come into their own.

Just look at this lawn, left: the only green patches are the pesky Yarrow!

But fear not: grass has a wonderful way of recovering, and all we need is a bit of rain and all will be well.

There is no point wasting water in watering the lawn (unless you need a lush bowling-green lawn, for some reason) (and if you do, then you have probably already been watering it...), it is much better to just leave it crispy and brown, and wait for the rains to come.

Which they will: this is England, after all!

And the minute it rains, up will pop all the new shoots, and in no time at all we will have forgotten that it was ever looking so dead.

In fact, as I frequently say, if grass were invented now, it would be hailed as a miracle ground cover:  it takes all the abuse that children and dogs can throw at it, it recovers from drought, and all it needs is for the mower to be run over it once a week. It can go for years with no feeding: it can be accidentally left to get rank and lumpy, and if you start cutting it again, in no time it's back to being lush green lawn.

It's a miracle! 

So don't panic if your grass is brown and apparently dead: it is NOT dead, it WILL recover, and just think - in the meantime, you don't have to mow it!!


Did you enjoy this article? Did you find it useful? Would you like me to answer your own, personal, gardening question? Become a Patron - just click here - and support me! Or use the Donate button for a one-off donation. If just 10% of my visitors gave me a pound a month, I'd be able to spend a lot more time answering all the questions!!

Monday, 1 August 2022

How to: grow your own Olive tree

I had a question in yesterday, from one of my "regulars" (*waves enthusiastically*) asking for advice about an Olive tree, which they have had for three years, and which was not  - as yet - producing fruit.

Olives are hardier than you would think, despite being a Mediterranean tree: they can live outdoors in the UK, as long as they are positioned with care. (I'll let those of you in other countries do your own calculations as to how your climate relates to ours!! ) That means, in a sheltered, sunny spot, and preferably close to a south-facing wall, so that they benefit from the reflected heat. Near to the house is therefore ideal.

But they don't enjoy our cold UK winters, as you would expect, so the options are to either protect them over the winter, by wrapping them in horticultural fleece, or hessian (not anything plastic!!): or by growing them in a pot, which you can move indoors in winter. Although having said that, they need their winter rest, in order to flower: internet research suggests "two months at below 10 degrees C" so put them somewhere sheltered from frost, but still receiving natural light (ie don't shove them into the garage), but which gets cold

Plants in pots...hmmmm,  I've given this advice many times (*cue Betty Marsden voice:* "Many, many, times...") but here it comes again - put them in a terracotta or ceramic pot, as opposed to a plastic one: get the largest pot you can reasonably manage: go for a straight-sided pot: put it up on feet to keep it clear of the ground: and bear in mind that you will need to both feed, and water, your plants in pots. Even if they are outdoors, and even if it rains. For all the reasons behind this advice, either type the word "pots" into the Search box, top left of the screen: or scoot over to this article and read all about it.


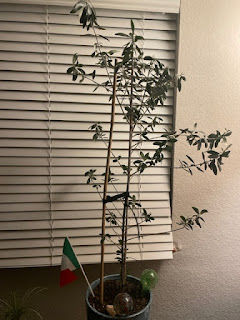
Here is the Olive tree in question: it looks like quite a young tree, and it's nice and healthy, but not very "lush" as yet. And not flowering yet.

My first thought is the pot: it's too small for the plant. So there's the first recommendation - pot it up, into a wider, slightly deeper pot. This also gives you a chance to put fresh compost in, and a small handful of pelleted slow-release fertiliser, if you have any. 

Next, I'd look at those spindly branches shooting off in all directions, especially the top left one, and those three to the right: and I'd shorten them by a few inches, to encourage branching out. In fact, I'd also say, at this point, that it's worth making a decision regarding the overall shape of the tree - do you want a "standard" or lollipop shape, in which case you can clear all the lower shoots from the main stem: or are you going for more of a "natural tree" look, in which case just shorten the sticky-out ones.

Next, I'd decide on a good location: I'm not entirely sure if the one in the photo is indoors or outdoors, the way the blinds hang suggests indoors: in which case I'd suggest moving it outside for the summer, as increasing the light it gets will also encourage it to thicken up, rather than growing long, spindly branches.

Then all it needs is regular watering, and also regular feeding - little and often is the key, for the feeding: a quick slosh of liquid feed once a month through the growing season. Watering needs to be more often, obviously!

Tail off the watering as the season ends, and if you leave it outdoors all year, make sure the pot is up on feet over the winter, as Olives really, really don't like have cold soggy roots. They are better at surviving drought, than they are at surviving waterlogging.

Pruning:  being slow-growing, they don't need much in the way of pruning, once you have done this early shaping, as mentioned above. If you do need to prune, try to do it in late spring/early summer if possible. The fruit appears on one-year-old wood, the branches

They should start to produce flowers and therefore fruit once they are 3 years old or so: although they are usually sold as being "self-pollinated", they really prefer to be wind pollinated, so they need to be outdoors while they are flowering. Another good reason for growing them in a pot, it means you can move them outside for the summer, then bring them inside when it's cold. Also, even a self-fertile plant needs the pollen to be moved from one flower to another, and there is much more chance of that occurring if the plant is outdoors, where there are absolutely bound to be more flying insects, than inside your house!

They also tend towards being biennial bearers: that means that they have alternate year of heavy cropping, and very light cropping: this is perfectly natural, if rather annoying, so don't be disappointed when it happens.

Fruiting won't occur on shaded branches, so thinning of the branches may be required: ideally, when you stand next to it, you should be able to just see through the canopy. If it's too dense to see through, then it probably needs thinning: if you can see little bits of daylight, then all is well. Besides, it is always good practice to ensure that air can circulate within the canopy of any tree, fruiting or ornamental, as it reduces the risk of disease, mildew, etc: plus, if you can "see" inside the canopy, you can spot any damage, or pests, or problems, as soon as they appear.

General maintenance - most Olive trees are grown with one main trunk, so check the base for suckers, and remove them as soon as you see them: and personally, I like a clear stem on a tree, so I'd also remove the lowest branches so that the bottom 1-2' of the trunk is clear. This also makes it easier to water, to remove weeds from the soil surface, and to spot those suckers!

One final point: Olives are evergreen, but they still shed their leaves, so don't be concerned if you find a lot of dead leaves on the ground in spring: rather than doing an autumn drop, they hold their leaves until the new ones push through. No need to panic!


Did you enjoy this article? Did you find it useful? Would you like me to answer your own, personal, gardening question? Become a Patron - just click here - and support me! Or use the Donate button for a one-off donation. If just 10% of my visitors gave me a pound a month, I'd be able to spend a lot more time answering all the questions!!