Saturday 31 December 2022

What to do with heavy shade, and tree roots.

I received a question a while back, (*waves* "Hi, Nicky!") concerning a lady wanting to create some planting areas in difficult spot, in a small communal garden.

Nicky said:  "Unfortunately the area is heavily tree lined…lots of roots, it is shady, the grass area is mostly moss or bare and the soil is rock hard or non-existent."

This photo shows one corner of the area - complete with bicycle! - and you can really see the problems.

Just look at those whopping great roots!

The tree roots are growing right on the surface: the thin covering of moss shows how deep the shade is, both by the fact that there is moss there at all, and by the fact that it is bare of grass: and it does look utterly compacted, because even the moss is struggling.

Nicky continued:  "I think the best thing I can do is put some top soil down, so at least the poor plants have a fighting chance and probably put mulch on to keep some of the moisture in. "

Now, there are a couple of problems with that idea.

Firstly, putting additional soil over tree roots is rarely a good idea: when tree roots rise up to the surface like this - as per the photos - it's a response to the compression of their soil, probably from being in between a building, and a road. 

Those exposed roots actually do perform a function: they contain lenticels, and the trees are using them to "breathe". So covering them in soil is not what the tree wants, plus, even if you do, they will work their way back up to the surface.

Next problem:  you will have immense difficulty finding spots soft enough to dig into, because all the best spots are going to have whacking great tree roots running across them. This can make it hard to achieve a tidy, or stylish, or symmetrical, arrangement.

If the problem is "merely" cosmetic (I say that in quotes, because as gardeners, we care a great deal about what things look like!) then a shallow layer of something loose, like bark chippings, is fine: it covers up the ugly roots, makes the surface look homogenous, and because bark chippings are big, they form a matrix - rather than compacting down - which allows the roots to "breathe". In an area that shady, and that compacted, it's often better to give up on the grass, altogether... but adding a layer of topsoil, deep enough to plant into, is not the answer.

All this means that, as Nicky had already spotted, the only real answer is to use planters.

I would suggest combining those two ideas:- use above-ground planters, and surrounding the whole area with a fairly thin layer of bark chippings, so that the lady owner can stroll around to admire the planters, without getting muddy shoes. 

The usual planter rules apply: get the biggest ones you can, get straight-sided ones wherever possible, avoid tapering ones at all costs: the key phrase is "trough" rather than "pot".

Make sure they have drainage holes: put them in place, taking some time to check the arrangements, because they will be too heavy to move once they are filled: then fill them with a 50-50 mix of cheap multipurpose bought-in compost, and either topsoil, or farmyard manure/organic matter, which will give the compost better water-holding properties. 

Starting from scratch like this is a great opportunity to get matching planters: for a simple but stylish look, go for either all the same shape, or all the same colour: this avoids what I call "the fruit salad effect".

Talking of colour, painted planters also brighten up the place in winter, and as it is quite shady there,  a splash of some contemporary colour on the planters might well be a welcome diversion, on a dark winter's day.

As the area is so very shady, a lot of plants might struggle to grow there, so planters offer another advantage, in that it's easy to remove/replace plants if they don't do well. A selection of shade-tolerant plants could be supported by cheap and replaceable bedding plants, both summer and winter,  which also means that the owner can change it every year, if they wish.

One often-overlooked problem with planting under heavy tree cover is that of water - the presence of moss might suggest that the area is damp, so watering won't be necessary, but  trees not only extract all the water from the soil around them, but they also act as umbrellas, keeping the rain off the planters below.

This isn't necessarily a big problem - a simple irrigation system could be installed.

Mind you, having to water the planters does give the owner an excellent excuse to go and walk around them every day!

So there you go, how to introduce planting into an otherwise very inhospitable environment!


Did you enjoy this article? Did you find it useful? Would you like me to answer your own, personal, gardening question? Become a Patron - just click here - and support me! Or use the Donate button for a one-off donation. If just 10% of my visitors gave me a pound a month, I'd be able to spend a lot more time answering all the questions!!

Thursday 29 December 2022

How to deal with an overgrown Climbing Rose

I've written quite a few articles about rose pruning - just type "rose" into the search box, top left of the screen - and today, it's time for a very brief article on dealing with a neglected climbing rose.

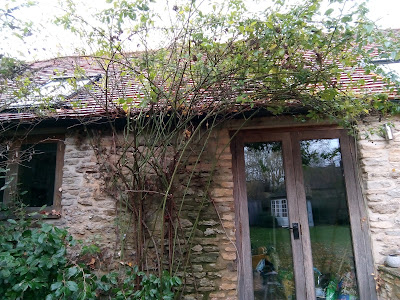
As usual, I forgot to take a "before" picture: the rose in question had grown to above gutter height on a single-storey building, had swallowed up one window altogether, and was now threatening to take over the French doors as well. 

Worse, it was stretching outwards, swamping the planting below it, and interfering with anyone trying to walk past, meaning that the lawn was now being worn away, as people stepped off the path to avoid the rose.

My first thought, on first seeing it, was to suggest to the Client that it was time to give it a really thorough cutting back, taking it right back to the wall, removing all the huge mass of overhanging material:much of which looked dead.

However, as often happens, the Client wasn't quite ready for a drastic cut-back, and asked that I just remove the dead wood, the overhang, the bits sticking out over the path: clear the window altogether, and cut back to the point where the doors could actually be opened.

This is perfectly ok: I do this for a living, I've been doing it for nearly two decades now, so I have total confidence that plants will grow back, they will fill that space again, they will be covered with flowers next year, they most like won't die:  but I know that it's a bit scary to allow someone to cut something back radically, if you are not quite sure about it.

So I forced my way in underneath it, where I could see that all the "underneath" growth was indeed brown, dead wood. As we all know - well, those of us where were RHS trained, at any rate, the first thing you do with roses is the Three Ds, ie remove all Dead, Diseased and Damaged (or Dying) wood, so that's where I started.


Here I am, in the middle of the rose, halfway through the job - I'm under an overhanging canopy of branches, looking sideways through it.

Note the preponderance of dead brown wood!

Every single dead brown bit was snipped off and pulled out, going as far back, ie as close to the wall and the "live" stems, as I could.

As I removed this dead material, the upper canopy starting drooping downwards, so I also removed the underneath layer of those stems, even if they were alive: anything spindly came off, any stem which was visibly damaged from rubbing up against other stems was removed, and anything which deliberately and maliciously poked me or scratched me, was also removed.

One builder bag full of mostly brown dead rose wood later....


This is where we were: the overhanging material was gone, the dead wood was gone, the window (including a velux one in the roof, which I had no idea existed) was revealed, the path was clear to walk on, and the French windows, if not quite completely clear, were at least now able to open.

At this point I went and got one of my long-handled tools, and started working on the top growth: partly to take more of the weight off, to ensure it didn't flop down over the door again at the first sign of heavy rain, or high wind: but also because several of the stems were growing behind the gutter, so I had to remove the top growth of those stems before I cut them below the gutter.

As luck would have it, at that point Mrs Client came out, and decided that it was so nice to see the stone walls again, and so nice to be able to walk along the path, and there was so much more light inside now, that she would like me to reduce it further, so that this time next year it would look more like this photo, and less like the way it was before I started.

This is a very sensible attitude, and I wish more Clients would understand that in order to get a climber to fill a certain space in the summer, it needs to be cut down to a lot less than that, the previous winter.

Let me say that in another way - if Mrs Client wants, next summer, this rose to look exactly as it does above, ie to arch nicely over the French windows without drooping all over the path, obscuring the window and attacking passers-by, then it has to be cut back by at least six feet, right now. Because it will grow at least six feet next year.

We smiled at each other.

"Go on, " she said. "Cut it right back, Back to below the height of the gutter, right back."

"Are you sure?" I asked. "It will look a bit bare."

"Go on, do it." she said. I like this Client. "The only thing is..." she said.

I looked at her in mock horror, wondering what was coming.

"The only thing is..... do you mind cutting it back more? I mean, you've just spent time carefully cutting it back as I wanted it, and now I've changed my mind. You did say, right at the beginning, that it would benefit from a proper prune..."

"No problem," I replied, cheerfully:  "Even if you'd allowed me to cut it right back at the start, I would still have done it this way, because if I'd just hacked straight across it, the whole lot would have come down in one enormous bundle, and would probably have pulled the guttering off."

I showed her how many of the stems were forcing their way up between the gutter and the roof, and she saw what I meant: not least when I handed her am entire roof tile which I'd found in the bed below the rose! This is another danger with letting climbing roses get too big, they can cause damage which you can't see - gutters, roof tiles, dampness, support wires and/or trellis pulling away from the wall, all sorts of things. Which is why I recommend, every few years, giving plants a really hard cut-back to allow the owner to check the walls and deal with any problems which may have been hidden.

And anyway, in my experience, virtually all climbers benefit from a hard cut-back, now and again: it rejuvenates them, it allows the new growth to be more evenly and pleasingly distributed, it allows light and air to get to the older stems, which can help to reduce pests and diseases.

"Cut it back!" she cried.

"Hoorah!" I cried.

Mrs Client went back inside, I got to work:

Ten minutes later, the gutter was cleared of stems above and below (although Mr Client would need to go up a ladder and extract the short lengths which were still stuck behind the guttering - I don't do that sort of job, as I don't want to take on liability for any damage to the guttering), and what remains had been trimmed to a reasonably balanced shape.
 

Job done!


Did you enjoy this article? Did you find it useful? Would you like me to answer your own, personal, gardening question? Become a Patron - just click here - and support me! Or use the Donate button for a one-off donation. If just 10% of my visitors gave me a pound a month, I'd be able to spend a lot more time answering all the questions!!
Tuesday 27 December 2022

Fuchsia - how to deal with them at the very end of the season

Hardy Fuchsia, don't we love them?

They flower their socks off, all season long, and come up smiling again, year after year.

This has been a particularly good year for them, and they were looking fantastic right up until we had that batch of extremely cold weather last week, which really finished them all off.

Here's a typical example - a fortnight ago, it was glorious, but when I arrived for work earlier this week, the foliage was blackened and mushy, and the flowers had all gone a horrible dull pink.

Time to cut it back!

Fuchsia is one of those woody perennial sub-shrubs which really benefits from being cut back hard every year: it rejuvenates them, they grow back just as big, the following year, and it keeps them bushy and lush.

So the first part of the job is very easy, just chop off every single woody stem, as low down as you reasonably can.

At this point, you are likely to get your knuckles stabbed by the remains of the stems which were cut down the previous year: and this is why I always advise Trainees to get in the habit of cutting as low down as "reasonably" possible, because if you leave them a foot high, then the following year, you will be unable to cut any lower, so you'll leave them 14" high, and the year after than, you'll be unable to cut any lower, so you leave them 16" high... you get the picture.

I also advise Trainees to cut straight across, rather than at a pointy angle - otherwise those last-year stems will really stab your knuckles! 


Here we are, then - right - the whole thing has been reduced down to just a few inches.

Job done?

No, not quite.

It's always good practice to rake out all those fallen leaves, along with any other debris you can remove.

This allows air in around the base of the plant, and removes what can turn into a soggy mass of organic matter, which is a haven for bugs and disease, and often leads to rot, at the base.

Having done that, you will now be able to get in amongst the stems, and you will be able to remove a lot of the very old stems, the ones which were cut in previous years. In fact, you will often find that old stems will just snap off, right at the base.

So snap off those you can, snip off those you can't, rake out the mess, and you will be left with something more like this:

You can see right down to soil level, between the clumps of stems: nice!

My work here is done.

Now to go all the way round the garden, repeating this process on the dozen or more large Fuchsias!


Did you enjoy this article? Did you find it useful? Would you like me to answer your own, personal, gardening question? Become a Patron - just click here - and support me! Or use the Donate button for a one-off donation. If just 10% of my visitors gave me a pound a month, I'd be able to spend a lot more time answering all the questions!!

Sunday 25 December 2022

Don't eat Yellow Snow....

Are we having a white Christmas?

Do we EVER have a white Christmas?

Well, no. We don't.

But here's a seasonal article anyway, for those of you who are so bored on Christmas Day that you have nothing better to do than come here and see if I have posted anything new. You are so sad! But who cares, it's Christmas! And if you'd rather be quietly reading, than arguing about who forget the sprouts, how many glasses of sherry Aunt Bertha has drunk, or what idiot invited the world's most boring relative to come and stay.... well, who can blame you.

So, "Don't eat yellow snow", then.

Yes, we all know that old so-called "Eskimo" joke - you know the one, what is the first thing that Eskimos teach their children: answer, don't eat yellow snow.

(Because someone or something has pee'd on it, of course.)

Well, it's a sound philosophy for life, and although we don't often see snow in the UK, there is one rather strange appearance of yellow snow, which you might like to keep an eye out for: the current cold snap has suddenly ended, which is quite a relief to those of us who work outdoors for their living, but we may yet have snow in January, or February... and when it does arrive, this is something you can look out for.

Here's some I found, a couple of winters back:

Mmm, yummy, look at that lovely yellow snow.

As it was in a bank of what I call Municipal Planting, on the way to the shops - ah, those happy, carefree days, when we used to just walk down to the shops whenever we felt like it, before Covid-19 hit, and turned us into a nation of hermits, not leaving the house other than for necessary journeys: shopping being necessary, but not in person: no, these days it's all click & collect, minimum contact: or delivery, if you are lucky enough to get a slot.

Where was I? Oh yes, those happy days when we could just stroll down to the shops for a couple of bits and pieces, whenever we felt like it.

So, this area being on the way to the shops, I assumed at first that it was just some dirty bugger having a pee: maybe on their way back from the pub, the previous night.

(Ah, yes, remember those days when the pubs were open, like, all the time.... I can't actually remember the last time I went into a pub...)

But when I looked up into the canopy:

Can you see it?

The snow lying on top of the branches, snow which has not yet fallen to the ground, is also yellow.

Huh?

How did somebody pee on that, way up there?

The answer is, of course, that they didn't.  

The secret lies in the species of tree: it's a common Alder, proper name being Alnus glutinosa, and it's a frequently-planted street tree. It's particularly popular as a municipal planting alongside streams or brooks, because Alder is one of the few trees that can tolerate having its roots in water.

How do I know that it's Alder? 

Well, the obvious answer is that I am a professional gardener, I have a diploma in Botany,  and for many years I have taught Tree ID, so it is kind of my specialist subject. *laughs*


  The less obvious answer is "catkins and cones" because Alder is one of the few deciduous trees which has cones, and these cones are often still available to be seen on the tree, right through the year.

This photo, left, was taken in January of this year, and shows the new male catkins, almost fully opened, with the previous year's female cones still on the tree, although now brown and empty of seeds.


In early summer the cones start to form, little green things in bunches of anywhere between three and seven or eight: by autumn they've turned woody, and are a dark brown colour: and they tend to stay on the tree right the way through to the following year, indeed you can often find fresh green cones growing, with the previous year's old brown ones still in place next to them!

And that's the reason for the yellow snow: the cones contain a lot of tannins and chemicals called humins.

This makes the cones very desirable for owners of aquariums, and apparently Alder cone sales is a big thing, in the fish-keeping world:  the humins release nitrogen, phosphor and sulphur, all of which help the occupants, including the plants, to grow: whereas the tannins kill germs, and apparently do a really good job of making the water crystal clear although at first, they stain it black, which sounds a bit scary, but presumably the black colour soon disappears.

Who would have guessed?

But it's the tannins which create the yellow snow: in the same way that tannins in tea leaves make our tea that nice deep brown colour, the tannins in the cones are washed out by rain, dew, moist air, and of course by snow. and they stain the snow yellow.

 So now we know - but "don't eat yellow snow" is still good advice - and in the meantime, Merry Christmas to you all!


Did you enjoy this article? Did you find it useful? Would you like me to answer your own, personal, gardening question? Become a Patron - just click here - and support me! Or use the Donate button for a one-off donation. If just 10% of my visitors gave me a pound a month, I'd be able to spend a lot more time answering all the questions!!

Friday 23 December 2022

Log stores can be things of beauty

Recently, I built myself a log store in my back garden, for seasoning small logs before burning them in my chiminea.

It was thrown together out of odds and ends of lumber: left overs from DIY projects, odd lengths turned out of other people's sheds, you know the sort of thing. 


 Here it is, not quite finished: the roof will have a waterproof layer on top, and I'm wondering if it needs something like a shower-proof cover across the front, just to keep out the rain if the wind swings round to that side...

But as you can see, big enough for a fair amount of wood, and a special gap for my old recycling box - remember when we all had those? - which contains kindling.

I was intending to paint it, as I find that creations made from "found" wood tend to look horrible, but a coat of paint suddenly renders them beautiful. Much of my garden works on that principle: my fencing is a horrible mish-mash of the original plank fencing, trellis, odd fence posts, and bodged-up joins, but once it was all painted, it looked lovely! 

So, I was going to paint this one, but actually I find that I quite like it in shades of brown, so it might remain like this, for a while.

Well, I was moderately proud of it: it does the job, and it looks ok, if slightly amusing: and then, going out to work for a new Client, I found this:


Isn't that just utterly charming!

The lady who owns it says it was there when they moved in, some 20 years ago, and I just love the idea that someone took the trouble to fit a frame into this otherwise un-used corner, and then to put a proper, beautiful, tiled roof on it.

I now have Log Store Envy...


Did you enjoy this article? Did you find it useful? Would you like me to answer your own, personal, gardening question? Become a Patron - just click here - and support me! Or use the Donate button for a one-off donation. If just 10% of my visitors gave me a pound a month, I'd be able to spend a lot more time answering all the questions!!

Thursday 22 December 2022

The fateful sound of Daffodil shoots crunching underfoot...

Oops.

I've spoken before about the Boot and Shoot Ballet, which normally occurs at about late January into February - that time when the bulbs are coming up, and we gardeners have to wobble around on one foot, waving the other in the air, while trying to find a clear space in the bed or border, in which to put it down safely.

This year, it's occurring somewhat earlier than usual! Here we are in December - ok, it's now late December, I'll grant you that - and already, the Daffodil bulbs are above the surface, and this is causing a bit of a problem for the gardener (that's me) who is trying to catch up with the usual winter cutting back and tidying of the garden, which was put on hold, due to the excessive and unseasonal frosts of the past fortnight.

Yes, I know that I just said it's late December, but December - although technically "winter" - is usually quite mild. The true cold snaps are generally reserved for January: do you remember that poem we all had to learn at school? 

"January brings the snow, makes our feet and fingers glow.

February brings the rain, thaws the frozen lake again.

March brings breezes, sharp and shrill, stirs the dancing daffodil," and so on.

Clearly written in the days when the seasons continued, unabated, and things happened when they were "supposed" to, unlike the last decade or so, where the weather seems to be completely independent of the seasons, and just does its own thing, regardless of what we are expecting it to do.

Where was I? Oh yes, unseasonal cold snap in mid December, causing delays to normal pre-winter maintenance of the flower beds, following on from a very unseasonably mild start to the month, and now a return to soft mild air and a couple of days of rain.... and up come the Daffodil shoots.

And down came the gardener's boot (that would be me). Accidentally, of course, I would never deliberately trample on Daffodil shoots!

Mind you, there was that time when I deliberately, savagely and repeatedly cut off the Daffodil shoots, but that was a special case... they were growing in a clump, in the middle of an otherwise plain front lawn, and when I say "middle" they weren't even decently in the middle, they were off to one side: apparently the grandchildren had, many years earlier, bought a pot of Daffs for granny (my Client) and had planted them themselves, so the poor lady felt obliged to let them come up every year, even thought they "spoiled" her nice front lawn. So, this particular year, she and I connived together, and I just cut their tops off, as soon as they appeared, and cut them off again and again, every week. After two years of this treatment, they gave up, and were never seen again. The visiting grandchildren, now all grown up with kids of their own, didn't even notice that they had gone. Peace returned to the lawn. All was well.

But apart from that, I generally take great care NOT to trample on the bulbs.

Alas, this time I didn't spot them under the covering of leaves - another good reason, dear reader, for raking up fallen leaves as soon as you reasonably can -  and this clump of emerging shoots was accidentally trampled. while I was giving the climbing roses their final prune of the year.

There's not a lot "one" can do, when this happens, other than to hope that they will recover. At least Daffs have the decency to send up a bunch of leaves first, so these are not the flowering stems, just the first sets of leaves, so the flowers should be fine.

Fingers crossed!


Did you enjoy this article? Did you find it useful? Would you like me to answer your own, personal, gardening question? Become a Patron - just click here - and support me! Or use the Donate button for a one-off donation. If just 10% of my visitors gave me a pound a month, I'd be able to spend a lot more time answering all the questions!!

Tuesday 20 December 2022

"How much waste will it generate, then?"

When I go to a new Client, especially a hit-and-run, er, sorry, an ad-hoc one-off project, I usually warn the Client that it will generate a lot of waste, which they will need to dispose of.

They often ask "how much waste?" or, even more fun, they say, casually, "Oh, don't worry, we have a brown bin, and if there's any left over, we can always take it down the tip."

Here's a good example of exactly how much waste is generated, when you - or the previous owners - have neglected a bed for a couple of years, and now decide it's time to clear it all out and start again.


Here - left - I was presented with a couple of long, narrow beds, hard up against the house, which had been "designer planted" with Stipa tenuissima, no doubt with the stated intention of "softening the edges of the bed".


Well, it worked, pretty much: the grasses were fluffy and covered up any shortcomings in the hard landscaping.


But after four years or so, they were getting rather big, and many of them had died completely: 

You can see in this photo, right, one of the many dead brown chopped stumps: not very attractive!

So the lady owner realised it was time for a change, and decided to replace them all with something more stylish and elegant.

She therefore asked me to dig them all out, and clear the bed completely.

"It will generate quite a lot of waste material," I warned.

"That's fine," Mrs Client replied, "we have a brown bin."

"It will be considerably more that one brown bin-full," I said, with a wry smile.

"No problem," she replied, "we can take it to the tip." 

See - they all say that! 

Knowing that they didn't have any old compost or bark bags (having only just moved in), I took along a pile of them - black bin bags are way too thin for garden waste, you really need the stout compost/bark bags: and those huge builder bags are fine, but you can't fill them more than a third full, or no-one can lift them. It really is time that someone started producing under-sized builder bags, small enough that two of them will fit across the width of a normal car, but not so small that they are fiddly to fill...

Anyway, in one afternoon, I filled their brown bin up, right to the top: I took home (with permission) two compost bags stuffed full of plants to pot up and re-home, and there was still this much left over:


That's eight large, heavy, muddy, bagfulls to go to the tip. 

More than enough to fill the boot of their car! 

They later said that it took them two runs, because not everyone is prepared to stuff the back of their car up to the ceiling, the way that I do... and there you have it, dear reader, when I say "it will generate quite a lot of green waste", I am not kidding!


Did you enjoy this article? Did you find it useful? Would you like me to answer your own, personal, gardening question? Become a Patron - just click here - and support me! Or use the Donate button for a one-off donation. If just 10% of my visitors gave me a pound a month, I'd be able to spend a lot more time answering all the questions!!

Sunday 18 December 2022

Everyday sexism in the garden.

How pervasive is sexism, in the garden? 

No, nothing to do with us humans, I'm talking about tools.

The other day, at work, I mislaid my Daisy Grubber. After extensive searching, I wound up at the bonfire heap and there, sure enough, I found it: I'd dropped it on top of the bindweed in my tub-trug, forgotten to pick it out, and thrown the lot onto the rubbish heap. 


Luckily it has a bright red handle. 

Returning to the border which I was weeding, I commented in relief to my Trainee, “I found him!” proudly waving the Daisy Grubber aloft.

“Him?” queried my (female) Trainee, giving me a bit of a Look.

“Errrr.. yes, him...” I replied. 

"Why," she asked - somewhat sniffily - "does your daisy grubber have to be male?"

"Errrrr...." I replied, in an articulate manner.

I don't give my tools names - well, apart from Big Orange, my super heavy-duty ratchet loppers - but this made me realise that all of my tools are “him” rather then “her” or “it”.

Thinking about it, everything in my toolbox at home is also a “him”. Needless to say, my power tools are masculine, but so is the hoover, and so is the washing machine, as in “has he finished his cycle, yet?” 

My current car - Brian - is clearly masculine, but the one before him, my dear little Agila, was female. But this is not necessarily a girlie trait: two years ago I had a Garden Team partner for some months, and his car was called Otto. And, decades ago, an early boyfriend had a car called Simon.

This proves that giving non-sentient items names is just something which we humans tend to do...it's probably tied in with our endless need to anthropormorphise, although I have to say that I draw the line - in disgust - at people who treat their cats and dogs like little humans. No, hang on, before you shoot me down in flames, not in the sense of looking after them - I mean, the ones who refer to them as "fur babies", an expression which makes me want to vomit. Come on, people. They are cats. (Or dogs. But usually cats.) They are not babies. THEY ARE NOT BABIES.  They may fill the baby-shaped hole in your life, but THEY ARE ANIMALS, THEY ARE NOT BABIES! Do not dress them up in clothes, do not refuse to let them live a natural outdoor life, DO NOT CALL THEM FUR BABIES.  

And for heaven's sake, stop putting inane posts on social media with a picture of a perfectly healthy, outdoor, cat, enjoying the outdoors, with a worried message saying "this cat is starving, it stood outside my house/came up to me on the path and keeps miaowing/wants to come into my house, I'm really worried about it..."   Clearly such idiots, well-meaning as they may be, have never owned a cat: cats are inveterate beggars, will take food whenever and from whomever they can, and will always want to come inside, just to see what's going on. And in case there's any food lying around. 

Just last summer, I was happily working away on the computer, as I am now, in my house, upstairs. A cat wandered into the room. Mostly white, with orange tail and ear tips.

"Hello, cat-face," I said, and carried on working.

Pause.

I stopped typing, and turned to look at the cat.

The cat looked at me.

"Miaow." it said. Not "Miaow! Prrrrrup! Lovely lovely Owner! Give me some loving!" Not "Miaooooooooow - get over here and feed me, NOW!"  Just "Miaow." like that, with no particular emphasis. 

I gave it a Look.

It turned and walked out of the room. 

I followed it downstairs. Because I don't have a white cat with orange tips and tail..... memo to self, don't leave a downstairs window open, even on hot summer days, otherwise curious cats will sneak inside and wander around my house.

And then there's Noisy. 

This is Noisy, comfortably asleep on the decking steps outside my patio door. 

She is often to be found snoozing on my decking. 

If I open the doors, she shoots inside at top speed, then starts poking around, in the manner of a rather disappointed Dust Bunny Inspector.  You know the type - "Hmm, I see you haven't hoovered round the back of the sofa for a while. And what's this under here? A pea? " *eating sounds*

If I don't open the doors, she stands with her front paws on the glass, yowling piteously until I do. Hence the name.

Noisy is skinny-looking, always yowling for food (again, hence the name), always trying to sneak into my house - but I happen to know that her real name is Georgie, and she belongs to Steve, three doors up. And yet, if I open the doors and call "Noisy!" she'll come running.

Conclusive proof, m'lud, that all cats are liars, beggars, and unfaithful.

Anyway, where were we? Oh yes, anthropomorphic resonance of tools: are they male or female, and I think we've established that most of them are male.

But then, what about plants - are they male or female?

I don't mean physically, botanically speaking: I mean the way in which we refer to them.

When I move a plant, I often say “he'll be happier there”.

Yet I always think of roses as being feminine flowers. But I never say “she'll be happier there”, it's always “he”.

Am I odd? OK, don't answer that - instead, am I the only one who does this? ? !


Did you enjoy this article? Did you find it useful? Would you like me to answer your own, personal, gardening question? Become a Patron - just click here - and support me! Or use the Donate button for a one-off donation. If just 10% of my visitors gave me a pound a month, I'd be able to spend a lot more time answering all the questions!!

Tuesday 13 December 2022

Oops, we forgot about these bulbs!

Talking about bulbs....  

I was presented, last week, with this tray of tulip bulbs which were lifted last spring, after flowering, left spread out to dry, but were never cleaned and put away. 

Oops.

They should have been planted in September, or early October, but they were overlooked, and now they have turned up, and look! They are sprouting!

"Oh no!" said Mr Client, "What do we do now, it's too late to plant them, and they're Mrs Client's favourites!!"

"All is not lost," I hastened to reassure him, "we can still plant them, they'll be fine."

And they will.

It takes a bit more care to plant out bulbs once they have started to sprout, because you have to be careful not to damage the new shoot - you can't just throw them roughly into a hole and ram the soil back down on top of them.

Err, not that that's what I do, no, no, no, no, of course not. I plant them carefully and individually, standing each one up on the basal plate and gently firming the soil around them, to hold them in that upright position.

*grins*

OK, I admit it, I am very casual when planting bulbs in autumn, whether it's in pots for display, or in the ground; I have found, over the years, that bulbs have an almost miraculous ability to "right" themselves in the soil: and the few that don't will simply send their shoot out sideways then upwards towards the light.

When emptying pots planted by other people, I have found bulbs planted upside down, which have flowered perfectly well, even though their shoots had to make a 180 degree bend, on emerging from the bulb!

Bearing all this in mind, you can see why, normally, I don't worry too much about sitting the bulbs upright before covering them - in my opinion, it's more important to get them deep enough to be protected from frost, protected from squirrels, and for them to support their upper growth.

So if you have only just found a bag or box or tray of last year's bulbs, now sprouting, don't worry about it, just plant them out as soon as you can, either into decorative pots, or into the ground: just take care not to break off the delicate growing tips.

If these are bulbs which you lifted yourself, earlier this year (as opposed to ones you bought and forgot to plant) then you might find that you have a lot of small bulbs, as well as the main ones: these are the offspring of the original ones, which is always lovely to find - free bulbs!

However, they may not flower for a couple of years, so you might not want to plant them out with the bigger "parent" bulbs.

Any that are too small to be worth planting out, can be put into "nursery pots" or - in my case - trays, to grow on for a year or two, until they reach flowering size.

Here is my idea of space-efficient small-bulb storage: I've simply lined a plastic mushroom tray with an old compost bag, added a layer of fresh multi-purpose compost, then I lay the small bulbs out on top: when the tray is filled with bulbs, I tip on more compost until the bulbs are covered, then label it, and set it aside. I don't bother trying to make the bulbs "sit up" neatly, I just cover them in compost, and let them sort themselves out.

The whole tray then goes outside, and is left in a sheltered corner of my front yard, to receive rain, sun, frost, snow, wind, light, dark and occasional cat poo (*frowny face*) which allows the small bulbs to grow on, naturally, until they are large enough to flower.

However, we digress: moral of the story - it's never too late to plant bulbs, even if they are already sprouting! 


Did you enjoy this article? Did you find it useful? Would you like me to answer your own, personal, gardening question? Become a Patron - just click here - and support me! Or use the Donate button for a one-off donation. If just 10% of my visitors gave me a pound a month, I'd be able to spend a lot more time answering all the questions!!

Friday 9 December 2022

How do bulbs cope with a sudden cold snap?

I had an anxious Client emailing me yesterday, expressing concern over the bulbs which are coming up in their garden, bearing in mind that we have been forecast to have a cold spell for a week or so.


Here are the first snowdrops, from three weeks ago... 


... and here are the Peonies, making nice fat red buds all ready for next spring...

... and the Daffodils are also well above the ground already, and that's her main concern.

It's easy to see why - it's been the *consults the BBC website*  third mildest autumn since records began, apparently, and this has caused all sorts of havoc in the garden.


In my own garden, I've had my Auriculas flowering - left - on the 14th November. 

It's more usual to have them in flower in May...


 And in several gardens, the winter flowering Jasmine is already in full flower,  here's one from mid November - right - which is looking, according to Mrs Client, better than it has ever done before.

No doubt in response to my harsh pruning regime, I thought smugly to myself... but anyway, it looks lovely but should not be flowering in November! 

The question which everyone is asking now, is "will they flower again at the correct/normal time, or have they done their thing and will they now just sit and sulk until next season?" and I have no answer for that. We will have to wait and see.

But the bulbs are more of a known quantity: they will always start to grow when, or if, the weather is mild: that's how they get those pots of paper-white Narcissi, or pots of Hyachinth in flower to be given as gifts at Christmas: they are "forced" by being kept in conditions of warmth and light which fool them into thinking that it's spring.

Outside in the garden, it's not a problem: the bulbs will have started to grow, thinking that spring was already here, but as soon as the temperatures drop, they will go dormant until it gets warmer again.

So no, you don't need to go out and spread horticultural fleece over the emerging bulbs: they will be fine.  

Yes, you can spread a mulch of compost or bark on them, if you are really worried about them - it won't do them any harm. 

Personally I like to leave them as they are, so that I can see them when I am working on the beds - this helps me to avoid treading on them! There's not much worse, on a cold January morning, than that feeling of something crunching underfoot.. you lift your boot and find a small, forlorn bunch of crushed daffodil shoots. Oh dear. So, in the hopes of avoiding that situation, I like to leave them, so I can do that manoeuvre where you balance on one foot, waving the other in the air, while you look for a safe place to put it down.= - the Boot and Shoot Ballet, as Helen Yemm always calls it. 

(Not so much of the ballet, in my case, unless you are thinking of those Hippos in tutus from Fantasia...)


Did you enjoy this article? Did you find it useful? Would you like me to answer your own, personal, gardening question? Become a Patron - just click here - and support me! Or use the Donate button for a one-off donation. If just 10% of my visitors gave me a pound a month, I'd be able to spend a lot more time answering all the questions!!

Tuesday 6 December 2022

Honesty - time to cut it down. Honestly.

Well, we've all enjoyed the Honesty this year, it's been a great year for it: but there comes a point where you have to admit that autumn is over, it's winter now, and it's time to cut them down.


The timing of this varies from year to year - this photo, left, was taken on the 3rd December a few years back, and they were very much still earning the name "Silver Pennies" (except that in the UK, the penny is a teeny tiny little coin...) as the weak winter sun shone through the silky membranes of the seed pods...


This year, however, by September they were already starting to look a bit battered....


...and by mid November, they were positively skeletonised!

I fail to see any beauty in this sort of thing, left, so out they come, and onto the compost heap they go, hi ho, as all the seeds are long, long gone.

And although I say "cut them, down",  what I really mean is "pull them up by the roots."

"What!" I can hear you screech, "But I want them to flower again next year!!"

That's ok - Honesty are biennial, which means that the seeds from this particular plant will germinate next year, but they will only produce a small, leafy plant: the following year, those small leafy plants will grow to full size, flower, and produce these pods, before dying off.  They do their complete life cycle over two years, and that's it.

But they will be back: once they get well established, as these ones are, you will find them popping up all over your beds and borders, because they are prolific self-seeders.

Careful weeding is required! But once you have learned what a first-year Honesty plant looks like, it is easy enough to leave them where you want them, and weed them out if they pop up in places where you don't really want them, such as the very front of a border,  in and around your roses, in the lawn, etc. 

(Actually, the normal mowing regime will take care of the ones in the grass, you don't need to worry about those ones.)

So once they have appeared in your garden once, you are likely to have them for ever more!


Did you enjoy this article? Did you find it useful? Would you like me to answer your own, personal, gardening question? Become a Patron - just click here - and support me! Or use the Donate button for a one-off donation. If just 10% of my visitors gave me a pound a month, I'd be able to spend a lot more time answering all the questions!!

Friday 2 December 2022

How to: Tidy up your ordinary Peonies in Autumn!

Just the other day, I wrote about how to tidy up Tree Peonies at this time of year, ie autumn, and I've received several pleas for some guidance on what to do with "normal" Peonies!  This refers to what  you might call the "usual" Peonies, the herbaceous ones.

"Normal" Peonies are much easier to deal with : as they are herbaceous, they die down every winter, and pop up again in spring.

So all we have to do is remove the dead upper foliage, because otherwise it may rot, and infect the roots with mildew or other types of rot: also, if you leave soggy dead foliage lying around on the garden, it encourages the dustmen of the garden, ie the slugs and snails, and goodness knows we don't need to encourage them!

OK, here we go:

Here we have your average herbaceous Peony, in late autumn, looking a right mess. (That's a technical term.)

As you can see from my yellow bucket, I have already started working on this one - yes, once again, I forgot to take the "before" picture, before actually beginning.....

First job, literally and simply, cut off every dead brown stem, leaving just a couple of inches.

Why leave a couple of inches? To help you to avoid treading on it.... more of that in a moment.

Having cut off the dead stems, you are then able to get in amongst those cut stems, to gently remove any weeds which have been sheltering under the dying foliage.
 

Here is the same clump, from the same position, now it is half done: there are a couple more small weeds to be dealt with, and the rest of the brown stems.

Note that grey leaf, lying on the soil to the bottom right of the photo - now look at the "mostly before" picture above: yes! It's the same clump!

Once you have done those two tasks - cut down dead stems, remove weeds - you can look more closely at what is left.

In amongst the freshly-cut dead stems, you will find the dead cut stems from the previous years. Assuming that your gardener did a proper job last year, that is! *laughs* 

Those stems should now just pull straight out of the ground, with a gentle tug. 

There we go - same plant, same grey leaf, but now all the battered old stems from last year have been cleared away,  so we are finished working on this plant.

In many gardens, the new buds are already starting to show, and that's why I like to leave a couple of inches of stems: otherwise it is fatally easy to accidentally tread on them, damaging those fat new buds.

Which would be bad.

All the dead stems, and the weeds, can go on the compost heap (unless the weeds are perennial thugs, of course), and there you go, that's one job done for the winter.

Oh, there is a bit of a debate about whether to mulch over them for the winter, or not. I prefer not to: Peonies are famous for not flowering if they are buried too deeply, and I believe that if you pour a thick layer of mulch over then, then you are in danger of - in effect - burying them. Too deeply.

The other possible reason for mulching Peonies, often repeated on the internet, is for frost protection, for the roots, and/or those new buds. In my experience - which is approaching 20 years now, blimey! - they simply don't need it. I have yet to see a Peony suffering from frost damage. As always, a disclaimer: if you live in the far north, where you get bitter frosts: or if your garden is in a real frost-pocket, and suffers harder frosts than "normal",  well, in those situations, you will probably already know all about frost protection for your plants. 

 But certainly, down here in sunny (?) Oxfordshire, Peonies don't seem to need it!


Did you enjoy this article? Did you find it useful? Would you like me to answer your own, personal, gardening question? Become a Patron - just click here - and support me! Or use the Donate button for a one-off donation. If just 10% of my visitors gave me a pound a month, I'd be able to spend a lot more time answering all the questions!!

Tuesday 29 November 2022

"Are those Holly flowers, in November?"

... said Mrs Client, in wonderment.


"In November?" I echoed, desperately trying to remember what Holly flowers look like. And when they flower,

"Well, look, aren't these where the petals have been splashed onto the leaves, look!"

I looked. They did look exactly like a flattened flower, which had been papier mache-ed onto the leaves. 

There were lots of them, all over the tree, which is a variegated Holly, in case you were wondering.  It's been raining, on and off, for weeks, so the concept of flowers being smashed by heavy rain and plastered onto leaves below is perfectly plausible.

And before you ask, no, Holly leaves are not always prickly, especially on larger trees which don't get pruned much - the prickles form as a response to grazing, so areas which don't get grazed tend to have leaves with smooth margins. 

In modern times, by the way, "grazing" means "pruning or hedge-cutting" , rather than being noshed by animals, and this particular tree is allowed to grow, unchecked.  Hence the lack of prickles.

Meanwhile, I'm still trying to remember what Holly flowers look like. Surely they don't appear at this time of year, because at this time of year, we are all looking at the berries, not the flowers, aren't we? 

I was also certain that Holly flowers are very small, so I thought it unlikely that these flowers, if they were flowers, came from the Holly - and I couldn't see anything else in the area which had white flowers.

"Hmmm, I'm not sure, it could be some sort of leaf miner damage," I commented, picking at the edge of the "flower" to see if I could lift it off.  Mrs Client wasn't convinced, and I had to agree that it did look rather like rain-splattered flowers. 

We continued to look amongst the foliage, and I spotted some tiny flower buds, still tightly closed. "Oh look," I said, "here are the flowers for next year, not even open yet."

"Well, maybe some of them opened earlier?" 

There was no answer to that, so what do we do? Answer, take photos, and/or take a sample home, then do some research.

It turned out to be laughably simple research - I typed "holly leaf miner" into google, selected "images" and half way down the page, there it was, exactly the same as the one in my hand. Phytomyza ilicis, commonly known as Holly leaf miner.

The good news is that it's just cosmetic damage, it doesn't hurt the tree overall, and damaged leaves can apparently remain on the tree for 5 years or more. 

But I wanted to know more about the flowers, so I did a bit more research - this is how I fill those rainy days, by the way, when it's too wet to work - and discovered that Holly normally flowers in late spring to early summer, so I was correct to say that the flower buds which I found were for next year's flowers.

Confusingly, I did find some photos on the internet which appeared to show Holly with flowers, open, next to bright red berries.  I have no explanation for this: in some cases you could see that the flowers were on a different, separate twig from the one with the berries, but that still doesn't explain how flowers - spring/summer - were present at the same time as berries - autumn/winter. 

Unless the berries were fake plastic ones: entirely possible, as the lady with the Holly Leaf Miner admitted that she didn't bother trying to keep the birds off the berries with netting, and could never remember to cut the berried branches now, while they are still covered in berries. (If you cut them now, and leave them in a cold garage or shed, they should still be fresh-looking for Christmas decorations) So she just cuts the branches that she wants, just before Christmas, and adds plastic berries!!

Oh, I suppose that's another answer: someone wanting to get a reference photo of berries and flowers together could cut the Holly in winter, and keep the cuttings in water, possibly in glycerine, until the following spring.

Or maybe they are opportune photos, taken when the weird weather fools the tree into opening the flowers, way, way too early?

Either way, normally, you won't see flowers and berries open at the same time, on a Holly tree.

And here's something interesting which I learned during my research - male and female Holly flowers are very different! 

You may already know that Holly trees are dioecious, which is a botanical term meaning that any one individual Holly tree will be either a male tree, or a female tree. So if you want berries, you have to buy a female tree: and if you want your female tree to product those berries, you need to have a male tree somewhere nearby, to fertilise the flowers.

How do you tell the difference? Not by the nursery cultivar names, that's for sure: annoyingly, Ilex 'Golden Queen' is in fact male, whilst Ilex 'Golden King' is actually female. Why? Why? *shakes head* What idiot got away with those names?

Moving on... here are the male flowers:

They have anthers, those projecting spikes, and at the tip of each anther you can see the bright yellow pollen.

That is the pollen which is carried by bees, hoverflies, and other pollinating insects, from one flower to the next.

With Holly, you need those insects to pick up a load of pollen from this tree, then to buzz across to your female Holly, whose flowers look like this:


Notice the complete lack of sticky-out stamens: instead, the female flowers have a central ball-like stigma, which - if fertilised - will develop into a berry, which will then turn the familiar bright red.

As always, it only needs one male tree to fertilise a number of female trees, so if you want berries, plant a copse of female trees, and be sure to include one or two males, and lo! and behold, berries will be yours!


Did you enjoy this article? Did you find it useful? Would you like me to answer your own, personal, gardening question? Become a Patron - just click here - and support me! Or use the Donate button for a one-off donation. If just 10% of my visitors gave me a pound a month, I'd be able to spend a lot more time answering all the questions!!

Friday 25 November 2022

Is it worth buying good quality garden tools - forks!

Just the other day, I wrote about secateurs, and was it worth buying expensive ones. (In a word - "No.")

Then look what happened this week!

So much for the Wilkinson Sword 25 year guarantee, eh?

And I wasn't even doing anything extravagant with it.

What's particularly annoying is that, prior to this one, I bought a Wilkinson Sword (now bought out by Fiskars) border fork, the one with the five year guarantee.

It lasted two months, and the handle broke.

And it's not as though I'm a hefty six-footer: so I took it back and the garden centre gave me a new one.

Six months later, the handle broke on the new one.

Embarrassed, but determined, I returned to the garden centre and yes, the garden centre refunded my money. 

Well, technically, they didn't refund it, but they offered to replace it. Instead, I did a part-exchange for this one, which was more expensive (still Wilkinson Sword), but came with a 25 year guarantee, on the grounds that as I'd already broken two 5-year tools, I clearly needed a better quality one!

I hear this a lot, actually, especially from male gardeners, who tend to use strength rather than technique: modern spades and forks have quite weak handles, and the generally accepted view is that the manufacturers used to use seasoned Ash wood (no jokes about fork 'andles, please) whereas now they are using cheap wood, often not properly seasoned, and they tend to break rather than bend.

But I hoped that the more-expensive, 25-year guarantee one, would have a better quality handle: and yes, I do admit that these days, I do take care not to use too much strength when levering shrub roots out with the fork, specifically to avoid stressing the handle too much.

 In case you are interested, the reason that seasoned Ash wood is traditionally used for tool handles is that it "gives" a little, under stress: it will bend, slightly, rather than snap. So now, when forking with gusto, I am always aware of the handle, and when I feel that slight springiness, that "give", I take care not to force it any further.

And now look, one of the tines has broken. OK, this one has lasted a few years, and yes, the handle has survived (although it worked loose within a year, and now it has an ugly great screw through the plastic part, to hold it firm), but honestly! A broken tine? I am simply not "that" strong!

Of course, now I have to decide exactly how embarrassing it will be, to take it back to the garden centre yet again.....


Did you enjoy this article? Did you find it useful? Would you like me to answer your own, personal, gardening question? Become a Patron - just click here - and support me! Or use the Donate button for a one-off donation. If just 10% of my visitors gave me a pound a month, I'd be able to spend a lot more time answering all the questions!!

Tuesday 22 November 2022

It's amazing what you dig up in other people's gardens....

I'm always digging up mildly interesting things - broken pottery, shards of glass, once even a dead body... long story, don't ask. Well, ok, maybe one day I'll tell you all about it...

The other day, I was merrily weeding around the base of a Mulberry tree, and at the back of it, between the trunk and the wall, there was something sticking up out of the ground.

It looked for all the world like a boot-scraper: you know, the old-fashioned sort with a horizontal bar of metal, usually embedded in a stone, or in concrete, beside the front door.

This caught my eye because, not ten minutes earlier, I had gone into my Client's house to use the loo and Mrs Client had made a passing remark about wondering where the boot scraper had got to. 

I always remove my boots before entering the house: well-meaning Clients often say "Oh, just come on in, don't worry about taking your boots off, we're used to it, stone floors, etc etc" but they have no idea just how muddy I can get when digging their garden... so I always take my boots off.

Except for that one time, last week... but no, I can't bear to admit to it. Sorry, Barbara.  Moving on.

So, I always (nearly always) remove my boots, Mrs Client mentioned a boot scraper, and then I saw what looked like one. You can see the train of thought... perhaps this was the missing boot scraper?

What would it have been doing, way out in the garden? Buried up to its neck? I know, I know, clearly I wasn't really thinking, I was "in the zone" of Zen Weeding - you know, that state where your hands are working on auto-pilot and your mind is busily planning the order of the next few jobs, how to get out that Cistus root without breaking another fork (er hem), wondering anew at the way there are such a wide range of weeds available, but how in any one area of the garden there are rarely more than two or three species...  so I took hold of it and pulled.

And this came out of the ground:

Hmmm... not a boot scraper, then! 

Although, looking at the entire thing, you can see a certain family resemblance to old-fashioned boot scrapers, can't you?

But it's clearly a trap of some kind.

The pair of eye-protector specs on the table should give you some idea of size: far too large to be a mouse-trap, not large enough to be a bear-trap, so what would it be for?

Rats, is the logical next suggestion,  and Mrs Client told me that the previous owners had had chickens in an outhouse in that direction. It is possible, then,  that traps were set to catch the rats running along beside the wall - the advice, for catching rats, is always to work out where their "runs" are, and to place the traps along the run.

"How old do you think it is?" asked Mrs Client.

"I have no idea," I replied, thinking that it looked rather old-fashioned, but not ancient, if you see what I mean. "Maybe 1930s, 20s?"  The style of it looked too elegant to be contemporary: the mud and rust with which was encrusted obviously made it look "old", but still, the design did not look modern.

After work, I did some research online, and at first it seemed as though it might be older than I'd thought, Victorian, possibly: I found quite a lot of pictures of wrought iron traps from that era, but nothing quite the same.

Eventually, I found it: it turned out to be a mole trap, which at least explains why it was buried in the soil.

The amazing part is that they are still being made today, to exactly the same design! Just look at that, then compare it to the picture above.

Snap!

Talking of which, I was shaking and scraping the mud off, while talking to Mrs Client, and I had just said "I think it's rusted solid" when it suddenly pinged undone in my hands!

Luckily it's not a finger-trapping sort of trap: when it went off,  the legs at the bottom closed together, presumably around the body of the offending mole.

But it made both of us jump, I can tell you!

Once we'd recovered from that, Mrs Client told me that they have lived there for nearly 20 years, so it's at least that old - but certainly not Victorian.

The only mystery remaining is that of why it was still there, upright and still "set", despite the fact that the bed in question had been dug over, at least three or four times in the past 20 years!


Did you enjoy this article? Did you find it useful? Would you like me to answer your own, personal, gardening question? Become a Patron - just click here - and support me! Or use the Donate button for a one-off donation. If just 10% of my visitors gave me a pound a month, I'd be able to spend a lot more time answering all the questions!!

Sunday 20 November 2022

How to: Tidy up your Tree Peony in late autumn

This question comes up quite often: What is the best thing to do with Tree Peonies, in late autumn? 

They look such a mess, but many people are unsure what they can and can't do, because there is a ton of information available on how to care for "normal" perennial peonies, but not a lot on these woody ones.

So firstly, what is a tree Peony? Is it really a Peony at all, or is just called that because the flowers look a bit Peony-like? Is it like Tree Poppies, which are not Poppies at all, but are actually Romneya? Should we prune it back in winter? Should we obey the labelling which says "does not need any pruning"?

Firstly, yes, it is a Peony.  Normal perennial Peonies are properly called Paeonia, that's the genus name: and Tree Poppies are the same genus, Paeonia. But no-one can spell it, so we generally say Peony.

Most Peonies are sold under just their cultivar name, which appears in single quotes, and Tree Peonies are the same: mind you, there seems to be some confusion over the naming of Tree Peonies. Wikipedia, that font of all (unchecked, unofficial) knowledge, refers to them being the Moutan Peonies, but I've never actually heard that term used.

One of the easiest to grow is Paeonia lutea var. ludlowii which is strong, sturdy, has bright yellow flowers in great profusion, and which sets seed, so you only need to buy one of it!! (I love plants which are generous with their seeding, and/or are easy to propagate!)

I have had, over the years, a white tree Peony, and a glorious dark red one, but alas, they have both died, whereas the good old ludlowii just keeps on growing.

Maintenance:

In mid to late autumn, they tend to  look like this:

The foliage is going brown, it is hanging down in unpleasant soggy fronds, and the whole plant looks like nothing on earth.

First things first: gently pull away all those dead and dying leaves - the brown ones. 

If they don't want to come off easily, don't rip them - leave them for another week or two, or use secateurs to snip them off, as close as you can get to the stalk.

Pay particular attention to the ground level, as a lot of the leaves will have fallen down and become wedged in amongst the stalks. Clear them away, otherwise they will encourage damp and rot around the base of the stems, which is not a good thing.

Once you cleared away the leaves, take a look at the overall shape: is it pleasingly balanced? Is it overcrowded in places?  Are there one or two branches which are bigger than all the rest? Is the whole thing getting too big?

Now is the time to get either secateurs or loppers out, and remove any of those stems which seem to be unwanted. Just cut them off as close to ground level as you can manage.

If one or two stems are sticking out too far, but you won't want to remove them completely, you can just shorten them: look closely along the stem, and see if you can spot a big fat bud which is in about the right place. If you can, cut immediately above it. This reduces the length of the stem, but won't leave you with dead stubby bits, next year.

Having achieved something a bit more pleasing to the eye, take a closer look at each of the remaining stems, starting at the tips. Look for any tips which appear to be dead: they will be grey, and they won't have a fat bud at the tip. Using secateurs, cut off any dead portions - they won't do any good, and the tend to die downwards, if not nipped off. 


 And there you are, done.


Here - left - is the same Tree Peony as you saw above, having had all these processes carried out.

It's now ready to face the winter - a few more leaves to drop, but for now they are quite pleasing - having been thinned and shaped.

Once all the leaves are down, the overall shape will be as attractive as a skeleton can ever be: and next year, there will plenty of new growth and lots of flowers!


Did you enjoy this article? Did you find it useful? Would you like me to answer your own, personal, gardening question? Become a Patron - just click here - and support me! Or use the Donate button for a one-off donation. If just 10% of my visitors gave me a pound a month, I'd be able to spend a lot more time answering all the questions!!