Saturday 28 March 2015

Newts: little friends in the garden

I have newts in my front yard.  I call it a "yard" rather than a "garden" as it has no lawn, no beds, no water feature, just shingle covered with benches covered with plants in pots.

And yet I keep finding newts.

Usually, they are common newts:


Here's one I found earlier: they are small, brown, and have teeny tiny toeses, which are rather sweet.

When picked up, (not for the fun of it, but to move them from harm's way) they tend to sit absolutely still, hoping not to attract attention. But if you wait patiently, they will start walking away.

In winter, when they are very cold, sometimes they seem to need time to "warm up" from the heat of my hand before they stir themselves. I understand that they don't actually hibernate, but they do go into "torpor" which is a state of very low metabolism. I always feel bad if I come across them in very cold weather, so I try to get them somewhere safe quickly, with the least disturbance possible.

Why do I disturb them at all, I hear you ask, crossly, hands on hips? Answer, because they will insist on invading my pots of plants.  Typically, I find them when I tip out a pot to check on the roots before it goes up for sale, or when I lift a trayful of plants onto the workbench for primping, and I find them in amongst the contents.

 Here's one that nearly got squashed, as he was lurking in the tray and I didn't see him until I had emptied out all the pots.


As well as the common ones, I sometimes find less common ones - these are some Great Crested Newts taking a stroll across the shingle:


As you can see, I have different sizes, and I find them most years, so I have assumed that I have a breeding population.

They are easily recognised by being shiny, black, and very chunky,
 To give you an idea of scale, here is my hand, gently picking up the larger one, in order to...


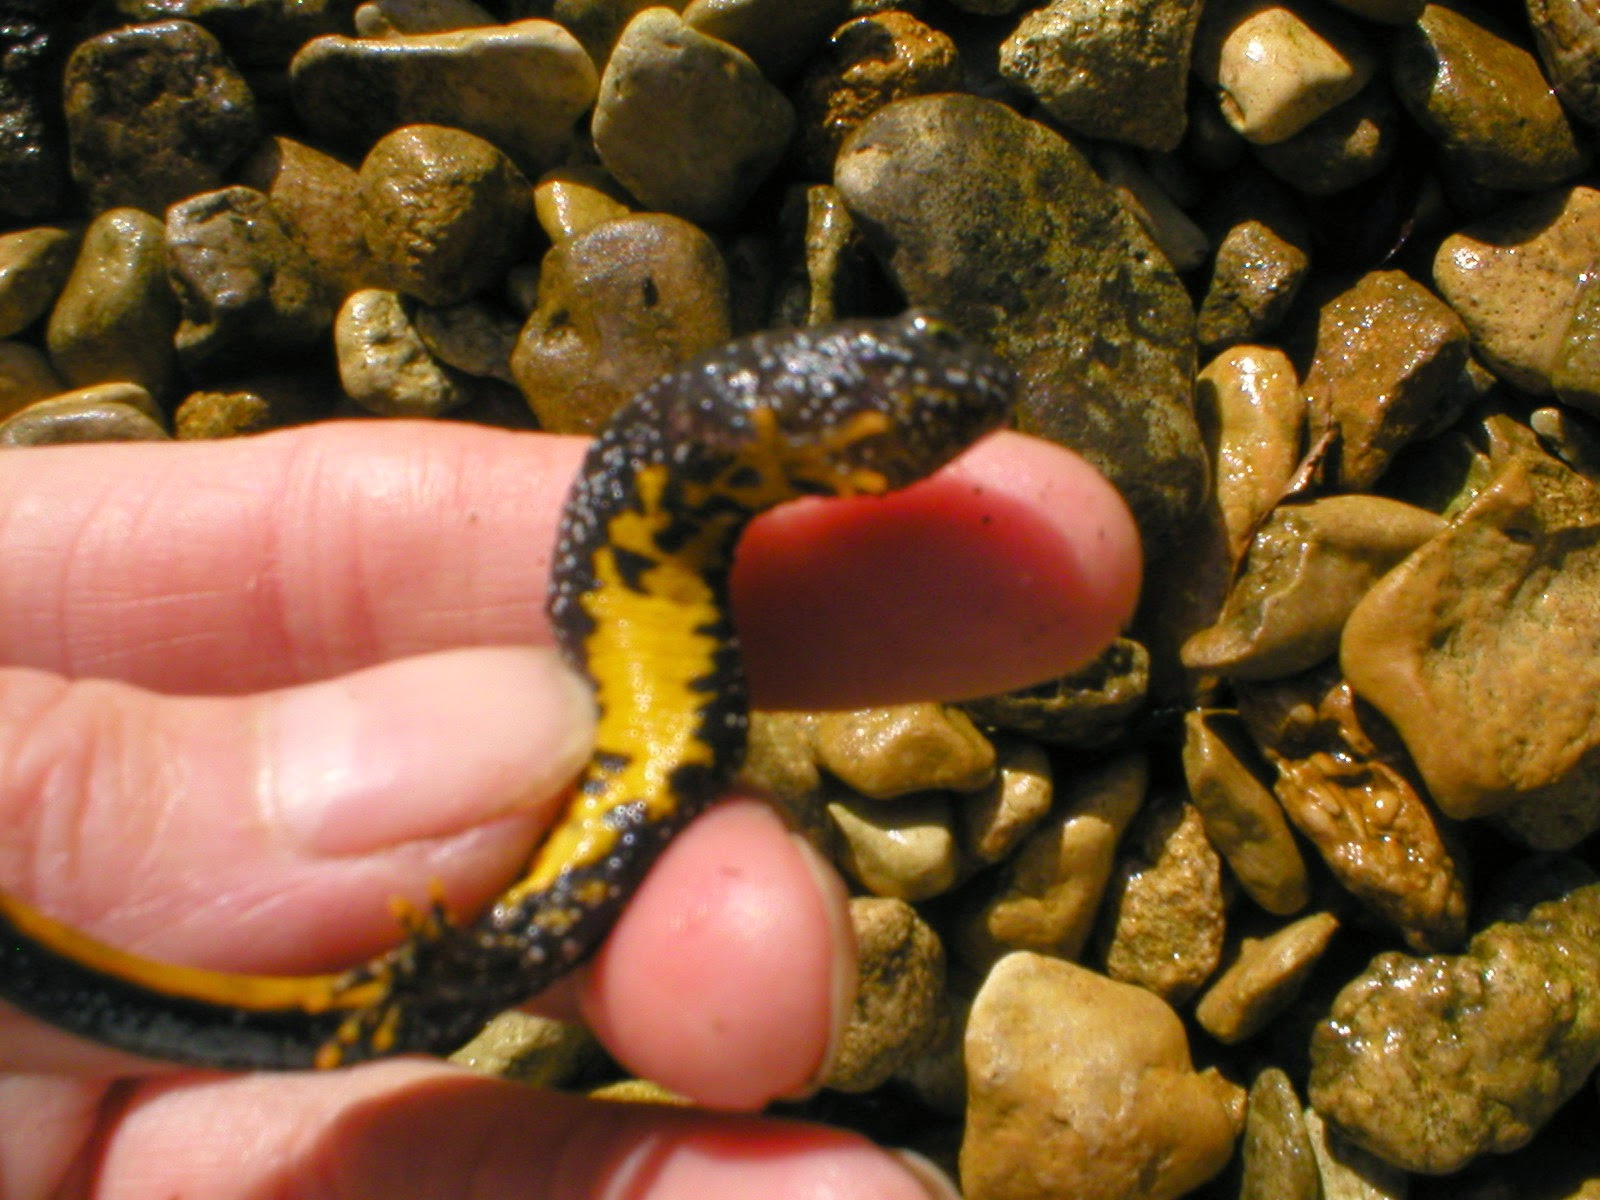
...turn him over to show you the bright yellow underneath.

They don't have any apparent crests, by the way, because I tend to mostly find them in winter, and they only produce the crests in the mating season, which is late spring.

Or, possibly, I only ever find females!!

Either way, I don't mind, I am quite happy to share my front yard with them.

In case you are wondering where they come from, there is an old canal about 150 yards from my house, so I assume that they wander down there for the summer, to breed, then stagger all the way back uphill to my yard for their winter holidays.

Sadly, they are about to build 150 houses on the field between my house and the canal, so I don't know if I will find them in my yard in future years, as they will have to run a gamut of roads, cars, pedestrians, obstructions, hard surfacing, predation by birds while crossing areas with no cover, and so on in order to get back here.

Or maybe they will find a new winter home in the garden of one of the new houses, with less far to walk?

Let's hope so, eh?


Did you enjoy this article? Did you find it useful? Would you like me to answer your own, personal, gardening question? Become a Patron - just click here - and support me! Or use the Donate button for a one-off donation. If just 10% of my visitors gave me a pound a month, I'd be able to spend a lot more time answering all the questions!!

Thursday 26 March 2015

Field Guide to Bluebells: free!

It's very nearly that time of year again - the bluebells are starting to sprout, and people keep asking me how to tell if they are looking at proper English Bluebells, or nasty inferior spanish infiltrators.

It's not a trivial question, as the imported spanish bluebells (note the deliberate insulting lack of capital letters) are interbreeding with our elegant originals, forming a population of hybrids which lack the scent.

This means that our grandchildren might never experience the scent of a Bluebell wood in May...

I'm not as concerned about the look of the flower: the spanish flower differs in shape and arrangement, and who is to say that it is not a more pleasing shape than the original?

But the loss of the scent - now, that would be a sad thing, so although I am not evangelical on the subject (unlike compost, about which I can talk until the cows come home) I do try to restrict the spread of spanish bluebells wherever possible.

So how to tell the difference?

Download my Field Guide to Bluebells this weekend - it is free at any time to anyone with Kindle Unlimited, or with Amazon Prime, and not terribly expensive to everyone else.. but this weekend, it is free to download to everyone, regardless of whether you have Kindle Unlimited or not.

In fact, regardless of whether you have a Kindle or not!  Amazon kindly provide a free method for downloading it to your own device, or to your pc for that matter.

So, no excuses, download it this weekend, then over the next few weeks you can check every Bluebell that you see while you are out and about.

I leave it up to you, as to what you do about them!!

Wednesday 18 March 2015

Plant Profile: Uncinia Rubra

I love this little grass!

Technically it's not actually a grass, it is a sedge: not one of those over-large, coarse invasive Carexes that we all know and hate love,  but an Uncinia, or New Zealand Hook-sedge, which is not a particularly attractive name, for a very attractive plant.

It's evergreen, but evergreen is the wrong word as it is one of the brightest copper-red grasses that  you can buy.

Isn't that glorious?

They are very well behaved, only growing to about a foot high, slow-growing, and tending to form dense clumps.

Although you would buy this plant for the foliage, they do also flower briefly in summer, and if you are lucky, you will get seedlings.

The colour is quite variable, some come up much redder than others, so personally I pot up any chance seedlings and then choose the ones with the best colour to grow on for sale.

You don't often see them for sale: internet research suggests that they are not fully hardy,  but I have them in my cold, east-facing front yard and they seem to be perfectly happy there.

They are very easy-care, and totally low maintenance: all you have to do is rake gently through them in early spring, to remove any dead leaves.

And they certainly bring a splash of colour to the garden in winter, unlike many of the "red" grasses which tend to be very brown and dead-looking over the winter.

Here are a trayfull of last year's seedlings, growing on nicely and ready for sale later this year - this photo was taken on a cold horrible late February day:


Quite bright and cheerful, aren't they? *laughs*

They nicely complement another of my favourites, Ophiopogon planiscapus 'Nigrescens':


this one has to be my ultimate favourite black "grass".  Also known as Black Mondo, great name, or Black Lily Turf, mmm, not so much.  Both of these two look good growing through gravel, and particularly when grown in contemporary pots.

Talking of pots, I'm just in the process of planting up a Pot Garden:  

Pot garden, part planted

So far I've used one of each of the Uncinia and the Ophiopogon, along with a stiff upright red grass (not very red at this time of year, which proves my point about the Uncinia) and, at the bottom, a dear little Auricula which is just starting to grow for this season.

I've used small plants of each, in order to stay in proportion with the pot.

Plenty of spaces left for other plants: hmm, what shall I put in there, I wonder?


Did you enjoy this article? Did you find it useful? Would you like me to answer your own, personal, gardening question? Become a Patron - just click here - and support me! Or use the Donate button for a one-off donation. If just 10% of my visitors gave me a pound a month, I'd be able to spend a lot more time answering all the questions!!

Friday 13 March 2015

Free Field Guide: Violets and Pansies

Ever wondered what the difference was, between Violets and Pansies?

Ever been faced with a small Violet and wondered if it was a Dog Violet, or could it possibly be an Early Dog Violet?

Wonder no longer! Download the latest Field Guide and find out for yourself!!


Here's the link to the Field Guide To Violets and Pansies, and as you can see, it's free to download for anyone with Kindle Unlimited.

However, special treat, it's free to everyone this coming weekend, 14th/15th March!! Yes, free! And it doesn't even matter if you don't have a Kindle, as Amazon kindly provide a free little programme ("app") which allows you to download it to any other device, or even to your pc.

So there you go, no excuses: download it, then get outside and start looking for violets to identify!


Saturday 7 March 2015

Brambles again

*groans theatrically*  Will I ever get away from brambles? Probably not!

Even if you follow my excellent advice about ensuring you cut the root below ground level in order to prevent the stump from shooting, there will still be  whole mass of blackberry pips in the ground all around, and there will still be new plants appearing, so constant vigilance is required.

One quick question popped up a few days ago "Will shredded brambles grow?"

Thankfully, the answer is "No."

There are some pernicious weeds which will indeed grow from small pieces of root - bindweed, ground elder, couch grass, japanese knotweed all come to mind - and there are certainly some shrubs that I would never shred and use as mulch: buddleia and willow for example, as both of those will grow from shreddings.

But thankfully once you have shredded a bramble, it is dead and gone.

Don't use them as mulch, though, as the prickles and the sharp corners of the stems remain as health hazards for years after they die. Rather like holly leaves. ("Ask me how I know... " yes, I stabbed myself painfully by grabbing up a big handful of dead holly leaves the other day.)

And, joy of joys, it's that time of year again, the brambles are starting to put on their new season's growth, so over the next couple of weeks I am going to be doing battle with them once more.

Wish me luck! 


Did you enjoy this article? Did you find it useful? Would you like me to answer your own, personal, gardening question? Become a Patron - just click here - and support me! Or use the Donate button for a one-off donation. If just 10% of my visitors gave me a pound a month, I'd be able to spend a lot more time answering all the questions!!

Oak Field Guide: FREE!!


Time for more blatant self-promotion: the Oaks Field Guide is available FREE to download this weekend, 7th/8th March.

OK, I know it's not really the right time of year to be learning how to tell the difference between the Oak trees commonly found while out walking, but Amazon are very strict on the number of days I can offer the Field Guides for free, and I've run out free days for Snowdrops, Hellebores, Bluebells, and Primulas.

So stock up on the Oak Guide now, while it's free!

This one is aimed at both beginners and Improvers, and rounds up the salient points on differentiating between the various Oaks.

They are only available electronically, and are published via Amazon's Kindle, but you can also download them to your PC or to other ebook readers, so it doesn't matter if you don't have a Kindle.

And this weekend, this one is free!  I hope you enjoy it!


Tuesday 3 March 2015

Leaf Mold: lovely stuff!

I get quite evangelical about both leaf mold and compost, which is hardly surprising considering it's my job... but even now, I am still surprised to find that so many gardeners are fully prepared to spend hours faffing with their compost heaps, but are not interested in making the much smaller effort to make leaf mold.

It does requite a little bit of knowledge, certainly, and a spare corner of the garden,  but once set up, it is hardly any effort at all.

All you have to do, quite literally, is make a lightweight pen to keep them together - in this one, you can see that I have used chicken-wire and odd stakes and branches for the corner posts:  my Client and I like to use recycled and natural materials wherever we can.

Generally speaking, it takes a good two years from start to finish: much slower than compost, but well worth the wait. So you will need to build three pens, filling one pen per year. By the time you are starting to fill the third pen, the first pen should be just about ready for use, but of course it's never ready before the time when the leaves start to fall... so it's far better to just build three pens, and not worry about it.

I've put in posts all round to keep the leaf mould away from the outbuilding wall and from the fence, to avoid any damp problems.  This one measures about a yard deep and nearly two yards long, but frankly the size depends more on where you can fit them in, and what materials you have to hand.

Oh, and make a note of that white slab against the fence!

Here we have the new pen, newly filled with leaves in December 2013.

All I do is rake up the leaves, and tip them in, pressing them well into the corners.

I take care not to include any Horse Chestnut leaves - they take forever to rot - and of course no conifers.

This is mostly Beech and Hornbeam from the hedges, Mulberry from the big tree, Birch, and a lot of Lime from the Lime Walk.

They all go in together, in no particular order, and I make sure they have a good sploosh of water on them after I tip them in. If it's a frosty morning, there's no need to add water, but generally speaking leaf mold pens fail for lack of water more than for any other reason, so add a bucket-full to each layer and you won't go far wrong.

Oh, and - as with your compost heaps -  make sure not to allow a "cone" to form: level off the top, to ensure that water stays inside the pen, and doesn't drain straight out.

Each week, I would find that the heap had sunk down 6" or so, so I could add that week's rakings, and water it well.  At one point I had more leaves than I could fit in this one pen, so I used the one next door for temporary overflow, and made a mental note to make the next set bigger!

Once the leaves stopped falling, I stopped adding, and left the pen alone. For the first month or so I would fling a bucket or two of water over it if I happened to be passing, but that was it.


Here we are in March 2014, it was sinking well, but you can't yet see the top of the white slab.


By June 2014 it had reduced by about half, and the top of slab is just showing.


By December 2014, the slab was halfway visible as the pile continued to shrink.

All this time, there was no stirring, no turning, no adding chemicals, nothing at all except letting it get on with the natural process.

And by January of this year, 2015, it was ready for use.


And here is that pen, opened up, with the top layer of dry stuff scraped off: I don't waste that material, I just add it to this year's pen.

As you can see, lovely stuff! Thick, black, fluffy, lightweight, totally smell-free.

It's worth repeating that this leaf mold material has little "goodness" in it: it's not like compost, which is rich and full of nutrients. The leaves give most of their nutrients back to the tree before they drop, but what we are left with is mineral-rich, and makes wonderful soil conditioner: if the soil is sticky clay, it breaks it up: if the soil is dry and sandy, it helps it to hold water: it lightens a heavy soil, and it thickens up a very poor soil.

Wonderful stuff indeed!

Mostly I mix it 50/50 with home-made compost then use it as mulch on the surface, or for digging in when planting holes are needed. You can also use leaf mold for germinating, as - being quite low in nutrients - it won't encourage the seedlings to outgrow themselves before they have formed proper root systems.

So there you have it, leaf mold - or mould -  in just one year: even I am impressed, as I always tell people that it takes two years to make good stuff. I think I had the right balance of a good big pen, the right volume of leaves, ie more than would fill it, and plenty of water.


Did you enjoy this article? Did you find it useful? Would you like me to answer your own, personal, gardening question? Become a Patron - just click here - and support me! Or use the Donate button for a one-off donation. If just 10% of my visitors gave me a pound a month, I'd be able to spend a lot more time answering all the questions!!

Monday 2 March 2015

It's Pollarding time again!

Pollarding and coppicing are two versions of the same pruning technique, used to keep vigorous trees such as Hazel and Willow down to a reasonable size.

In "olden times" - ie the last two thousand years apart from the most recent 50 or so - this technique was used primarily to provide a product, ie long straight wands, which were then cut and used for weaving baskets, construction of hurdles for fencing, bundling into faggots for firewood and so on.

Coppicing involves chopping a tree at ankle height, then cutting the regrowth on a cycle of 5-7 years, depending on the species of tree, and the size of wands required. Pollarding is exactly the same, but higher up the trunk, and was used where grazing animals would eat off the fresh new shoots before they had a chance to grow. The height of the pollard would depend on what animals were in the area - horses have longer necks than cattle, so the main cut would need to be higher.

These days, pollarding is mostly seen on street trees, which have an annual chop to keep them under control, preventing them shading out street lights, overshadowing neighbouring properties etc.

In a garden setting, it's a good way to keep an otherwise boisterous tree under control, and here is a small Salix (Willow) that gets this treatment every year.

As you can see, not a huge tree, but only because I have been cutting it every year for the past 12 years or so.

This causes the top of the tree to grow into a "knob" instead of continuing to grow upwards, and this knob puts out new sprouts each year, which are easily pruned off.

All you do is take secateurs, or loppers, and cut off each individual branch as close as you can to the base.

Then catch them before they fall in the lake and get washed downstream to cause havoc at the weir...

Here's a close-up to show you that it's not rocket science: some of them are chopped off more closely than others, because the ones on the left as you look at this picture, are the ones overhanging the lake, so I have to stand in a fairly precarious position to get at them.

And the ones you have already cut tend to get in the way of the blades, making it hard to get them all cut really closely: but as with many gardening tasks, you do the best you can, and the plant generally rewards you by thriving.

Here's the final effect from a few feet back: two wheelbarrow loads of offcuts taken up to the bonfire heap, all I have to do is a quick rake up of the smaller debris, put away my big loppers, and job done.

In this case, the off cuts are never long or strong enough to be of any use in weaving, which annoys me every year. 

I think the cause is the heavy overhang of trees which put this side of the lake in deep shade for most of the summer, so I am gradually working my way along the lake path, chopping out the lowest overhanging greenery, in order to get more light on the path.


Mind you, I quite like keeping this particular tree small, as it is perfectly in scale when seen from the house. It also does duty as half of the hammock support on hot summer evenings!

Sunday 1 March 2015

Salix caprea 'Kilmarnock' - Success!

Almost one year ago to the day, I wrote about a poor little specimen of a weeping Salix that had been neglected and brutalised, on a nearby Tech Park.

This is what it looked like when I found it:


The rootstock sprouts were twice as big as the proper tree, the sad remainders of the weeping branches had been pudding-bowled, there was a ruff of weeds around the base, and the less said about that stake, the better.

Having obtained permission from the groundsman, I set to work on it: removed the "wrong" growth, removed dead and damaged top growth, tidied and balanced the little that was left, weeded the base and untied the stake.

Success was forthcoming, as is shown in the series of photos below:

Left: immediately after working on it. (looks horrible, I know!)
Middle: May, two months later, new growth.
Right: July, looking lovely, fully recovered.


Full story here, but that's the gist of it.

I was back there yesterday, and delighted to see that "my" little tree was looking lovely, with fluffy pussy-willow buds already breaking open:

This photo was taken from the other side, just to confuse everyone.

This photo clearly illustrates the "light airy waterfall" effect that should be aimed for.

I will be keeping an eye on it through the summer, and I'll prune it again to keep it small, light, and clear of the ground.

I'm proud of this tiny bit of guerrilla gardening: I have personally saved a small tree, I experience a glow of pride every time I go up there, and I live in hope that some of the Tech Park occupants might, in some small way, be pleased to see a nice-looking tree on the edge of their car park again, instead of a tangled mess.