Saturday 30 April 2022

How to: understand the difference between bulbs, corms and tubers. And rhizomes.

 Just the other day, I wrote about Crocosmia, which grow from what look like bulbs, but which are actually corms, and I said that I would write a quick article explaining the difference.

Does anyone care?

Apparently a few people do (*waves cheerfully*), so here we go! Brace yourselves for some botany... let's gallop quickly through bulbs, corms, tubers, and rhizomes, all of which are underground storage organs, which hold the energy which the plant needs to produce flowers. 

1) bulbs 

A lot of plants-which-come-from-bulbs appear very early in the year, and many of them flower before the leaves are up, or are only just up, which begs the question, where do they get the energy for all those flowers, before the leaves have barely had a chance to start photosynthesising? 

The answer lies in those bulbs, those "storage organs", which put aside a whole bunch of energy (in the form of insoluble starch) (and the "insoluble" part is important, to make sure it doesn't get leached away by water in the soil, over the dormant period) at the end of the previous year, which then gets used up by the flowering stems, early in the year: then the leaves do their bit, and replace the stored energy ready for the following year.

This also describes the reason why we don't cut down the foliage of bulbs as soon as the flowers are over: I am sure you have read about the importance of leaving the foliage to die down naturally, hence the importance of planting bulbs in areas where you don't have to mow the grass until a couple of months later.. well, that's the reason why. If you cut off the leaves too soon, the bulb hasn't had time to store up enough energy to flower the next year, hence no flowers.

So, now we all know about bulbs. 

Does this mean that all spring flowers grow from bulbs?

No: there are a couple of types of "underground storage organ", which all fulfil the same function, but do it in different ways.


Here's a bit of culinary botany for you, to start with: bulbs are modified leaves. 

If you cut one in half, you will find that it looks very much like an onion inside - there are lots of "layers". 

Here's a diagram - left. 

It's a Daffodil, but it holds true for most bulbs.

At the bottom is what's called a Basal Plate or Stem: this is the original stem of the plant, shrunk down to a tiny short thing. Roots spring out from the underside of it, and leaves spring out from the upper side, and they have become thick and fleshy (and very short) so they form the "onion" part of the bulb. Outside all this lot, you will often (not always) find a papery brown layer, which is called the tunic, whose job is to protect the "leaves". And at the very centre, you will find the  buds which will become the flowering stem, followed by the proper leaves, which will do all the hard work of photosynthesising, to replenish those fleshy leaves.

Bulbs reproduce in two ways: the flower up above can form seeds, and the basal plate, down below, can produce bulbils, which are tiny little bulbs.  They can take a few years to grow large enough to flower, and they are the reason why bulbs spread in clumps: each individual bulb which you plant will, after a few years, have made a colony around itself. And that's also why bulbs sometimes need to be lifted and separated (sounds like a Playtex advert, said she, showing her age), as they can become overcrowded by their own offspring.

The analogy with an onion brings up the important point that Daffodils may look like onions, but they are not edible. They are, in fact, quite poisonous, and a few people die each year from accidentally eating them, thinking they were onions.

Now let's move on to corms, which takes us back to our Crocosmia. 

Corms are modified stems, and they are undifferentiated, which means that if you cut them across, they have no layers, it's just solid.

Like bulbs, they have a basal plate - which helps you to plant them the correct way up - and they also have an outside layer called a tunic, which can be fibrous, or it can be quite smooth but with distinct rings. The technical term for these two is netted, or reticulate, for the fibrous tunics: and annulate for the sort with rings. This can be handy to know, because sometimes this is the way to tell which crocus species is which. Advanced botany! Next autumn, go and look in your local garden centre, at all the packs of bulbs hung up for sale, and look closely at the crocus section. You will be able to see the difference between reticulate crocus bulbs, and annulate ones. No-one else will care, but you will have the satisfaction of knowing more than everyone else!

Unlike bulbs, the corm is not used again the following year: instead, the plant creates a new corm on top of the old one, pushing the older ones further down into the soil.

Now we have tubers: and the easiest example is the humble potato.

You will all be familiar with the "eyes" of a spud: those are the growing points, the areas which sprout, if left in the bottom of the cupboard for too long. So you already know that tubers are a bit disorganised, compared to bulbs and corms: they don't have a basal plate, they don't have a papery tunic, and it's not at all easy to tell which way up they should be planted. 

If in doubt, with tubers, just plant them any old way, and let them sort themselves out. Mind you, bulbs will likewise find a way up to the surface, if you accidentally plant them upside down, or if you just throw a handful of them into a hole in the ground, stomp the earth down, and forget all about them... yes, I did that once, and when I dug them up later in the year, they were the most wonderful tangle of shoots and roots! They still flowered. Oh, and there's this: 

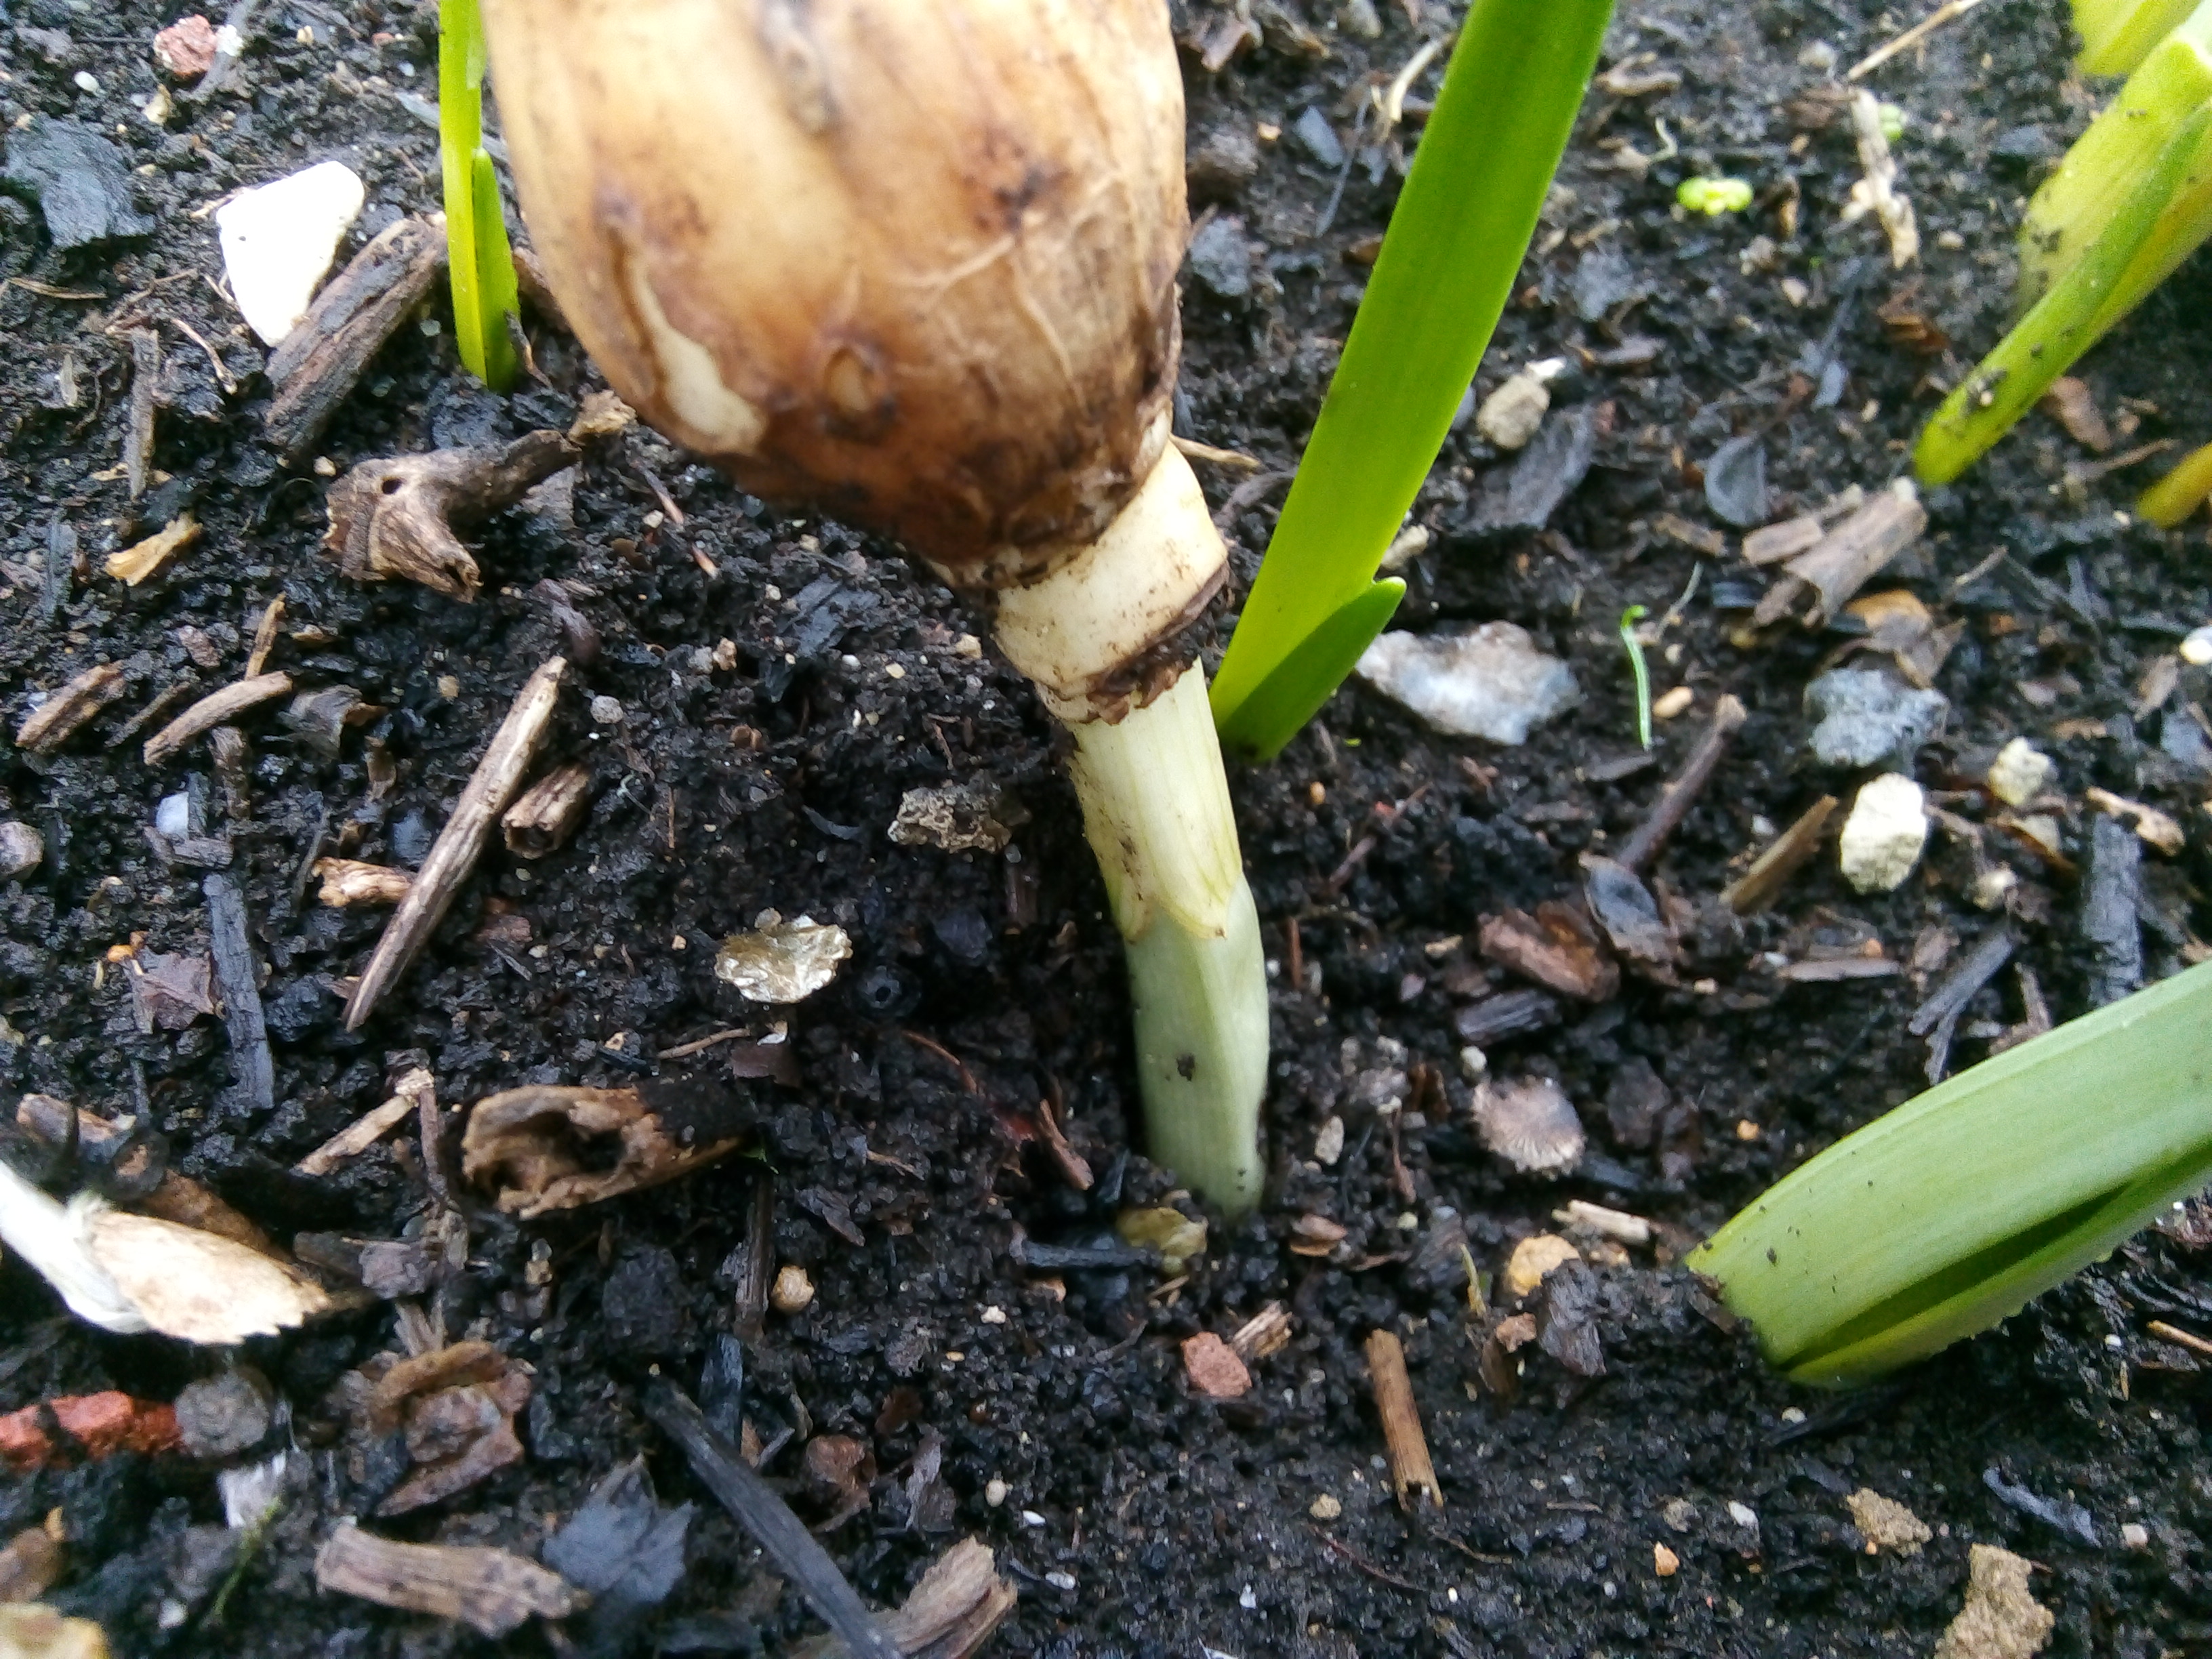
I wrote about this one a while back: it's a Daffodil bulb which was dug up by varmints, small rodents in the garden, and left on the surface of the pot. When it started to shoot, the shoot pushed into the soil - which is what it would expect to find, after all - but instead of growing upwards and into daylight, it grew downwards, and actually lifted its bulb off the ground!

I took pity on it, and reburied it the right way up, but it does go to show that - as was famously said in Jurassic Park, life will find a way: although that was a bit more sinister than one upside-down daffodil.

Where were we? Oh yes, tubers: no basal plate, no tunic (the thin skins of new potatoes don't count, before you ask!), no internal structure to speak of. They don't make offsets, or produce baby tubers: they either just get bigger every year - that would be things like Dahlias - or the tuber is used up to produce the new plant, which then produces a whole bunch of new tubers ready for the following year. If you've ever grown potatoes, you will have seen this in action:  the original "seed" potato can often be found as a shrivelled, shrunken-head sort of thing, when you lift the plants, which has meanwhile produced a whole big cluster of beautiful firm new tubers, which we then gleefully eat.

4)  and now we have Rhizomes.

These are stems which grow sideways, rather than growing upwards, so they run along under, or on, the surface of the soil. They get bigger and fatter each year, and they often branch and divide, with any one rhizome producing two new ones each year, which means they spread rapidly and exponentially.

Again, this can lead to overcrowding and reduced flowering, so every few years they can be lifted and split, as each section of rhizome will then grow into a new plant.

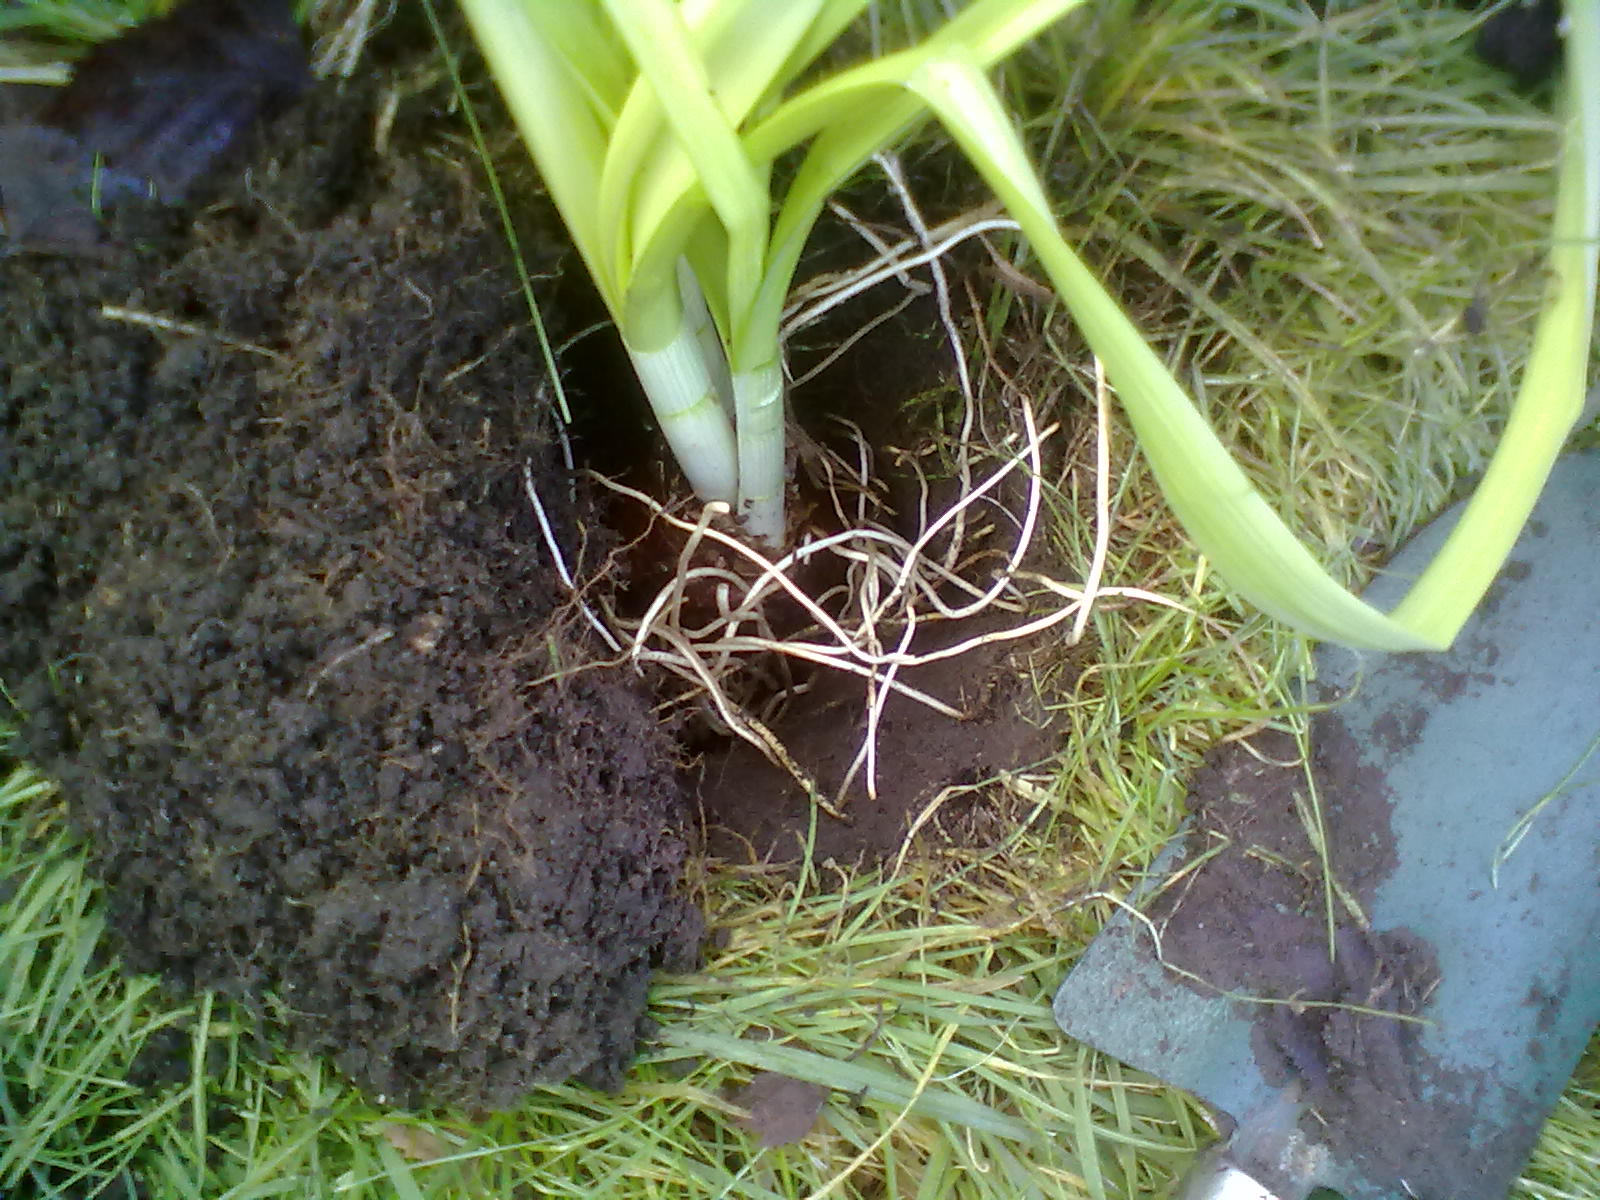
Here - left - are a handful of Bearded Iris rhizomes being split and re-planted, and you can see the mass of fibrous roots produced all the way along the rhizome.

You can also see how the main rhizome is producing a handful of new rhizomes at the leafy end, each of which will produce a flower the following year.

So there you have it:

Bulbs = modified leaves in layers: tunic, yes; basal plate, yes. Examples: daffodils, tulips, hyacinths, and snowdrops

Corms = swollen stem base, undifferentiated: tunic, yes; basal plate yes. Examples: crocosmia, gladiolus, freesia, and crocus

Tuber = modified stem, undifferentiated: tunic, no; basal plate, no. Examples: potato, dahlias, hemerocallis (Day Lily)

Rhizome = modified stem, undifferentiated, growing sideways: tunic, no; basal plate, no. Examples: Iris, lily-of-the-valley, canna, and ginger.


Did you enjoy this article? Did you find it useful? Would you like me to answer your own, personal, gardening question? Become a Patron - just click here - and support me! Or use the Donate button for a one-off donation. If just 10% of my visitors gave me a pound a month, I'd be able to spend a lot more time answering all the questions!!

Thursday 28 April 2022

Pachyphragma - a much under-used plant

Don't you love it when people ask you what your favourite plant is? 

I mean, it's such a “piece of string” question: do they mean my favourite tree, shrub, perennial, bulb? My favourite flower, or foliage? Favourite in winter, or summer - or spring, or autumn? So many answers, so many to choose from. 

 But at this exact time of year, now that the Eranthis hyemalis are going over, my current favourite has to be Pachyphragma macrophyllum, whose clear, strong white flowers are now shining out at ground level. 


It's a really under-used plant, and I don't really know why: it's a bit hard to get it established, and it is quite slow growing, but once it settles down in your garden, it will spread into dense colonies, making quite effective ground cover. 

I say that, because it's not a classic ground-cover such as Ajuga reptans (Bugle), whose leaves lay flat to the ground: instead, it grows as individual plants, but the leaves are long-stemmed and lay flat all the way round each plant, overlapping and giving good ground coverage.

And right now, in spring, those mounds of foliage produce a short spike of white four-petalled flowers: each of which is tiny, but en masse they have a lovely effect.

They'll be flowering for at least a month now, and for the rest of the year, you have a rosette of rounded, ruffled-looking leaves at ground level, and being what is called semi-evergreen, it will hold those leaves through a mild winter with no trouble at all.

Best of all, it is perfectly happy in semi-shade, so it's perfect for a woodland bed, or for planting under deciduous trees or large-ish deciduous shrubs, where it gets the low spring sun: ah, remember the sun? One day it will return, one day..


Did you enjoy this article? Did you find it useful? Would you like me to answer your own, personal, gardening question? Become a Patron - just click here - and support me! Or use the Donate button for a one-off donation. If just 10% of my visitors gave me a pound a month, I'd be able to spend a lot more time answering all the questions!!

Tuesday 26 April 2022

Water Butts: what to do when your diverter is too low.

I had a question from Vernon today - "Hi, Vernon!" - about water butts, which came in via this article, catchily entitled Water Butt - Fail! which dealt with a few of the  problems encountered when installing water butts.

I am, by the way, about two thirds of the way through a new book, all about water management in the garden, but I keep getting distracted by questions, and by the other four half-finished books which I am currently working on (Wildflower meadows, Tree ID in Summer, Photography in the Garden, and New Garden, New Gardener.....), but one day I'll finish it, one day...

Anyway, Vernon wrote:

"I am trying to connect a new water butt to an existing rainwater pipe system. Unfortunately with the water butt on its base the inlet hole is exactly the same level as the y junction on the rainwater pipe system connecting the pipes from the guttering on the front and back of my shed. I therefore cannot fit the diverter at the level." 

Now, I can't find a diagram or photo to illustrate this, but I can visualise exactly what Vernon has - one run of guttering along each side of the shed, meeting round the back or the side, in a Y-junction, then going downwards.

Because all junctions have to be lower than the gutters, and because rainwater diverters normally have to be fitted to an upright pipe, this means that by the time there is space on the pipe for the diverter, it's too low for the water butt.

 Here's a diagram:

This illustrates the basic principles: you fix the diverter to the downpipe, then run the connecting hose straight across into the water butt inlet.

The water butt has to be up on a stand, otherwise you can't get a watering can underneath it, which is maddening.

So when fitting a new water butt,  you start by positioning the empty butt on the stand, make sure that the tap is facing outwards (don't laugh, I've seen it done...), then the height of the inlet dictates where the diverter has to be fixed, on the downpipe.

Fix the diverter too low, and the water won't be able to run uphill to the inlet, and the butt won't fill. 

Fix the diverter too high, and the excess water won't "run back" along the connecting hose, which means that the butt will constantly overflow, so there will be water all over the place: mud and moss all around: general deterioration of the path/concrete/hard standing/foundations, and possibly the end of the world.

So you can see how important it is, to get the diverter at the "right" height.

By the way, if you inherit a water butt with the diverter too high, and you can't bear the thought of having to remove the diverter, cut the downpipes, move the diverter, mend the downpipes... then a quick and easy fix is to empty the butt, then raise it up, by putting some concrete slabs under the stand, until the inlet hole is at the right height. 


If this leaves the watering can a long way below the tap, it's easy enough to attach a short length of garden hose to the tap, to prevent splashing - as per this picture, right.

In this case, the stand was a wee bit too high for the watering can, but the real problem was that the tap was a really splashy one, it just would not send out a nice neat flow of water, no matter if I had it fully open, half open, three-quarters open: so in the end I added the hose to avoid wasting water, and getting wet hands. And wet feet.

Back to the plot - you can see how important it is to get the diverter at the correct height, and you can also see that the position of the water butt inlet forces you to put the diverter at a certain height, relative to the butt.

Vernon's problem is that he doesn't have a nice long, straight run of downpipe like that: he is taking water from a shed, so it's only one story high: the gutters are probably only about head height anyway, as most sheds are not particularly tall: and because he has two lines of guttering joining together, the joiner and the subsequent down pipe are too low for his water butt.

However, there are a couple of options!

Option 1:

The most obvious, and possibly the easiest (but least satisfactory) is to fit the diverter below the Y-junction, and to make a new inlet hole in the butt, at the "correct" level. 

The downside of this option is that the water butt will never fill right up to the top:


Excuse the roughness of this diagram, I did a hasty cut'n'paste to show what I meant, on the basis that a picture is worth a thousand words, and you guys would all die of boredom if I spent a thousand words trying to describe this situation...

Imagine, if you'd be so kind, that instead of a long down pipe, we have Vernon's  two gutters, joined together, which means he can only fit his diverter underneath the join.

As you can see, if  you fit the diverter lower than the inlet hole, then the butt will only fill up to the point where the diverter sends the water in.

Plus, you have the interesting task of creating a new inlet hole in the butt: they are easy enough to drill into, you just need a gadget called a "tank cutter" which fits onto your normal drill, and which cuts out a neat circle.  However, the manufacturers make water butts with a nice flat panel at the top, perfect for drilling and fixing, whereas lower down, they are usually ribbed or fluted for extra strength, which means it's less easy to drill a neat hole, and much less easy to get a good seal around the inlet fixing - it usually requires some silicon sealant, and a bit of huffing and puffing. 

However, needs must when the devil drives, as they say, and if you only have one option for the placement of  your diverter, then the butt will have to have a new hole in it.

As I said, the butt will never fully fill up, but at least it will fill as far as it can: you will still be getting free water, you will still be able to get the watering can under the tap, it's better than nothing, and it's fairly easy to do. 

UPDATE: Vernon has kindly sent me a photo of his guttering: 

There you go, pretty much as described: the diverter has to be fitted immediately below that Y-junction - I've drawn it in, in green.

I've then drawn a line along the brickwork to show approximately where the level of the diverter will be - and you can see by the line on the water butt, that it is quite a bit lower than the place on the butt where the inlet/overflow connector is designed to be situated, which is visible as an indented flat area, just above my green circle, which is there to indicate roughly where the new hole will have to be drilled.

It could be worse - it could be right slap bang across that strengthening band! As it is, I think Vernon should be able to cut a new hole just above the thicker band, and with luck, the connector will sit flush to the side of the butt. As mentioned, silicon sealant often comes into play, if  you have to position a connector anywhere other than the "standard" position.

Right, so much for Option 1:  

Option 2:

Get a different shaped water butt. Instead of an "upright" one, get a rectangular tank, more like the shape of an old cold-water tank, or a trough: you can buy pretty much anything, these days.  This will mean that you can still put it up on a stand, but the top of it will be a lot lower than the top of a normal shaped butt, so you should easily be able to get it low enough to fit below the Y-junction.

Downsides: you will have to build a stand for it, as it probably won't arrive with one: and it will have to be sturdy, because water is heavy.. A neat stack of bricks, dry-laid in a criss-cross pattern, at each corner will probably work, if it's a metal tank: if it's plastic, then you will need some sort of rigid base of wood or metal to run underneath it, to prevent sagging.

As a side issue, talking of sagging, one of my dearly beloved Clients recently moved their large water butt, and was horrified to find that the bottom of it had sagged and moulded itself to the shape of the three plastic "legs" which comprised the (rather cheap) stand which was supplied with it. We all looked at it, eyebrows raised, and we could all envisage it breaking, one day, not too far in the future.. so we found an offcut of marine plywood, super-strong, and cut it to the shape of the base of the butt. This was carefully positioned on the three plastic "legs", and then we put the water butt back on top. 

It wobbled, like a weeble. 

My Clients looked at me, with huge, fear-filled eyes. "Oh no!" they said, in chorus. "It's ruined!"

"Fear not," I replied, sturdily. "Let's fill it with water, and see if the weight will compress it back to the proper shape." 

Long story made short: yes, it did. The base of the butt re-formed itself under the pressure of the weight of the water, and now conforms to the flat plywood base. And hopefully, it will now last for many years!

Back to the plot:

Option 3:

Fit two water butts, one to each gutter. Take off the joining sections, and the Y-junction altogether, and put one butt at the end of each run of guttering. Twice as much free water! Yay! 

There are two sub-options here, depending on how much you want to faff about with guttering and down-pipes: either fit a downpipe and then a diverter to each run of guttering, moving the "join" and the Y-junction lower down, below the level of the two diverters.

 Or, fit one butt with a diverter to the original downpipe - now you will be able to fit it sufficiently high, as the Y-junction is gone - and for the second butt, just run the gutter straight into it, using a short length of down-pipe in through the hole in the top.  Most water butts have a moulded circular place, usually in the lid, where you can easily cut out a round hole,  using a Stanley knife.

I can hear you drawing breath to say "Ah, but what about the overflow? Surely it will just fill up then spill over..." .

Indeed! All you need to do is use the overflow outlet of the second water butt: they have them, pre-drilled, usually with a black, blanking plug already installed, and most water butts come with a joining kit which is simply a connector which screws into that hole, and a short length of corrugated pipe.  (If they don't, you can easily buy just the connectors.)  Pull out the plug, insert the connector, then push the hosepipe onto the outside of the connector. Run this hosepipe down to the drain.

Or, if you are feeling in a Heath-Robinson sort of mood, you can connect the two butts together using the overflow outlet on each one, and a length of hosepipe (assuming that the corrugated joiner kit pipe is too short...) which means that as butt number two fills to the overflow point, the water will run over to water butt number one, and will then disappear down the diverter.

This can be a good scheme if one side of the roof gets a lot more rain than the other: but you have to support the hose which connects them, otherwise it will droop in the middle. You can use some brackets, screwed to the shed: or you can fix up a shallow shelf for the hose to lie along.  

Hopefully, Vernon, one of these suggestions will either be the right one for you, or will give you an idea as to how best to tackle your particular problem. Do send photos!!


Did you enjoy this article? Did you find it useful? Would you like me to answer your own, personal, gardening question? Become a Patron - just click here - and support me! Or use the Donate button for a one-off donation. If just 10% of my visitors gave me a pound a month, I'd be able to spend a lot more time answering all the questions!!

Monday 25 April 2022

Crocosmia: have you ever wondered....

... what would happen if you were to separate that long string of corms?

Ok, backtrack: Crocosmia (formerly and sometimes still known as Montbretia) are a popular garden plant: they have long, upright, narrow leaves, topped with an arching spire of flowers.


They come in shades of yellow and orange, and are usually about knee height: and then there is the cultivar Lucifer - left - which is bright red, and waist height.

It's very popular, and deservedly so: the flowers are magnificent, the plants are super-easy to grow, they are as tough as old boots, they survive in horrible soil, they seem to thrive on neglect, and all you have to do is cut down the foliage in winter, once it's gone brown and droops sadly: then the following spring, up they come again, and by mid-summer they are blooming their socks off.

Left to their own devices, they will spread to form large clumps, which sometimes gives them a bit of a reputation for being a thug, but I don't go along with that: if you don't want them, they are very easy to remove, as they are not deep-rooted.

Because they come up smiling ever year, they are a perennial: and they are usually described as a  bulbous perennial, although technically, they grow from a Corm, not a Bulb (what's the difference? I could tell you, but it's not really important) (oh all right, I'll cover it in detail, next time!)

If you've ever dug them up, you'll know that these corms form a chain underneath the plant:

...you can see that there is a succession of flattened corms here, stacked on top of each other, with the current year's flowering shoot (now dead) just visible at the top.

Every student, every Trainee I have ever had, plus a whole lot of people who ask me questions here, have asked at some point, "Is it possible to split up these chains of corms? Will we get lots more plants, if we do?"

As you will have gathered by now, if you are a regular reader, I love to do experiments, and I hate to take other people's word for things: especially if the "other people" in question are the internet.

Pardon the grammar of that sentence!

Anyway, so there's the question - what would happen if we were to separate the chain of corms, and plant them all out individually?

Last July, my Trainee and I were lifting, splitting and moving huge clumps of Lucifer, so we decided to try an experiment for ourselves. 


 We started with a healthy-looking string or chain of corms.

The oldest is on the left, the youngest one is on the right.

As we did this in summer, right in the middle of their flowering season, we had no idea if this would work, as an experiment, or not: it probably would have been better to do it either in autumn, as everything was dying down: or, possibly, better, in early spring, to give them all a good start.

However, it was July, and we had the time, so we took this section of corms, which didn't have any greenery growing from it, and decided to give it a go.


Next, we carefully split up the chain.


Again, oldest on the left, youngest on the right, and this gave us six corms, of very different sizes.

Presumably the bigger ones were formed during "good" years?

We deliberately didn't cut the chain, we snapped them - gently, carefully - because corms have a basal plate, and if we were to damage it by cutting into it, well, it would spoil our experiment.


Now we potted each corm up separately, and in this photo we started with the oldest one in the top left, then going from left to right, then to the bottom row, left to right. 

So the youngest corm - the whitest one - is on the bottom row, far right, with a white label.

We then filled the pots with compost, watered well, and stood them to one side, to see what would happen.

For a long time, nothing happened....

Then, in December, I noticed that two of the corms had put out foliage! This was very surprising, not least because we planted them in July, at the point where they "should" have been in full flower. 

Normally, plants with underground storage organs like these, rely on what happened the previous year to be the fuel for any flowers appearing this year.

So I would not have expected those corms to do anything at all.

As  you might be able to see, only two of them made an effort: corms 2 and 3, with 1 being the oldest, and 6 being the youngest.

So 2 and 3 sent up leaves, and in due course, they died off and I removed them.

Over the winter, I kept the pots outdoors, exposed to all the usual weather, and I watered them maybe a couple of times, just to keep the compost damp.

This photo - left - was taken yesterday (we are now in late April) and you can see that all six of them are sprouting.

Which is quite exciting, and rather interesting: when left in the ground, only the top one shoots, and I know this because of the number of times I have uplifted and moved them - never once have I seen any greenery sprouting from any corm other than the top, youngest one.

So there is your answer: if you split up the chains, you will get a lot of plants.

But!

And it's a big but.... internet research suggests that only the newest one will flower. None of the others will flower, because each corm is "used up" in producing the flower, and the new corm, for the following year.

 Shame!!

Mind you, bearing in mind what I said at the beginning of this article, I am going to let these six plants grow on, and just see how many of them produce any sort of flowers.

I will let  you know.......


Did you enjoy this article? Did you find it useful? Would you like me to answer your own, personal, gardening question? Become a Patron - just click here - and support me! Or use the Donate button for a one-off donation. If just 10% of my visitors gave me a pound a month, I'd be able to spend a lot more time answering all the questions!!

Saturday 23 April 2022

Boots: do expensive products ie Nikwax, actually work?

I've written about waterproof boots (and the impossibility of finding such a thing) many times.

(*quavering old-lady voice*)

Many, many times.....

*grins*

But here's a variation on a theme: if you accept that I have given up on finding any product that will make my leather work-boots waterproof, then is is still worth treating the leather, to keep it supple and lovely?

I started a new pair of work boots a couple of months back, and I made a resolution that I would keep the leather in tip-top condition, and see if that helped with the whole "lack of water proof ness" problem. This was due to several comments I'd received on other articles, stating that it was vital to keep the leather in good condition, otherwise no so-called waterproofing product would work, anyway.

So I started out using Nikwax on the left boot, and cheap old handcream on the right boot.

This was because I had bought some Nikwax to try to waterproof an earlier pair - I don't know why I keep on buying it, I've tried Nikwax over the years on horsey gear, on walking gear, and now on working gear, and it has never worked in the past. But heyho, always willing to try... I'd bought a new tube of the stuff, it failed... but I thought I would give it one more try, as a leather conditioner.

The other one was treated in literally any old hand cream which I happened to have to hand. I think it was Atrixo, but frankly they are all pretty much the same stuff.

So, at least 2-3 times a week, the left boot received some Nikwax, and the right boot received an equal amount of Atrixo, rubbed in for the same amount of time.

And here's the result: both boots have sogged up equal amounts of water.

There is no discernible difference between them, at all.

To remind you, the left boot (that's the one with my left foot inside it, so it's the one on the right, in the photo) had expensive Nikwax rubbed into it.

The other had cheap hand-cream.


By the end of the day, the water had soaked right the way up the boots - right - and there was no difference at all between one boot and the other.

There was a slight difference when applying the product: Nikwax tended to have a very inconsistent consistency, if you see what I mean: sometimes it would be thick and toothpasty, other times it would run off the boot and trickle onto the newspaper.  (Yes, I clean and treat my boots on newspaper, to prevent damage to my carpets. Aren't I good?! )  And yes, I did shake the tube beforehand, it just seemed to be quite hard to mix. The handcream, on the other hand, was super-easy to use, being the same texture all the way through.

They were both absorbed equally well: possibly the hand cream was a little easier to work in properly, as it had a creamier texture.

And the handcream had the added advantage that if I'd applied too much, I could just rub the excess into my hands, ha! ha!  I would not be doing that with the Nikwax....

So, dear readers, I can assure you that if you want to apply any conditioning product to your leather boots, you might as well treat them as though they are your hands, and just use your normal hand cream on them.

In fact, this is the perfect use for all those over-perfumed fancy hand creams which well-meaning people give as gifts, especially at the Christmas end of the year!


Did you enjoy this article? Did you find it useful? Would you like me to answer your own, personal, gardening question? Become a Patron - just click here - and support me! Or use the Donate button for a one-off donation. If just 10% of my visitors gave me a pound a month, I'd be able to spend a lot more time answering all the questions!!

Thursday 21 April 2022

How to: pee discreetly, while working outdoors. For ladies, obviously.

As you might have gathered, I have written a book on How To Be A Successful Self-Employed Gardener. 

You must be aware of this, because I indulge in relentless self-publicity, and there are links to it all over this website.

Oh look, here's another one!

I also do regular one-day seminars on this subject, and one of the highlights of the day - or so I have been told - is my demonstration on how to pee outdoors.

(One reviewer, after the seminar: "The demonstration on how to pee outdoors was, by itself, worth the cost of the seminar."  I think I'm flattered...)

I am constantly getting questions about how to cope with this issue: so many people ask me about this, or tell me that it's a problem for them,  that I have decided I might as well put the information on here, in order to reach a wider audience: normally I just direct them to The Book, but frankly this information is relevant to all ladies who work outdoors (so many Clients are not on site all the time), who go walking (so many public loos have been closed due to Covid), or who do outdoor activities where there are either no loos at all, or inadequate ones.

 Ok, I may lose a few book sales (although there is a TON of other information in there, go on, check it out for yourself! 128,000 words, that's easily the size of a normal paperback!), but as a public service to all women out there..... let's do it! So here we are, lifted from my excellent book on ... *laughs*

Right, what's the problem?

Well, that's easy: Men have external plumbing, all they have to do is unzip, heave it out, and let fly. We may be able to tell, by their stance, what they are doing, but we can't actually "see" anything.

So easy for the guys, so difficult for us gals. *sigh* Not every garden has an outside loo, not every Client is at home while we are working: thanks to Covid-19, it's not always advisable to go into their houses:  and not everyone can hold it in for four hours at a time, so there are times when it will be necessary to have a pee in the shrubbery... but there are ways to make it easier.

Always, always go to the loo just before you leave home. Make it part of your routine: check for phone, hanky, paperwork, tool bag, water: go to the loo, leave for work.

Inspect each garden for a suitable place: a shed is best, but a thick shrubbery can work, if you are certain you are alone in the garden. Be wary of garages in case they have security cameras. If in doubt, ask. Some Clients will give you a key so you can use their house loo, but with keys comes responsibility, so I generally try to manage without.

Position: most girls, when forced to pee outdoors,  make the mistake of dropping their trousers round their ankles and crouching, as though on an invisible toilet: invariably the flow will go forwards, not downwards, and will soak your clothes. It is actually better to kneel, knees apart, body upright, which keeps your trousers dry and throws the liquid forwards. Try it in your (empty) bath some time, you will see what I mean.

Better still is to practice peeing standing up: SmugAmanda used to swear by the wide-necked plastic pickle jar which was small enough that she didn't have to drop her trousers right round her ankles in order to use it.  (A mug, by the way, would seem to be ideal, having a handle and all, but surprisingly, it's not big enough. Ask me how I know....) Start by peeing into it in the shower: then stand in the empty bath, dressed but barefoot, and practice using it while clothed. The trick is to get it “high” enough: hold it really close to your body, so none of the pee escapes onto your leg.

But be warned that you will never again buy a jar of pickles from the local village fete.....

If you prefer the low-tech answer, most of us use those flexible plastic buckets-with-handles, or tub-trugs/gorilla tubs, as they are called,  for collecting weeds: they are ideal as you can squash them easily between your thighs, hoist them up high, and let fly.  Emptying them is completely innocuous: slosh some water from the watering can into the bucket after use, then, paper hanky and all, tip the contents onto the compost heap, no-one will ever know. The only drawback is if your bucket is a bit muddy on the outside... ask me how I know... yes, I got mud all over my legs one day (sigh).

A better, but slightly more fiddly, solution is to use Nappy Sacks.  These are small plastic bags with handles, designed for pooey nappies, therefore sturdy and waterproof. I used to use these all the time during my camping days... you can slip your trousers down to mid-thigh, then hold the Nappy Sack with one handle in front, one behind you. Pull it up firmly, let fly: when finished, slip the front handle over your wrist, let go of the back handle,  bring the half-full (warm, eeugh) bag to the front, slip the second handle over the same wrist: with the other hand, wipe, put the tissue into the bag. Tie the handles, set it gently down on the ground, reassemble clothing. You can then tip the liquid out of the bag onto the compost heap, or behind the shed, and take the bag and soggy tissue home for disposal.

So, all of those are what you might call low-tech solutions, and they all share the same drawback - they require us to drop our trousers, thus revealing our posteriors to all and sundry. There must be a better way, I hear you cry.

Yes, there is!

Finally, the high-tech answer - and my current best solution - is the P-Style.  It's the French-designed answer to the Australian-designed She-pee, and is so much better, in every way.

This is a simple, open-topped chute,  designed so that you unzip, but don't unbutton, your trousers: a brilliant idea, very quick, very discrete.  You just work the chute in through the zip opening: up under the t-shirt, down inside the knickers:  point it slightly downwards,  and let fly. Can't wait for winter so I can try writing my name in the snow....

Again, start by practising in an empty bath, clothed but barefoot, until you work out how far “back” it has to sit. Once you get the hang of it, it's wonderfully easy, and is not only great for work, but has revolutionised my long-walks-in-the-country, as well.

With a P-style, all you need is a small amount of sheltering foliage - you don't need to be totally hidden from view, as you do with all the other methods. And if you are not comfortable leaving a small puddle of urine behind, you can pee into your bucket, then rinse it out and tip it on the compost heap.

I suggest taking a nappy sack as well, then once you've finished, and wiped, you can tuck the tissue (you don't need to wipe afterwards, properly speaking - yes, it's that well designed - but personally I prefer a quick wipe) inside the chute and pop the whole thing into the nappy sack, shove it in your pocket, and take it back to your car or workbag. Very discrete. I even made a special little pouch for mine, from shower curtain fabric, to keep it clean, and so that I could leave a couple of paper hankies tucked inside it at all times, ready for action.

Unless someone is standing right in front of you, there is absolutely nothing for them to see. And if they are standing right in front of you, well, they might get pee on their shoes, and serve them right!

So there you have it: just type the word Pstyle into your search engine and click on the "shopping" tab to find them for sale: the price is about £15 including postage, they come in a range of colours, and I now have at least five of them, each with their own shower-curtain pouch, and stock of paper hankies. One lives in my chainsaw-and-chipper equipment bag: one in my climbing-equipment rucksack: one in my normal walking rucksack: one in the boot of the car: and one on the hall stand, in case I am going out but not going either working, or climbing, or walking: I can't actually remember the last time I left the house other than to go working, or climbing, or walking, but you never know, one day... and if I do, then I will pop the hall-stand P-style into my handbag. 

Just in case.

Now, before we leave this subject, I would just like to offer a couple more pieces of advice:

1) In all these cases, don't wait until you are bursting to go, as that's when accidents happen! If you are getting uncomfortable, just go and do it.

2) If the worst comes to the worst, and you can't get along with any of these suggestions, then you will simply have to stop work and either drive home, or drive to the nearest public loo. Either make up the time afterwards, or reduce your bill for that day.

3) If you have a problem in this area, don't let it stop you working as a gardener - you might choose to work no more than three hours at a time, or you might choose to only work for Clients with a proper facility that you can use.

4) And don't think that by not drinking, you will reduce the problem: as the urine in our bladders becomes more and more concentrated, it can “irritate” the lining of the bladder, making us want to go to the loo, even though it is not “full”.  Weird, huh? There is a logical feeling that by drinking, you will “fill” your bladder so that it needs to be emptied, but that's not quite how it works.  After all, how many times have you been to the loo in the morning, ie “emptied your bladder”, gone out to work, or shopping, or whatever, and not had anything to drink for hours, then still needed to go to the loo as soon as you got home?

So have a couple of glugs of water every so often  - it's very important to stay hydrated,  it won't make you want to go to the loo more often, and in fact if you don't, you are more likely to have an urgent need to pee.

Right, I hope you all enjoyed that fascinating venture into the world of peeing - discreetly - in public, and that I won't have to mention it again!!


Did you enjoy this article? Did you find it useful? Would you like me to answer your own, personal, gardening question? Become a Patron - just click here - and support me! Or use the Donate button for a one-off donation. If just 10% of my visitors gave me a pound a month, I'd be able to spend a lot more time answering all the questions!!

Tuesday 19 April 2022

Grow your Own - how to start

Drug addicts perplex me. I can't see any pleasure in ruining your brain, ruining your health, and often quite literally ruining your entire life.

They are a relatively recent development, historically speaking: there have always been deranged hermits who ate dodgy mushrooms in order to speak in tongues, and but they were always few and far between, nothing like the masses of druggies we have these days. 

Everyone has their theory, of course, from godlessness to laziness, with a side issue of mental health issues combined with our incredible wealth: at no other time in the history of civilisation have people - and when I say "people" I mean the general population, not the teeny tiny number of lords and ladies - not had to spend all their time and energy working the soil, to grow food, in order to live.

And that's the basis of my hypothesis: it seems to me that drug addiction is a plague that developed at the time of the Industrial Revolution - a time when opium dens sprang up in cities, when density of population created poverty, disease and the sort of black-market mentality that would encourage self-harm for money.

It wasn't until 1868 that the Pharmacy Act was created, recognising dangerous drugs and limiting their sale to registered chemists and pharmacists. Until that time, it simply wasn't an issue: the general public lacked the money or the contacts to buy drugs in sufficient quantities to harm themselves.

So why then? Why were the mid 1800s a time when madness descended on the population? Partly it was due to money - the man in the street was suddenly able to earn more money than was needed simply to survive - but the reason he was able to earn this excess money was the division of labour between those who raised crops and animals for us to eat, and those who worked in shops and factories.

Without having to tend crops every day, without having to look after animals, men (and women, of course) lived their lives one step removed from basic survival, which might on the face of it seem like a good thing: just "scraping through" is not a comfortable way to live. But once disconnected from this contact with nature, the town populations found that there was a hollow place in their lives that they didn't know how to fill.

Some found healthy ways to fill the void, with hobbies, good works, social clubs, friendship, and self improvement through learning: whereas others took the easy route and hit the drugs.

It's no coincidence that there are a growing number of gardening associations created for ex cons, for people with mental health problems, for shell shocked veterans, for the underprivileged kids: show 'em some weeds and oh look, they immediately get better. But it works. It really does.

There are also an increasing number of town vegetable beds, community gardens, local gardening groups and associations: we are all starting to realise that we have produced a generation of children who are completely out of touch with nature: who can't recognise common trees, who literally don't know where their food comes from.

Ever worse, their parents are the generation who have grown up eating nothing but fast food, and who don't know how to prepare vegetables, how to make a meal from basic ingredients: and this was highlighted last year, when the government started a well-meant initiative to provide low-income families with a box of groceries intended to make healthy lunches for one child, for a week.

This was blasted on social media: distraught parents, faced with a couple of potatoes, carrots, raw pasta and other items, had no idea how to make food from it!

Another aspect to the problem was most people's complete unawareness of the food supply chain: people on social media were commenting, indignantly and very loudly, that to buy that same set of ingredients at their local supermarket would cost a little over £5, rather than the £25/£30 that it was costing the taxpayer. They seem to be completely unaware of the massive logistics of storing the fresh food, picking it, packing it, moving it from central warehouse to local warehouse, to big van, to little van, to their doorsteps - every step of which costs money. There is no such thing as 'free delivery' . 

And - of course - the government has learned, time and time again, that simply issuing food vouchers does not work, because half of the recipients immediately find "black market" ways to get booze and fags with their vouchers. Hence their decision to send out a box of actual groceries.

What can we do, though, to break this barrier? How can we 'get back to nature'?

First and most obvious, start to grow your own vegetables! 

Start simply, with cress on a piece of kitchen roll:  right.

My generation always used to do this, usually overseen by doting grandparents. Does anyone have time to do this, any more? A packet of cress seeds costs just a pound or two, and will take you all summer to use up.

You literally just put some moist kitchen paper (or an old flannel) into a shallow dish, sprinkle on a few cress seeds, keep it just moist for a week or two, and there you go, cress.

So you can then enjoy your own egg-and-cress sandwiches. 

Once you've done it once or twice, you learn about something called "successional sowing" which means that if it take 2-3 weeks to grow, and it takes you about a week to eat the contents of a tray, then you need to start a new tray every week, so that by the time you've eaten up all the cress in one tray, the next one is just about ready for harvesting.

 So instead of just doing it once, you'll have two or maybe three of them on the go, at any one time.


 Move on to growing lettuce in shallow seed trays, either indoors on a sunny window ledge, or outdoors in a sunny spot, or in a greenhouse if you have one: even those cheap plastic greenhouses - left - work really well for sheltering the lettuce plants, and keeping the bird poo off them. 

This photo is my little plastic greenhouse from last year: I would start a new tray of lettuce every couple of weeks until I had six or so trays on the go, and that was enough to keep  me in lettuce for most of the summer.

Then, once you have the hang of that, you could think about growing some actual veg: and the trick here, is to only grow things you actually eat. There is no point growing cabbage and Brussels sprouts if no-one in the house likes them.

Also, grow things which are expensive to buy: potatoes and carrots take up a lot of room, and are very cheap to buy, so unless you have a huge garden, there seems little point trying to grow them at home. But Asparagus, on the other hand, is expensive to buy, but very easy to grow, if you have the space for it.

I also grow Climbing French Beans - they are as easy to grow as Runner Beans, but I don't really like Runner Beans, because they are often stringy and tough. Climbing French Beans, on the other hand, are tender and yummy, they freeze really well, they're dead cheap to grow - one pack of seeds provides dozens of plants, plus at the end of the season, you can leave a couple of pods on the plant, let them mature and start to go brown, then lo! and behold, you have seeds for next year. Free.

Fruit, likewise: I grow Raspberries, because they are ludicrously easy to grow (I go for Autumn-fruiting ones, which are super easy:  none of that faffing about with this year's canes and last year's canes) and yet they are extremely expensive to buy, because they are so fragile, and because they go mouldy so quickly, once picked and packed. Far better to have them growing in your own garden, so you can pick a bowlful when you want them. Again, they freeze quite well, although they lose their texture once defrosted - but they can still be used as a sort of semi-coulis, with ice-cream!

And best of all, the act of growing our own reminds us of a few things that we would do well to reconnect with: the seasonal nature of fruit and veg, the importance of learning how to store excess produce (grow-your-own is synonymous with "glut" !), the joy of sharing your excess produce with others, and even the joys of working together as a community, where one neighbour might grow courgettes while another grows beans, and you can mix-and-match among yourselves, to share out the gluts.

So there you have it: start small, but do start.


Did you enjoy this article? Did you find it useful? Would you like me to answer your own, personal, gardening question? Become a Patron - just click here - and support me! Or use the Donate button for a one-off donation. If just 10% of my visitors gave me a pound a month, I'd be able to spend a lot more time answering all the questions!!

Sunday 17 April 2022

How to: make compost with only two pens

Creating a Soil Fertility Retainer. Or, The importance of Compost: even if you don't have room to do it properly!

Why make compost? Because it’s free, it’s organic, it saves using peat, and it saves you paying to have your garden rubbish taken away: so make a resolution to make compost this year. 

If you’ve tried and failed, or if your compost heap is a smelly, unsightly, unproductive nuisance, then look at it again, following these guidelines.

Start by finding a quiet corner of the garden for the bins: they will never be a thing of beauty, so find a position that is out of sight, and yet easy to get to.

To do the job easily and efficiently, you really need to have three compost bins or pens:- one that you are adding stuff to right now: one from last year that is being left to rot down: and the third one from the previous year, whose compost you are now using. 

These ones - left - are pretty much "perfect" compost pens, being big, and in a set of three: but as so many of us don't have room for three bins, here is how to manage with just two: it means slightly more work, but it's better than not composting at all.

Size is important: the bins need to be a minimum of a yard square each (oh all right, a metre square for you youngsters!) and it’s important to fill them neatly, right to the corners, keeping them flat on top. They don’t need lids, and it’s handy to be able to take the front panel out for easy emptying.

Fill one bin first, aiming for a 50/50 mix of “greens” ie soft garden waste, kitchen waste (non-meat) and grass cuttings, and “browns” ie shredded paper, ripped cardboard, and perennial prunings (no thicker than a pencil). 

At first it will fill up alarmingly quickly, but after a few weeks the level will drop, despite you adding to it. If it doesn't, slosh a bucket of water onto it: more compost heaps fail for being too dry, than for being too wet. You know you’ve got it right when the bin never seems to get any fuller!

When the first bin finally reaches the top, which should take several months, leave it alone to rot down, and start filling the second one. This is where most people go wrong: they see Bin Number One start to sink, and think "Oh, I'll go back to filling that one." 

Don't! Let it rot down!

Once the second one is more than half full, move the top layer of non-rotted material from the first bin into the second one, leaving a pile of good stuff in the first bin for you to use.

This is where having three bins is best: with only two, you need to empty out the first bin to start filling it again!

It can take a year for a compost bin to rot down thoroughly, or it can be as quick as six months: a good mix of greens and browns promotes a hot, quickly rotting bin. If you find that your second bin is full, but the first one hasn't rotted down yet, then you need bigger bins. Or you have to build a third one!


Did you enjoy this article? Did you find it useful? Would you like me to answer your own, personal, gardening question? Become a Patron - just click here - and support me! Or use the Donate button for a one-off donation. If just 10% of my visitors gave me a pound a month, I'd be able to spend a lot more time answering all the questions!!

Thursday 14 April 2022

Ephemerals in the garden

I've written a couple of articles about Lesser Celandine, proper name Ranunculus ficaria:

...which is this little beastie, left.

It's a hellishly determined invader, it can ruin a lawn, it can smother a bed, and it's particularly evil because it spreads not only by seed, but by devious underground tubers which break off as soon as you try to dig the parent plant out, then lurk in the soil, waiting for you to go away - at which point they immediately start to grow into new plants.

I had a comment arrive from that article, the other day, which said:-

"Well ... spring. Hey actually are ephemerals, albeit obnoxious ones."

Not one of the most articulate comments I have received,  but they have made a big mistake if they think that Lesser Celandine is an ephemeral.

Time for a quick lecture on botanical "lifestyles" . 

Most garden plants fall into three categories: Woody Perennials, Herbaceous Perennials, and Annuals.

"Perennial" means that it comes back, year after year: 

Woody Perennials are big things like trees, and smaller things such as shrubs, which may or may not lose their leaves, but which have a permanent framework of stems and branches. You can see them all year round.

Herbaceous Perennials come back year after year, but the top growth dies off to nothing, usually over the winter.

Annuals grow from seed, live for just one year, flower and set seed, then die. They carry out their whole life cycle in one year.

This is a simplification, of course: there are many in-betweenies such as sub-shrubs: some woody perennials will die off in a cold winter:  there are plants which technically are perennials, but which we treat as annuals because they grow better if started off fresh each year - a lot of our garden vegetables come into that category.  In addition, some tender plants which we grow as annuals will sometimes, in a mild winter, make it through to the next year, because technically they are perennials. 

And then there are oddities like Biennials, which take two years to grow to flowering size, then flower, set seed and die. So they're no perennials, nor are they annuals.

Oh, and I should mention things like bulbs - familiar flowers such as Daffodils, Snowdrops, Crocus etc - are technically herbaceous perennials, because they come back year after year, having lost their top growth completely: but you will sometimes see them labelled as Spring Annuals. 

So, as with most botany, it's not a black-and-white world, there are many subtleties and distinctions between the groupings.

So where do Ephemerals come into it, and why are Lesser Celandine not ephemerals?

Ephemerals is the name for a group of weeds plants who can carry out their entire life cycle - seed, growth, flowering, setting seed and dying - more than once in a year, and usually over a very short period. 

Good examples of Ephemerals are Chickweed (Stellaria media), Groundsel (Senecio vulgaris) and most of the Speedwells (Veronica) as these weeds pop up, flower, and disappear within just a couple of weeks. This allows them to spread incredibly fast, and to take over a garden in no time at all. But at least they are easy to weed out, being very shallow-rooted: they don't have deep tap-roots like Dandelions, nor do they have a strong mat of fibrous roots, like Creeping Buttercup. Or Lesser Celandine.

The problem with the ephemerals is that, because they set seed so fast, if you let the first few get away with it, you will find your garden will be full of them for the rest of the season!
 

So why did this anonymous commenter think that Lesser Celandine is an ephemeral?  

Whoever they are, they are not alone in making this mistake, because the internet is full of sites which describe Lesser Celandine as a "spring ephemeral". Many of these sites also describe the plant as disappearing later in the year, which is simply not true: the rosettes of shiny leaves remain in the beds and lawns quite happily through most of the year: over winter the foliage disappears, as does that of all the other herbaceous perennials: and then in spring the same individual plants pop up new leaves and get on with flowering again. 

You can see this for yourself, because individual plants get bigger and bigger over time,  if you don't week them out.

The confusion comes from mis-interpreting the term "ephemeral" to mean "only flowering for a short time" whereas it should mean "completing its life cycle in a short time" ie growing from seed, flowering, and dying.

If you interpret "ephemeral" to mean "only flowering for a short time" then most of the plants in the garden are ephemeral!

Does it really matter, if we call Lesser Celandine a perennial, or an ephemeral? Well, not, not really, I suppose: but it does make a difference to how we, the gardener, treat them. Ephemerals can be simply hoed out, on a dry day: slice through their flimsy stems, and they are dead and gone.

Try hoeing Lesser Celandine, and you will get absolutely nowhere!


Did you enjoy this article? Did you find it useful? Would you like me to answer your own, personal, gardening question? Become a Patron - just click here - and support me! Or use the Donate button for a one-off donation. If just 10% of my visitors gave me a pound a month, I'd be able to spend a lot more time answering all the questions!!

Tuesday 12 April 2022

How to: edging of borders

I have written about this before, and I have no doubt that I will do so again!

There is nothing quite like edging a bed or border, to instantly smarten up a garden.

Here's a perfect example: 

This was taken in October, so you can see that the herbaceous planting is starting to lose its colour, the leaves on the fruit trees are starting to drop, and it generally looks quite a mess: but this is mostly because the lawn has crept into the border.

There is no longer any definition between border and lawn, and the whole thing just looks unsightly.

So I cut a line along where I estimated the edge to be: that's the black line you can see in this picture.

I did this very quickly and simply, using my border spade, whose blade is virtually flat. A normal sized spade won't work, because the blade is curved: if  you don't have a flat-bladed spade, then you would need to use a half-moon edger, which is the "right tool for the job".

When doing this sort of remedial work, sometimes you can clearly see where the edge used to be, sometimes, not so much. 

In this case, as  you can see, not much at all! 

You can make this job easier by stretching a line from one end to the other, in order to get the line straight: I'm fairly good at doing it by eye, and in this case the Client asked that I just neaten it up for now, without getting it perfectly straight: this was because we were planning to move some of the larger plants around in spring, so she didn't want me to enlarge the bed to fit the plants, when some of them might not be there next year.

If you see what I mean.

So, having used my border spade to mark out a roughly straight line, I then weeded out all the grass on the border side, until it looked all spiffy and neat.

There - how much better is that?

I was also able to remove some of the dead foliage from the Peonies, and to clear inbetween the lovely Iris pallida at this end of the border, who were in danger of suffocating under the grass.

Oh, and the bed doesn't actually curve inwards at the far end, that's an artifact with the camera-phone...

... honest!


Did you enjoy this article? Did you find it useful? Would you like me to answer your own, personal, gardening question? Become a Patron - just click here - and support me! Or use the Donate button for a one-off donation. If just 10% of my visitors gave me a pound a month, I'd be able to spend a lot more time answering all the questions!!

Sunday 10 April 2022

How to: make good use of kind gifts of Daffodils in Spring.

Ever wondered what you can do with those lovely Daffodils-in-a-pot which a kind person gave you several weeks ago, the ones which have flowered their socks off for you indoors, and are now sad and wilting? 

 I am frequently asked if it is possible to plant them outdoors – this goes for Hyacinths and Crocuses (Croci?) as well and, to some extent, Tulips – and my answer is always “Yes!” followed by a snatch-and-grab of the pot, and a quick dash into the garden with a trowel. 

Bulbs which have been forced for indoor sale one year can often establish themselves perfectly well outdoors: all you have to do is dig a decently deep hole for them, pop them in, leaving the leaves intact, and let them die down naturally. 

One of my Clients was given a bowl of very tall, fancy paperwhite daffodils, not what I would normally choose to plant outdoors but we have a fairly sheltered area under a large Silver Birch tree, and on the grounds that they “may” survive outdoors, but definitely ”will not” survive in her green waste bin, I suggested that we plant them out.

(I say “we” but you know I mean “I”...) 


When planting bulbs in grass – at whatever time of year - the routine is the same: take a small hand trowel, push it in to about half its depth and wiggle it from side to side to make a good slit. 


Pull it out upwards, and make another slit at right angles, then tilt the trowel in order to lever out a triangular wodge of grass and earth.

Excavate into the hole thus formed, try to go down as far as you reasonably can. These bulbs are huge things, so I went the full depth of the trowel.


Having shaken off all the dried out, exhausted compost in which they were planted, put the bulb into the 'ole, with the stems against one of the walls, ie not plonked in the very middle of the hole.

Coil the white roots up underneath it as much as possible: at this point, I don't worry too much about damaging these roots, as some damage is inevitable, and usually the act of de-potting and separating the bulbs will cause some root damage. As you can see from the photos, some of the roots were trying to escape!

Use the excavated earth to backfill the hole, gently covering any escaping roots, then press down firmly: fold back the flap of turf – ah, now you see the point of placing the stem against one wall of the hole: the wall gives support to the stems and you can flap over the grass without crushing them. Press the flap down firmly as well.

Job done! 


This last photo - left - shows the finished area, the foliage looks quite limp and tatty but it is imperative that you leave it in place to die down naturally, to give the bulbs a chance to store up enough energy to get them going again next season. It can sometimes be beneficial to give them a foliar feed: I usually do so, on the grounds that it can't do any harm.

I have been doing this for many years, in many gardens, and usually the bulbs succeed: Tulips are not as reliable as Daffs, as only the species Tulips are fully hardy: but again, if someone has presented you with a potful of them, and you don't have the time or inclination to dry out the bulbs and store them over the summer, then it's always worth trying them outside. Amaryllis, those gigantic Christmas gift bulbs, are a different matter, though: they are not hardy at all, so they would not survive outside.

I would say that about a third of the time, post-flowering Daffodils come up blind (ie leaves but no flowers) the next year, but thereafter they generally all flower well, and in time, they bulk up and spread.

Will the paperwhites do the same? Who knows – but for ten minutes of effort, it is well worth trying!


Did you enjoy this article? Did you find it useful? Would you like me to answer your own, personal, gardening question? Become a Patron - just click here - and support me! Or use the Donate button for a one-off donation. If just 10% of my visitors gave me a pound a month, I'd be able to spend a lot more time answering all the questions!!

Friday 8 April 2022

How to: use an old water butt to restrain over-vigorous plants.

We all know that old story about planting mint in a pot with no bottom, to restrict the spread of it... and it's not just mint that needs a bit of a firm hand: many bamboos have a tendency to run, along with shrubs such as Symphoricarpus (or Pop-Berry as we used to call it - you know, those white berries that make a satisfying POP! when you tread on them) and even beauties such as Alstroemeria and Solomon's Seal can cause problems when they start to spread too far. 

This may not seem like an obvious connection, but I recently had to replace several of my water butts, as they had developed leaks: there is no point in trying to mend a leaky water butt, you might as well give up and buy a new one. 

But the old one need not go to waste - get out your general all-purpose hand saw and cut it into hoops. You start by running the saw across the curved surface of the butt, and just when you think that you aren't getting anywhere, it suddenly “bites” and whoosh, there you are, sawing merrily through it with not much effort at all.

Then you can sink a hoop into the ground, and plant the thuggish little monster (whatever it is!) inside the hoop.

Simple, eh?! 

In this picture - left - you can see that I cut the butt into three slices, quite roughly: this gave slices of about a foot in depth, which felt about right: any deeper and you'd have a lot of digging to do, in order to install them.

Installation was very easy: you can either use a trowel to excavate a ring of soil to the right depth, put in place and backfill: or you can use a fork to dig over a largeish hole, insert the hoop, and then replace the soil. This latter method is both easier and quicker - believe it or not! - but only if you have the space to get at it from all sides.


I didn't worry too much about cutting the hoop exactly level, or about setting it exactly at soil level: as soon as the contained plant starts to grow, the foliage will flop over the sides anyway.

The advantages of the hoop, as opposed to keeping the mint or other invasive plant in a ceramic pot above ground, is that you don't need to keep watering it: the roots of the plant have access to the “water bank” in the soil, but they are restricted from wandering all around your borders and beds.

So there you are, two birds with one stone: a good way to re-use an otherwise wasted broken water butt, and a good way to restrain certain creeping plants.


Did you enjoy this article? Did you find it useful? Would you like me to answer your own, personal, gardening question? Become a Patron - just click here - and support me! Or use the Donate button for a one-off donation. If just 10% of my visitors gave me a pound a month, I'd be able to spend a lot more time answering all the questions!!