Friday 29 December 2023

Mistakes Wot I Have Made: ground cover under Holly

Once upon a time, I had a Client with a stately Holly tree in their front garden.


It wasn't really a garden, as such: it was just a small triangle of land on the front of their property, but it separated them from the footpath, and it contained a large clipped Holly tree, so they felt a certain responsibility for it......


To see the rest of this article, please hop over to Patreon.

Tuesday 26 December 2023

2023 - What a year for weather!

To me, the outstanding memory of this year - assuming I want to remember it, that is - is how weird the weather has been.  And how wet, miserable and grey the latter half of the year was.


And, no,  it's not just one of those "oh, the days were sunnier when we were young, the summers were long and hot, the winters were bright and crisp" feelings: I looked it up, and October 2023 is the wettest month since 1838.  

Alongside that, September 2023 was the warmest September on record. 

March of 2023 was the wettest in 40 years across England, after the driest February in 30 years. 

All of which is very unsettling for our plants (I have no idea how the farmers are coping....) and pretty unsettling for those of us who are self-employed and who work outdoors, as bad weather has a big impact on how many hours we can work, and therefore on our earnings.

Back in 2014, my garage flooded (it's in a block, away from the house, luckily) for the first time, due to a combination of insufficient drainage and a lot of rain. It was only about an inch deep, but it was very messy, and took a long time to dry out.

It happened again in 2016, left: then again in 2018, and I realised that it was going to become a regular event, so I took action and dug a drainage channel, to get the water away from the building. 

This helped, but the garage was flooded again in 2019, and again in 2020.

This year, 2023, the garage had flooded four times by June, and I'd stopped making a note of it after that, because now it floods - despite my drainage channel - every time we have heavy rain.

And yet, back in 2018, it was so hot and dry that I was writing article after article about how to cope with drought, how to water pots, how to resuscitate plants which had dried right out... seems incredible now, doesn't it? 

All of which seems to show that yes, climate change is a very real thing, although not quite in the way we'd imagined it would be. 

The official position is that climate change is linked to global warming, and we all assumed it was going to be hot and dry: but that turns out not to be the case. The climate might be getting warmer, but the weather is getting worse - and that's the difference between them. Climate "is", if you like: but weather "might be".  The climate is getting warmer, there's no doubt about that, on a world-wide scale:  but the actual weather, the stuff we deal with every day, is not getting warmer, as such: it's getting wetter, wilder, less predictable, less regular, less seasonal.

In fact, in 2020 I wrote an ironic article about climate change, where I went through an article from a gardening magazine, from ten years earlier, and commented on how wrong the predictions within it had been: they thought we'd all have astro-turf (because it would be too hot and dry for grass) and prairie planting with drought-tolerant plants.... well, that turned out to be a bit off the mark, didn't it! 

Although the astro-turf thing is sort of coming true: I'm seeing a lot of artificial grass these days, especially in tiny new-build gardens. I can't really blame them: the sort of people who buy new builds are mostly young families, or working professionals, who don't know much about gardening and who don't have time for them anyway. 

The gardens are so small that there isn't room for a shed for the mower, and besides, the lawns are so small that it's barely worth getting a mower out anyway. And the houses are so small that an "outdoor room" has become a necessity rather than a luxury, and there's no point having an outside space that you can't use because it's muddy, or gets your shoes wet: so out goes the grass, and in comes the hard landscaping and the dreaded plastic grass.

Mmm, lovely.

"Not."

Sterile. But practical, if this is all the outside space you have, you poor things.

Oh, to be fair, I should also mention that most new builds don't have "soil" in the designated "garden" areas, they have subsoil and building rubble, compacted to a rock-like consistency, with no drainage and not much chance of anything growing in it, without expensive and messy remedial work beforehand. 

So it is a lot easier to just scrape off the top layer of weeds, and throw down the plastic grass.

So what can we hope for, in 2024?

More of the same, I suspect!  Unpredictable weather, plants flowering at the wrong time, late frosts, early heatwaves, miserable summers and milder winters, which sounds like a good thing, but to be honest, wouldn't you rather have a couple of weeks of cold-but-bright weather, rather than this relentless mild-but-dirty-grey stuff?

After all, most plants are not that worried by the snow, and it is awfully pretty to look at!

So there you have it, 2023 is nearly over, the day are starting to get longer again - yay! - and we are heading uphill to spring.

You may also have noticed a change on my blog: from now on, I'll be creating the new articles over on my Patreon page, on a weekly basis, with just one post a month on here, to keep you in touch.

But you are most welcome to trawl through the past posts on this blog, of course - and there are plenty to keep you occupied!


Did you enjoy this article? Did you find it useful? Would you like me to answer your own, personal, gardening question? Become a Patron - just click here - and support me! Or use the Donate button for a one-off donation. If just 10% of my visitors gave me a pound a month, I'd be able to spend a lot more time answering all the questions!!

Friday 22 December 2023

Frost displays - this is the only time they work!

All the gardening articles - in books, and particularly on the internet - bang on about leaving dead perennials standing through the autumn, rather than cutting them down as soon as they die, in order to allow the "frost display".

This is the sort of thing they mean:


 Ethereal shades of pink, green, beige, silver, gold... lovely.

Who could resist?


To see the rest of this article, please hop over to Patreon.

Friday 15 December 2023

How NOT to leave ferns overwinter

This is the time of year - early winter, at the time of writing - when our ferns are starting to look brown and revolting, so now is the time to get out there and cut off all the dying foliage.

Here's a typical example - left: the ends of the fronds are black, and they have flopped down to  the ground, exhausted, and longing to be taken away to a place where they can lay down and quietly decompose.

Let's put them out of their misery, and cut them off, then.

Out with the secateurs, and off we go! 

Now, at this point, I always instruct people to cut the dead or dying fronds off as low down as they can, not to leave stumps. 


This is what it should like like once you are done:

This is the same clump as in the photo above: all the fronds have been cut off, and I've take the opportunity to remove the Lamium that was creeping all around the fern base, as well.

Sometimes, students will ask "what if some of the fronds are still quite green and nice?" and my answer is that once you start cutting them off, it's best to cut the whole lot off, otherwise you may find that the remaining fronds won't stand upright without the dead ones underneath.

Also, you could look on it this way: if most of the fronds have reached the wilting point, then the others are going to be there pretty soon, and you are just making two jobs for yourself, instead of doing it all in one go.

Conversely, of course, if only one or two fronds have gone brown or black, then carefully snip those few out, and leave the rest until they have reached the stage of "not looking nice any more".

Regardless of when you cut them, the important part is how to cut them - and that is, right down to the base.

This is definitely how not to do it!


 No! No!

What is that??

Why did you cut off the top, and leave the brown stem behind??

It looks ridiculous! 

And it won't improve - those brown bits will stay like that, or at best they'll partially snap at the base, or bend over, and then they will lie on the ground, looking up at you, accusingly.

In the meantime, they will catch every fallen leaf, every bit of wind-blown debris or litter: yes, it could be said that they are creating micro-climates and/or wildlife habitats, but honestly, there are acres, miles, of untended land all around us: road verges, railway embankments, canals, walks, footpaths, backs-of-industrial-areas, neglected areas, hedgerows, junctions of back-to-back gardens: all these places provide plenty of micro climates and wildlife habitats, so there really is no need to allow your precious garden to become over-run with weeds.

So you might as well do a proper job the first time: cut them off flush with the tightly furled new fronds (technical term: croziers) (which still sounds like "croupiers" to me) so that they end up looking more like this:

... a collection of round, light green knobbles.

You can now clear a space around the fern, and if time allows, you can also clear away some of the moss and other debris which has found its way in amongst the knobbles.

This is now all set for the winter:  and come spring, you will be able to see the first signs of those new croziers, as they start to unfold!


Did you enjoy this article? Did you find it useful? Would you like me to answer your own, personal, gardening question? Become a Patron - just click here - and support me! Or use the Donate button for a one-off donation. If just 10% of my visitors gave me a pound a month, I'd be able to spend a lot more time answering all the questions!!

Friday 8 December 2023

Hellebores: why we should weed out all those seedlings.

Many people have Hellebores in their garden - usually the fabulous Oriental Hellebore:

OK not the most glorious of photos, but it's a real photo of a real garden, not something pinched off the internet, which has been filtered, tweaked, sharpened, and generally faked...

Here we have a rather nice cascade of purple ones, Helleborus orientalis, and because this is one of "my" gardens, I have removed the majority of the old leaves, so that we can see the flowers properly.

Not everyone likes to do this: some people prefer to leave the leaves, if you see what I mean. 

But I prefer to remove them, for reasons which have been covered in several other articles - just type "Hellebores" into the Search box, top left - not least being to reduce Hellebore Leaf Spot disease.


Here - right - is a clump of Hellebores in a different garden, and you can see the brown blotches on the older, yellowing leaves.

Pretty unpleasant, aren't they? I really don't see any reason to leave them on the plant: and as for that old wives' tale about "the leaves protect the tender new flowering stems and/or tender new leaves from frost," well, that's simply not the case, because I have been chopping off old leaves in autumn for over twenty years now, and I have yet to see a denuded Hellebore suffering any damage from frost, or snow, or anything else which the British winter can throw at them.

An additional advantage of removing all the old leaves before flowering is that you can see whether or not you have a thick clump of tiny seedlings around the base of the mature plants.

Now, if you read any of those other articles, you will also have learnt that I am in the habit of dead-heading like a demon, once the flowers are over, precisely to prevent the Hellebores from setting seed, and creating those vast numbers of seedlings.

"But surely, this is a good thing?" I hear you ask (Gary, this means you!), "Because then I'll have lots of free Hellebores, and I can pot them up and sell them?"

Alas, they may seed themselves freely, but the seedlings don't "come true", so you are unlikely to get the same desirable colours as they ones which you bought, unless the original ones are all the same colour.. and unless you can prevent any cross-pollination with other colours. Also, it takes between three and five years for seedlings to achieve flowering size. (Sorry, Gary!)

So if you leave them - as anyone with Hellebores in their garden will know - you get a dense clump of seedlings all around the base of the parent plant, like this:

What's wrong with this?

Well, those hungry little seedlings are gobbling up all the goodness from the soil, depriving the adult plant of nutrition: and congestion is never a good thing in a garden, because it leads to mildew and other diseases, especially over the winter.

At the very least, it means you can't see the emerging flowers for the vigorous leaves of the seedling, so it's best to weed the seedlings out as soon as you see them.

The trick is to avoid damaging the parent plant, especially at this time of year when the new flowers are just starting to emerge, so you will need to be careful.

And it's a much easier job if the seedlings are still tiny, as in this photo (above), because they have not yet developed the long, wiry roots which make them hard to remove. Of course, it's even easier if you can weed them out over the summer, before there is any risk of damaging the flower shoots, but let's be honest, there are usually more important jobs to do through the summer, and weeding the Hellebores is one of those jobs which often gets put off until winter.

So there's a nice job for a winter's day: remove the old leaves from your Oriental Hellebores, and while you are at it, winkle out all those tiny little seedlings, carefully and gently: then you can sit back and wait for the flowers!


Did you enjoy this article? Did you find it useful? Would you like me to answer your own, personal, gardening question? Become a Patron - just click here - and support me! Or use the Donate button for a one-off donation. If just 10% of my visitors gave me a pound a month, I'd be able to spend a lot more time answering all the questions!!

Friday 1 December 2023

When it comes to compost, how damp is "damp"?

I was working with one of my students, the other day, and we were potting on some plants: this means that they had outgrown their pots - the plants, not the student -  and needed to be "potted on" into larger ones.

This activity requires larger pots, and a decent amount of additional potting medium, to fill up the gaps in the pots. This "medium" can be multi-purpose compost, "organic matter" (which I always have to put in quotes, because it's the fancy PC name for farmyard manure, also known as cow poo), or topsoil, or even soil from your own garden.

I say "even soil from your own garden" because using garden soil - or "earth", as we know it! -  is not necessarily the best things for plants in pots: garden soil usually contains weed seeds, and often contains quite a few bugs, worms, creepy crawlies, etc, which can be a problem for plants-in-pots.

So it's usually best to use the pretty-much-sterile bagged stuff.

The Client produced a couple of old bags of assorted stuff: one was bone dry and dusty, one was lumpy and hard, one had a lot of mushroom-type white filaments growing on it, and the last one appeared to be garden soil.

We decided to mix them all up together, in the hopes that the deficiencies would cancel each other out, so the first job was to find an empty wheelbarrow. 

We started with the worst one, the bone-dry commercial multi-purpose compost. It's always best to "wet" this sort of compost first, before doing anything with it: as you will know if you grown things in pots, it is well-nigh impossible to re-wet commercial multi-purpose compost, once it has dried out: just adding water doesn't do it, the water runs off and through the dry compost, in a very annoying manner, so it needs a bit of special treatment.

This next part, by the way, also applies to newly-opened bags of commercial multi-purpose compost as well: always check it, before you use it.

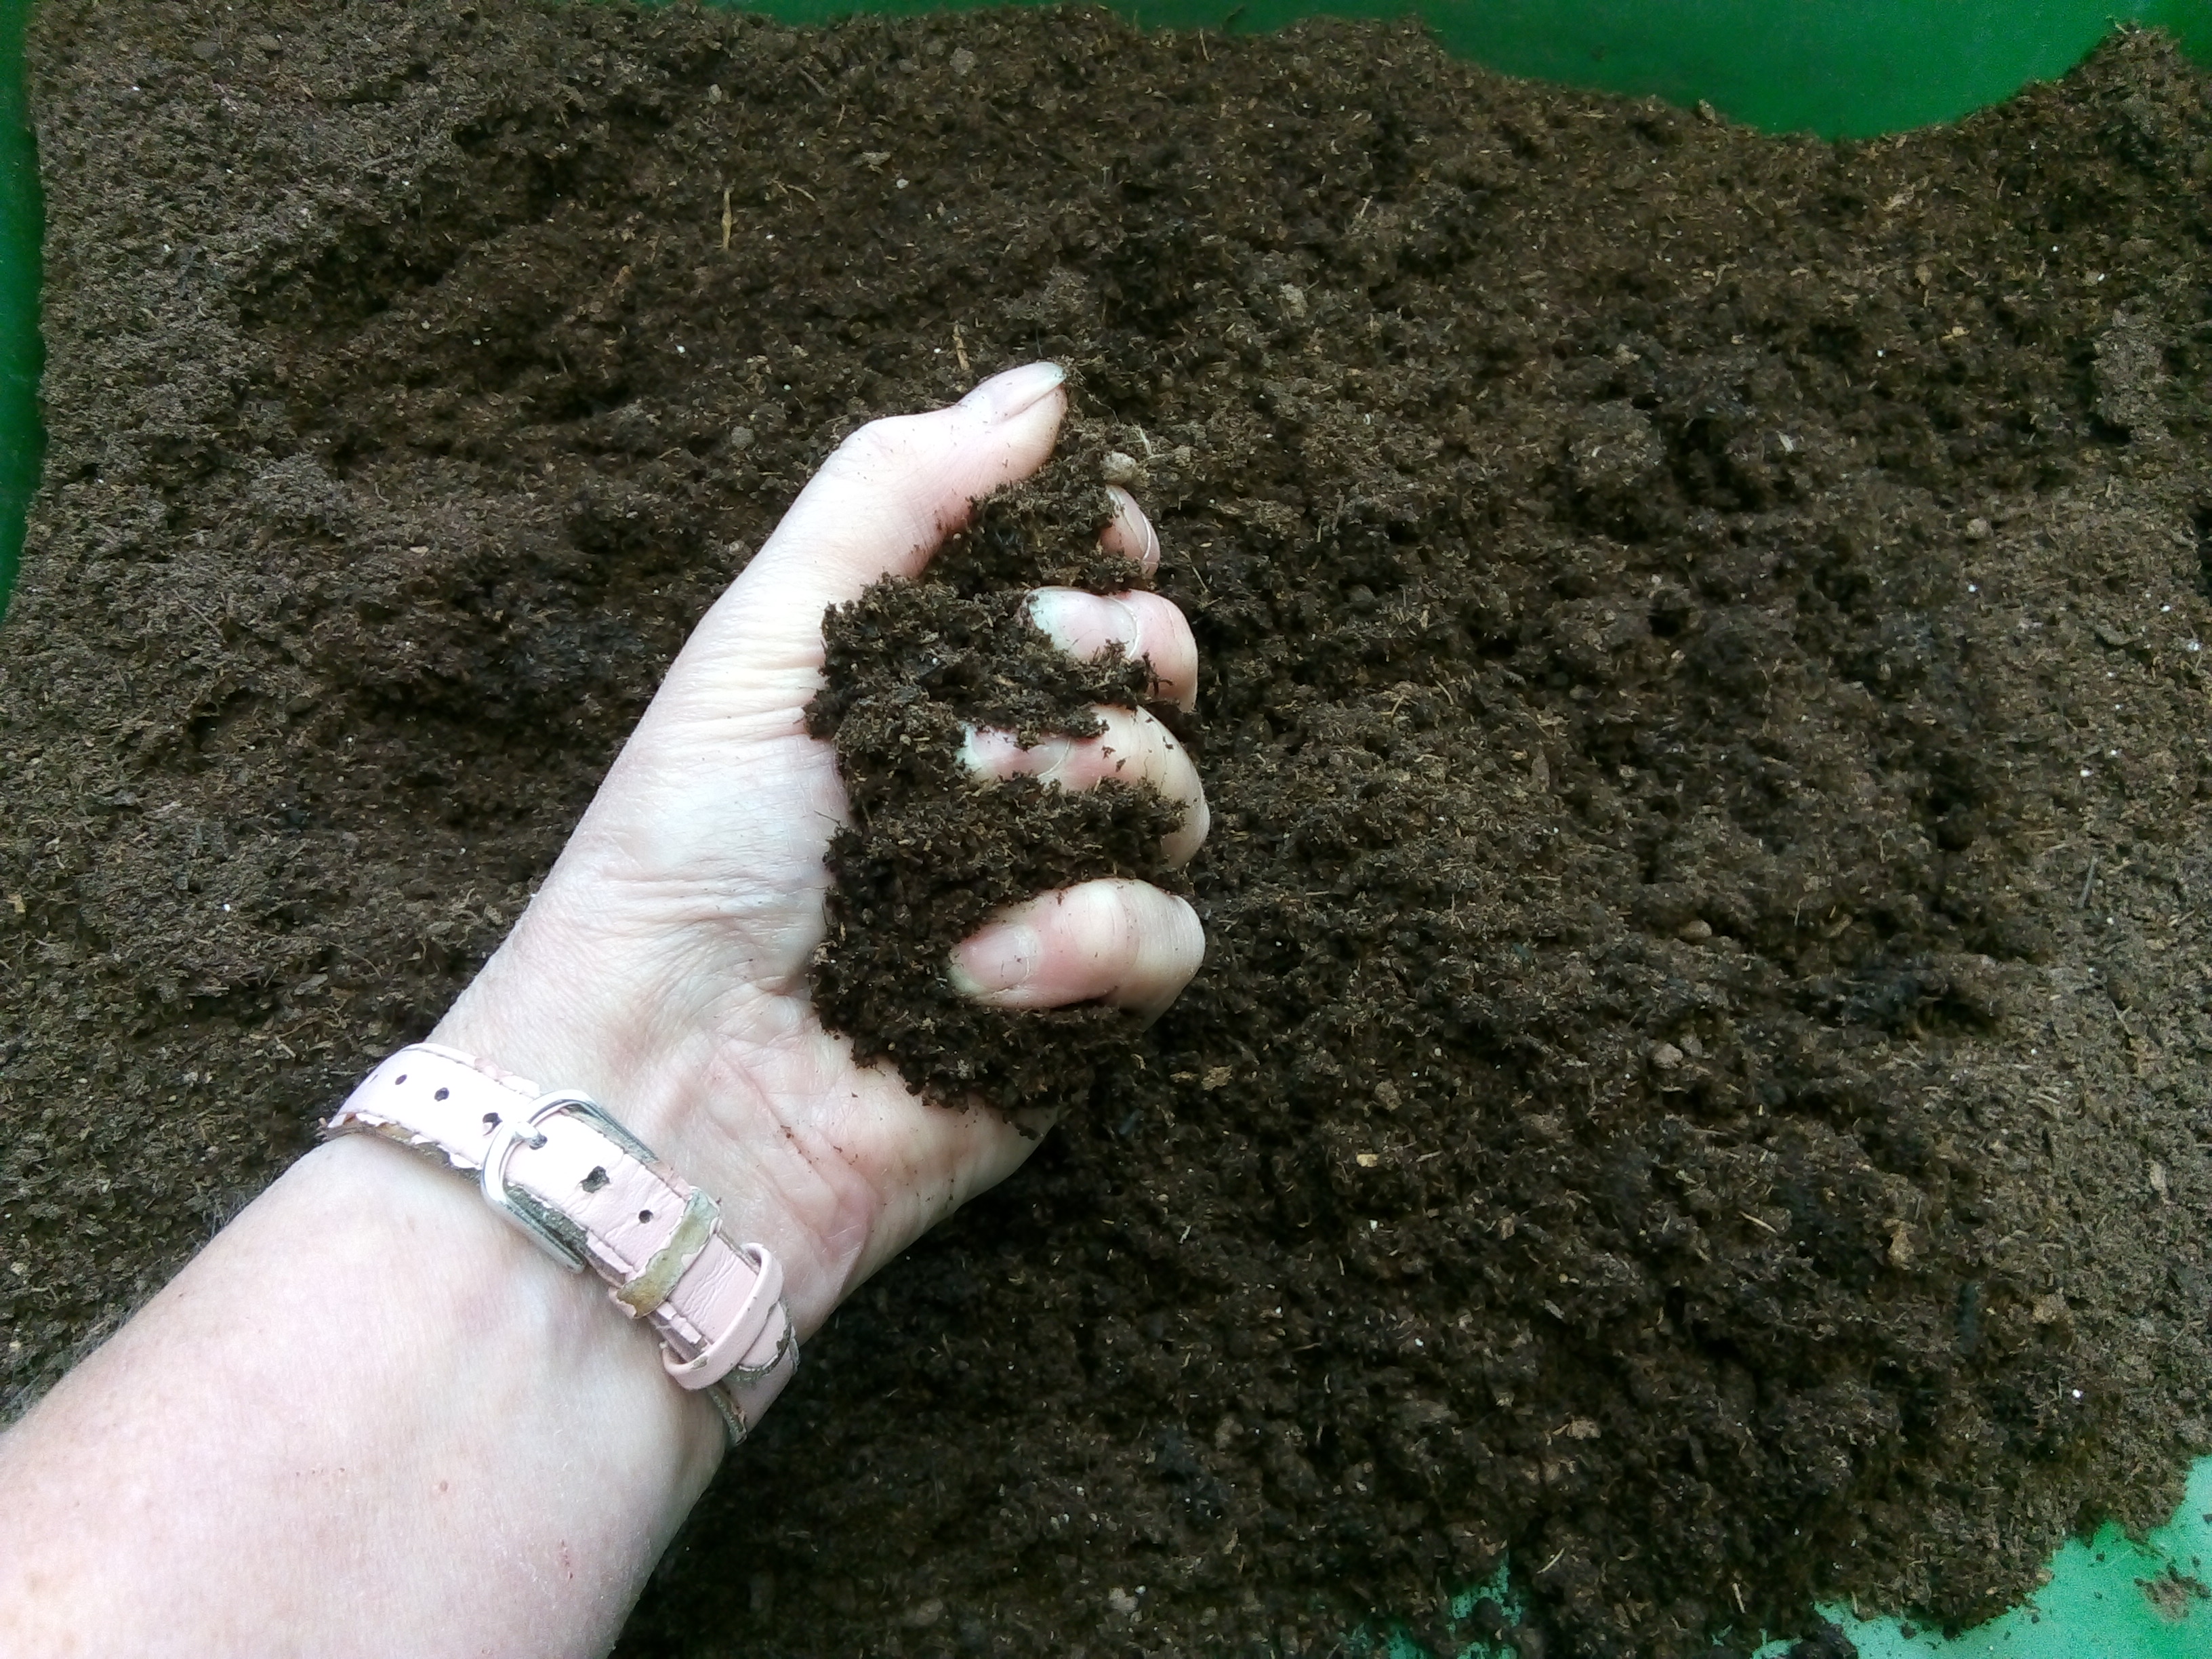
How to check it? Apply the "fist" test: take a big handful and gently squeeze it: open  your hand, and if you can just see your finger-ridges in the clod of compost, it's perfect. 

Now, that's a bit of a tricky concept to explain in words, so I have just popped outside and taken some photos for you, to illustrate the process.


Here is my potting tray, half filled with some sieved multi-purpose compost.

It's been in the tray for a couple of days, so it's dried out: multi-purpose compost  dries out really quickly, so I try to only sieve as much as I am going to need on that day. But there's usually a bit left over, and it's not a problem, as long as you remember to re-wet it before using it.

This batch is clearly too dry - I can tell by looking at it, by the colour of it, but let's apply the fist test anyway.


I take a fistful of the compost, and squeeze it in my hand.

Then I hold my hand where it is, and open my fingers:

Look what happens - the dry compost just falls back into my hand, and some of it falls through my fingers.

This is Too Dry.

If your compost is like this (and ours certainly was!) then put some of it in a bucket or a potting-up tray, add water, and rub it through your hands as though making crumble, until it is just damp enough. If you don't know how to rub up a crumble mix, then shame on you *laughs*,  just mix it around with  your hands, rubbing it and stirring it until all the water is absorbed.

It's no good just pouring water on top of it - the water will "sit" in globules, rather like when they used to let us play with mercury at school. (Do they still do that? Are they allowed to?) So you have to work the water in, manually.

Here is my potting tray, I have added water, and rubbed it in, and in fact, if  you look closely, you can see that I didn't bother to do the outer edges, because I just wanted enough to get a photo of it, to show you all:  can you see how the far left and far right of the tray are lighter in colour, and dusty-looking?

That is the original dry compost.  The slightly darker, lumpier-looking stuff in the middle is the area which received the water.


Now I apply the fist test again: and in case you are wondering, the sun went in, which is why this photo is a different colour from the above! 

But you can still see the darker compost in the middle, and the lighter compost to the far left and far right. 

There is no trickery here, this is the same compost, honest!


 Perfect.

When I open my hand, the compost stays on the palm of my hand, and you can clearly see the ridges where my fingers were.

This shows that my compost is damp enough.

Having rubbed in some water to your compost, how do you know if you've made it  "damp enough", exactly? 

Do the fist test again: if it drips all over your leg, it's too wet: if it all falls apart in your hand, it's still too dry, add more water. 

Keep working more water in, until you get to that perfect dampness, where you can just see those finger-ridges.

Right, end of demonstration, and back to the plot: having made the multi-purpose compost into something usable, we then added the other material.

The garden soil one, we tipped through a sieve first, to remove stones and other unwanted lumps.

The lumpy, rock-hard one was also tipped through the sieve, and the lumps were crushed in our hands: any which refused to be crushed were put aside. The mouldy stuff, well, that's nothing to worry about, a lot of commercially-produced compost will produce what appears to be disastrous amounts of mould, or fungus, and although it may be scary looking, it's perfectly normal, as fungus grows when things are dark and moist, ie the inside of a black plastic bag. Spores are pretty much everywhere, they are in the air all around us, so a bit of "mould" in a bag of compost is nothing to be alarmed about.

Having mixed it all together (at this point, there may or may not have been a couple of choruses of  "you put de lime in de coconut, and mix dem all up"), we applied the fist test again, and decided that it was still a bit too dry, so we stirred in some more water, until we were happy with it.

Why go to all this trouble? Well, I'm sure you've heard all those nice little aphorisms about "you can't build a castle on shaky foundations", or "forewarned is forearmed", or "an ounce of prevention is worth a pound of cure", although that one ought to be "a gram of preparation is worth a kilo of cure" in these modern, decimal times.

The point is, if you try to pot on, or pot up, with dry, horrible compost (I use the word "compost" now, because it takes too long to write out the description of "potting medium" every time) then you will struggle: if the compost is bone dry, you won't be able to pack it firmly but gently around the plant, you will find yourself ramming it in, in order to hold the plant upright. This damages the delicate roots: and as soon as you try to water it, the compost will "boil" in the pot, and will froth up and bubble over the sides, while the water then leaps straight through and out, all over your feet.

But if you get your compost just right, before you start - ah, that's when potting up, or potting on, becomes pleasurable, because it is easy. End of lecture.

So there we were, with a wheelbarrow full of good "stuff": well mixed, and perfectly acceptable for potting up, potting on, and for top-dressing any pots whose soil level was getting a bit low. We had also made use of four half-bags of otherwise wasted material, which is ecologically sound: we'd cleared out four dirty, cobwebby, messy bags from behind the shed: and now we could instruct the Client to buy in half a dozen new bags, ready for use.

And the re-potted plants were very happy!


Did you enjoy this article? Did you find it useful? Would you like me to answer your own, personal, gardening question? Become a Patron - just click here - and support me! Or use the Donate button for a one-off donation. If just 10% of my visitors gave me a pound a month, I'd be able to spend a lot more time answering all the questions!!