Thursday, 31 December 2015

Do you have plastic mesh in your beds?

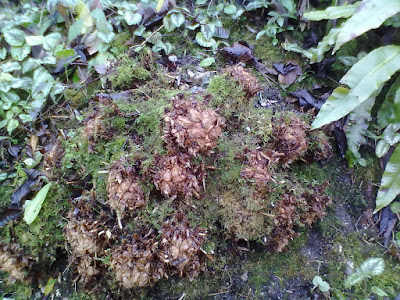
This stuff has been driving me demented for years:

Have you ever encountered it?

Thin green plastic mesh, about 2" squares, buried in the soil.

It gets caught around the fork, it is tough as old boots so you can rarely break it or snap it, so you end up having to dig up whole section of it, disrupting the planting as you do so.

It makes me spit!

There was never any obvious reason for it - I had always assumed that it was something to do with landscaping contractors, as the only hint of a link between the gardens in which I find it is that they are either fairly new gardens, or have had obvious "cheap landscaping" input, by which I mean that they might have had some "design" work done, but not what you'd call good quality, long-lasting design- just those horrible makeovers where they slap down some turf in a circle, throw in some cheap-looking paving paths (which usually crack and crumble between the slabs, causing endless weed infiltration, but are otherwise set on a bed of 2' of concrete so they can't even be removed without heavy equipment) and cram in some massively unbalanced and badly-thought-out planting, such that the garden ends up with - as I encountered in one last year - one quarter-bed overflowing with rampant Vibernum, while the other three quarter-beds were desolate and bare.

Not that I'm biased against landscaping contractors (emphasis on the CON-tractors) you understand, it's just that I get lumbered with clearing up their inefficiency, short-cuts and total lack of planting knowledge... and in the case of this rotten stuff, I have to spend time digging it out, and it always takes much longer than it ought to, with frustratingly little apparent visible improvement.

So what it is actually for? Stabilising banks? Nope, I've found it on banks, but also on perfectly flat beds. Some sort of mulch matting? I don't think so, surely no-one would make a fabric that rots away to leave a skeleton of indestructible green mesh. Industrial-strength anti-squirrel netting? Well, it seems unlikely - why would people be protecting soil around herbaceous planting?

Eventually, after a lot of research, the truth surfaced - it's a material used by cheap turf suppliers. By which I mean, people who charge a lot of money but who use cheap, inferior turf. They grow it on this mesh stuff so that they can skim it up in really thin slices, thus using the minimum amount of good soil (and making the load lighter and less bulky so they can get more per lorryload), and so that they can lift it really early, before it has made a proper matted root system, so that they can get more crops off the same land.

Poor show, eh?!

It means that your turf might look nice when they first lay it, but for ever more you are going to be encountering the mesh - apparently, it can rise up through the grass and get caught on the blades of the mower, thus ripping up whole areas of lawn.

And woe betide your gardener if you decide to extend the beds (and this is where I come into it), as the mesh - if it wasn't removed by the action of lifting the turfs - turns up all over the beds for ever more and drives your gardener bonkers!

The manufacturer has apparently stated that it is biodegradable *snorts through nose* and, when a colleague of mine asked them how long before it disintegrated, was told "oh, only a year or so."  Not true! I have found it in gardens that have not had any changes done in over 10 years, and the photo above was from a garden that last had major work done when they moved in, which was over 20 years ago!

So if you are buying in turf, ask your supplier direct to their face if it has stabilising mesh in it, and if they say yes, cancel the order and go elsewhere.


Did you enjoy this article? Did you find it useful? Would you like me to answer your own, personal, gardening question? Become a Patron - just click here - and support me! Or use the Donate button for a one-off donation. If just 10% of my visitors gave me a pound a month, I'd be able to spend a lot more time answering all the questions!!

Wednesday, 30 December 2015

What is Santa's....

... favourite pizza?

(Does Santa even eat pizza?)

Well, it's nearly year end, and time to reflect on how the year went, and what new projects we plan to tackle next year.

I always encourage my Clients (and students) to take photos of their gardens at intervals, and to make notes in their Garden Journal about what worked well, what was a bit of a flop, any noticeable gaps in the garden and so on, on the grounds that when we finally get time to think about these things - and winter is a great time to think about them - we have invariably forgotten all the details.

One in particular that I am keeping an eye on is a Client who lives sideways on to a fairly quiet road, well, more of a lane really: they have a large bank of conifer hedging (ok, a MASSIVE bank) up by the house, as well as further down the garden, but there is a section in the middle which is deciduous trees, and every year they comment that in winter, when the leaves are down, they are annoyed by seeing traffic through the gap.

But they don't want to fill it up with conifers.

But they don't like seeing the traffic.

It's a bit of a conundrum.  So far I have encouraged them to plant a couple of decorative hollies in the area, on the grounds that they are evergreen, but not conifer - and they are not as "dense" as the unlovely Leylandii, but they do offer some privacy.

I was there for  tea and mince pies just before Christmas, and we all stood and regarded the gap: you could still see the traffic - although in defence of the hollies, I did point out that they have only been down a couple of months, and have hardly started to grow yet.

We decided that, once Christmas was over, they would take the corpse of their (real) Christmas tree and ram it into the ground in the middle of the gap, just to see what it would look like.  I thought this would give them a chance to get used to seeing "conifer" in the gap without going to the expense of buying and planting, and without making the long-term commitment before they are sure.

It is also an excellent way of getting the dead tree outside before it drops leaves everywhere, allowing it to die in its own time instead of having to trot it down the dump, thus filling the car with dead leaves and getting scratches all over the head lining. By the time spring arrives, it should be pretty much dead and brown, and thus much easier to chop up and dispose of in the green waste bin, bit by bit.

And hopefully by then, they will have decided whether they are going to fill the gap with conifers - or not!!

OK then, brace yourselves, here it is:

What is Santa's favourite pizza?

One that is deep pan, crisp and even.

Tuesday, 29 December 2015

What do snowmen...

 ... eat for lunch?

(are you tired of these Terrible Christmas Jokes yet?)

I love the way that this sort of joke forces us to suspend disbelief entirely - snowmen don't eat anything, they are not alive! And if they were, they would only eat snow - after all, we are made of meat, and we eat meat, so logically all a snowman would need to eat would be more snow?

Perhaps I am over analysing...

Today is a day for planning - I have a Client with a bare corner in her garden, and I am planning to make it into something lovely.   To date, it has been the vegetable patch, but for a rather complicated reason involving the death of the irrigation system, it is not going to be used for veg any more. So, I have decided to make it a small sitting and cutting garden, with a bench, an up-and-over arch of sweet peas, and some sort of pathway that is not grass.

I have located a bench (found an old one, perfectly serviceable, round the back of the shed) and something I can use for the arch (former fruit cage with the netting removed, stood up on end) and I have already earmarked several plants that can be divided next spring, with the offshoots being moved to this new area.  I have a lot of annual seeds at home which I can bring along, and I am hoping to find enough bits of broken slabs down the edge of the compost bins to make a stepping stone path.

All I need to do today, really, is to decide roughly where the plants are going to go: shall I have a low border of lavender/rosemary edging my new path? Will I place hollyhocks at the back, as is traditional, or shall I put some closer to the path in order to make interesting "hidden" areas? Will oriental poppies look good in front of the aforementioned hollyhock, or will the colours clash? Does it matter if the colours clash? Shall I go for perennial sweet pea (I have some seeds, saved from another garden) which are obviously the easiest, or would it be better to raise them each year in order to have fragrance as well as flowers?

So many decisions!

Such fun!

Right, let's get it over with:


What do snowmen eat for lunch?

Iceburgers.

(presumably this is meant to be a pune or play of words on ice-bergs and beefburgers?!!) 


Did you enjoy this article? Did you find it useful? Would you like me to answer your own, personal, gardening question? Become a Patron - just click here - and support me! Or use the Donate button for a one-off donation. If just 10% of my visitors gave me a pound a month, I'd be able to spend a lot more time answering all the questions!!

Monday, 28 December 2015

What do Santa's little helpers...

... learn at school?

(ha! ha! Another good one!)

I've been taking advantage of time off work to sort out my enormous "Dead Gloves" box. This is the box full of odd gloves - mostly rights, as I always wear out my lefts.

Here is a picture of something which particularly pains my soul: Gold Leaf Winter Touch orphaned rights.

As you can see, I have quite a collection of them, and at £25 a pair, this represents a serious waste of money - there's nearly two hundred quid's worth there, and that is just this year's box.

Well, not a "waste" of money per se, as they are brilliant gloves for working in winter, being thermal lined and waterproof, thus keeping my fingers toasty warm and comfy in the worst of weather.  I just wish they would last a bit longer!

With some types of gloves - the summer ones, usually - I can turn the orphaned rights inside out and use them on my left hand, which is a cunning wheeze to extend their life: I'm not proud, I am quite happy to wear a glove with strange bits of thread hanging off it. But with these gloves, it's not possible.

I have even tried cutting off the fingers from a spare right and grafting them over  the damaged left, but they don't last for long, and the double thickness makes them unwieldy to work in. Shame!

Right, what was today's joke?


What do Santa's little helpers learn at school?

The elfabet.


Did you enjoy this article? (Apart from the dreadful joke..) Did you find it useful? Would you like me to answer your own, personal, gardening question? Become a Patron - just click here - and support me! Or use the Donate button for a one-off donation. If just 10% of my visitors gave me a pound a month, I'd be able to spend a lot more time answering all the questions!!

Sunday, 27 December 2015

Who delivers presents.....

.... to cats?

I'm sure I read somewhere that the internet was sinking under the weight of pictures of cats... probably true, there are whole websites dedicated to this topic. My favourite is.. oops, nearly lost all my street cred there.

Actually, I've had cats all my life except for the last 20 years (?) and I have to say, none of our cats ever pulled all the toilet paper off the roll (they would have been thrashed if they had tried it) or climbed up inside the Christmas tree (ditto). Presumably cats, like children, are not taught to behave any more?

This has been a year for plants not behaving as they are supposed to - not only do we have tulips flowering before they are even planted, but now we have deep-winter flowers appearing while it is still mild - look what I found last week:

Can you see them?

A pair of Winter Aconite (Eranthis hyamelis) merrily flowering, all by themselves.

I am well aware that some plants appear and/or flower in response to temperatures rising or falling, whereas some respond to day length: those are the ones that can be "forced" by being kept in the dark, or by being subjected to artificial light.

I had assumed that Eranthis were a day-length plant, but now I'm not so sure, they seem to be out awfully early. Nice to see them, though!

Typically, they are not where they are supposed to be  - in this garden, the Client wanted to have a drift of Eranthis around a rather nice wooden seat in one corner of the formal lawn, so I dutifully provided and planted a dozen of them, a couple of years ago. Once Eranthis get established, they set seed generously and over time they form wide drifts or swathes of colour in winter - lovely! In this case, however, instead of seeding around the bench, they have chosen to seed themselves in the nearby border.

This means that next month, I will be sent out with a trowel to dig them up and carefully transplant them back to where they are supposed to be!

Now, back to that cat joke:


Who delivers presents to cats?

Santa Paws.

Saturday, 26 December 2015

Who hides in the bakery...

 ...at Christmas?

(This one is actually quite good!)

Ah, Boxing Day - apparently this used to be the day when we opened our "boxes", ie our presents.  I'm not quite sure when present-opening migrated to yesterday, maybe googling it will give an answer:

*pause while I google*  Oh! Boxing Day was supposed to be the day when the staff and tradesmen were given their gratuity. Hmm, wonder if I should tell my Clients about this tradition? *laughs* No, I don't expect a gratuity from Clients, it's enough that they pay me to work in their lovely gardens!

I don't imagine that many people will be working in their gardens today, we are all too fat and full up from huge turkey dinners yesterday, not to mention the weather. I'll be happy if I can get to go out for a walk around the streets.

Talking of which, even on a day like today I can't quite stop being a gardener - I always like looking at what other people are growing in their front gardens, partly to see what they have, and partly to see if they have come up with an interesting or clever way to get around the usual front-garden problems of access, no light, paving for parking, wheelie bins and lack of attention.  Or even, a particularly effective combination of planting.

I'll try to remember to take pictures of anything interesting...

Meanwhile, back to the Terrible Christmas Joke of the Day:


Who hides in the bakery at Christmas?

A mince spy.

Thursday, 24 December 2015

What do you get....

.... if you cross Santa with a duck?

Today is Christmas Eve, and by now most of us are thoroughly fed up with the whole holiday thing, having been suffering it in the shops since early November.

But it wasn't always like this.. I have a series of school books about the Chalet School, they were written by a lady called Elinor M Brent-Dyer, about a pair of English sisters, one much younger than the other, who moved out to Tyrol and started a school. The first one was written in 1925, and she kept banging them out at a rate of more than one a year,  right through the war (which had quite an impact on the school), through rock and roll (which bypassed it altogether) and right up into the 70s. They are utterly fascinating as a social history of private girls' education, continent-based but still very "English".

The parts of the earlier books that always caught my interest - quite apart from the fact that having their hair washed was something they were taken to a hairdresser for - were the descriptions of Christmas, which didn't start until late on Christmas Eve. That was the day when the servants - servants!! - were given the afternoon off to go and do their shopping for gifts, and was the day when the tree arrived and was decorated ready for Christmas day.

So different now....

They didn't do a lot of gardening when they were based in Austria, apart from the annual wrapping-up of the rose bushes in sacking to protect them from the snow. This year, in this country, I have done very little plant protection: last week I did finally wrap up a fig in a pot, and a fairly new Sorbaria which the Client thought might benefit from another year of protection: it's been so ridiculously mild that no-one can quite believe that it is ever going to actually get cold again.

The 10-day forecast says we are going to have double figures, 13-14 degrees, right to the end of the month, which is quite extraordinary: and the long-range forecast is "mild and wet" right through to mid-January, so there doesn't seem a lot of point in wrapping up the plants.

If you do decide to go ahead with plant protection, here are a couple of Expert Tips: don't use bubble-wrap or any sort of plastic: the plants will still be "breathing" even through the winter, and the first sign of sunshine will cause them to "sweat" inside the plastic wrapping. This will lead to mould and fungus, ugh.  Instead, use horticultural fleece, which is lightweight and usually quite translucent - the light can still get in to the plant, which is kinder than plunging it into darkness for several months.  Even leftover landscaping fabric or membrane is better than plastic, but lightweight fleece is best of all, and can be re-used year after year if you are careful when you remove it. Don't use old sheets, they soak up the water and a) become so heavy that they are likely to squash or snap the plant, and b) long-term dampness is another way to invite mould and fungus onto your precious plant.

Second tip, use old pegs to hold it in place. Much better than trying to get loops of string to stay in place.

Third tip, try to leave the very top of the bundle open so that the air and the sun can get in freely. This helps to reduce the amount of insects who creep inside!

Here's one I did last week:

It's a fig, and as the branches are quite flexible I have been a bit cruel and have curled them gently upwards inside the wrapping, but only in order to make a neater package, as it is on the path. Next year I will have to do some judicious pruning, but I don't like to prune this late in the year.

You can see the cunning use of clothes pegs... and they are very handy when you are doing this sort of thing by yourself, without anyone else to hold the fleece in place while a force-9 gale tries to whip it out of your hands.

I then went on to wrap the pot - in bubble wrap, which is ok for pots, not for plants - which is mostly to protect the pot, rather than to protect the roots of the plant.


So, what do you get if you cross Santa with a duck?

A Christmas Quacker.

Wednesday, 23 December 2015

Where do snowmen....

...like to dance?

(I'm sniggering like a 12-year-old at this one, because it remind me of a different, rather ruder Christmas joke, but I'll try to keep that one to myself.)

This year, everyone is talking about the weird weather: it's been the coolest and least-sunny summer ever, and the warmest, mildest winter in over a hundred years, the upshot of which is that none of us feel as though it is really Christmas, and all the plants are flowering at the wrong times.

A friend of mine went to plant out her tulips last week - yes, rather late - and found this:


Your eyes do not deceive you, it is indeed flowering, in the bag. Not even planted yet, but already flowering!!

(In case you are wondering, the correct procedure in these cases is to get them planted asap, carefully so as not to snap the flowering stem, then give them a good drenching of water with liquid feed in it, in order to help the bulb stock up on energy for next year.)  (And at least you know for certain what colour it is!!)


So, where do snowmen like to dance?

At snowballs.

Tuesday, 22 December 2015

What do you get....

... if you eat Christmas decorations?

OK, I admit it, there's not so much going on in the garden this week: it's nearly Christmas, I have officially stopped work for the holidays, so what can I talk about here, to keep you all interested? I've decided to treat you to a series of terrible Christmas jokes, courtesy of my Malteasers Advent Calendar - a small piece of chocolate and a dreadful pun for every day of the run-up to Christmas, which should keep us going until I get back to work. And I'll try to add some gardening content as well... honest!

Traditionally, the gardening columns say things like "winter is a great time for looking at seed catalogues" but they don't thrill me: most of the photos are unrealistically beautiful, many of them are, if not actually air brushed, artificially boosted (for instance, by bundling together a dozen blooms, when you know that in fact they flower in sequence, so you are unlikely to get more than one at a time from any one plant), and they are certainly presented in the best possible flattering-colour-filtered way.

Also, I know from experience that many of those exotic beauties simply won't survive in the cold damp soil of Oxfordshire... not to mention the fact that most of my Clients don't want to spend a lot of money on something that might or might not survive - they generally like tried-and-trusted plants that can be relied on to perform.

Talking of which, a while back, a kind Client gave me a huge stack of Garden magazines - the RHS monthly journal - going back over ten years. I sorted them into month and year order, and have spent the last two years working my way through them. The older ones, I have to say, are SO MUCH better than the current ones.  There is a lot of talk of dumbing down these days, and these magazines really prove it. The earlier ones used to take me weeks to read (I tend to read them only while stuffing down my lunch, so I only get 20 mins a day at them), and I would constantly be reaching for the scissors to cut out articles of interest to go in my scrapbooks and ideas books.

The later ones, and particularly this year and last year, can be flipped through in ten minutes, and I have not cut out and kept a single article. They have page after page of truly beautiful, huge, pictures, but not a lot of actual content. RHS, are you listening? You are supposed to educate and enthuse us, not entertain us with pretty pictures.

My point, however, is the realisation that so many of the "new" plants featured over the years in these magazines have simply fallen by the wayside.

All of them were hailed, at the time, as the latest, greatest, bestest thing - hardy, long-lived, long flowering season, disease-resistant, drought-hardy, perfect for this that and the other: but now they have sunk without trace. I do have one Client who likes to experiment, and who is always buying those "special offers" that you see in the papers, but I can't think of one plant, off-hand, that has survived longer than a year or two, or which has really impressed us with its flowering capacity.

And this is why I don't ever fizz with enthusiasm for "new" plants, I prefer to wait and see if anyone actually grows one locally, before I would consider recommending it to my Clients.

So no, I don't get much of a thrill from looking at seed catalogues at this time of year.

Now, what was today's Terrible Christmas Joke?

What do you get if you eat Christmas decorations?

Tinselitis.

Sunday, 20 December 2015

Ferns: time to cut them back!

The last post rambled on a bit, so here is the second instalment: how to tidy up ferns.

It is very much the same problem and the same principle as for the Hellebores: the old leaves reach a point where they are getting tatty, and they do obstruct the new fronds - but on the other hand, people say "Oh, but you should leave the old fronds there for frost protection".

It really isn't necessary, ferns are as tough as old boots, unless you live in an area with really hard winters. In this particular garden, the whole of this area is a massive frost pocket, as it is set within a deep valley, so the frost just sits there. And yet the ferns survive..

Here is the problem - the fern fronds have lost their fresh greenness and are getting quite brown and tatty, worsened in this case by having the brambles hauled down from above, when we cleared the upper bank of the worst of the top-growth (more of that another time).

A fern in this condition is no use to man or beast, and it is time to clear it away.

Looked at more closely, you can see that each frond has its own brown stalk, and they emerge from a knobbly brown base.

As the plant ages, these knobbles become huge, several inches across, and you often find knobbles growing out of other knobbles.

All you have to do is take your secateurs, and carefully snip off each brown stem, as close to the knobble as you can reach.


Here we are, halfway through the job.

You can see that this fern is actually a collection of smaller knobbles, where it has expanded over the years.

If I wanted to increase the fern bed, I would use a spade to chop off some of the outlying knobbles, getting a good chunk of root with each one. These would then be planted out, and the original plant would quickly fill in the gaps, so by next summer you would not notice that it had been split up.

Here is the whole thing, all fronds cut, and you can see that I have taken the opportunity to remove as much of the encroaching Lamium as I could.

I did also try to get off as much moss as possible, but it was firmly attached and I didn't want to risk damaging the new fronds.

This is an excellent time of year to do this job, as the new fronds are still tightly packed - can you see those smooth, lighter brown mini-kobbles? Each of those is a new frond, just waiting for spring. And when they are still tightly-packed like this, there is no chance of damaging them.


Here is the same clump, fully cleaned up and ready for spring.

You can see that I am trying to keep the Lamium to the area above the fern layer: this is to keep the Hellebore area free, not just for the convenience of the Hellebores, but because I am gradually filling up the lowest area with Common Spotted Orchids, and I don't want them to be swamped by the over-vigorous Lamium. It means that the Hellebore area is comparatively bare and uninteresting at this time of year, but only for a couple of weeks until the Hellebores start flowering, and I think it is well worth it, to preserve and encourage the tiny Orchids.

Luckily for me, the Client agrees!

And what of the cut-off fronds? Compost, or not compost?  I still don't have a definitive answer on this one. Personally I don't compost them, partly due to the millions of spores on them - I don't want to spend my life weeding out baby ferns - and mostly because I think they are too "tough" for composting, and that the mid-ribs would be persistent in the compost for too long.

The internet is no help at all here: some people say yes, some say no: there is a huge confusion about what is a fern, and what is bracken (they are different) and what difference it will make to the ph of the soil, and so on. So I will stick to my own principles for now, and as my composting is all done in "normal" gardens, not on a commercial scale, I will continue to put fern fronds on the bonfire heap, using the ash later on for other purposes.

If you have any thoughts or comments on the matter of composting ferns, I would be delighted to hear from you! 


Did you enjoy this article? Did you find it useful? Would you like me to answer your own, personal, gardening question? Become a Patron - just click here - and support me! Or use the Donate button for a one-off donation. If just 10% of my visitors gave me a pound a month, I'd be able to spend a lot more time answering all the questions!!

Sunday, 13 December 2015

Ferns and Hellebores - time to clear them away

It may be nearly Christmas, but now is the time to get out there and tidy up the "woodland" beds before the new buds start shooting.

One of my gardens has a fabulous Hellebore bank, but at the moment it looks like nothing on earth:

 Bit of a mess, huh?

It's suffered this year, as we have been doing sterling work on the brambles higher up the bank (if you want advice about removing brambles, I have written about it here, here, here, and here) and this has led to a lot of trampling, and a good deal of crushing as the brambles were removed.

Sometimes, a garden just has to suffer, for the greater good *sigh* .

Anyway, the brambles have been cut back and removed, and now it is time to tidy up this lower area.

This is what is causing the messy look - masses of fern fronds, and a whole load of middle-aged Hellebore leaves.

I deal with the ferns first - which, just to keep you on your toes, I will be explaining further down the page - and then you can see what the Hellebore leaves are up to.

I generally nip off any dead-looking or really tatty leaves as and when I see them, starting in late summer, so the ones that are still growing are in quite nice condition: but there comes a time when you have to clear them out properly, and now is that time.

"Why? " I hear you ask, "Don't they offer frost protection for the flower buds?"

Well, they do, but Hellebores don't seem to need it. I have spent the last ten years or more cutting off Hellebore leaves before Christmas, and I have never lost a Hellebore yet.

So, what do you do? Take each old Hellebore leaf, one at a time, take a pair of sharp secateurs, apply one to the other. Cut the stalk as low down as you can - there is no point leaving a couple of inches of stem to go brown and 'orrible, and it will only stab you in the knuckles when you go round them again, as you inevitable would have to - unless you don't mind looking at dead brown stalks, that is.

As you do this, look for the tender new shoots coming up: some will be leaves, but many - hopefully, most - will be flower buds, so take care not to cut or snap those ones.

Sometimes you might find that there are already some of the new season leaves appearing: they will be fresh and green, and a lot smaller than the old ones from the past season. It's up to you whether to leave them or not: my rule is that if they are neat and tidy, I leave them, but if they are growing at odd angles, or are going to obstruct our view of the flowers, then they get snipped off as well.

Once you have cleared the leaves away, suddenly it all starts to look more hopeful. Take the opportunity to clear away any infiltrating weeds while you are at it, but keep the weeds separate from the leaves - leaves are not for composting, partly because they are as tough as Horse Chestnut leaflets and take forever to rot, but mostly because they harbour the spores of a particularly nasty (and mostly unpronounceable) fungal disease called Microsphaeropsis hellebori (told you) which causes leaf spot, and is terribly common. The only way to control it is to clear out and burn the leaves, thus breaking the cycle of disease-spore-overwinter-jump-to-new-leaf-disease.

If you can't burn your leaves, then either put them in your council Green Waste bin (they get their processing plant up to a much higher temperature than we can, which kills the spores) or bag them up and trundle them down to the tip, for very much the same reason.


 Things will look a little bare afterwards, but not for long - here is part of the bank, "after", and as you can see, there are already flower shoots coming through.

I hadn't quite finished this section when I took the photo (says she, defensively!) so there is still some debris to remove and some weeding to do - just look at that cheeky Lamium there! - but you get the general idea.

I find it's important to cut back the leaves  now, before the new buds really get going, otherwise the new bud are distorted by having to force their way through the old leaves, and there is a much higher risk of damaging the new, when trying to cut off the old.

And now here is the bank, from the same point:

Much better!

OK, much barer, but now we will be able to see the flowers clearly, and I will also take this opportunity to sling on a thick layer of our own compost.

Not to protect the buds, by the way, just to enrich the soil: being at the bottom of a bank, a lot of water comes washing down through the year, and much of the soil gets washed away. There isn't much soil here, with chalk underneath, so I have to add organic matter whenever I get the chance.

So a good layer of compost will make the bed look very smart now, and won't harm or hinder the flower buds. In a couple of weeks they will be several inches high, and it will be exciting to see what colours we have - earlier this year I had to move a lot of the planting when the bank edging collapsed, and I'm not at all sure that I put them back in the right order!!

So, what about those ferns?

Oops, I've run out of time! I'll write about those in the very next post..... 


Did you enjoy this article? Did you find it useful? Would you like me to answer your own, personal, gardening question? Become a Patron - just click here - and support me! Or use the Donate button for a one-off donation. If just 10% of my visitors gave me a pound a month, I'd be able to spend a lot more time answering all the questions!!

Friday, 11 December 2015

Dear Prince Charles: lovely idea, but it doesn't work!

Now, I'm not in the habit of taking gardening advice from  HRH Prince Charles, but a few years ago a good friend of mine went on an outing to Buck House and came back full of a particular idea which is practised down there.

Apparently - I say "apparently" because I am only repeating what she said, I don't know this for myself - HRH is in the habit of planting up his enormous decorative terracotta plants with plants which are left in their plastic pots, the plastic pots being plunged into the terracotta pots.

After discussing this with a Client, she was so intrigued by the idea that we tried it with a Fig, in a particularly lovely but awkwardly-shaped ali-baba style terracotta pot.

Anyone who has ever tried to empty one of these out will tell you that it's impossible: the tapered-top shape means that the wodge of soil won't come out through the narrow opening, and if a plant has developed a good rootball, the only way to empty the pot is to chip the roots out one chunk at a time, which is both tiring and tedious. Last time I did this, I had spread out a plastic sheet, gently lowered the pot onto its side, and spent half an hour or more on hands and knees, patiently working away at it.

Never again, I quoth, nevermore!

This is why it seemed like a good idea to employ the HRH-pot-plunging technique.

All went well for a couple of years, the Fig grew strongly, it looked lovely, but earlier this year we noticed that it was leaning to one side rather a lot, and had sunk down rather low inside the terracotta pot.

No problem, said my Client, it's in a plastic pot, isn't it? Just lift the pot up, push some additional soil underneath to raise it, straightening it as you do so, will only take you five minutes.

Five minutes, she said.

Here is the offending article: as you can see, the main stem is listing drunkenly to one side, and the whole thing has sunk down well below the rim of the pot.

You can just see the curve of the black plastic pot above the sunken soil level, a good 5-6" below the lip.

 
Here is the view from above (the main stem does not look quite so crooked from here, but I assure you that it is well off-centre) showing the pot, along with a couple of cheeky weeds that have sneaked in.

They were easily dealt with, but of course, the inner pot would not lift up. I heaved, I strained, I heaved again, but it would not budge. I tried soaking it, to soften the soil, but that just made me muddy.

The fig has rooted through the plastic pot, hasn't it?

Of course it has.

Never mind, said my Client,  all you have to do is dig down the sides of the plastic pot, go underneath and sever the roots, then just pull it out.

"All you have to do...."

For a start, as you can see from this photo, there is barely enough room to slide a hand down inside the terracotta pot, and it took me twenty minutes to get to this stage - I have managed to scrape out a few inches of the surrounding soil, at the cost of several scraped knuckles, but I have now found roots, as you can see, and this means the fig has not only rooted through the bottom of the plastic pot and downwards, it has also spread the roots up outside the plastic pot.

Hmmm.

By this point, the plastic pot was wiggle-able, but would not come loose, and I found it impossible to get a grip on it - it has a very small rim, and I just couldn't get any purchase, my fingers kept slipping off, adding a broken fingernail to the scraped .  I tried looping a rope round the rim,  to give me something to get hold of (you can just see the green rope in the above photo) but all that happened was that the plastic rim snapped, I jarred myself, and said a rude word. Sabrina, the Client's cat, walked away in a huff at this point.

I was feeling rather like walking away in a huff myself, but unfortunately I am paid to deal with these problems, so I stood back and reassessed it.

The good news was that all that heaving and straining had brought the main stem into a much more upright position.

The bad news was that I simply could not lift the inner pot up at all.

So I went to the Client, and told her that I could not get the plastic pot out, but that it was a lot more upright than before, and suggested that we just top up the soil to the rim of the terracotta pot, and pretend that I'd raised it.

It worked! The Client agreed, I rammed in a lot of soil to hold the plastic pot in the new, "slightly more upright" position, then - having checked that it does not harm a fig stem to be heavily mulched - I topped up the pot.

Result!  Happy Client, upright Fig, exhausted Gardener.


And a lesson learned, which I will happily pass on to all and sundry: if doing this trick at home, before you plunge the pot, take some strong nylon rope, make a loop long enough to go under the pot (doubled  up) and up each side, with enough above the rim to get hold of: get an assistant to hold these two loops as though they were using them to lift the pot.

Now take some more of the nylon rope and tie your lifting loop in place, just under the rim, and again towards the base of the pot.

Then plonk the whole contraption, rope and all, into the decorative pot. Backfill with soil, taking care not to disturb your lifting loop. When you get to the top of the pot, fold the  two hand-loops downwards and cover them with soil.

When you need to move the plastic pot, all you have to do is unbury those two hand-loops, and pull.

Simple!


Did you enjoy this article? Did you find it useful? Would you like me to answer your own, personal, gardening question? Become a Patron - just click here - and support me! Or use the Donate button for a one-off donation. If just 10% of my visitors gave me a pound a month, I'd be able to spend a lot more time answering all the questions!!

Sunday, 6 December 2015

Never be scared of Conifers again!

Yesterday I published a new botany book, Conifer Basics.

This is part of a new series, hence the jazzy bright yellow covers... these Basics Books are aimed at complete beginners - people who know (or say they know) nothing whatsoever about the subject.

It came about after I lead a couple of Conifer ID courses last winter, which were very well received by my Midweek Botany Crew, and during which I realised that some people really do want an absolutely basic introduction to the subject.

So instead of focusing on the tiny differences between species, which is what I do in the Cribs (green covers), in this book I talk you through the broad differences between the various genera (plural of genus) of conifers, very much as I do on my courses.

The idea is that, after reading this book, anyone can go out (anyone in the UK, that is!) and look at the conifers in their area, and can identify them to genus level.

Not to individual species level - that's a bit more advanced, although I do give species info on Larch and Cedar, as they only have three each. But, after reading this book, you will be confident to identify most of the conifers you are likely to see, to genus level. That means you can go round your local garden centre selling Christmas Trees, and can knowledgeably say "Abies.... Abies...... Picea..... Abies..." which will astound and impress all your friends.

So what is in the book?

I start by explaining what a "conifer" really is, and why it is not as simple as saying "evergreen".

Then I split all the conifers up into three groups, according to what type of leaf they have - needle, flat linear leaf, or scale leaf.

Next I do a quick walk-through each of those three groups, giving a bit more information about what you need to look at, in order to work out which genus you have.

Then I run through twenty of the commonest genera of conifers in the UK, in detail, explaining what you are looking at, what you are looking for, and a little bit of background information on each genus.

You need never be scared of conifers, ever again!

Here is where to find it: Conifer Basics by Rachel The Gardener, available right now on Kindle, free to download if you have Kindle Unlimited or Amazon Prime, and only a couple of quid if you don't.

Still not sure? Here's the list of Chapters, so you can see what is covered:

1) Welcome
2) What's in a name (explanation of botanical naming)
3) Equipment Required: (minimal)
4) How to start looking at conifers:
5) What is a Conifer?
   Group 1: Needle
   Group 2: Flat Leaves
   Group 3: Scale Leaves.
6) Group 1 - Needles (Pine, Larch, Cedar)
7) Group 2 - Flat leaves, Evergreen (subdivided into green shoots and brown shoots)
                   - Flat leaves, Deciduous
 8) Group 3 - Scale leaves (subdivided into Big Trees, Hedges, and Others)
9) Finally (and a Crib)

My intention is that you will start with this book, become comfortable and confident on identifying to genus level, then go on to look at identifying to species level. Conifers are more interesting than most people think, and are a comparatively small group of plants, especially when compared to wildflowers, or garden plants. So it doesn't take long to become an Expert, and we all love being an Expert, don't we!