Showing posts with label Grow Your Own. Show all posts

Friday, 21 October 2022

Neem Oil - no thank you!


Now, a quick word about Neem oil, which has been flavour of the month amongst the organic/permaculture crowd for the past few years. What is it? "Neem oil is a naturally occurring pesticide found in seeds from the neem tree."

In my opinion, Neem oil is evil, evil, stuff, avoid it like the plague. It is extremely potent, stains the concrete if you spill it, stinks, and: 

...and it doesn't have much of a beneficial effect - in my opinion - on pests: it certainly did nothing at all on the aphid infestation on the lupins.

In fact, it seemed to kill off the ladybirds, rather than making inroads into the aphid population. 

To be strictly fair, perhaps I should say that when the aphids first moved in, I looked out for ladybirds and only found on average two of them per plant, over a large bed of lupins.

This is why I was persuaded by the owner to try Neem Oil - because we just didn't seem to have any decent number of ladybirds. But alas, despite following the best instructions on the internet (*laughs*), and the exact dilution and frequency of spraying details on the bottle, the lupins got worse and worse, and not a ladybird was to be seen. 

So it might have been coincidence, it might have been that the Neem Oil was working very slowly, and the ladybirds didn't like the neem-flavoured aphids... but in my opinion, the neem oil failed to control the aphids, and seemed to scare away the ladybirds.


When I tried Neem oil at home, against lily beetles, I'm afraid to say that it ruined the lilies - right

This was the result of one single spray, diluted as per instructions on the bottle, and as you can see, it simply killed off the tops of all the lilies, which meant no flowers that year.

I was not happy.

I threw away the Neem Oil and went back to the old-fashioned method of lily beetle control, ie ceaseless vigilance and crushing the little beasts with a thumbnail.

Quite apart from its lack of beneficial effects, I was quite shocked to find out, when I did some research, how potentially harmful it is - even the bottle carries a warning that it may cause an adverse reaction in someone with sensitive skin or a skin disorder like eczema.

Don't believe me - do some research for yourself. Just put something like  "Neem oil harmful" into a search engine, and see what you get. Here are a few which I have just pulled up, at random:

WebMD: "Taking Neem oil by mouth is extremely unsafe in children. Serious side effects in infants and small children can happen within hours after taking neem oil. These serious side effects include vomiting, diarrhoea, drowsiness, seizures, loss of consciousness, coma, and death."

 Organic gardening website: "Is it safe to eat vegetables sprayed with neem oil? Yes, you can eat vegetables sprayed with neem oil, but make sure you wash the vegetables thoroughly before consuming them. However, it's not advisable to spray neem oil on vegetables if you're going to consume them the next day."

Bobvila.com: "some neem oil products contain additives that can be irritants."

Pesticide product label: "Harmful if inhaled. Avoid breathing spray mist. Causes moderate eye irritation. Harmful if absorbed through skin."

So why would you want to use something with so many warnings, and which doesn't appear to be terribly beneficial to plants, and is actually extremely detrimental to lilies?

My answer: don't. As per the article about "natural remedies", the old-fashioned answers are usually the best, and that means keeping your plants in tip-top condition by regular feeding and watering: keeping on top of garden hygiene by ensuring good airflow around the plants, and clearing  up debris: and by constant vigilance: if you can catch an infestation early, it is much easier to deal with it.


Did you enjoy this article? Did you find it useful? Would you like me to answer your own, personal, gardening question? Become a Patron - just click here - and support me! Or use the Donate button for a one-off donation. If just 10% of my visitors gave me a pound a month, I'd be able to spend a lot more time answering all the questions!!

Tuesday, 11 October 2022

"Natural" remedies - the correct way to go, or a waste of time?

Following on from the recent article about Plum Rust, I was asked about what products to use, when doing the spring spray.  It's a good question, and relates not just to fruit trees, but to many garden plants which suffer from fungal infections.

This one - left - is Hellebore Black Spot, another fungal infection, although in this case it's less "black spot" and more "black leaf", as you can see! 

Anyway, getting back to preventative measures:

Specifically, the question was:  "would it be possible to use a natural spray at blossom time in spring / early summer e.g. Garlic Spray in the correct ratio garlic juice to cold or warm water or indeed diluted apple cider vinegar or Neem leaf diluted spray which all have antifungal as well as other medicinal properties?"

Of course it would be possible - you can spray with anything you like! Apart from glyphosate, or other weedkillers, of course... but the question really was, will these natural remedies do any good?

Now, I am fully prepared to be shot down in flames for this, in fact, I might even turn off comments for this article (*laughs*) but after nearly 20 years of observing "natural" and "home-made" and "organic" and "eco-friendly" remedies, I would say that most of them simply don't work.

What sort of "natural sprays" are we talking about?  Garlic, apple cider vinegar, baking soda, ordinary vinegar, cornmeal, cinnamon oil, hot peppers, chili peppers, ordinary salt-and-pepper pepper - all of these and more are, you will find from a cursory internet search, being recommended as the perfect answer for whatever ails your garden or allotment, if you don't want to use chemical sprays.

The questioner (*waves* "Hi, Michele!")  mentions dilution, and the "correct ratio" but the problem with all these home remedies is that no-one knows what the "correct ratio" actually is, because none of these are regulated products, and none of them have gone through scientific testing. 

So there's the first problem: no-one knows what the correct dilution actually is. 

Next, we have to consider what "natural products" we are told to use, and what proportion or strength or quantity of the active constituent - whatever that might be, the internet rarely specifies - it contains.  Any random clove of garlic/chili pepper/etc which you buy or grow will have a different "strength" to any other random clove of garlic/chili pepper/etc, and it's impossible to gauge this, so even if you knew what the "correct" dilution rate ought to be, how can you relate that to your random, unknown-strength, clove of garlic? 

For that matter, any pack of baking soda/vinegar etc may well have a different concentration from any other brand or pack of the same product, and the concentration won't be listed on the pack, because you are using something for a purpose for which it is not intended, so they won't feel the need to tell you how much of the relevant ingredient it contains - assuming that you know which chemical is the one you need, of course.

So that's the second issue: you don't know how "strong" the clove of garlic in your hand actually is. And that's assuming that garlic - or whatever it is - actually does any good.

And now here's the third point, the common-sense one:  if these home remedies actually worked, don't you think that commercial crop growers would have tossed aside the expensive chemical products, and leapt on these easily-available, grow-your-own, cheap,  remedies? Don't you think they would like to avoid the whole business with the hazardous chemicals, PPE for workers, safe storage and disposal, coping with complaints from the organic movement, resistance, both from the plants, and from the organic movement (*laughs*) (well, I thought it was funny...) and so on?

And yet they don't. Doesn't this say something about "natural" remedies? They are what you might call a bit hit and miss.

In fact, I honestly believe that when people claim that something like this has worked for them, it's a one-off, lucky-for-them, low-pest/disease year, and quite coincidental: and has more to do with the way pests and diseases come in cycles, dependant on a very complex interaction of weather conditions, prey and predator numbers which affect spreading vectors (some infections are spread by insects) and other factors. 

In my opinion - and experience - it's also entirely feasible that when someone realises they have a problem in their garden, they get out the garlic spray, but they also attend to garden hygiene, by picking off/up diseased leaves, correct pruning, burning rather than composting of diseased material: they feed and water the plants concerned, to get them as strong and healthy as possible;  and they are probably on high alert very early in the year, having suffered the previous year, which means that they are far more likely to spot an infestation or infection as soon as it appears, and will deal with it promptly, thus preventing the spread.

And then they say "Ah, it was all to do with my home-made remedy, I shall tell everyone on the internet about the wonders of crushed moth balls mixed with aniseed" and, as is the way with the internet, their text gets cut-and-pasted into any number of other websites, until it becomes as "authentic" as anything else on the internet.

I do get this myself, by the way: the number of times I've spotted my own hand-written (if you see what I mean) text appearing on other people's websites, is hilarious! No, I don't get all upset about it - imitation being the sincerest form of flattery, as we all know: plus, there is absolutely nothing I can do about it, so there's no point crying and wailing. OK, it's a bit of a shame that I don't get a credit for it, or a link back here, but hey, it's the internet, and anyone creating original content has to accept that someone, somewhere, will steal it. Moving on...

So where does this all leave us, with our trees covered in pests and diseases?

My answer: If you "need" the crop, if you are relying on it to feed you, then use a proper, bought-in, chemical, spray.  If you don't "need" it, ie you just grow fruit for fun, or because it's nice, or because you enjoy being able to pick your own now and again, then put up with losing some of your crop to bugs, pests and diseases (who do, also, have to eat/live), and maybe just check your plants early in the season, keep them well fed and well watered, keep on top of your garden hygiene, and who knows, you might see a mysterious improvement in them, without having to resort to any sort of spray, natural or otherwise!

Did you enjoy this article? Did you find it useful? Would you like me to answer your own, personal, gardening question? Become a Patron - just click here - and support me! Or use the Donate button for a one-off donation. If just 10% of my visitors gave me a pound a month, I'd be able to spend a lot more time answering all the questions!!

Tuesday, 19 April 2022

Grow your Own - how to start

Drug addicts perplex me. I can't see any pleasure in ruining your brain, ruining your health, and often quite literally ruining your entire life.

They are a relatively recent development, historically speaking: there have always been deranged hermits who ate dodgy mushrooms in order to speak in tongues, and but they were always few and far between, nothing like the masses of druggies we have these days. 

Everyone has their theory, of course, from godlessness to laziness, with a side issue of mental health issues combined with our incredible wealth: at no other time in the history of civilisation have people - and when I say "people" I mean the general population, not the teeny tiny number of lords and ladies - not had to spend all their time and energy working the soil, to grow food, in order to live.

And that's the basis of my hypothesis: it seems to me that drug addiction is a plague that developed at the time of the Industrial Revolution - a time when opium dens sprang up in cities, when density of population created poverty, disease and the sort of black-market mentality that would encourage self-harm for money.

It wasn't until 1868 that the Pharmacy Act was created, recognising dangerous drugs and limiting their sale to registered chemists and pharmacists. Until that time, it simply wasn't an issue: the general public lacked the money or the contacts to buy drugs in sufficient quantities to harm themselves.

So why then? Why were the mid 1800s a time when madness descended on the population? Partly it was due to money - the man in the street was suddenly able to earn more money than was needed simply to survive - but the reason he was able to earn this excess money was the division of labour between those who raised crops and animals for us to eat, and those who worked in shops and factories.

Without having to tend crops every day, without having to look after animals, men (and women, of course) lived their lives one step removed from basic survival, which might on the face of it seem like a good thing: just "scraping through" is not a comfortable way to live. But once disconnected from this contact with nature, the town populations found that there was a hollow place in their lives that they didn't know how to fill.

Some found healthy ways to fill the void, with hobbies, good works, social clubs, friendship, and self improvement through learning: whereas others took the easy route and hit the drugs.

It's no coincidence that there are a growing number of gardening associations created for ex cons, for people with mental health problems, for shell shocked veterans, for the underprivileged kids: show 'em some weeds and oh look, they immediately get better. But it works. It really does.

There are also an increasing number of town vegetable beds, community gardens, local gardening groups and associations: we are all starting to realise that we have produced a generation of children who are completely out of touch with nature: who can't recognise common trees, who literally don't know where their food comes from.

Ever worse, their parents are the generation who have grown up eating nothing but fast food, and who don't know how to prepare vegetables, how to make a meal from basic ingredients: and this was highlighted last year, when the government started a well-meant initiative to provide low-income families with a box of groceries intended to make healthy lunches for one child, for a week.

This was blasted on social media: distraught parents, faced with a couple of potatoes, carrots, raw pasta and other items, had no idea how to make food from it!

Another aspect to the problem was most people's complete unawareness of the food supply chain: people on social media were commenting, indignantly and very loudly, that to buy that same set of ingredients at their local supermarket would cost a little over £5, rather than the £25/£30 that it was costing the taxpayer. They seem to be completely unaware of the massive logistics of storing the fresh food, picking it, packing it, moving it from central warehouse to local warehouse, to big van, to little van, to their doorsteps - every step of which costs money. There is no such thing as 'free delivery' . 

And - of course - the government has learned, time and time again, that simply issuing food vouchers does not work, because half of the recipients immediately find "black market" ways to get booze and fags with their vouchers. Hence their decision to send out a box of actual groceries.

What can we do, though, to break this barrier? How can we 'get back to nature'?

First and most obvious, start to grow your own vegetables! 

Start simply, with cress on a piece of kitchen roll:  right.

My generation always used to do this, usually overseen by doting grandparents. Does anyone have time to do this, any more? A packet of cress seeds costs just a pound or two, and will take you all summer to use up.

You literally just put some moist kitchen paper (or an old flannel) into a shallow dish, sprinkle on a few cress seeds, keep it just moist for a week or two, and there you go, cress.

So you can then enjoy your own egg-and-cress sandwiches. 

Once you've done it once or twice, you learn about something called "successional sowing" which means that if it take 2-3 weeks to grow, and it takes you about a week to eat the contents of a tray, then you need to start a new tray every week, so that by the time you've eaten up all the cress in one tray, the next one is just about ready for harvesting.

 So instead of just doing it once, you'll have two or maybe three of them on the go, at any one time.


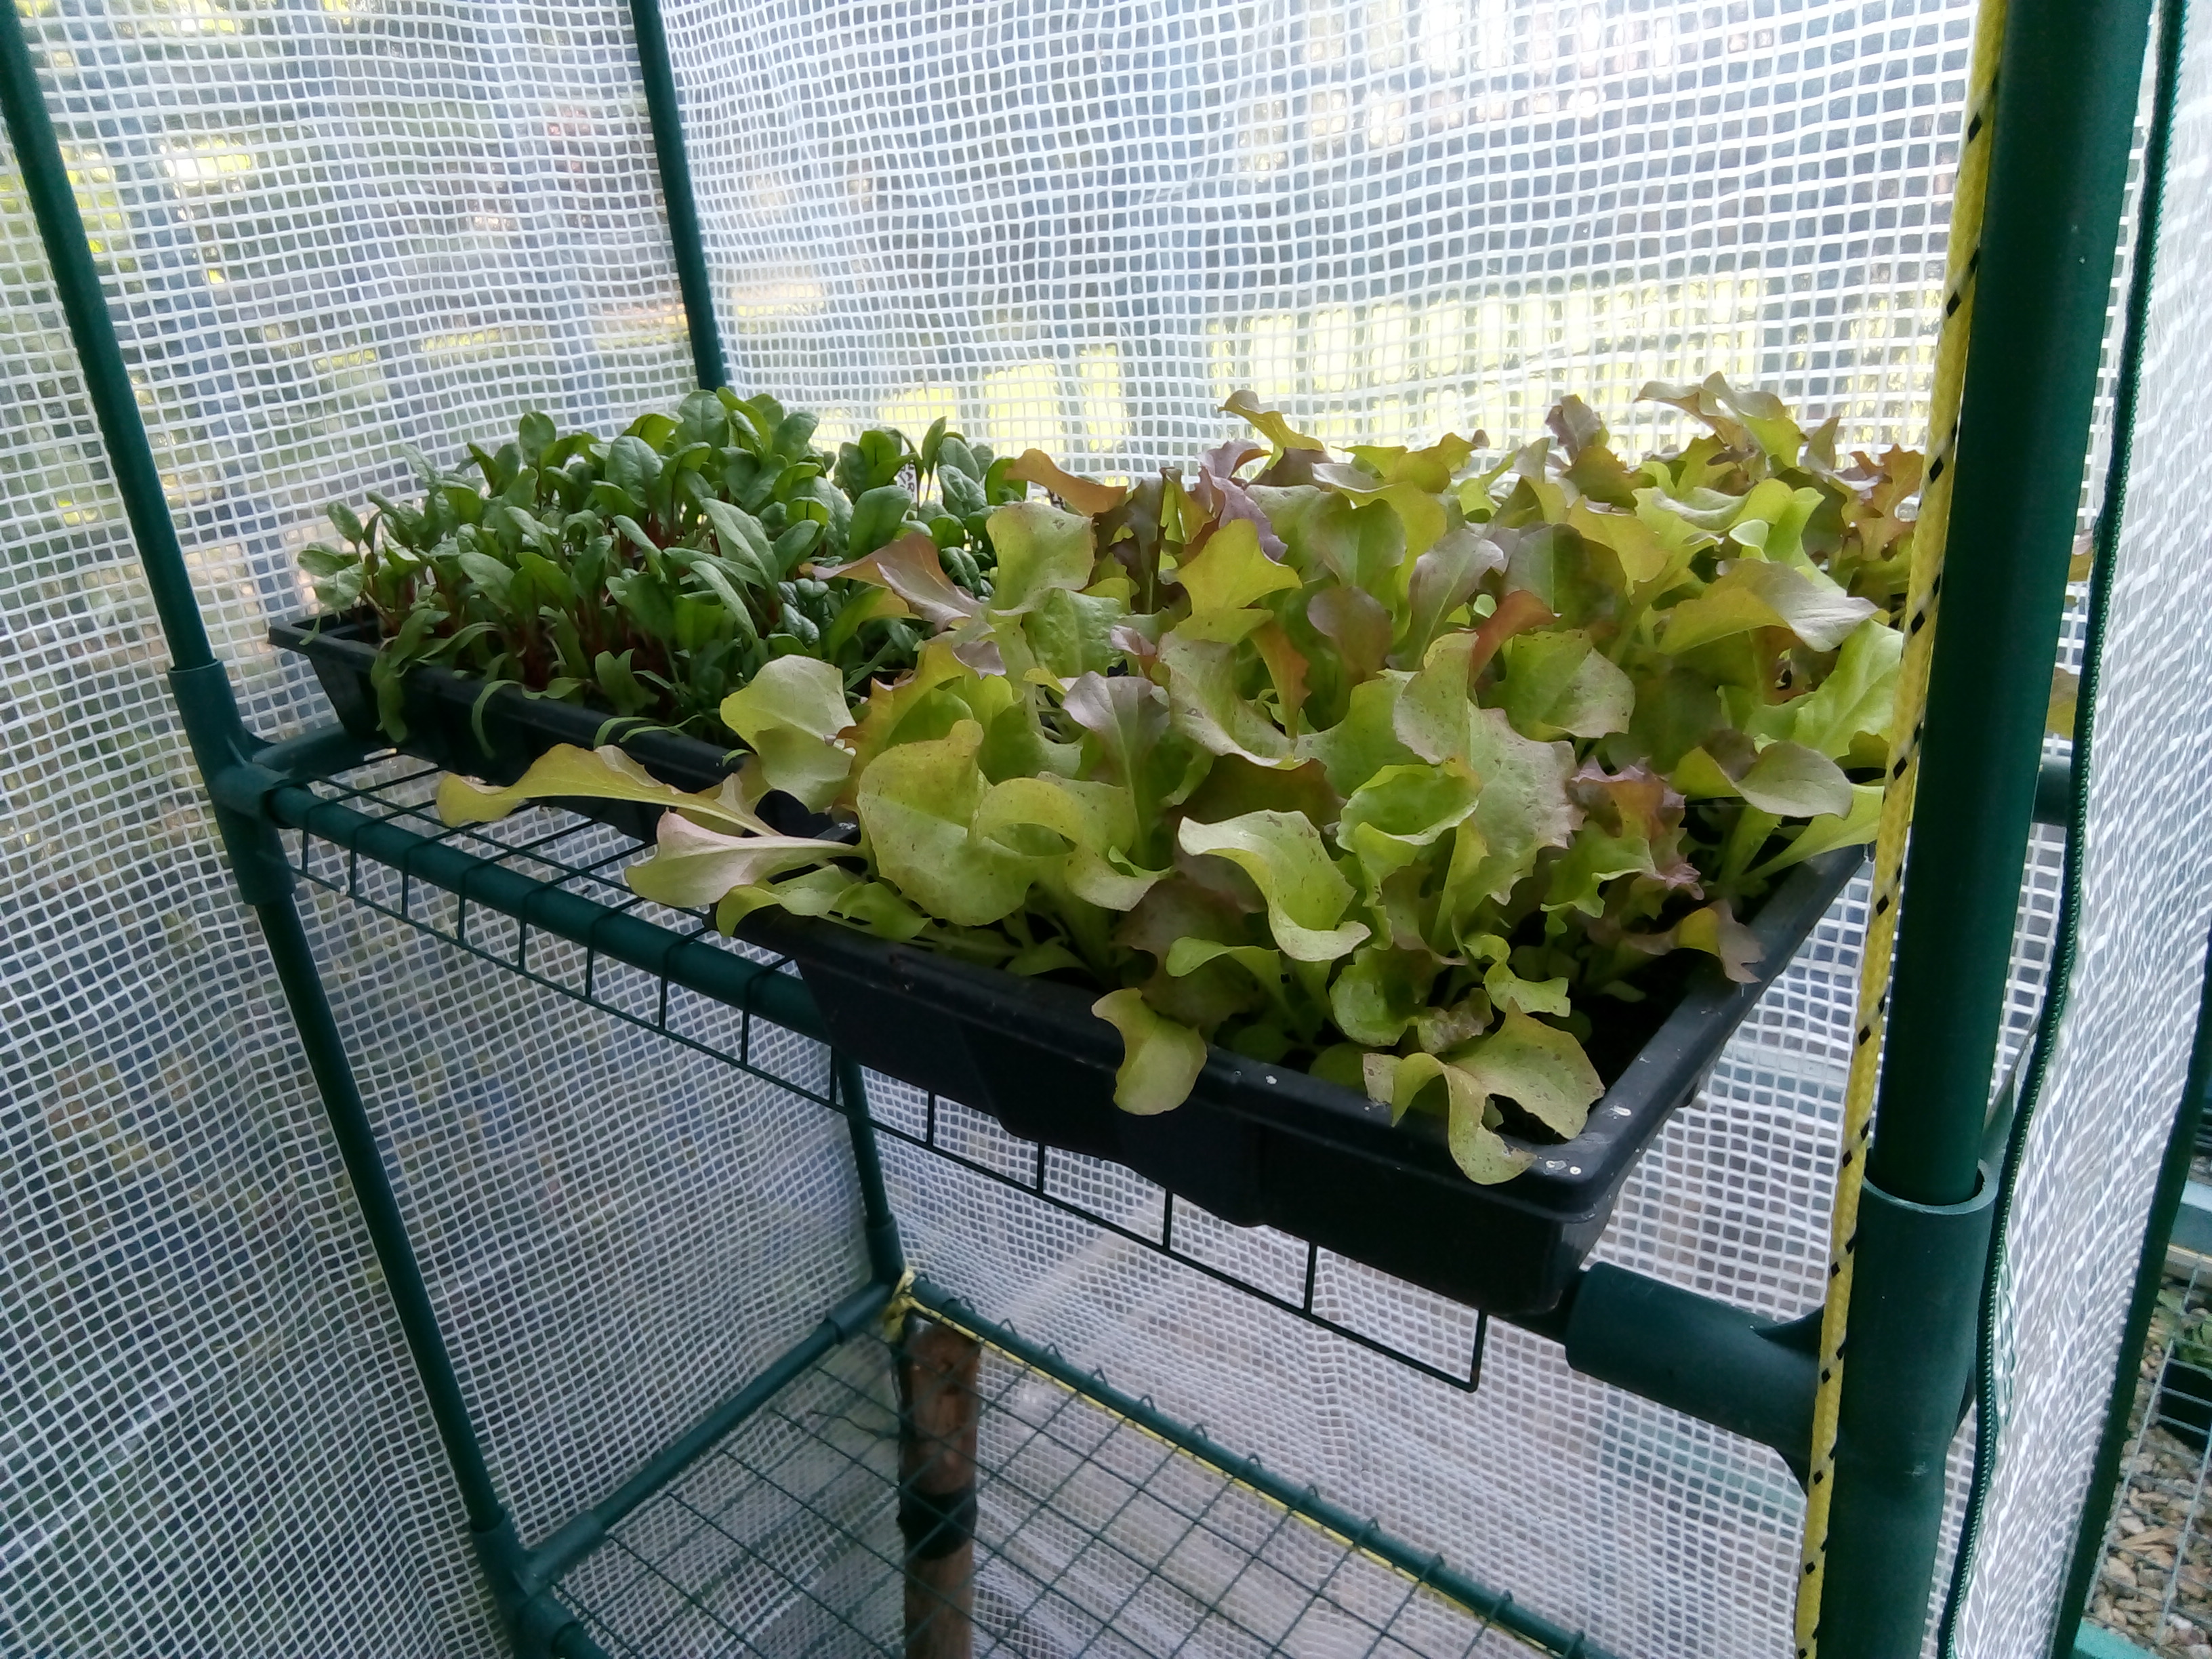
 Move on to growing lettuce in shallow seed trays, either indoors on a sunny window ledge, or outdoors in a sunny spot, or in a greenhouse if you have one: even those cheap plastic greenhouses - left - work really well for sheltering the lettuce plants, and keeping the bird poo off them. 

This photo is my little plastic greenhouse from last year: I would start a new tray of lettuce every couple of weeks until I had six or so trays on the go, and that was enough to keep  me in lettuce for most of the summer.

Then, once you have the hang of that, you could think about growing some actual veg: and the trick here, is to only grow things you actually eat. There is no point growing cabbage and Brussels sprouts if no-one in the house likes them.

Also, grow things which are expensive to buy: potatoes and carrots take up a lot of room, and are very cheap to buy, so unless you have a huge garden, there seems little point trying to grow them at home. But Asparagus, on the other hand, is expensive to buy, but very easy to grow, if you have the space for it.

I also grow Climbing French Beans - they are as easy to grow as Runner Beans, but I don't really like Runner Beans, because they are often stringy and tough. Climbing French Beans, on the other hand, are tender and yummy, they freeze really well, they're dead cheap to grow - one pack of seeds provides dozens of plants, plus at the end of the season, you can leave a couple of pods on the plant, let them mature and start to go brown, then lo! and behold, you have seeds for next year. Free.

Fruit, likewise: I grow Raspberries, because they are ludicrously easy to grow (I go for Autumn-fruiting ones, which are super easy:  none of that faffing about with this year's canes and last year's canes) and yet they are extremely expensive to buy, because they are so fragile, and because they go mouldy so quickly, once picked and packed. Far better to have them growing in your own garden, so you can pick a bowlful when you want them. Again, they freeze quite well, although they lose their texture once defrosted - but they can still be used as a sort of semi-coulis, with ice-cream!

And best of all, the act of growing our own reminds us of a few things that we would do well to reconnect with: the seasonal nature of fruit and veg, the importance of learning how to store excess produce (grow-your-own is synonymous with "glut" !), the joy of sharing your excess produce with others, and even the joys of working together as a community, where one neighbour might grow courgettes while another grows beans, and you can mix-and-match among yourselves, to share out the gluts.

So there you have it: start small, but do start.


Did you enjoy this article? Did you find it useful? Would you like me to answer your own, personal, gardening question? Become a Patron - just click here - and support me! Or use the Donate button for a one-off donation. If just 10% of my visitors gave me a pound a month, I'd be able to spend a lot more time answering all the questions!!

Saturday, 26 March 2022

How to: set up your greenhouse ready for spring

It might feel as though spring is a long way off, what with that lovely nip in the air in the mornings, but the daffodils are out, the sun is starting to shine, and the clocks will be going forward any minute now, so now is the time to start getting your greenhouse ready for the growing season.

If you were "good" .... *laughs* ... you will have done all this work last year, as described in this article on cleaning out the greenhouse

And it will look something like this one, left.

Everything out, cleaned the glass, swept the floor, lovely!

But if you haven't quite done it yet, no worries, now is the time, so get out there and do now: even if the air is a bit cold, you'll be nice and snug, working inside the greenhouse, and just think how virtuous you will feel afterwards.

Once the greenhouse is emptied, cleaned, swept, and the useful things have been put back neatly, it's time to get your gro-bags ready, and I've written about how to fluff them up, already this year. 

There's nothing worse that pancake flat, rock-hard gro-bags.

Once you've done that, you can put them in position, and I always recommend the addition of some collars, which are these things:


 That - left - is a whole stack of them, and the idea is that you position three of them along a standard gro-bag.

To do this, press them lightly in place - they have serrated bottoms, not enough to cut their way in (well, not without ripping the gro-bag to shreds. Ask me how I know... yes, I tried it once, never again) but enough to leave a ring of small holes.

Using scissors, cut around those holes:

I've shown you all three, here, but of course you'd normally only do one at a time, to reduce the risk of making a mess in the greenhouse.

Having cut the holes, push the collars into place.

Once they are sitting comfortably, fill up the central well with a bit of extra multi-purpose compost.

I don't advocate the use of home-made garden compost in this situation, because it is invariably full of weed seeds, and the whole point of buying gro-bags is that they contain fresh, clean, sterile - as far as weeds are concerned - compost.

So, top them up with bought-in compost, then plant your greenhouse seedlings, one per collar.

(OK sometimes I plant up two per collar, then remove the weaker of the two after a couple of weeks...)

Once they are in place, you can pop in the irrigation drippers, if you have them: and you can then construct your framework of supports.

I always like to do the planting first, because otherwise I am trying to put delicate little seedlings into position, while knocking my head on the canes.. but you might prefer to do the building work first, and then plant them up. 

It really doesn't matter, just do it whichever way suits you.

The collars have three main advantages: firstly, they give your greenhouse plants a bit more soil in which to grow, as gro-bags are pretty shallow.

Secondly, they protect the tiny new plants, because it is much harder to accidentally brush against them while watering etc, when they are protected by the sides of the collar.

And thirdly, the main and best advantage - easy watering! Even if you have irrigation, there are going to be times when you are watering manually: giving them their weekly dose of tomato food, for example. And the beauty of the collars is that you can slosh the water into the outer ring of each collar without disturbing the seedling, without having to be careful not to jet-wash it to smithereens, without getting the foliage wet, and without creating those crusty-topped craters on the soil.

It also keeps all the water inside the gro-bag, and not spilling out all over the floor.

Here's a quick glimpse of one of "my" greenhouses, from last year, with gro-bags, collars, bamboo cane supports, and a promising crop of tomatoes and sweet peppers.

Just to encourage you, to get out there and set it up!

Which also reminds me, that now is the time to start off the plants that you'll be wanting in the greenhouse. 

I always leave a note in my diary to start them off at the end of February, and I always look at the note and think, "Nooo! It's far too early!" and then of course we are suddenly into late March, the sun comes out, the greenhouse gets hot, and I wish that I'd done them a couple of weeks ago....


Did you enjoy this article? Did you find it useful? Would you like me to answer your own, personal, gardening question? Become a Patron - just click here - and support me! Or use the Donate button for a one-off donation. If just 10% of my visitors gave me a pound a month, I'd be able to spend a lot more time answering all the questions!!

Saturday, 12 February 2022

How to: install gro-bags.

This is another of those garden tasks which you'd think doesn't need any explanation, but I keep coming across grow-bags, or gro-bags, however you spell it, with plants jutting out of them, with only half the rootball inside the gro-bag: or gro-bags which are rock hard and bone dry, with the owner anxiously telling me that they water them every day, but the plants are still dying. 

So what is a gro-bag? 

It's an undersized bag of compost, commercially produced, made to be long and flat. 

They are laid direct on the ground or up on frames, they are more or less a standard size, and they are intended to be used for the growing of crops - outside or, more often, in greenhouses - where there is no soil to be planted into.

The bags are self-contained: you cut a small hole or slit in the top, insert your plants - usually three per gro-bag - water them, enjoy them for the summer, then discard the whole thing at the end of the season.

Not exactly “eco”, but oh! so convenient!

They work because they hold all the compost neatly inside (no spillage). they hold water well (because they don't usually have any drainage holes, unless they get handled roughly), the compost has enough nutrition in it to get plants started, and because they are only intended to last for one season, it doesn't matter than they will be pretty much exhausted by the end of the season.

So where do people go wrong? 


They are manufactured and delivered to the garden centre in enormous numbers, stacked on pallets, which leaves them flat as pancakes, as you can see - left.

 This makes them very easy to get hold of, easy to move, but not so easy to plant into.


So when you get yours home, take them to their final location, then stand them on their side and gently squash them with your fist. 

Turn them gently over, and repeat. 

Why gently? 

Because they have one long seam along the bottom, and if you treat them too roughly, this seam will split: a cunning ploy by the manufacturer to get us to buy more of them, no doubt.

 If this does happen, though, just turn them upside down and use them with the split edge on top. 

There is no rule which says that you have to use them with the pretty printed side upwards!


After squashing, take hold of each corner in turn, and shake it a little, until the compost within comes loose from the corner. 

Then flop them down flat again, and pat them back into shape.

This treatment - which takes about two minutes and thirty seconds -  de-compresses all the compost inside, including the corners (which is often otherwise wasted), and makes it easier to insert your plants, and a great deal easier to get the water to stay in the compost. 

It also makes them deeper, which means that when you make a planting hole, you are less likely to hit the bottom of the bag and accidentally rip it.

Having fluffed them up, you can prick a couple of small holes in the underside, then cut holes in the top, and plant them up with ease: and when you water them, the compost is already nice and “open” and able to soak up all the water.

There you go - simple, really! 


Did you enjoy this article? Did you find it useful? Would you like me to answer your own, personal, gardening question? Become a Patron - just click here - and support me! Or use the Donate button for a one-off donation. If just 10% of my visitors gave me a pound a month, I'd be able to spend a lot more time answering all the questions!!
Monday, 13 December 2021

How to: clean out the greenhouse!

There's nothing like... a nice clean greenhouse.

And I bet that a lot of you are looking at the screen and muttering "and my greenhouse is nothing like a nice clean one!" 

Late December is a horrible time of year for working in the garden: it's cold, wet and miserable, and a lot of the time, there is a hard frost which makes it impossible to walk on the grass. 

Well, you can walk on the grass if you want to, but if you do so while it's crunchy with frost, you'll regret it later when you find dead brown footprints all across the lawn...

So what can we do? Answer: clean out that greenhouse! Get rid of all last year's dead tomatoes, tip out the tired contents of the old grow-bags on nearby beds or borders, and clear out all the clutter and bits and bobs.

If you have staging or shelving, lift it outside and brush all the dirt and cobwebs off. 

This is a doubly useful job: partly because it means all the dirt is now outside the greenhouse so there's less for you clear up in there: and partly because it gives you room to move properly inside.

This applies to all those stacks of empty pots as well: get them all outside, brush them off, sort them into sizes, and decide if you really need that many of them in the greenhouse. Do you really need that many at all, come to that! Keep as many as you are realistically going to use, and offer the rest on your local community website: far better to pass them on, than to send them off to landfill, as most councils don't seem to be able to recycle plastic pots as yet.

Then, when the floor is clear, you can wash down all the glass on the inside, getting rid of over-wintering bugs as well as cobwebs and general dirt.

Once that's done, a good sweep of the floor makes it look spick and span, and ready for the installation of new grow-bags in a month or so.

Best of all, as it's a greenhouse, it's a great deal warmer than working outside - especially if the sun comes out for a while!

Once you're nice and warm from working inside it, and you've put the staging back in place, it's time to look at the outside. 

Is there a mass of moss growing between the panes? 

Get a long cane, and see if you can run it carefully along the joins, to flick out clumps of moss. If you are feeling brave, get the hosepipe out and twist the nozzle until you get a really tight jet: use that to jet-blast along the joins and up the metal strips. 

It's a messy job, but can really get that moss off. 

Even if it's too cold for the “you will get wet doing this job” jet-blasting, you can run a long-handled mop across the roof, frequently dipping it in a bucket of water, to wipe off any bird poo, green algae or general dirt. 

And if you can get some of the moss off, so much the better. 

If you don't have a long-handled mop, well, improvise! Yes, that's a kitchen sponge, tied on to one of the runner bean canes...

But be gentle - when you are accustomed to double-glazing, the thin single panes of greenhouse glass can be surprisingly fragile. Ask me how I know... yes, I once leant too heavily and shattered a whole pane. I've been super careful, ever since.

Once the outside is clean as well, you can go inside - I mean indoors, not into the greenhouse - for a well-deserved cup of tea, knowing that when you decide to start your early seedlings and veg, the greenhouse is all ready for use! 


Did you enjoy this article? Did you find it useful? Would you like me to answer your own, personal, gardening question? Become a Patron - just click here - and support me! Or use the Donate button for a one-off donation. If just 10% of my visitors gave me a pound a month, I'd be able to spend a lot more time answering all the questions!!

Monday, 30 November 2020

Pumpkins at Hallow'e'en: why a pumpkin?

 OK, so technically I've missed Hallow'e'en for this year, but Mal and I were talking about Parsnips, after my Giant Parsnip Post of two days ago, which reminded me of this article Wot I Wrote a couple of years ago, for GreenPlantSwap.

Ever wondered why we cut big toothy grins in hollowed-out orange pumpkins? 

It goes right back to pagan times, pre-dating the birth of Christ: there was a Celtic tradition that on the day of the dead, at the end of October, all fires in the village should be extinguished, then re-lit by a priest, who went around from house to house.

Remember that these were the days before lighters and matches were invented, so letting the fire go out was a big thing for them: it would mean having to find some suitable dry tinder, then to find the correct rocks to strike sparks, and having tried fire-lighting by this method, I assure you that it can take quite some time, and a fair amount of effort.

In addition, fire might have been their only light, as candles were not generally common in Europe until the Middle Ages: so to let the fire go out after dark would leave them quite literally in pitch blackness, making it all the harder to relight the fire.

The symbolism of the priest bringing the fire back into the houses was presumably to make them grateful to their gods and their representatives on earth, who would bring the glowing embers which would re-kindle their fires.

And how, exactly, did he carry these glowing embers?

Answer: inside a hollowed-out parsnip. Parsnip? Yes, a parsnip. Or a carrot. At that time, by the way, carrots were mostly white, like parsnips. Orange carrots were not popular until the seventeenth century, when they were bred to produce the familiar bright orange, in honour of Dutch nobility, William of Orange: and they've been orange ever since. But back in Celtic times, they were mostly white, and in fact these two root vegetables were often used interchangeably.

But getting back to our parsnip - a good big, tough old parsnip was just the thing for carrying embers, and the tradition of using one to carry embers all round the village at the “end” of the year continued through the centuries, although over time it lost the original meaning: householders no longer extinguished their own fires, and it was no longer a priest who carried it, but was more likely to be a village elder.

Then came the exodus to the new world, and the Pilgrims took this tradition to America, where they quickly found that there was a splendid new vegetable out there, which was perfect for hollowing and carrying glowing embers: yes, the pumpkin. And with the over-the-top enthusiasm which marks everything that Americans do, it grew from being a humble ember-holder into being a decorative lantern, embellished with cut-outs to let the light show through more clearly.

And that, dear listener, is the origin of the gap-toothed scary pumpkin lanterns of today! 

So if "my" giant Parsnip - left, with secateurs for scale, in case you missed it -  turns out to be too tough to eat, we can always use it to carry embers round the village!


Did you enjoy this article? Did you find it useful? Would you like me to answer your own, personal, gardening question? Become a Patron - just click here - and support me! Or use the Donate button for a one-off donation. If just 10% of my visitors gave me a pound a month, I'd be able to spend a lot more time answering all the questions!!

Saturday, 28 November 2020

How big do your parsnips grow?

 Answer: this big!

What a whopper, eh? 

Note the secateurs for scale... this is a seriously large parsnip.

And it wasn't the only one - I dug up a dozen or more, and at least half of them were in the same general size category as this one, although the other half were very, very short.

I think this might be something to do with this year's newly-constructed no-dig beds, made by laying cardboard over the old lawn grass, then heaping compost on top.

(No, not in the middle of the lawn - in an odd "spare" area, out of sight!)

So, some of the parsnips made it to the cardboard barrier and gave up, going for width rather than depth: and some of them clearly managed to poke a way through the cardboard layer, and went on to bigger and greater things, as this one did.

But all of them did it in six months, which shows how well the no-dig vegetable garden can work.

Traditionally, parsnips are left in the ground until after the first frosts, "so that the starch will turn to sugar". Personally, I find that the thinnings, which are lifted very early in the season, are just as tasty, so I am not sure how accurate the whole "leave them for the frost" principle really is. 

 I sometimes wonder if it's more the fact that parsnips seem to be able to survive being left in the cold damp ground for months, whereas other root veg - carrots, beetroot, for example - get eaten by slugs. 

This is, obviously, relating to the days before shops, freezers, and imported unseasonable veg. Back then, it was very difficult to store vegetables, to tide you over the hungry months of winter, when nothing was actively growing, and you'd eaten up the last of the autumn produce.

So parsnips became the "go-to" later winter veg, to be eaten when all else fails. You'll sometimes find them mentioned in reference to the "hungry gap". This is the period in spring, when we've eaten all our stored veg from last year, and - despite the apparently nice warm weather - nothing new is growing yet. Parsnips can tide us over, in that period.

Mind you, with parsnips this big, you'd only want one a week!


Did you enjoy this article? Did you find it useful? Would you like me to answer your own, personal, gardening question? Become a Patron - just click here - and support me! Or use the Donate button for a one-off donation. If just 10% of my visitors gave me a pound a month, I'd be able to spend a lot more time answering all the questions!!

Monday, 5 October 2020

Organic Fertilisers: How to Make Your Own

Many gardeners are now trying to reduce the amount of commercially-produced chemicals which we are liberally spreading all over our gardens - this is a good thing to do, for many reasons: and one quick and easy way to get started is to make your own organic fertilisers.

There are many recipes, but two of the easiest are Comfrey, and Nettles.  Not together! Separately.

You may already know that Comfrey - left - contains a lot of protein (25% by weight when dried, apparently) which is why it has been used as fodder in the past, and is still fed to chickens today. 

The proper name is Symphytum officinale, and if you are ever using plants for any purpose other than just looking at them, then it's vitally important to get the correct plant, so learning the proper name is a good first step.

As an illustration of that point, one of the UK foraging sites warns: 

 "Comfrey contains pyrrolizidine alkaloids some of which can harm the liver so some foragers no longer consider this a safe plant to eat... White flowered Comfrey does not contain echimidine, the pyrrolizine alkaloid that is causing concern at the moment so wait until the plant flowers and eat only from the white flowering variety."

This is absolutely true: on 2008 the FDA (Food and Drug Administration, US) banned the sale of dietary supplements which contain comfrey, and they specified Symphytum officionale (common comfrey), S. asperum (prickly comfrey), and S. x uplandicum (Russian comfrey) .  

 Interestingly, when this was reported on a medical site in the US, they said  "Scientific and common names: Symphytum officinale, Symphytum radix, Consolidae radix, comfrey, Russian comfrey, ass ear, black root, gum plant, healing herb, knitback, salsify, slippery root, wallwort, knitbone, bruisewort, blackwort "  which is a rather scary insight into why we have to learn the proper names of  plants, if we want to use them medicinally. All those common names! 

In the UK, Salsify is a completely different plant! 

It's proper name is Tragopogon porrifolius and the roots are allegedly edible, although apparently not very nice. Waitrose did try to introduce them as an unusual vegetable a couple of years ago, but gave up.

This - left - is the beautiful and ornate seed head of Salsify, looking like a cross between a jellyfish, and a dandelion on steroids.

Anyway, back to Comfrey: "eat only white flowered Comfrey" they said: White Comfrey is Symphytum orientale: but there is also Symphytum grandiflorum, which is also grown in many gardens, and this one has creamy white flowers. Would you be sure that the flowers were white, or were they creamy white?

 Now you can see why I always encourage people to learn the proper names of plants!

Common Comfrey, though - S. officinale -  is grown on many allotments, so it's very easy to get hold of.

Talking of "easy to get hold of", the other useful fertiliser plant is common or garden Stinging Nettle: I will remind you of the proper name, Urtica dioica, but you don't need a photo, because everyone knows what stinging nettles look like! As is always the way with botany, there are several other plants which you might confuse with nettles, but it's an easy one to find: if it stings you, it's stinging nettle.

I'm sure you've all read that “nettle tea is a delicious and beneficial beverage” - although I have to say, I've never tried it myself, nor do I particularly want to... and it makes you wonder just how desperate people were, to start trying out ways to make tea from nettles.  An infusion of nettles in water has been drunk, time out of mind, long before the World Wars: but it was only during the rationing of WW2 that it was called "nettle tea", in an attempt, I think,  to make it sound more like "tea", and therefore to encourage the the populace give it a go.

But both of these common weeds can be put to use in the garden: they contain a lot of nutrients, as they both have deep root systems which can extract minerals from the soil, at depths that many other plants cannot reach.

This year, why not have a go at making your own organic plant food from Comfrey and nettles? By watering -  or spraying -  your plants with an extract made from either or both of these weeds you can provide nitrogen, and lots of yummy trace minerals.And although it might feel a bit late in the year to do it, well, now is a good time to practice, and get the hang of it, then next year you can swing into full production.

These feeds are not a substitute for good soil care, of course, but can be very beneficial for plants growing in confined spaces such as pots or containers: and it provides a top up of nutrients in a readily available form that plants can use quickly - and best of all, it's free! And organic!

It's very easy: put on some gloves, get a bucket, and fill it with either chopped comfrey leaves, or with chopped nettles. Ram them down well, then add just enough water to cover them. Put a lid on the bucket, and leave it - two weeks for nettles, six weeks for Comfrey. Stir, or poke it with a stick, every now and again, and prepare to hold your nose as you do so, as it's quite stinky!

After the requisite time, strain off the disgusting smelling, dark brown liquid, and dilute it 1:10, ie one cupful of brown liquid to ten cupfuls of water. You don't have to be too precise about the dilution, as long as you end up with liquid that looks a bit like weak tea. This can then be sprayed onto the foliage, or watered in around the base of the plants.

Is that it? Yes, it really is that easy! If you don't have either of them growing in your own garden (stop looking so smug, we can see you!) then pop down to your local allotment and ask if you can collect a bagful.

To make it even easier, you can stuff the chopped leaves into hessian or muslin bags (or some old tights) before soaking them, so you don't have to strain them: and yes, the leftover mush can go straight onto the compost heap.

So why not give it a go? And best of all, you have a perfect excuse for not brewing that delicious and nutritious cup of Nettle Tea: “Sorry, I've used it all for the plants!” 


Did you enjoy this article? Did you find it useful? Would you like me to answer your own, personal, gardening question? Become a Patron - just click here - and support me! Or use the Donate button for a one-off donation. If just 10% of my visitors gave me a pound a month, I'd be able to spend a lot more time answering all the questions!!

Friday, 24 April 2020

The difference between workmen and gardeners....

... well, I imagine there are many differences, but one in particular came to my attention last week.

My Client's handymen had been in, to lay some concrete slab paths and to install some really sturdy posts and wires for the new raspberry bed, and for the soft fruit bed.

When they came to price up the job, the lead man said "after we lay the paths, we'll rotovate that raspberry bed for you, save you digging it" which was a very kind thought. Normally, when workmen of any sort have been in a garden, you are left with heavily trampled areas which then take a lot of digging to restore to a nice working tilth. So I thought, oh goody, when I go there next time, all I have to do is quickly plant the new rasps, excellent!

*sigh* Best laid plans....

On arrival, it looked like this:


"Nice!" I thought.

(incidentally, look at the soil to the right - a week earlier, that had all been dug over ready for use. See what I mean about trampling workmen?)

But, being a bit cautious (for which read, "experienced") I thought I'd just quickly dig it over myself, just to make sure.

So I dug it over again, and this is the result:

A quarter bucket of rocks, broken glass, crockery and stones.

An a third of a tub-trug of roots, and weeds.

Now, this is not meant as a criticism of the workmen: well, yes it is, but not in a bad way.

We all expect certain things from our workers, and "one" would never expect a handyman to realise that it's kind of important to get all the weeds out before you put in permanent planting such as fruit bushes, trees, shrubs etc.

And this is precisely why I chose to dig it over again, even though it looked lovely: I'm the one that will be keeping the new rasps weed-free and productive, so it's very much in my interest to get the bed very thoroughly dug over and cleared of perennial weeds before we start.

And that level of experience and devotion to detail, dear reader, is what my Clients pay me for! ("so modest...")

Here's the final thing: rasp section dug, manure added and dug in, rasps planted, and the main veg area dug over (again!) ready for planting.

There!

What a lovely sight! 


Did you enjoy this article? Did you find it useful? Would you like me to answer your own, personal, gardening question? Become a Patron - just click here - and support me! Or use the Donate button for a one-off donation. If just 10% of my visitors gave me a pound a month, I'd be able to spend a lot more time answering all the questions!!

Saturday, 11 April 2020

Intruders in the Climbing French Bean Bed!

Last week I started off some seeds for, among other things, my Climbing French Beans.

As an aside, for years, I always used to grow Runner Beans, mostly because "that's what we always grew" when I was young.

But I rarely eat runner beans - I buy French beans at the supermarket, or "fine beans" as they call them on the pack. So I started growing French beans instead, and they are just as easy to grow as runner beans, but taste better, don't turn into wooden inedible things if you forget to pick them while they are small, and they crop and crop and crop for months.

So, Climbing French Beans it is. They are now merrily germinating indoors, and it was time to prepare the bed for them.

This means taking off the anti-cat-fouling cover (wire mesh on a wooden frame) and lightly forking over the bed, removing any weeds.

As I fluffed it up, I found a sprouting seed! Wow! Could it be an un-germinated bean from last year?

I found over a dozen of them: bright yellow sprouts ("hmmmmm - not beans, then") and the "seeds" looked a bit solid to be any sort of vegetable.

Duuuh! They are hazel nuts, from the hazel hedge next door.

Those blasted squirrels must have sat on the top of the wire mesh, poking the hazels down through the squares, into the soil.

Persistent little blighters!

So, out with the hazels, I have quite enough of them next door and don't need any more, particularly not in my veg bed.

Then my daisy grubber hit something solid.

"Ouch!" I yelled, as the pain shot up my wrist.  I've had this veg bed in this position for years, there can't be any builder rubble in it, surely?

So I dug around a bit, and found a hard, solid lump that would not "give" at all.

This is what I unearthed:

What on earth is it? Roots of some kind, but as hard as half a brick (which is what I thought it would be, when I hit it with the daisy grubber),

Further excavation revealed that it was a tangle of solid roots, sending out an enormous shoot to the right, which went over a yard to the side.

 There you go, you can see it shooting off along the bed.

This, of course, gave the game away: it's a bamboo shoot.

"Uh?" you might be saying, at this point, "why is there a bamboo shoot in your tiny veg bed?"


The answer is that I have a large Phyllostachys nigra (that's Black Bamboo to the non-gardener) (or the "fairly new to it all" gardener) in one corner of my small garden, about 6-7' away from this bed.

As you can see, right.  (Sorry about the mess, but I'm partway through the job!)

And the crafty thing had sent out a questing root, all the way under the shingle, under the step, and up into my veg bed.

This is somewhat unusual: some Bamboos are famous for "running", and being a nuisance: in fact, Bamboo are usually labelled as either runners or clumpers, and P. nigra is usually a very well-behaved clumper.

That's partly why it's so expensive to buy: it doesn't normally spread itself, so you can't pot up the runners. You have to lift and split the clump, and grow them on to saleable size, which can take years.

But alas, this one has decided that it's time to head off into the sunset, via the rest of my garden.

For now, I dug down as far as I could, and cut it off, but as I did, I could hear Arnie's voice saying "I'll be back..." 


Did you enjoy this article? Did you find it useful? Would you like me to answer your own, personal, gardening question? Become a Patron - just click here - and support me! Or use the Donate button for a one-off donation. If just 10% of my visitors gave me a pound a month, I'd be able to spend a lot more time answering all the questions!!

Sunday, 5 April 2020

April: grow your own patio spuds

Ever wanted to grow your own spuds, but feel that you just don't have room for them?

Have you decided that, what with the covid-19 lockdown and everything, it is time that you made the effort to at least try?

This year, perhaps you might try growing some patio pots of spuds, just to see what it's like to grow your own. Then, if you enjoy it, and if  you like being vegetably independent of the shops (that's a new phrase which I have just invented), maybe next year you'll turn over some of your garden for spud growing. So here's some info to get you going.

Patio pots means exactly that: some largeish pots which you can sit on your patio, nice and handy for the back door.

Here's a little experiment I did for a Client a couple of years ago:

We started with two pots, which had previously been used for bulbs.

Pot number one: filled one-third with nice new compost, then four chitted seed potatoes were carefully positioned, and covered with a couple of handfuls more compost.

Chitting, by the way, is the process whereby you leave your seed potatoes in a light, frost-free  room for about six weeks before you plant them, so that they develop sprouts. People often sit them up in egg boxes, which always looks rather cute.

This is exactly the same thing which happens to your supermarket spuds, if you forget about them and leave them in the cupboard for too long.

But instead of growing a tangled mass of lanky white shoots, as your forgotten spuds do, they produce tight, short, dark purple sprouts - this is because they are in the light, rather than sitting in a dark cupboard.

Normally, of course, we don't want our supermarket spuds to go green and/or to sprout, because when they do, they start converting their starch into poisonous chemicals, making them less than delicious to eat.

But for planting, we do want them to "chit" or sprout, because then we know that they are definitely going to grow!

(And before you ask, yes, you can plant out neglected supermarket spuds, but normally people don't, because those long white shoots are fragile, and will easily be broken off as you attempt to plant them. So the spud will have to start again, wasting all that energy. You might further be asking if the whole "seed potato" sales business is a cynical way to get money from us, when we could just as well use our leftover supermarket spuds, and chit them? Well, sort of, and sort of not.  The "seed" potatoes which you buy are checked and certified virus-free, for a start: they are exactly the right size, not too big, not too small: and they are named varieties, so you know what you are getting. End of diversion, please drive on.)

So, pot number one had the chitted spuds placed low down in the pot, as is traditional: and we would add more compost as they grew, to "earth them up" as it is called. This is done to force the plants to produce more and more new tubers, all the way up their stems. It also ensures that the tubers which form, are kept in the dark ie underground, so they don't go green. See note above about green potatoes going poisonous...

Pot number 2: we decided to try the "plant on the surface" method. This involves filling the pot with compost, nearly up to the top:


...then covering the soil with black plastic (actually an old bark chip bag, cut up and used inside out), tucking it neatly in at the edges.


Next, we take our six chitted potatoes, make slits in the black plastic, and poke them in through the slits.

The idea behind this method is that the plant grows through the slit, thus receiving light: and the tubers grow under the black plastic, not needing to be earthed up, and - importantly - not needing to be dug up at the end, because they will all be sitting on the surface waiting to be cropped. But they won't be green and poisonous, because the black plastic will exclude light.

So, two pots, alike in dignity.

Each pot then had a handful of soil added to it, not a deep layer, just enough to cover the spuds in pot number 1, and to cover the rather ugly plastic in pot number two.

This was all done on the 9th April. Not this year, obviously!

Here we are nearly three weeks later:

As you can see, pot number one now has soil halfway up the pot: as the green shoots grew, I "earthed them up" by adding more compost

Pot number two is less dramatic, and is partially out of the frame, oops.

In fact, they look as though they have about the same amount of growth, but we know that the square pot's plants have grown a couple of inches and have been earthed  up, whereas the round pot's plants have just stuck their noses out of the bag, and that's it.

By the end of May, a month later, there was nothing to choose between the two pots.

The square pot had been earthed up to the brim, and both sets of plants had made excellent top growth.

Being in pots, we had to keep them well watered, of course.

By the end of July, they were ready to eat, so we emptied out the pots and compared the crop.

We all agreed that the traditional ones took more effort to get them out - I had to tip the pot over on the grass, and pull the whole thing out in order to get the spuds. This was fairly messy, which might be a problem if you really are growing them on a patio, and don't have any handy grass to use. You would have to spread out some sort of mat, sheet, or cover.

The plastic one was much easier to get to, all I did was cut off the top foliage, peel back the plastic, and there they were.

However,  I found the combination of black plastic, shielding foliage, and lots of watering, had created a sort of running buffet for slugs, and about half of the crop had to be thrown away because they'd been sabotaged by the slugs.  Call me old-fashioned, but when eating meat with my spuds, I prefer the meat to have had legs....

So there you have it, growing patio spuds definitely does work: you don't get a huge crop compared to growing them in the ground, but it's well worth a try, as there is not much which is more satisfying than eating veggies which you have grown yourself!


Did you enjoy this article? Did you find it useful? Would you like me to answer your own, personal, gardening question? Become a Patron - just click here - and support me! Or use the Donate button for a one-off donation. If just 10% of my visitors gave me a pound a month, I'd be able to spend a lot more time answering all the questions!!

Monday, 30 March 2020

"When is the last frosty night this year??"

What a good question! Thanks, Mal! *waves enthusiastically*

When it comes to veg and seedlings, all the books and articles will tell you to "plant them out once all chance of frost is over" but who knows when that will be?

Certainly, this year, it's been a blooming cold start to spring: this time last year, I'd been back in shorts for a week. But this time the year before, one of my friends reminded me that they were milking cows in the snow!

Ah, the joys of living in jolly old England, where the weather is so unpredictable. I spent some time in the Czech Republic a long, long time ago, and I was staggered that they didn't bother with weather forecasts: they knew that whatever weather they had now, it was going to be the same for weeks on end.  How dull!

So what do we do about the late frost problem?

Two things, really: keen gardeners will always keen an eye on the weather forecast, and if it looks like being frosty overnight, they rush out with lengths of horticultural fleece, and wrap up or cover any sensitive plants, or delicate seedlings.

The other way to deal with it is to do a rigorous "hardening off" process: that's where you gradually accustom your seedlings to the outdoor weather.

Here's the routine: for the first week or two, starting about now,  put your seedlings outside in the sun during the day, but bring them in every evening.

On the third week, you can stop bringing them inside at night, but you must cover them up with horticultural fleece or something similar, over night.

On the fourth week, they should be fully hardened off and can then be left outside all the time, until they are big enough to be planted out. 

Unless, of course, it turns really cold again, or you hear that frost is forecast, in which case you have to go back to covering them up at night.

Now, like all gardening advice, this has to be taken with a pinch of common sense: if you live in an area which is very windy, or which is prone to frost, then you might need to extend the hardening-off period for a few weeks more. But if the days are balmy, and the nights are merely cool, then you might be able to shorten it.

How will you know? Only by trial and error, I'm afraid.  If in doubt, follow the regime slavishly.  If feeling bold, do what you think best. 

If you are undecided, then take a half-way position: maybe leave half of your seedlings uncovered, and see if they survive!


Did you enjoy this article? Did you find it useful? Would you like me to answer your own, personal, gardening question? Become a Patron - just click here - and support me! Or use the Donate button for a one-off donation. If just 10% of my visitors gave me a pound a month, I'd be able to spend a lot more time answering all the questions!!

Sunday, 29 March 2020

Grow Your Own: 1 Starting a Veg garden

Ok folks, let's all grow veg at home!

 Assuming that you have an actual garden, no matter how small, I can't do better than to point you towards my eBook on the subject, which covers everything from what to grow, how to do it, water management, etc.

You don't need a Kindle or Tablet to download it, by the way: Amazon kindly provide a free programme (or “app” for our younger readers) so that you can download it to your own pc or laptop. There's a box on the right, below the “click here to get it” boxes, titled “Read on Any Device. Get free Kindle app” just click on that and away you go.

So what are the important points of setting up a new vegetable garden? It seems to me that the main point is to make it efficient, which means making it easy: that means easy access, easy working, easy watering, and easy cropping.

This book draws together all the experiences I have of creating new vegetable gardens, of updating old ones: the good points, the bad points, the mistakes, the failures – so you can benefit from my experience, and get it right first time.

And if you have Kindle Unlimited, it's free to download! (only a fiver if you don't, and worth every penny, if I do say so myself).

If you are too mean to spend five quid not able to obtain the eBook, here are the potted headlines, based on advice from the RHS, with a few additional comments from me:

1) “A sunny site is ideal, but more shade-tolerant crops include beetroot, chard, peas, runner beans, spinach and salads.” This is very good advice.

2) “Growing your plants in soil (ie in the ground) is ideal, but if your plot doesn't even support weeds it might be unsuitable.” I can't say I have seen a garden which does not even support weeds!! If your garden is full of horrible weeds such as couch grass, ground elder and/or bindweed, however, see item 3.

3) “Growbags or containers filled with potting compost will give good crops where soil is not an option.” Be aware that they will only last for one season, but if you don't have any beds yet, starting with a couple of growbags gives you a chance to try it, for very little money. They also take up a lot less room than a “proper” veg bed, and are only temporary. So they might be the ideal choice, if you are not quite sure if growing veg is really something that you want to do. 4) “Clear an area of weeds by digging. Ideally add garden compost or rotted manure and fertiliser to improve the soil. “ If you have a weedy corner that you think would be good for veg, get out there with a garden fork, and dig it over. Lovely healthy exercise! Pull out every scrap of root that you find, as well as all the green stuff on the surface.

5) “Sow seeds of whatever you like to eat. Crops that taste best freshly gathered are many peoples favourites - salads, tomatoes, new potatoes, chard and other leaves” . This is such good advice: so often, new gardeners think they have to plant spinach, Brussels sprouts and, errr, something else unpalatable, just because “that's what Grandad always grew on his allotment”. Not so! Grow only the things you like to eat. I would also add, grow things which are expensive to buy, such as raspberries.

6) “There is no need to buy expensive seeds, bargain ones in supermarkets meet the same legal standards “. Very true: you don't need to go to an expensive online supplier: most supermarkets now have a rack of veg seeds, usually in the fresh veg section.

7) “Seeds need warmth, moisture, light and air most easily provided by sowing in pots, covering very lightly with sieved compost and watering ideally from below by standing pots in a shallow dish of water “ Again, good advice, although it misses out the essential word “indoors”. Sow your seed in pots, or in seed trays if you have them, and put them on a window ledge so that you remember to water them a little every day. Also, a lot of seeds are temperature-sensitive, so if you put the pots outside, they may not germinate until long after you have lost interest in the whole idea.

8) “Sowing outdoors is best for peas and beans, as many plants are needed for a decent serving. Leave a finger width between small seeds, two fingers between peas and a hand's width between broad beans. “ Again, very true: there is no point trying to grow peas in a growbag.

9) “Water heavily every 14 days if drought strikes and keep weeds down”   Water “heavily”? *rolls eyes*  "drought?"  There must be something lost in translation here. There are two parts to this advice:

Firstly, the seeds. You should check them every day, and water if they are drying out. How will you know? Gently dab your finger on the surface of the soil. If a few grains of soil or compost stick to your finger, it's ok. If your finger comes up perfectly clean and dry, they need watering. Their advice about watering from below is a good one: if you have done so, check that the water-filled tray still has water in it.

Once you have planted your germinated seedlings outdoors, in the soil or in growbag, then you will need to water them, but  not "heavily".

Always water gently. Don't drown the poor things, and don't pour the water on so hard or fast that it washes the soil away. Water slowly, trickle the water gently around the stems of your new seedlings, don't jet-wash them with the hose, or flatten them with a cascade from above. Where possible, water just the soil and the base of the plant, not the foliage.

As for “keep weeds down”, that means to tease out any cheeky weeds that dare to sprout in among your seedlings, because they will be competing for water and light, and being weeds, they are bound to be a great deal better at it than your delicate little veggie-lings! And how do you know if they are weeds or not? When you plant your seeds, or when you plant out the sprouting ones, plant them in neat rows, not at random. This way, you'll easily be able to spot any infiltrators.

Right, there you go, easy veg starter information: so what question will we answer tomorrow? Over to you... 


Did you enjoy this article? Did you find it useful? Would you like me to answer your own, personal, gardening question? Become a Patron - just click here - and support me! Or use the Donate button for a one-off donation. If just 10% of my visitors gave me a pound a month, I'd be able to spend a lot more time answering all the questions!!

Saturday, 28 March 2020

Covid-19 and Gardening

Well, it's true folks - we are now at war. With coronavirus.

“At war?” I hear you say, “bit of an exaggeration, surely?”

We have rationing, lack of supplies, curfews, isolation, neighbours telling tales on other neighbours, finger pointing and halo waving, we have actual people dying: it's a war.

On the good side, we have amazing acts of selfless bravery: not going over the line with bayonets fixed, admittedly, but we have people doing shopping for vulnerable folks, picking up prescriptions, checking on those who live alone. We are also, for the first time since it was invented, been using the internet properly: to pool resources, to ask for and offer help, to pass round food, medical items etc to those who need them, and to engender community spirit by supporting each other, and by trying to do little acts of kindness, without risking our health or breaking any restrictions.

So how does this all relate to gardening?

Well, a lot of people are, for the first time, going to realise that in a crisis, it's the fresh food which is first to be hit. Ok, ok, toilet rolls as well, but that was a moment of insanity and I still don't quite know why people went crazy to buy up vast amounts of toilet roll, rather than tinned food, flour and medical supplies....

Anyone with any sense (or who was brought up with grandparents who lived through the last War) will have a cupboard containing tinned food (I can hear my Nan saying “enough tinned food to feed a family of four for a week” even as I type), and will have a reasonable stock of the daily essentials.

But huge numbers of people don't do this: and it's hardly their fault, because we live in times of plenty, we are richer now than we have ever been before: it is fair to say that we no longer have the luxury of having women at home, bringing up the children, doing the shopping, planning the meals and keeping both garden and household running.

We've been spoilt rotten in recent decades: shops are open every hour of every day, we have grown accustomed to being able to zoom round to the shops in our cars, bringing home a load of short-use food including ready meals, so we've lost the knack of planning for a week ahead, buying things which allow us to eat up leftovers, not wasting food...

But fresh food is suddenly becoming a problem.

Between supply difficulties, and wanting to avoid going shopping, we are now realising that getting fresh veg is a problem.

And at the same time, an awful lot of people are being told to stay at home, are bored rigid, and are just realising that they have a fantastic resource right outside the back door: a garden, which has probably not been used for anything other than kicking a football about when the kids were small, and maybe sitting out in once in a blue moon.

Guess what? All three problems - lack of fresh food, boredom, and a wasted garden - can be solved in one easy step.

Grow Your Own.

Yes! Let's use those under-utilised gardens to grow some veg, help us to avoid the shops, and to retain our sanity?

Over the next few weeks - or possibly months - I shall be posting every day with information about growing veg at home, along with regular Homework: yes, my Trainee may be temporarily unable to work with me, but that's no excuse for halting the learning process! So I shall be asking a question each day, and answering it the following day.

And I invite you all to contribute comments, answers, and additional questions!

We might be feeling a bit alone at the moment, but if we can connect through a simple garden question, well, it might make some of us feel a bit less lonely.

So let's start with a question: How can I grow my own veg at home???

Let's get started...