Pages

Wednesday, 25 May 2016

Pruning Curly or Corkscrew Willow

My recent article about attempting to retrieve a past-its-sell-by-date dwarf weeping willow prompted a question from L'enfant bouffante (Hi Rachel! *waves*) about a problem with an over-large Corkscrew Willow.

Rachel - who presumably is a child with a big, 60s-style hairdo, if my O-level French doesn't let me down - asks my advice about whether she can prune a Corkscrew willow that has grown rather too big for its boots.

Now for the good news: Yes! You can!

Right, here's the botany bit: Corkscrew or Curly Willow is properly known as either Salix babylonica or Salix matsudana (experts can't quite agree whether it is one species with two names, or two different but very similar species) and is not a grafted tree, it just grows like that. This means that there is no reversion from rootstock to worry about, no graft union spotting to do, and as it is a willow, you can prune it with confidence: It Will Grow Back.

 For anyone who hasn't seen one of these lovely trees, here's one I grew from a cutting earlier (left). Obviously, this is a small one.

They are more or less upright in habit, they can get to 30' tall if you let them, and all the branches are wavy, as are the leaves: but unlike Corkscrew or Contorted Hazel, the leaves are merely pleasantly wavy, not hideously malformed and diseased-looking. Not that I'm biased, you understand, and I do have a purple-leaved Contorted Hazel of my own, which I love: but I really don't like the normal green ones. Well, to be honest, I think they're fabulous in winter, when you can see the skeleton of them, but in summer, frankly, I think those leaves just look diseased. So there.

Right, where were we? Oh, yes, Corkscrew Willow.

Not grafted, upright habit, and it grows nearly as fast as many "normal" willows, and yes, they can easily get too big for their situation.

The good news is that you can chop it as much as you like, and it will probably not mind in the slightest. Bearing in mind that I haven't seen it, I would suggest that if it is close to your house and/or overhanging next door, get a tree surgeon in to do the actual chopping: they will reduce it safely, they'll take away the waste, and they will/should leave you with a shapely, well balanced tree, which will, once it regrows, quickly become beautiful again.

Having said that one advantage of tree surgeons is that they take the waste away, bear in mind that long wavy stems are very much in demand by flower arrangers, so if you know anyone who does this, or have a college with a floristry course nearby, it's worth asking them if they would be interested in collecting the offcuts. Or, trim up a pile of the longest stems you can retrieve on the day,  put them in the garage to dry out slowly,  then sell them! A little gold or glitter spray, bung them in a tall vase and hey presto! instant Christmas decoration. Did I really just say "christmas?" In May? Oh dear.

As well as hopefully recycling some of the branches,  my personal advice is to take cuttings from it before the work is done: chop off a few branches of about pencil thickness, and either pot them up, or push them into the ground, water well, and leave them  to grow:  this time next year, they should be rooted, so you can either sell them, or hold them in reserve in case the big tree does not regrow the way you would like it to.

I should also say that you have several options regarding the style of cutting, which your tree surgeon should discuss with you. You can have it:

1)  crown-lifted and thinned, which means they will reduce the overall height and density, but you will still have a tree:

2) they can "hat-rack" it, also known as "topping" which means they cut off all the main branches at the same distance from the trunk, leaving a hideous truncated skeleton which then sprouts a bushy lollipop of foliage at each tip (not recommended);

3) they can pollard it, which means they chop off every large branch, leaving you with a tall bare stump: it will quickly regrow, it's perfectly acceptable, and this is how street trees are normally treated - but once you start pollarding you will have to have it done regularly for ever more.

4) they can coppice it - like pollarding but at knee height, making it very, very easy to do future maintenance on it.

Those last two are not normally done on ornamental trees, but if they advise that pollarding/coppicing is the best thing for the tree, then so be it. It WILL regrow! 


Did you enjoy this article? Did you find it useful? Would you like me to answer your own, personal, gardening question? Become a Patron - just click here - and support me! Or use the Donate button for a one-off donation. If just 10% of my visitors gave me a pound a month, I'd be able to spend a lot more time answering all the questions!!

Tuesday, 24 May 2016

Dwarf Willow reversion - Part 3

My article about Salix Kilmarnock retrieval recently prompted a comment from Paul, who asked for advice on pruning his willow, which I assume was originally a Kilmarnock.

He very sensibly emailed me some photos of the tree in question, with views from each side, and we discussed the problem, and hopefully came up with a plan to deal with it, and here are the details, in case you have a similar problem.

Here it is, poor thing: as you can see, it has a short curved trunk which is badly split, then some fresher growth - from this angle, it appears to be just one stout upright branch, but actually it is one on top of another, with tufts of foliage in odd places.

Clearly, it has been chopped back to size a couple of times: maybe it grew too big for the position, or maybe it was damaged by wind or weather, and has split or broken, necessitating the chopping.

Either way, all the nice weeping shape has gone, leaving just this part.

My first reaction was, obviously, to advise him to start again: dig it out, and buy a new one. Well, let's be honest, my first reaction was to scream in horror, then to laugh, but that's the kind of gal I am. Full of sympathy. *laughs* No, I don't do sympathy, but I do do advice, and my advice was that it's too far gone, and it's better to start again.

But Paul asked me if I would look at it more closely, as he really wanted to keep it if at all possible.

Here's a closer look at that trunk, from the other side;

You can see that there are three elements here: starting from the ground, the first is the curved trunk (with the badly damaged bark, now out of sight); the second is the greenish branch heading to the right, and the third is the greenish branch heading straight upwards.

From my experience, I would suggest that the first element might not necessarily be the original rootstock. The fact that it is curved is irrelevant: it could easily be a sucker from the original rootstock which grew out at an angle, and took over the entire plant, as often happens.

If we assume that the first element IS the original rootstock, then logically, the second element could be the original top-material, the weeping part: but the fact that someone at some  point sawed it off would suggest that this is not the case: also, it is too low to the ground - most weeping trees are made to start weeping at about 4-5' clear of the ground, otherwise the branches don't have room to weep, but have to lie untidily on the ground.

(Having said that, I was recently sent pictures of a weeping willow which did exactly that - lie on the ground - and I still think it was a very unsuccessful thing to do to a tree - sorry, Brenda!)

So, the second element is probably a sucker from the rootstock, which grew away at an awkward angle and was sawn off, in punishment.

The third element is a new branch from that second element, and it is clearly heading joyously for the sky: it's about the same size as the second one, so I am guessing that it continued to head upwards until someone realised that it was not going to "weep", and chopped it off.

Both elements two and three are bravely sending out new growth, on the basis that "you can't stamp the life out of a willow".

In my opinion - bearing in mind that all I have are these few photos - I would say that these two thick branches, and the new growth coming from them, are not weeping material at all, but are just ordinary willow, generated from the rootstock. In addition, the extensive damage to the bark of the first (lowest) element suggests that the whole tree is not going to live much longer anyway.

But if Paul wants to give it one more chance, my advice was to start at the very top of the current tree, and work out which are the six or so top-most shoots.

Remove - gently - every shoot below that. Remove by pulling them gently in a downwards direction, the aim is to "rip" off the shoot, but not so hard that you pull off a great streamer of bark as well. If you are not sure about doing this, or if the shoots bend but won't rip, then get sharp secateurs and cut them off as close as you can to the trunk, and every couple of weeks, go back and check each cut for regrowth: rip off any tiny new shoots.

This will leave you with a clear stem, with just a bundle of sprouts at the top. Let those sprouts grow all summer, and see what happens.

If they all shoot straight for the sky, then there is no "weeping" growth left, and all you have is the original rootstock which is probably common Grey Willow, and it will have to be removed - unless you want a plain old willow tree taking over your garden. If they bend over, then hooray! You have a weeping tree again.

And no, you can't "force" them to weep by tying them down. Or, properly speaking, you "can", but it would be a tremendous amount of work, and you would need to constantly prune the branches, as they would all put out vigorous, upward-shooting growth. Honestly, not worth the effort.

So there you have it - in my opinion, once a tree reaches this state, and has bark so badly split, it is better to dig it up and buy a new one, no matter how attached you were to the original. It is perfectly ok to replace it with another willow - there is no problem with any sort of replant disease, as the "failed" tree is perfectly healthy: apart, in this case, from the horrendously split bark. Rather like that horrendously split infinitive, but there you go - you wouldn't believe I have A levels in both English Lit and Lang, would you?

With any tree growing in a lawn like this, it is always a kindness to clear a small area, like a "bed", at the base of the tree, this makes it easier to cut the grass and easier to avoid damaging the trunk while mowing, not to mention making it look better.

So if your weeping tree looks a bit like this one, put aside some time next weekend to dig it out: clear an area of turf at least a foot away from the trunk in all directions, then dig vertically down at the edges of that circle in order to cut off all roots: once the roots are cut, wiggle the stump to and fro like a ten-year-old with a loose tooth until you can get it out: sometimes you might have to cut through a main central root, sometimes they only have a collection of more minor ones.

Having removed the stump, fill in the hole with soil from elsewhere in the garden, or with home-made compost, firm it down well and leave it to settle for a week or two. This gives you time to go and choose a new tree, which can be planted in the nice soft soil, watered in well, and allowed to flourish.

And this time, check it a couple of time every year for branches springing up from below the graft level - from the first element - and ruthlessly remove any such by gently pulling them away from the trunk. If you do this while they are tiny and tender, it is very easy and does not damage the tree.In fact, you can spot them while they are still just a couple of leaves, you can just rub them off, which is even easier!Did you enjoy this article? 


Did you find it useful? Would you like me to answer your own, personal, gardening question? Become a Patron - just click here - and support me! Or use the Donate button for a one-off donation. If just 10% of my visitors gave me a pound a month, I'd be able to spend a lot more time answering all the questions!!

Sunday, 15 May 2016

Invading Brambles - Episode VII - The Complaining Neighbour

I had an email from a nice lady called Heather yesterday: *waves* which made me roll my eyes in sympathy.

Heather has a beautiful beech hedge, and her neighbour's brambles throw themselves over the boundary and infiltrate this hedge, so when the hedge is trimmed, the brambles - not unreasonably - get chopped.

Apparently the neighbour came round and complained about the loss of blackberries!!!

So what can you do in this sort of situation?

The first rule is "Don't fall out with neighbours if you can possibly avoid it" which usually means talking to them. It's always tricky when inter-neighbour communication starts with a complaint, but it's worth gritting your teeth and accepting that part of being a grown-up is having to do things you don't really like doing, and sometimes an apology (no matter how insincere) can prevent years of low-level war and bad feeling.

If "one" had known beforehand that the neighbour was going to complain, "one" could have been ready to say  "Oh, I'm terribly sorry, I had no idea that they were of value to you, I thought that they were just wild brambles which are making a terrible mess of my lovely hedge. Can I suggest that if you don't want them chopped, that's no problem, just keep them on your side of the boundary." and I would suggest that in most cases, it's worth going round to their door and attempting to say something similar.

But before doing so, take a look at the boundary and see what you can do to make life easier for both parties: what sort of fencing exists? Can it be mended, strengthened, replaced? Is there a way for you to repel the brambles before they get to your hedge?

I've written about brambles several times:  if you go to the very top left-hand corner of this page you will find an orange "B", then an empty box with what looks like a Q in it: I'm not sure if that is meant to be a magnifying glass symbolising "look closely" or is simply a Q for Question, but either way, it's a search box, so type "brambles" into it, to get a list of everything I have ever written on the subject.

If you don't have time to do this, skip to this How To Deal With Brambles article, which explained how brambles grow, and why you don't need to dig our yards of roots, but you DO need to get a couple of inches below soil level.

Then check out Bramble Removing: Invaders From Next Door, which has a few suggestions on ways to deal with this annoying issue, and some additional information in the article prompted by the question What Shrubs Can Hold Brambles Back? (answer: none, but there are some more comments and suggestions about fencing and tactics).

In Heather's case, she mentions a fence which is presumably "behind" (from her perspective) the hedge, and this makes it a lot easier to solve the problem.

If there is a fence of some sort, then the answers are in the articles mentioned: basically you have to patrol the boundary once a fortnight or so and fold back all invading stems, pushing them firmly back over to "their" side. Don't cut them off, or you will double your trouble - just fold them back, flip them over the fence until they catch on themselves and stay back. Any stems that are forcing themselves through the fence must be pushed back through the slats.

If the fence is decrepit and full of holes, then whoever owns it should be advised to replace it. In Heather's case, if the fence is hers then she has the option to install a stouter fence, possibly higher than the existing one, which will help to keep the brambles out of her hedge. If it belongs to the neighbour, then the neighbour could be politely advised that if they want to get the best crop from their brambles, they should replace the fence, and put wires along their side of it, to train the brambles properly.

You will need to get behind your own hedge in order to do this, but this is not a bad thing: it might mean that you have to clip the "back" side of your hedge instead of just letting it grow (bashing up against a fence usually restricts the growth of a hedge in a sort of "natural pruning" way), but this will make it easier to keep the base of the hedge clear of weeds and other undesirables, and might well make it easier for whoever trims your hedge, if they can access it from both side. And it helps for boundary maintenance, too.

So, in short, the advice is to trim the back of your hedge so that you can get behind it, then make a point of tucking or flipping back all new bramble growth as soon as it gets over to your side. This should please the neighbour, who will see more stems and therefore more crop - and it will keep the darned things out of your hedge.  Once the hedge is clipped, it should only take you five minutes or so every couple of weeks, and peace will be restore: and who knows, if you get on good terms with the neighbour, there might be a pot of bramble jelly for you, later in the year! 


Did you enjoy this article? Did you find it useful? Would you like me to answer your own, personal, gardening question? Become a Patron - just click here - and support me! Or use the Donate button for a one-off donation. If just 10% of my visitors gave me a pound a month, I'd be able to spend a lot more time answering all the questions!!

Wednesday, 11 May 2016

100% Slug Protection.

There are many products out there which you can buy to get rid of snails, but many of us have concerns about polluting our gardens with nasty chemicals, plus the knock-on effect of other creatures eating the poisoned slugs before they finally shrivel up and die ("Mwaaaah haaah haaa!") (sorry).

There are just as many tall stories on the internet, of what will absolutely, definitely, with no exception, get rid of the darned things.

However, most of them are old wives' tales, and simply don't work.

Of the products, slug pellets work, perfectly, easily, every time, no mistake. But they are nasty chemicals. Then there are nematodes: tiny parasitic organisms that kill slugs and snails from within, as it were. You can buy them from the internet, but there is no real way to tell if they are actually working or not - the supplier can (and does) say that their action is affected by temperature, soil conditions, amount of water in the soil, can takes weeks to work, must ensure they don't die before you spread them about, blah blah, woof woof, until sometimes you wonder how they manage to sell any of the little beasties at all.

As an aside, one of my Clients once bought some expensive nematodes designed to kill Vine Weevils, and they totally, completely, 100% failed to work. Well, I suppose they might have killed off a few of them, but the plants in question - a dense bed of Bergenia (Elephant's Ears) in the shade of a vast Yew hedge - were just as raddled with foliage holes as they were before we applied it. In the end we gave up, and created an exclusion zone around them to keep them in that, rather unloved, corner of the garden.

Anyway, back to the slugs and snails: Old Wives Tales.

1) Crushed eggshells around a favoured plant will keep them at bay.

No it won't.

Exhibit A:


Reproduced with kind permission of a chap on Twitter, his handle is @GrowLikeGrandad.

As you can see, he put a snail on a plate, surrounded by a ring of crushed eggshells.

1, 2, 3 and there he is gone.

The experiment was repeated with much larger pieces of eggshell, to exactly the same result.

So no, crushed eggshells won't do any good at all. Nor will putting them on your compost, while we're on the subject of eggshells - honestly, they don't rot, and there is no scientific proof WHATSOEVER that the "goodness" in the egg shells can leach out into the soil. For that matter, there is likewise NO PROOF that using the water in which you boiled eggs will be of any benefit to your plants, over and above that of the water itself.

2) "Lay down a bramble stem."  Seriously, someone somewhere made this statement. Exhibit B:

Well, there you go. Snail gliding in unconcerned manner across a bramble stalk.

You can try this with fresh bramble, with dessicated rock-hard old brown ones: the result will be the same, the snails (and slugs) are not the least bit fazed by something a bit prickly.

In fact, open  up another tab right now, and type in "snail on razor blade". Go on, I dare you. See? The expression "sharp as a razor" means nothing to slugs and snails.

3) Coffee grounds.

*sigh* Another urban myth, with a tiny grain of truth behind it. Coffee grounds contain caffeine, and caffeine is pretty toxic stuff - too much of it is "bad" for us, and likewise for slugs and snails, but you need a much higher concentration of caffeine than you will find in coffee grounds. Think about it - we drink coffee for the caffeine, so would all those expensive coffee shops throw out something with any use left in it? Coffee is carefully processed to extract as much of the caffeine as possible before it is discarded.  (Obviously decaffeinated coffee grounds are a complete waste of time!

Furthermore, if you pile coffee grounds thickly on the garden, they will go mouldy which invites fungal diseases - oh dear, not so good for the plants. Or the beetles, frogs, toads, birds etc.  Certainly the texture of the coffee grounds won't have any effect - see 2) above.

Spraying a caffeine solution on the leaves of vulnerable plants would do it - but the slugs would have to eat the plant in order to ingest the toxin, so that's not exactly viable, is it?

4) "Copper tape repels slugs."

No it doesn't. All that business about the moist body of the slug/snail conducting a weak but repellent electric charge is just rubbish.

I tested this one day, using the lid of an ice-cream tub, with a full edging of copper tape around the perimeter - rather like @GrowLikeGrandad's plate, above.  It was a simple test, scientific in the sense that it is repeatable by anyone. Take a rigid sheet of plastic, stick down a border of copper tape, grab a couple of slugs and snails, and drop them down in the middle. Do they escape, or are they trapped forever?

Well, of course they escape.

I did some more research at that time, and discovered that the theory was to do with the moist body of the mollusc creating a circuit. Consultation with an Electronic Engineer that I happen to be on very good terms with *big grin* suggested that the only way it could possibly work would be if the moist body "completed a circuit", so we made two parallel circles of copper tape, one inside the other, and waited for the slugs to bridge the two.

Did it make the slightest difference? No it did not.

However, when we wired up a cheap solar garden light to the two circles - whooo hooo! They recoiled as though it really, really hurt them. ("Mwaaah haaa haaaa!")  After an hour or more in the baking hot sun, it became apparent that they would rather die than cross an electrified copper tape, even one only powered by a tiny solar panel.

Before you ask, we did briefly consider marketing it, but we could not find a reliable way to connect the solar panel to the copper tape other than soldering - so the only way we could do it (bearing in mind that most people can't solder) would be to instruct the customer to lay down an  unbroken hoop of copper tape, then we would come along and solder the connections. Simply not feasible, plus it would only really be worth it for large raised beds.

But!!  before you go home crying in disappointment, I have found one cheap, relatively simple way to make a pot or trough 100% immune to slugs, snails and - incidentally - vine weevils.

Step one: buy or construct your chosen pot or trough. I made a simple box out of old planking and planted it up with strawberries, mulched with gravel for a decorative effect, and to keep the fruits dry.

Step two: using recycled wooden planks *laughs* (ok, you can use brand new wood if you want to!) construct a wooden frame, big enough to go right around your pot or trough, and at least an inch bigger in each direction.

Step three: find an old compost or bark chip bag with no holes in it (apart from the one at the top, obviously) and use it to line the frame: I cut my bag very roughly to size and used a staple gun to hold the sides in place. I arranged it so that the printed side would not show.

Step four: position the frame where you want it. You won't be able to move it later, so apply some thought before you do it.

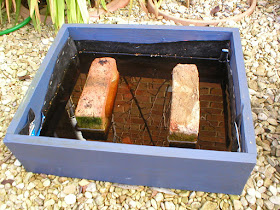
Step five: place two bricks inside the frame, on top of the plastic. Fill the frame with water. If if all leaks out, get a better bag (or a piece of pond liner) and try again.

Here we are at step five: you can see how unevenly I have trimmed the black plastic, but it really doesn't matter as it's not visible once the planted box is in place.

Note the water level: below the top of the black plastic, and below the top edge of the bricks.

(This was only supposed to be a trial, I was intending to make a "proper" one once I'd established it would work, but I've been using it for the last seven years and it's still going strong!)


Final step: carefully lower the planter down onto the bricks.

There!

Moated beds!

The bricks keep the bottom of the planter out of the water, so it won't rot, and the water keeps the slugs and snails out, as they can't swim.

All I do is keep the water topped up, and no slug or snail has ever made it onto the plants.

Points of note:

A) Essential to keep the water topped up, otherwise.. well, you can imagine the disaster if you let it dry out, some snails move in, you refill it (not realising that you have political prisoners trapped on your island) and they scoff everything that grows there.

B) Essential to ensure that nearby greenery does not flop across to make a short cut - see A.

C) As with any pot, you have to water it in hot weather. I tend to top up the moat whenever I water  - and of course any excess water drains through the trough and into the moat. Overfilling the moat isn't an issue, as it just leaks away once above the level of the plastic.

So there you have it: forget coffee grounds and copper tape, just make some moated beds!


Did you enjoy this article? Did you find it useful? Would you like me to answer your own, personal, gardening question? Become a Patron - just click here - and support me! Or use the Donate button for a one-off donation. If just 10% of my visitors gave me a pound a month, I'd be able to spend a lot more time answering all the questions!!

Sunday, 1 May 2016

How to remove an overgrown Rosemary bush

I know, I know: we all love Rosemary, it's pretty and it smells nice, but come on, how much of it does anyone actually use as a herb? Just how much lamb can one family eat?

These days, I rarely find Rosemary being used as a herb:  it is usually allowed to grow into a fine bush, usually it is allowed to flower, and it only becomes a problem when it is taking up too much room in a herb bed.


Rather like lavender, there comes a point where it gets too big and leggy - left - and by the time it has reached this size, it usually can't be cut back to size anymore, in which case it is time to heave it out and start again.

This one has been lovely for many years, but now is is spreading right out across the grassy path, ruining the grass and making it hard for the owner to walk past it on wet days, without ending up bedraggled and cross.

So it is time for action.
 Step one: get your loppers, get down on hands and knees, reach as far underneath it as you can and cut off the branches, as close to the main trunk as you can reach.

Here we are - right - half way through the job.

You can really see the extent of the dead brown wood in this photo, which is - in effect - a cross section of the bush. In fact, to be honest with you, I've been treating this shrub (and it's matching sister at the other end of the bed) as topiary, clipping them to neat round shapes every year, in an attempt to keep them down to a reasonable size.

Here's a quick snap of the immense pile of debris created!

It always amazes and amuses me, to see how what looked like a large but reasonable shrub can turn into a massive pile once you start to chop it.

I suppose this is a tribute to the "leaf mosaic" which plants and trees create: they hold their leaves in such a way that every leaf gets as much sunlight as possible, which means they arrange themselves very efficiently, spatially speaking.

When we cut them down, we ruin all this careful arrangement, so this must be why the offcuts seem to be twice as bulky as the actual shrub was.

With all the stems removed, the central trunk is revealed, and now I can get close enough to it to start digging out the root.

With a sudden sense of deja vu - remember Digging Out A Buddleia? - I excavate all around the roots, loosening it to the point where I can wiggle the stump too and fro, which then gives me the leverage to loosen it even more, until eventually it gives up, breaks off, and comes out.

Phew!

Rosemary, like many shrubs, won't grow back from portions of underground roots, so I don't need to dig a massive hole.

Once the stump was out, all that remained was to fork over the edges of the hole, add a bucketful or two of our home-made compost to replenish the soil, and lo! and behold, ready for replanting. But not with another rosemary!