Pages

Tuesday, 20 December 2011

Fremontodendron...

..."What's one of them?" I hear you ask.

No, you probably all already knew about this shrub, but for some reason I have never encountered it before last week.

Well, I know the reason why - it's  not a fully hardy shrub, and as such I would not expect to find it in any of my gardens, where phrases like "value for money" and "doesn't require faffing"  are frequently aired.

But I haven't even seen it in garden centres, and I do like to wander round the plant sections... I can't imagine how I'd missed it.

Anyway, I was recently out walking around Buckland, which is a village just north of the A420 - pretty, but somewhat blighted by the noise of the road, and having to always plan your journeys so that you don't have to risk death by turning right out of the village across the A420......

...and on the front of one of the cottages, right on the road, I was intrigued by an espaliered shrub that I simply didn't recognise.  It had tiny, pretty, leaves, not so much oak-shaped as shaped like those of Hydrangea quercifolia: very downy underneath, and it was still flowering, even in December!

Here is the main body of the plant... and yes, it's a south-facing wall, but it's right onto the road, no sheltering garden or wall, just the main stem going straight down into the tarmac. Heaven knows where it finds water and nourishment!


And here is one of the flowers:


Aren't they lovely?

If you google for it and look at images, you can see that in a good year, it is completely smothered with these large, saucer-shaped yellow flowers, and it's an absolute picture!

As I said, I didn't recognise it, so I took a leaf home and identified it.

And then, just one week later, I was working for the second time in a new garden that I took on over the winter, and blow me, there was another one! Free-form this time, rather than espaliered, and again, grown against a south-facing wall but not in a particularly sheltered position, and again, not into good garden soil, but right on the edge of a concrete path.

So beware, clients, I am going to be singing the praises of this plant, and will be trying to find sheltered nooks for it...

Did you enjoy this article? Did you find it useful? Would you like me to answer your own, personal, gardening question? Become a Patron - just click here - and support me! Or use the Donate button for a one-off donation. If just 10% of my visitors gave me a pound a month, I'd be able to spend a lot more time answering all the questions!!

Monday, 19 December 2011

Prairie Planting - easy autumns!

As I haven't said anything much about Prairie Planting recently, I thought I'd better explain why: it's because all through Sept, Oct, Nov and Dec they don't require any work.

Well, barely any work, apart from raking through the Stipa tenuissima as they flower, to avoid soggy brown masses after any rain. Oh, and maybe a little bit of weeding.

But so far, I haven't even cut down the very dead Echinacea purpurea or coneflower. They are now matt black, still standing stiffly to attention, and actually looking rather lovely, if not particularly colourful. I have removed one or two stems that have collapsed sideways, only because they look so untidy, but otherwise I have left them standing.

Likewise the Cardoons or Cynara cardunculus, which are holding up wonderfully this year.  Last year the seed pods opened quite early, and they shed masses of fluffy seeds all over the garden. Luckily most of them failed to germinate, otherwise it would be standing room only for Cardoons! This year, however, the heads are intact, and they weren't as big as last year - a mere 5' tall (errr, not even 2m tall) whereas last year they were towering over my head.

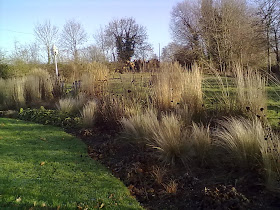
So, here are my Prairie beds this week: a Picture in Shades of Beige?


 The other one looks better, with the sun behind me:


That's more like it, a Picture in Shades of Gold.  Glorious, aren't they? Not to everyone's taste, and it's not possible to achieve the look without a large garden, but they certainly are very low-maintenance at this time of year.

Now I have to wait and see how long I can leave them before I start the winter clear-out.

What does that mean, exactly?

Well, I am sure you have all read in the books about "leaving your perennials to make a fabulous frost display".

This phrase is usually accompanied by a beautiful photo like this one (right) showing an atmospherically back-lit image of the perfection of crystallised foliage, shimmering in the winter sun.

And have you ever tried leaving your perennials unchopped in autumn?

In the UK, we are usually treated to howling winds and rain through November and December, leaving us with something more like this:

Yes, that's more familiar, isn't it? Ruined plants, blackened foliage, and as soon as the frost melts, it collapses into a soggy mess which then solidifies into an impenetrable crust, preventing the warm soft rains of Spring (er hem) penetrating the ground.

Or, more realistically, preventing the bulbs around the perennials from coming up cleanly, leaving each one with a lid of sodden black muck on it, spoiling the blooms.

And at the very least, making a safe haven for slugs and snails over the winter.

Oh dear, do I sound a bit negative about the frost effect? (said she, unrepentantly.)

Well, in a word, "yes",  I am very negative about the frost effect. I don't know which country contains the people who rhapsodise about it, but it can't be the UK.

Over here, we generally get rain before we get much in the way of frost, and that does rather tend to ruin the foliage, flatten the stalks, and destroy any symmetry of form.

Every year I am requested to leave plants unchopped "for the frost", and every year, a few weeks later, I am asked to clear up the horrible black soggy mess...

...but this year, so far, it has been surprising dry, and the wind has done surprisingly little damage, so for the time being I am leaving the Prairie beds as they are.


Did you enjoy this article? Did you find it useful? Would you like me to answer your own, personal, gardening question? Become a Patron - just click here - and support me! Or use the Donate button for a one-off donation. If just 10% of my visitors gave me a pound a month, I'd be able to spend a lot more time answering all the questions!!
Wednesday, 14 December 2011

Vine pruning

Aha, we're back to Wisteria pruning again!

No, today it's Vines, but it's very much the same thing as for Wisteria: at this time of year, it's time to cut back all the new growth, right back to the basic framework of knobbly spurs.

And, once again, I forgot to take photos until I was half-way through the job, sorry!

With vines, my first step is always to cut and gently pull away all the entangled new growth of the season - at this point, I am concerned with getting the bulk of the unwanted growth out of the way, so I just cut roughly a good 20cms or 8" away from the main framework

So here is the "Before" of one end of a vine in my charge, at that stage:

Often, due to the tendrils, it takes some careful snipping to release the unwanted growth, and I often have to snip out long growth in sections, particularly when it has sneaked around behind the supporting wires and has headed skywards, unseen behind the covering leaves.

As you can see, it's had all that work done, and is now reduced to the basic framework with untidy sprouts in all directions.

The next stage is to cut all of those right back to the framework, leaving maybe one or two buds on each one. Don't forget those sloping cuts, again!

Once this is done - right - you should be left with some gnarled old branches, ending in knobbly lumpy bits.

This is correct pruning for a vine!

I know it looks drastic, but honestly, you really have to do this every year.

Normally, presented with what you can see in this photo, you would say that one stem of growth should have been allowed to remain, on the far right-hand of the upper framework.

The intention would be to train this stem along the wire to the right, allowing it to become part of the framework.

However, in this case, the client has brought in a new vine this year, which we are going to train up next year to take the place of this one, which has never performed well. The new vine is to the right of this one, and is going to move left along that wire, taking up the empty space next season.

I am hoping that by the end of the next season, I will be able to dig out this one altogether.

And yes, if it were my garden, I would have taken this one out altogether as soon as the new one was delivered, but I was instructed to leave it for one more year, "just in case".

Oh, one other job to do at this time: gently remove any loose bark from the main old framework.

I know it seems terribly harsh, you do think that the stems would benefit from the loose "skin" as frost protection, but - and you can look this up for yourselves on google if you don't believe me - the books all say that we should remove loose bark as it harbours pests, particularly scale insects, over the winter.

So, gently rub off any loose flaking bark, and rub off any scale insects that you should happen to see, as well.

"What's a Scale insect?" I hear you say.  Oh, have you not met these strange little things? They are kind of primitive-looking things:  basically sap-suckers with hard outer shells which they clamp down tightly against the bark, to prevent birds getting at them.  Like all sap-suckers, they rarely kill plants, but they weaken them, which reduces their vigour and makes them more prone to diseases, and other pests. For this reason, you should try to reduce their numbers if you can; and removing the dead bark and rubbing off any that you find is a good start.

What do they look like? Just google "scale insect" and click on "images". They are tiny, semi-hemispheres, brownish or orangish in colour, and it helps to imagine them as tiny barnacles, clamped onto the stems of vines and many other plants. How small is "tiny"? Oh, er, about a quarter the size of a fingernail, how's that for precision? (Hey, I'm a botanist, not an entomologist!) At this time of year they are quite dry, and often you can just sweep them off with a finger.

So there you go, quick guide to the Winter Tidy-Up for vines, hope you enjoyed it!

Tuesday, 13 December 2011

Wisteria pruning, ready for winter

I covered this topic a while ago, but I hadn't taken photos:  we all know that phrase "a picture is worth a thousand words" and I should imagine there were some readers who were wishing that I had chosen photos rather than thousands of words on the subject!

So when I was asked to tidy up a Wisteria last week, I thought of you brave souls, ploughing through my thousands of words in the hopes of a) learning something or b) being mildly entertained, and I managed to pull out my phone and take a photo.

Here is what you might call "before":


Well, technically, "half done" as you might notice that on the right-hand side, there are clear signs that I have already been at work - yes, I was well into the job before I remembered that I had intended to take photos...

Anyway, generally speaking, this is the "before" picture: the Wisteria in question has had at least two runs of summer pruning, clipping off all those monstrous whippy green shoots that make the place look so untidy, and is still lightly covered with leaves, although they fall off at the slightest touch.

Summer pruning, as mentioned in the earlier entry, is not just to remove the wild growth and retrieve your gutters, it is also to promote the formation of flowering buds, rather than endless whippy growth.

Winter pruning is for neatness, and to ensure the flowers can be seen to their best advantage. It is also the time to assess the shape of the plant, and to make decisions about how you are going to manage it in the forthcoming year.

So, armed with secateurs, small steps, and my trusty long-reach pruning pole, I set to work.

The first job is always to sweep off as many loose leaves as you can reach: I use the pruning pole or a rake, and gently wipe it across as much of the plant as I can reach. That takes care of most of the loose leaves. If they don't come off easily, then it's too early! Leave it another couple of weeks and try again.

I always start at the bottom, which may seem wrong, but it means that it's easier for the debris to fall straight through the stems to the ground.

So, ground level: wipe off the leaves, gently tug off any stubborn stalks, then cut back all the newest, palest gray stems to just one or two buds. Don't forget to always make a clean, sloping cut, sloping away from the bud so that the rain, snow, dew etc slide off the stem. If any of the knobbly spurs are getting very congested, now is the time to thin them out.

Next stage: get up on the steps and do everything you can reach, then it's out with the long pole and repeat the process up to the top - although, as mentioned in the earlier post, it's not possible to be surgically precise with your sloping cuts when you can't even see what you are cutting....

Oh, at this point I should say that my professional insurance only covers me for working up to 1.5m off the ground, so I have to work on a set of low steps, or with a long-reach pole. You may prefer to lean a ladder against the wall and simply climb up and down it.

I would say, however, that I encourage all my "Senior" clients to make the decision to get a long-reach pole and lower the height of the Wisteria to the point where it can be managed from the ground, rather than risking life and limb clambering up ladders. Many of my clients are at that stage where they are looking to simplify their gardens, and reducing the height of a climber that requires regular pruning is quite a simple thing to do.

I know it sounds like a cowardly thing to suggest - but it has the huge advantage of bringing that aspect of their garden back under their control, rather than struggling to do it themselves, or having to pay a man with a ladder to come round and do it. And after all, what's the point of Wisteria blossom so high up that you can't see them clearly?

Anyway, once this is done, stand back and look at what you have left.

This is time to decide if it is becoming un-balanced, if one part is too thick, perhaps: or you might decide that you are sick and tired of brushing past a mass of wet leaves every time you walk up the path, or tired of being poked as you walk underneath an archway.

If any of these apply, get out your loppers, or pruning saw if necessary, and remove any branches that you no longer want.

In this case, the client and I agreed that it was getting too "proud" at ground level: that is, it was projecting out into the courtyard too far, and becoming a nuisance.  So we cut off all of the branches that were poking out at head height or lower, leaving all the sideways-growing ones.

When you have completed this phase, stand back again, and take another look: once you are happy with it, you can sweep up the mess, and there you go:


It has a sort of elegance of simplicity, doesn't it? And I assure you that I have been doing this to this particular Wisteria for over eight years now, and if flowers wonderfully every year.

In this particular case, it doesn't go much above the top of the picture, as the building is a low-eaved thatched cottage, and in earlier years we had a lot of problems with the whippy growth getting caught up in the thatch.

Now that we keep it to this height, it is much more manageable, which has proved to be a big relief to the client. Sometimes, in my job, it's important to give priority to the wants of the client, rather than the wants of the plant. 


Did you enjoy this article? Did you find it useful? Would you like me to answer your own, personal, gardening question? Become a Patron - just click here - and support me! Or use the Donate button for a one-off donation. If just 10% of my visitors gave me a pound a month, I'd be able to spend a lot more time answering all the questions!!

Monday, 5 December 2011

Caryopteris: time to prune

Caryopteris x clandonensis - normally just a smallish shrub, with pretty, foamy blue flowers all through late summer into autumn.

They haven't had the best of years this year, but then we've had some very odd weather...

Anyway, it's time to prune them ready for the winter, for two reasons: firstly because the flowers are better on new wood than on old wood, and secondly to prevent damage over the winter.

Here is one that I prune every year - left to their own devices they grow in a rather bush-like shape, something like Spirea, but this one was planted rather too near the front of the bed, and the client won't let me widen the bed, so I have had to encourage the Caryopteris to form a woody framework which is going up and along, rather than out, with the new growth falling in pendant fashion from the framework.

It makes a very attractive shape, and is rather more interesting that yet another fluffy round ball.

Here it is "before" - a rather tangled mess, looking quite bedraggled as the flowers have all finished and dried off to brown fluff. Normally with anything grown as a pendant, such as willow-leaved pear, that miniature weeping willow Salix caprea 'Kilmarnock' and so on, the aim is for a "light airy waterfall".

Hmmm.

More of a flourishing hydro-electric plant, in this case.

As you can see, it completely obliterates the front of the border: this fits in perfectly with the tall scented shrubs running along the back of the border, and through the summer it creates a wall of colour and scent. Lovely!


Right - on with the pruning.  It's a simple process: go over each branch, and cut back all the new growth to stubs on the old wood.

Rather like Wisteria, or Buddleia: you keep the old framework, unless it has split, or is growing in the wrong direction, or getting a bit top-heavy.  In this one's case, I always take off a few of the bigger branches that are coming forward over the grass, and I try to keep it looking fairly balanced.

Once all the long twigs are gone, we are left with a much neater and much woodier-looking shrub:

Suddenly we can see through it to the shape of the shrubs behind - you can now see the Abelia in all it's end-of-season fluffy seed-head glory. That one had a major chop two years ago, and this year only needed the over-long new growth removed, which I did about a month ago.

Further behind you can see where I brutally chopped the other shrubs two years ago, forcing them to produce strong thickets of upright stems from much lower down.

And of course you can now see the Hellebore thicket!

Here it is from slightly closer, so that you can see the stubs - very similar to the method used for encouraging fruiting spurs in Wisteria, or in vines, or for that matter in fruit trees.


And once again, I have to say how impressed I am with professional plant photographers, as all of these photos do rather look like a mass of greenery..... but I hope you can make out enough detail to make sense.

I also have, in another garden, much smaller examples of this shrub, pruned in exactly the same way but only 45cms off the ground (she said, proudly and metrically - although I am thinking 18" of course) rather than 1.5 metres - I'll  try and remember to take a photo of them next week, to show you the comparison.

So off you go, get out there and prune! 


Did you enjoy this article? Did you find it useful? Would you like me to answer your own, personal, gardening question? Become a Patron - just click here - and support me! Or use the Donate button for a one-off donation. If just 10% of my visitors gave me a pound a month, I'd be able to spend a lot more time answering all the questions!!

Wednesday, 30 November 2011

Where there's a Willow, there's a way...

At last! It's that time again - time to trim back the willows.

I have quite a lot of willow-work scattered around my gardens: I have lots of Fedges, plus the Willow Bridge which I think I've mentioned earlier.

"Fedges?" I hear you say, "What's a fedge?"

Answer: it's a cross between a fence and a hedge, made of willow, which grows. There, now you know.

The principle is laughably simple: take plain willow "wands" or branches-with-no-side-shoots, push them into the ground, and weave them together decoratively.

The wands will put out roots and will grow: where they cross, they will gradually graft themselves together, and you get something nearly as sturdy as a fence, but which is green and leafy in the summer, and is bare but decorative in the winter. A sort of living trellis, really.

And then there is the Willow Bridge... no, that does not make it a Brillow.

Two years ago one of my clients asked me to install a fedge to separate their garage flat from the rest of the garden, to give some privacy to the tenant, and to screen off the newly-installed oil tank.

I suggested that if they were ordering willow for this, it would be a good idea to get enough to make an additional fedge to hide the extraordinarily ugly compost bins that they had just built for me. (I gave them detailed instructions! I gave them sketches! I gave them measurements! They asked their handyman to do it, and instead of a neat block of 3 x 1m square bins, I got 2 x 2m square monstrosities, easily 1.5m high,  grumble grumble grumble...)

Well, they measured the area, sent off for the willow, it duly arrived, and I got to work.

Here is the Curvy Fedge, seen from the garage side.  It runs in front of the unlovely oil tank, leaving the small grove of silver birch on the "garden" side: it then snakes elegantly around to divide off the tenant's area.

You can see that I was asked to put down membrane at the base: this is not always needed, but grass does offer a lot of competition to willow, so it was either use the membrane, or spend the whole year weeding around the base of the wands.

This is of particular relevance in their first year, while they are getting established.

This Fedge clearly demonstrates the principle: insert an upright wand every - whoops! nearly said 18"! - 45cms to form the basis of the Fedge. Then go back and insert wands at 45 degree angles, and weave them alternately in front of, or behind, the uprights.  Tie them together at the joins. Add a long wand to the "top" of the Fedge to give stability - this is a non-living one, and will die - then, if required, add a decorative top.

Simple!

I did something similar for the compost bins, making the tops into decorative Cathedral-type arches.

There was plenty of willow left over, so I did another short length along the drive, (left) where it fronts onto the road: I thought it would be nice for visitors arriving to be greeted by something a bit unusual.

This client, by the way, runs a very nice boutique B&B, so the garden has to look good, and be safe, all year round. More of that in another post! Back to the willow. This was taken in May 2009, which is about four months after I installed it, and you can see that it put on quite good growth, even in the first year.

There was still yet more willow left over, even after doing another "screen" up by the house:  and I came in to work one morning to find that the clients had been out playing, over the weekend, and had taken all the leftover willow and had rammed them into the stream, tying the ends along the bridge. Well, why not? All it took was a little neatening, and the arranging of some of the wands into strong horizontal bands, to form the framework for future years.

This became known as the Willow Bridge, for the obvious reason, and during the summer it looks like this:

I spend 20 minutes or so, every other week, weaving the new growth in so that visitors can still see over the sides.

You might remember that this year, we had late frosts? Well, the new growth was completely blackened and spoiled, to the point where there was nothing to do but cut off all the horrible black bits, and let it regrow. It didn't look too pretty for a couple of weeks, but then it picked up speed again, and you would have to look closely to see where the damage was.

I don't prune this at all: if I did, there would be twice as much new growth (apical dominance and all that) and visitors would never be able to see the stream! Instead, I plait it sideways, filling in the sides of the bridge as much as possible, and keeping the top as low as I can.

It gets a lot of compliments, which is nice.

And then, of course, once a year it has to have a proper haircut:  this is essential with decorative willow, otherwise it will lose it's form completely, and just become a huge willow tree.

Here is the same side of the bridge as shown above, but today it is late January, the leaves are blackened and falling, and it's time for the big prune. I go along the handrail, cutting off all the current year's shoots, right back to the basic framework which I established the first year.

Seven wheel-barrow-loads later, the job is done, the bridge is bare again, and the visitors are asking "where is the Willow Bridge?" 


Did you enjoy this article? Did you find it useful? Would you like me to answer your own, personal, gardening question? Become a Patron - just click here - and support me! Or use the Donate button for a one-off donation. If just 10% of my visitors gave me a pound a month, I'd be able to spend a lot more time answering all the questions!!

Tuesday, 29 November 2011

Water Butts

Another subject that is dear to my heart - capturing and using rainwater, which is free, rather than expensive treated drinking water.

I was giving a client's water butt the annual dredging the other day, and I thought you might like to see it, as it's a bit of a lateral-thinking answer to a problem.

What was the problem? Well, three years ago there were two problems - firstly, next door's gutter was broken, so the water was making a mess on our side, and secondly, that end of the garden had no water supply, and I had just installed a set of three leaf mould pens which, being under the trees, were not going to receive any rain water.

I quickly realised that my client was unlikely to carry buckets of water all the way down the garden just to dampen the leaves, so I had to find a way to make it easy for them.

Asking the client gave the answer "I think there's an old butt somewhere", and a quick rootle around in the car port turned up an old water butt, and a short length of guttering. There are always plenty of old bricks around the garden, so I built up a nice stack of them, put the butt on top, and held the length of gutter up. Perfect! Now all I needed was a way to suspend the guttering so that it caught the water from the broken gutter, and directed it down into the butt.

The following week, I returned with a wire coat hanger from home, and a pair of pliers, and bingo!

Here's the top - you can see that next door's gutter has somehow shifted out of the joining bracket, and there is now a gap of about 4". (Errrr, 10cms. Sorry, I really will try to go metric....) It's a single-storey building, by the way, otherwise I would not have attempted it...

This top edge of my black gutter is propped up against the wall, and is leaning against the support bracket, which you can't quite see in this picture. It has been in place for two years now, and doesn't seem to need anything more to hold it there.

The bottom edge is supported inside the water butt by the wire coat hanger, bent in an S-shape to go up and over the edge of the butt.

At the business end, I have two lengths of old hosepipe, either of which can connect up to the tap - which, you may note with some amusement, is quite literally a kitchen tap......


One of these hoses is just long enough to run from the water butt to the leaf mould bins, which are just to the left, out of shot.

All we have to do is clip it on, turn the tap, and water the leaves. It's a very slow trickle, being just gravity fed, so I generally set it going, then go and work for 20 minutes or so.

The second hosepipe is the clever one, it runs around the back of the tree to the right, round the corner of the garden and slightly downhill to another water butt.

By the clever facility of syphoning, the water from this water butt can go and fill the second water butt, quite some distance away.

"Syphoning?" I hear you ask. Syphoning is the phenomenon whereby water, once you get it running along a hosepipe, will happily go uphill if the final destination is lower than the original height.

Shall I say that again?

It means that I can run a hose from the bottom of this butt, along the ground, UP and over the lip of another water butt at pretty much the same height, then down inside the butt. Once the water is flowing, it quite happily goes up and over, like a very small miracle. This means I can fill the second water butt, some distance away, to the same level as this water butt.   Which means half full, of course. Then when this butt fills again, I open the tap and they equalise again. If it were raining steadily, and I left the tap open, they would both eventually fill to the top and overflow.

But it does mean that we now have two sources of water at the far end of the garden.

And yes, in case you are wondering, once this butt is full, it does overflow and splash around, just as it did before I installed it - but during the winter, when we don't need it, I slip a piece of plastic into the broken gutter, so that most of the water runs along it and down at the end into next door's drain, as it is supposed to.

While on the subject of syphoning, and "oh we haven't got room for one", here's a quick run-down of my own back garden's water collection system.

I had exactly the "oh, I haven't got room for one" problem: there was a down-pipe, but it was between the window on one side, and the pear tree on the other, so there was no-where to put a water butt.

My garden slopes slightly away from the house,  so I installed a water butt at the far end of the garden, and experimented with a hosepipe.

You need an assistant for this game.... set up your water butt, then lay a hose-pipe from there to the downpipe.  Hold your end of the hose at a comfortable height. Ask your assistant to hold their end of the hosepipe about a foot off the ground.  Fill the hosepipe with water, until it comes out their end. Ask them to lift their end slowly until the water stops coming out. Continue to add water to your end - a jug is handy for this - and ask them to raise their end, until you have both of you holding the ends a metre or so off the ground, and both of you can see the water in the end of your hose.

You can now play a fun game of raising and lowering the ends, to observe how moving one end makes the water level change in the other end.

Now, you need to get the hosepipe arranged such that the water butt end is as high off the ground as the intake of the water butt. In my case, I had the water butt up on a stand, to allow filling of watering cans, so the overall height was about a metre and a half. (look at me, trying to be modern and metric! I am thinking "4' off the ground" but I'm trying to work in metres now...) Then you can see how high your rainwater diverter needs to be. In my case, it was about one metre off the ground, because the garden slopes away from the house.

There is no point putting the rainwater diverter in any higher, otherwise the water won't come back up the pipe once the butt is full.  That's why you have to establish the level of the water butt first.

Having marked the downpipe to show where the rain diverter was to go, I then buried the hosepipe through the garden.

Here is one section, running through the courgette area, past the caged strawberries and the empty cold-frame. As it's shingle here, I am simply scraping back the shingle, putting the hose pipe in position over the membrane, and scraping the shingle back.

It's quite deep, just there, but I've been happily walking over it for a couple of years now, and it doesn't seem to have harmed the hose.

As I said, my garden slopes away from the house, so I had terraced it, using log roll edging to hold back the top terrace, and putting in two shallow steps in the middle.

To pass this obstacle, I had to dig a channel inside the log roll edging, dig a little tunnel underneath the bottom of the wood, and feed the hosepipe through it.

Yes, I had emptied out the water first.

I then tucked the hose under the shingle at the very base of the bottom step, where it was unlikely to be trodden on, and continued across the garden to the water butt.

If you try this, make sure you start with an overlong length of hosepipe, and leave plenty at each end, as the distance is just a little further when you bury the pipe.

On arrival at the end of the garden, I connected one end to the water butt, cutting off the excess: I then connected the other end to the rainwater diverter.

And it works perfectly!

So well, in fact, that I added another water butt down there - you can just see the two of them side by side on the far left of this picture, hiding behind the raspberry poles.

And there in the middle are the blue steps that we bypassed earlier.

As you can see, no sign of the hosepipe: at the house end I just have a neat diverter and a length of hose disappearing straight down. At the far end, the hose rises out of the ground and straight into the left-hand butt.

This ensures that I have plenty of water in the garden, and it's free water!

There, I hope that inspires you to have a go. If you have any questions, do feel free to ask. 


Did you enjoy this article? Did you find it useful? Would you like me to answer your own, personal, gardening question? Become a Patron - just click here - and support me! Or use the Donate button for a one-off donation. If just 10% of my visitors gave me a pound a month, I'd be able to spend a lot more time answering all the questions!!

Saturday, 12 November 2011

Today I saved a Bee...

Well, at least, I hope that I did.

I'm sure you have read that our bees are in trouble - their numbers are declining, there is a specific virus that is reducing their numbers, we are removing their habitats, and so on.  So we are all being encouraged to Be Nice To Bees.

This involves planting bee-friendly plants, which of course I thoroughly embrace, and I have to say that one day, I am hoping to keep bees myself.

So the other morning, I was intrigued to find a large bee sitting on a late Lychnis coronia flower: there was a light frost on the grass, and there was also a light frost on the bee's fur. "This doesn't look good" I thought. It looked as though he'd been out all night....

Two hours later, he was still there - clamped on for dear  life, but not actually moving.

Lines from Monty Python were running through my head: Eric the Half-a-Bee, to be exact. Anyone else remember that one? It went something like -Can a bee be said to be, or not to be, an entire bee: when half the bee is not a bee, due to some ancient injury. Singing! "Is this wretched demi-bee, half asleep upon my knee, some freak from a menagerie? No! It's Eric, the Half-a-Bee" etc.

So I collected a saucer, some warm water and some sugar from my obliging client, then added the bee:


I left him in their warmish porch, having tipped the sugar water so it ran practically up his nose.

Half an hour later, I returned - success! There he was, with his proboscis zipping in and out, taking in the sugar water.

I have since found out that this is a reflex action - if a bee's antenna make contact with a sugar solution, the proboscis automatically starts working.

So I guess my bee was refuelling in his sleep? What a useful reflex, as I am sure the bee was too cold to have been able to feed of his own volition. What a good thing I unknowingly dunked him in the sugar water.

How long does it take a bee to refuel? Quite some time, I think: I left him in the saucer for an hour and three quarters, then when I was leaving, I transferred him to an open Scabious bloom, along with the rest of the sugar water, in the hope that he would continue to feed, and that being in the sun - which had obligingly come out by then - would warm him up sufficiently to be able to fly off, feed normally, and be safely tucked away somewhere before dark.

Did it work? I won't know for sure, unless I go back in a week's time and find a dead bee at the foot of the Scabious.. but at least I tried!


Did you enjoy this article? Did you find it useful? Would you like me to answer your own, personal, gardening question? Become a Patron - just click here - and support me! Or use the Donate button for a one-off donation. If just 10% of my visitors gave me a pound a month, I'd be able to spend a lot more time answering all the questions!!

Friday, 11 November 2011

Time to make leaf mould!

Yes, it's that time again: I spent a happy hour yesterday raking up leaves and stacking them in the Leaf Mould bins for a client. 

I'm into compost and leaf mould in a big way, I even lecture on the subject, (If you want me to come and give a talk at your organisation, just email me - but only if you are near to Wantage!) so it's lovely to be paid for doing it!

In case you're not totally clear on the subject, here's the briefest precis:

Garden debris rots as an aerobic process, meaning that it needs oxygen. Hence the presence of worms, earwigs, and other livestock in your compost heap.

Leaves rot via an anaerobic process, meaning without oxygen - they use fungus. Hence there are no worms, earwigs or other livestock in the leaf mould bins, just fungus.  It also take a lot longer - two years, normally.

If you don't have many leaves, it's ok to put them on the compost heap, if you mix them in well - they will eventually rot. Even better if you can shred them, or mow them up.

But if you have a lot, it's much better to treat them separately. You can either make special leaf-mould bins out of chickenwire, or you can simply stuff them into black plastic sacks and stack them out of sight somewhere.  (Black bags are not the prettiest part of gardening.)

Honestly! It works just as well in bags, but if you have a lot of them - and most of my clients have big gardens and lots of trees - then making chickenwire bins is much quicker and easier.

The only "trick of the trade" (if you can call it that ) is to make sure the leaves are wet.

The resultant leaf mould is wonderful stuff for conditioning the soil - it doesn't have a great deal of nutrients in it, unlike proper compost, but it lightens the soil and helps it to hold water. And it's completely free! All you have to do is collect the leaves, leave them for two years, then spread it around...

...and as I like to be helpful,  here are my Top Tips:

A - Leaf Mould bins/pens

1) Leaves are not heavy, so you literally only need chicken wire wrapped around four posts.
2) They are, however, very bulky, so you may need to make three or four of them.
3) Make sure they are wet - frosty days are ideal for raking up the leaves. If not, just water them. This also helps reduce their bulk so you can stuff more in on top. If you site them under trees, you may have to add more water a couple of times during the year.
4) Next year, you could shift the half-processed stuff from three bins into one, to free up a couple more bins - but that is making work for yourself. Do it the easy way, make plenty of pens, let them sit for two years.

B - Leaf Mould In Bags

1) Rake up the leaves, stuff them into plastic sacks. The bigger the better.
2) Throw in a bucket of water, make sure they are good and wet. You want them to go mouldy.
3) Tie the top of the bag, loosely, then stab the sides viciously with a fork. We are aiming for wet, not sodden. If you don't tie the top, and stab too enthusiastically,  they all come flying out of the top of the bag. Ask me how I know this......
4) Stack the bags out of sight somewhere. Behind a shed is ideal.
5) In two years' time, they will have shrunk into flattened slabs. Open, or peel off the bags, if you used thin bin-liners. Good quality bags can be re-used. Break up the slab of dark, peaty stuff and there you go.

C - General Points

1) Don't attempt this with evergreen leaves - holly, laurel, conifers - as it won't work.
2) Don't bother with Horse-Chestnut leaves either, they don't rot well.
3) Other than those, yes, you can mix up as many different types of leaves as you can.
4) No, you don't need to shred the leaves.
5) This is for leaves only - don't mix in grass cuttings, or normal garden waste.

I've often read on the internet that leaf mould is a good potting compost, but I'm not convinced about that, as it is pretty low in nutrients. I would say that it makes good seed compost, as it does not contain weed seeds, as long as you pot the seedlings on into "normal" compost or bought compost.

Anyway, there are the basics, so off you go! Rush outside with a rake and make yourself some free leaf mould.

As far as I know, there is nothing to stop you raking up leaves from public areas such as parks, grass verges and footpaths, so if you have room to stack the bags, but no trees, this need not stop you!

Thinking about it, it would be lovely if we could start some community schemes - I live on a housing estate which a huge number of grassy areas and a good variety of trees, and there are leaves everywhere. If only the local brats weren't so bratty, I would make some pens and encourage my neighbours to help to fill them, and to help themselves to the leaf mould in due course. But - sigh - I just know that the pens would be pulled apart, or the leaves would be set on fire.

Oh well, maybe one day...

Tuesday, 8 November 2011

Roses: never quite dead.

Today we have a happy tale, of a rose that didn't quite die.

The rose in question is a very old one, which had in it's time been much loved by the client, but was now in a sad and sorry state, being mostly one gnarled stem, which grew vertically to above head height, and then produced a small tuft of spindly growth with just a few flowers.

Last year, with permission, I gave it a massive chop, removing all the pathetic top-growth, cutting it back to the one bare stem. Taking the chance for a bit of plant-torturing, I then carefully bent the main stem over to the left, close to the base, and tied it in to the wall.  Finally, I cut the stem neatly,  leaving just what looked like the most promising shoot.

It did well, producing a good strong shoot from the highest point, pretty much as you would expect: and that shoot grew well, thickened up, branched, budded, and actually produced flowers.

"Great!" you might be thinking, "a success, then!"

Ah, but I wanted more! I wanted it to shoot from much lower down.  So I watched and watched, I gave it some compost, I gave it some water, and finally:

...much to my joy, this tiny little shoot appeared - can you see it? Right at the top of the picture, heading off on the diagonal,  it's the same colour as the red bricks, and is about 3" long at this point.

Each week I would check it,  hardly daring to look in case it had been damaged by wind, client or cats.. but it survived!


And here it is at the end of the season, you can see the strong new shoot rising out of the top of the picture, in brown,  and my little shoot is that lovely fresh green one.

And yes, you are quite right, I have already started the torturing process by tying it in to the wall and forcing it to go horizontally.

As I never tire of explaining to people, climbing plants all have their basis in a jungle environment, and they all think that their mission in life is to grow and grow until they get to the top of the canopy, where there is sunlight and freedom. At that point, they lay down on the canopy and relax, and only then will they burst into flower.

So if you want a lot of low-down flowering from your climbers, you need to prevent them from making a bid for the sky: instead you have to gently persuade them to go left-and-right instead.

Much of my work with roses involves torturing gently persuading them into more horizontal growth, in order to get them covered with blooms at the right height for appreciation by us normal-sized people.

Fan-training is always nice, if you have a rose against a wall: for pergolas or upright supports, wind the new growth round the support, rather than letting it gallop straight up. Then at the end of the season, cut the new growth off, back to your basic shapes, and allow those to become your framework. After the second year, maintenance gets suddenly much easier!

So that new little shoot is going to be allowed to go right, and then it is going to be eased back to the left, and in time this will become part of the "framework" wood of this rose.  Other new shoots will be treated in the same manner, and in a year or two the wall should be well covered, with blooms at just the right height.


Did you enjoy this article? Did you find it useful? Would you like me to answer your own, personal, gardening question? Become a Patron - just click here - and support me! Or use the Donate button for a one-off donation. If just 10% of my visitors gave me a pound a month, I'd be able to spend a lot more time answering all the questions!!

Thursday, 3 November 2011

Maintenance of Grasses: Miscanthus Zebrinus

Oh yes, it's that time of year all right, I am now stripping grasses wherever I go!

The latest one is  Miscanthus zebrinus, which is a lovely upright, clumping grass, with bands of creamy yellow running across the leaves, rather than down the middle. It's quite slow to increase itself, which is what I usually find with what you might call "highly bred" grasses. Generally speaking, the closer a plant is to the original, the better and faster it grows, the tougher it is, the longer it lives.

So, how do we deal with this grass at this time of year?

Here is a clump "before": as you can see, very similar to the Sugar Cane that I talked about a couple of entries ago, in that the leaf sheath - the part that wraps around the stalk - dies off and goes brown, and can easily be pulled away to reveal a clear green stem.

This has the added benefit that you have fewer fronds blowing around the garden for weeks afterwards!

Once again, all you have to do is take each dead leaf in turn and pull it away from the stem.

This requires a little care: if you pull too hard, you risk bending or breaking the stem, which is bad: if you pull too sharply, the leaf part will break off, leaving the stem still encased in the dead sheath. This means you have to go back and do it again, this time slitting the sheath with a finger nail and peeling it carefully away.

Yes, as with my Sugar Cane, it's a job that I find is best done with bare hands.


And the result?

Nice clean stems, great reduction in the amount of dead brown "stuff",  generally better all round.

What do you mean, you can't see the difference?

Look again!

Actually, the difference is greater when seen from a distance, and the general effect is, I assure you, an improvement. 


Did you enjoy this article? Did you find it useful? Would you like me to answer your own, personal, gardening question? Become a Patron - just click here - and support me! Or use the Donate button for a one-off donation. If just 10% of my visitors gave me a pound a month, I'd be able to spend a lot more time answering all the questions!!

Saturday, 29 October 2011

Olive trees - surviving the winter

Did your olive trees suffer this year?  If so, you are not alone, I have received several questions concerning what to do with dead or nearly-dead olives.

So here is a tale of encouragement: one of my clients had two olives in huge terracotta pots: great tall things, with about 4' of clear stem then a lollipop of foliage, several years old. They had been in a fairly well sheltered courtyard gardens, on different sides of the house,  and last winter they both suffered terribly.

The one to the north of the house took the whole summer to die, and almost once a month I would find myself climbing up on my steps to chop off yet another branch that was clearly dead. By June I had had enough, and suggested that it would never regain its form, so we agreed to cut it right off at soil level, water it well, and see if would re-grow..

By July, a few tiny shoots were to be seen - by August the best one was a foot high - so in September, I removed all the weaker shoots, gleefully inserted a cane  and tied the strongest new shoot firmly upright.  Two weeks ago, I had to replace the cane with a longer one, as it has made about 5' of growth, which I think is quite remarkable.We may yet save it.

The other one, however, was much sorrier:  it hadn't been watered at all during the summer, and by about August it was clearly dead. Again, I sawed it down to soil level, but  I arrived one morning to find the pot empty, and later I spotted it on the bonfire heap.

Time passed, bonfires piles were burned, and to my surprise, in late September, I was adding some cuttings to the bonfire heap when I noticed that the blackened, burned root of that olive was actually sprouting. I showed the client, as I thought it would amuse them, and they immediately wanted me to replant it.

"Oh no!" I groaned (silently, of course - I never disagree with clients if I can possibly help it) "It will never, EVER recover!"

But I cleared out some of the soil from the pot, added some fresh compost, re-planted the scorched, truncated thing, watered it and left it. I've been watering it most weeks ever since, and  I just wish that I had taken a photo of it when it was fresh off the bonfire, because last week, lo! and behold, a positive thicket of shoots.

I selected the strongest, carefully pulled off all the rest, and inserted a cane.

Here it is.

Just as with the other one, I have selected the strongest shoot, and tied it firmly upright.

For now,   I am leaving the side branches, as it will need some foliage.

As it grows, I will remove the lower branches, to reform the clear stem.

And in time, I will top up the compost in the pot to cover the original trunk.

You can clearly see how big the trunk used to be!
 
Then, this week, we had our first taste of frost - just a little on the grass, but a reminder that October is nearly gone, in fact the clocks go back this weekend: and once we are into November, the cold weather might arrive.

Now, as these two olive trees have tender, new little shoots, we definitely need to protect them, so it was time to wrap them up in fleece for the winter.

Slight problem: the House has paying guests all through the winter, and no-one wanted to see scruffy bundles of horticultural fleece tied up with string, getting blown about all over the courtyard and having to be chased, retrieved and re-tied every week. As we had last year.......  so I was tasked with thinking up a more "stylish" way of protecting them.

In the garage we had some willow wigwams, which had been cleared of sweet peas a few weeks ago. Could they be pressed into service, I wondered? At the very least they would stop the fleece from blowing about all over the place.

While searching for the fleece, I found the tail-end of the landscaping fabric that we used for the willow fedges a couple of years ago. And I couldn't find the fleece anywhere. So I decided to line the wigwams with the landscaping fabric and see if it was possible to slip the whole thing neatly over the olive shoots.

Well, what do you think?

The fabric has a multitude of tiny holes in it, being landscaping fabric, so it is neither as opaque nor as dense as it appears, and I am hoping that it won't leave the shoots too much in the dark.

I guess that we can always take the lid off, if we get a few nice days.

Apart from slight concerns about the light, I was so pleased with the effect that I repeated the work on one of the larger wigwams, for the other olive tree shoot.


And here is that other one, snug and smart on the main patio area, where guests frequently sit out after breakfast.

Much better looking than a bundle of white-and-going-grey horticultural fleece, that's for sure.

But if anyone has any other bright ideas for protecting fairly tall plants, other than the "bundle up in fleece and use lots of string" then I would be interested to hear about it! 


Did you enjoy this article? Did you find it useful? Would you like me to answer your own, personal, gardening question? Become a Patron - just click here - and support me! Or use the Donate button for a one-off donation. If just 10% of my visitors gave me a pound a month, I'd be able to spend a lot more time answering all the questions!!

Friday, 28 October 2011

Prairie Planting: Grasses maintenance

Well, I have had a nice quiet month from my Prairie beds: September is the time when they don't need any attention at all.

 Here is one of them, taken last week: as you can see, heaps of low red grasses, masses of tall grasses, and the Alchemilla mollis has come back into nice neat mounds of foliage, as planned.

The Photinia hedge behind them has been a bit of a disappointment to me this year, as the garden's owners wanted it to grow higher as a a screen, which means I haven't been cutting it, which means no fresh new red foliage.

Luckily for me, it grew sideways as well as upwards, and just last week I was instructed to clip it back enough so that they could get the mower round the back of the bed in two strips again, instead of the one-and-a-half strips to which it has shrunk.

So there will soon be some red growth on the inside, which will please me. I'm just hoping that there is time for it to freshen up before it stops growing for the winter.

As you can see, it's hard to get nice photos of plants.

The more I try to take photos for this blog - on the basis that a picture is worth a thousand words, and I am sure that all readers would rather look at one photo than listen to me rattling on for a thousand words - the more I realise the skill that professional plant photographers need to have.

I mean, just look at it! In real life, this is a lush, dramatic bed, with interesting contrasts in foliage, and interesting toning colours.

In this photo, all I can see are the dead brown stems of the cardoon, leaning at ugly angles across everything else.

And this one is supposed to show the contrast between the Miscanthus at the rear, with the sticky-out foliage and the purple fluffy flower heads, when compared to the thrusting uprightness of the Stipa at the front,  which is now much more straw-coloured.

They both have variegated foliage, each having a white stripe up the centre of the leaf, which is supposed to add cohesion to the planting.

But does any of that show through in the  photos? No, they just look a bit scruffy, and rather too close together!

Oh well, such is life. I am not a professional plant photographer!

But I try: and today, here I am showing you about maintenance of annual grasses, as I get a lot of questions on this subject.

The one in question is Stipa tenuissima or Feather Grass.

I have masses of it in these Prairie beds, as it self-seeds generously all around. However, it's very hard to move it once it has established itself, so I have learned to allow the seedlings to grow, then weed out the ones I don't want. I now have "rivers" of it through the beds, and it has become an annual battle to keep the river but prevent, as it were, the flood.

At this time of year, each clump needs a bit of tidying, as the flowering is over, and the fluffy seed heads can quickly become a horrible sodden mass, if we get any rain.

Just chopping off the tops might seem to be the easiest way to deal with them, but it looks horribly unnatural, so a better option is to comb them.

Here is my step-by-step guide to Combing Grasses.

Here is a typical clump of this grass, waving beautifully in the wind, but starting to shed the dead seed heads, giving a strange cobwebby look to the ground around each clump.

My preferred tool for this is my daisy grubber, but you can use a small hand fork, one of those three-pronged claw tools, or your own fingers. In gloves, of course.

For larger grasses I use a border fork or a rake, but these smaller ones are better done by hand.

1) Gather the clump together, from the base, and pull it over to one side.

I am doing this right-handed, so I am holding the grass in my left hand. Reverse positions if you are left-handed.

Immediately, you can see the difference between the fresh green stems at the bottom, and the dead brown/white stems at the top.

You can see the daisy grubber there on the ground, ready for use.


2) Now start to rake from right to left, pushing the tool in to the clump and running it straight up the length of the stems.

I do this quite quickly, over and over again, and you need to push quite hard once the dead stems start to come out.

They quickly work their way up the bundle of grass towards your other hand.


3) Part way through: you can see that an area of split dead stems is gathering.


4) Here you can see what a mass of dead stuff is building up.

It's important not to let go of the bunch too soon! Hold on to it, and keep combing upwards.
5) There you go, nearly done: large mass of dead stems and spend seeds in one hand, and most of the clump has sprung back upright, released from being part of the bundle.


And here is the finished article on the left, below - much more green than brown now, and no danger of the seed heads forming a soggy brown mass. The 'Before' picture is to the right, so you can see the difference.


After half an  hour of work, I had filled a wheelbarrow with the combings.  Then all I had to do was get the spring rake, and carefully - and gently - rake between all the clumps to remove all the stray dead stems.

Job done! And well worth the effort. 


Did you enjoy this article? Did you find it useful? Would you like me to answer your own, personal, gardening question? Become a Patron - just click here - and support me! Or use the Donate button for a one-off donation. If just 10% of my visitors gave me a pound a month, I'd be able to spend a lot more time answering all the questions!!

Thursday, 27 October 2011

Call that "Customer Service"?

We have a sad and sorry tale of woe today - which could be titled How Not To Do Customer Service.

The other day I popped in to a nursery, while I was out and about. Naming no names, but not far from home, it used to be a very average nursery which went bust, probably due to them selling weeds along with every plant.

Earlier this year it was bought, and re-opened, still as a plant nursery, but the new people seemed to be very into chickens, which is not a bad thing (keeping chickens is positively trendy round here) and their wobbly hand-painted signs have been advertising "Come and stroke the bunny's" which made me grit my teeth every time I saw it, and "Come and pet the baby chicks".  Baby chicks? Chicks are babies by definition, surely?

Mostly due to these grammatical annoyances, I hadn't bothered to go and investigate them, and I was feeling a little guilty for not doing so. Not everyone has A levels in English, and it's wrong of me to discriminate against them, just because I think their signs are uneducated. Maybe they did it deliberately in order to lure in people who may have felt a bit shy about going to a new place? Who knows.

Anyway, finally, I went in, interested to see what plants they were offering at this time of year, as I am getting a bit low on choice for my bench at Dews Meadow Farm Shop, (shameless self-publicity) and it's always interesting to see what other people are selling.

It was a weekday afternoon, getting on towards closing time when I drove in and parked in the car park, which was fairly nice: shingled, rather than muddy, and with a row of "show sheds" at the back. They were each set up in a mini-Chelsea plot, the effect somewhat spoilt by the weeds growing within each enclosure.

I was a bit confused by not being able to see into what used to be the main selling area, as it was blocked off by stacks of pallets, shrink-wrapped around bags of compost. Not terribly enticing, but to the left was a big portacabin-type building, with "Shop" in big letters over it.

"Aha!" I thought, "That's the way to go."

I opened the door - after a bit of a struggle - and was nearly choked by the stale, damp smell of the place. Memo to self: don't buy icecream or anything edible from here.  There was no-one there, so I let out a few "Hal-looooo?" noises, somewhat self-consciously. I mean, it can't be hard to set up a bell or buzzer to let them know when anyone drives through the entrance, surely?

Eventually a woman popped out of a door, and looked at me.

This is the point at which I would expect "Can I help you?" or "Sorry to keep you waiting" or even "Hallo". But no, she just looked at me.

OK, I thought, it's up to me to start the conversation, then. I asked "Are you still selling plants?" which I thought would be a good start. "No." she replied. Flatly. This threw me somewhat. Resisting the urge to ask her why they were calling themselves a plant nursery, I said "Oh. Ok, thanks." and turned to go.

Why I said "thanks" I will never know. Years of training, I suppose. "How rude" would have been more appropriate.

As I turned to go, she suddenly came forward to the door, and said "What sort of plants were you looking for, then?" which was a bit odd, from someone who had just said that she wasn't selling any. I replied "oh, perennials mostly, some shrubs, but don't worry, I'll try somewhere else."

"We're not doing any at this time of year, people don't want to buy plants at this time of year," she said, suddenly becoming quite chatty.  Then she turned and pointed beyond the pallets of compost, drawing my attention to a staggering amount of weeds, growing freely in what used to be the neatly shingled sales area of the former owners. "We've got those orange things," she said, "but that's about it."

Sure enough, there were some pots standing amongst the weeds, containing greenery and some orange flowers.

"No-one wants plants at this time of year," she repeated.

"OK," I replied "don't worry, er, I'll be going, then."

So I hurried back to my car and drove off, noticing as I did so the large rack of bedding plants just beside the building, which she had totally failed to bring to my attention.

Call that customer service? I don't!

Friday, 21 October 2011

Sugar Cane: and time to strip it

"Strip the sugar cane?" I hear you say, in tones of wonderment.

Yes, Strip the Sugar Cane. No, it's not a strange folk dance, it's an annual ritual that I go through in my back garden, round about this time of year.

Along my back fence I have a stand of Miscanthus sacchariflorus, or Sugar Cane. It's a tall, lovely grass, with slender canes - a bit like bamboo, which it does somewhat resemble - and long leaves which rustle fabulously in the wind.

Every year it has an annual stripping, where I peel off the old, dead leaves to reveal the bare stems, or culms, which then turn bright red over the course of a week or two. This leaves me with beautiful elegant red stems over the winter, until such time as I chop them all down to nothing in March, ready for the next year's stems to start growing.

Here's what it looked like when I started:

Yes, a tangled mess.

You can see that each long, slender leaf wraps itself around the culm, then leans away to become the leaf.

All I have to do it take each leaf in turn and carefully strip it away from the culm.

"All I have to do", excuse me while I laugh hollowly - forgot to mention that the edges of the leaves are quite sharp, so I have to be a bit careful how I handle them.

And no, I can't do it in gloves, as the leaves need to be separated from the culms, and I have found over the years that a thumbnail is just exactly the right tool for the job. So I do it in bare hands, and put up with the occasional slash.

Actually, it's quite a fun job to do, as you can really see how much progress you are making.

And here is the result.

Can you see the difference? All that tangle of dead stuff has gone, and the culms are now revealed, in their green splendidness.

Best of all, I know that in a couple of weeks - especially if we get some frost next week as has been forecast - they will turn bright red, which always makes a nice contrast with the blue of the trellis beyond.

I'll try to remember to take another photo in a couple of weeks' time, to show you how nice they look.

There are still a lot of leaves left, so I still get the rustling when the wind blows: and over the next few weeks I will pop out there and strip off more leaves as they start to die off.

This means that I will have a period of several weeks where the stems are partly bright red and partly green, which is very enjoyable.

Updated insert: I still haven't taken a photo of them going bright red, but here's a pic from a different winter:


This photo - right - was taken about a week after I stripped off the leaves,  in late September of that year, and the stems have gone dark purple, which is quite dramatic.


Eventually they reach a point where all the leaves are gone, and all I have are the stems, bright red (or purple!) but with no tops. I generally leave them in place over the winter, as the colour remains good, and they do provide some level of screening.

Then, once the stems have faded to golden brown, I cut the whole lot to ground level, which gives me a crop of lightweight garden canes. Interestingly, this plant is now being grown commercially as a biofuel.

So there you have it - Strip the Sugar Cane! Oh, and no, in this country, they don't make sugar... sadly!


Did you enjoy this article? Did you find it useful? Would you like me to answer your own, personal, gardening question? Become a Patron - just click here - and support me! Or use the Donate button for a one-off donation. If just 10% of my visitors gave me a pound a month, I'd be able to spend a lot more time answering all the questions!!